The Grow Awards 2026 🏆
Likes
Comments
Share
@nonick123
Follow
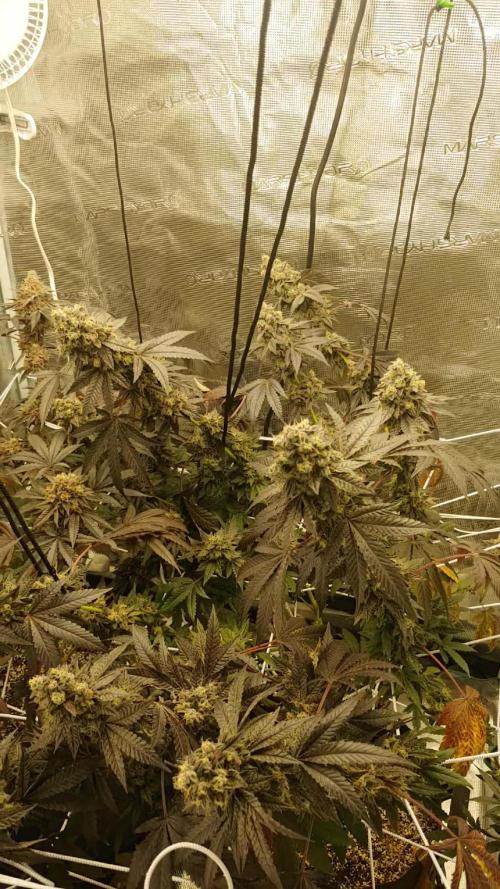
Día 34 (27/05) Riego con 750 ml H2O + Regulator 0,15 ml/l + P-Boost 0,5 ml/l + CaMg-Boost 0,25 ml/l + TopBooster 0,2 ml/l - pH 6.2 Día 35 (28/05) Riego 750 ml sólo H2O pH 6.2 Día 36 (29/05) Riego con 750 ml H2O + Regulator 0,15 ml/l + P-Boost 0,5 ml/l + TopBooster 0,2 ml/l - pH 6.2 ANDF es superdemandante de Magnesio. Como aún está en preflower, hago una aplicación foliar de sales de Epson a 4 g/L Día 37 (30/05) Riego 750 ml sólo H2O pH 6.2 ANDF está creciendo muchísimo! Una genética muy potente! Día 38 (31/05) Riego con 750 ml H2O + Regulator 0,15 ml/l + P-Boost 0,5 ml/l + CaMg-Boost 0,25 ml/I +TopBooster 0,2 ml/l - pH 6.2 Día 39 (01/06) Riego 750 ml sólo H2O pH 6.2 Día 40 (02/06) Riego con 750 ml de Té de Compost de Floración ANDF no para de crecer y demandar Magnesio! Le aplico 4 gr de Sales de Epsom como Top dress 💦Nutrients by Aptus Holland - www.aptus-holland.com 🌱Substrate PRO-MIX HP BACILLUS + MYCORRHIZAE - www.pthorticulture.com/en/products/pro-mix-hp-biostimulant-plus-mycorrhizae
Likes
Comments
Share
Allmählich entwickeln sich die Blütenstände aus und es ist schön zu erkennen, das die Interniodenabstände sich während des SCROG nicht groß weiter auseinander gestreckt haben. Daraus vermute ich dass nun eine Dichte und Breite Budstruktur zum Vorschein kommen wird. Jetzt geht es darum zu schauen wie sich daß Aroma und eben die Blütenbildung weiterentwickelt. Heute befindet sich die Blue Cream Haze bei Blütetag 18.
Likes
17
Share
@Naujas
Follow
Although I am not a Super grower, I have not grown many plants, but for this girl, there were definitely bigger ones, but were there any more beautiful ones than this one?, I highly doubt it :) she looks fantastic, the finish is very close :)))) @FastBuds gorilla cookies auto. with small space, high temperature, high humidity, it copes without major problems :) which makes me very happy :) good luck to everyone :)
Likes
6
Share
@TrexyTame
Follow
They’re fattening up a lot now, they all drink really slow but they’re still packing on and look happy. It feels like I’m gonna kill them because I’m only watering about once a week. Humidity is getting to be a problem. Getting a dehumidifier soon, if you have any recs lmk I’m still kinda lost. Too many options and I’m not sure any of them even work. I’m getting the first few whiffs here and there, smell’s starting and everything looks frosty. The oils smell like fresh fruit and cream, some have a cookie-ish rub to em. Every day I get more excited to see what they do in the end!
Processing
Likes
49
Share
She is going great. She was a little close to the light so on day 47, I gently pinched her and broght her main down and she is loving it. I was able to move the light lower now and she has responded well to it. This is the biggest autoflower plant I've ever grown. Day 49; wow this plant is a beauty and a lovely one to grow. Those buds are looking good and it becoming pretty pungent in there when the fans are off.
Likes
2
Share
Morning of day 14- tops look dry but it’s just the very surface. They took a little longer than I wanted to dry out. The weather has been cold windy and rainy, not much sun lately, and we are still about a month away from our potential last frost date. Farmer’s Almanac says last frost date is May 30th or something crazy, even though the days are normally rather warm by now. I haven’t fed as of Day 14 because they are not dry enough, there is plenty of amendments in the pot, especially towards the bottom, except I will still spoon feed a little bit. I just rehydrated the tops as they were really dry at least 1-2 inches of the tops were dry, but the bottoms are still plenty wet, so with clean water in a spray bottle, I just lightly rehydrated the top a lil, so I might be feeding tomorrow for day 15, but I don’t know yet. Keeping the tent around 80 degrees Fahrenheit, and only about 25-30% RH. This helps me compensate for the lack of heat provided by the LEDs and help the plants adapt to a higher water demand. I haven’t seen the low humidity effect the seedlings, intact all the plants that grow outside in the hot bone dry climate LOVE IT! They were praising all last year. So to help keep me away from damping issues and to better prepare the little ones for the outdoors, I’m trying to match a hot and dry environment in the tent. With VPD levels way up in the red, I have yet to experience a negative impact. I have damped off enough plants in my life, it’s a lot harder for me in 60-70%RH to water the plants and get them to dry out fast enough in the tent with cold LEDs.
Likes
38
Share
Utopia Haze is a rare heavily sativa dominant hybrid (90% sativa/10% indica) strain created through back crossing Brazilian Sativa strains. This tasty little bud took home 1st Place for Best Sativa in the 2008 High Times’ Cannabis Cup and for good reason – with its potent 18-22% average THC level and long lasting cerebral effects, Utopia Haze is one powerhouse smoke. The Utopia Haze high comes on soon after you finish your first toke, hitting you with a strong cerebral lift that infuses you with a sense of hazy relaxation. Type: Feminised/Photoperiod Cultivation: Indoor/Outdoor Flowering Time (days): 70-75 Indoor Yield (g): Up to 650 Feminised Outdoor Harvest Month: October Feminised Outdoor Harvest Month Week: 3rd-4th week Aroma: Citrus, Woody, Pungent, Mint Effect: Cerebral Lift, Hazy Relaxation, Sleepy Welcome Everyone to the Final Entry of my Utopia Haze Grow ! There is so much to discuss ! I have been extremely busy as of late trying to get this Harvest together, but i am happy to have it here for you now ! I Seriously under estimated the amount of time, help from others, and my own necessary skills to pull this off.. and i still kind of screwed it up lol ! But its worth noting i have never actually done this before and trying to document it during....was extremely hard. It is next to impossible to work an iPhone with rubber gloves on ! First I want to discuss everything step by step so before you jump straight into the comments on how the end product is so small in "quantity" Rest assured i am happy with its"quality"...and thats all that matters to me because Life is a journey not a destination! and i have learned so much from this grow that I couldn't be any happy even if i messed some things up :) But at the very least I hope you read through this entry in its entirety with an open mind and focus more on the process, rather than just the outcome! I ran out of Ice & i was only able to wash three times..(normally I've heard you should go sometimes 5-6 washes) Preparation is Key & things will be much better next round :) Photos 1-22 These are pretty self explanatory but for those of you just tuning in now.. this is what happens to a very happy plant when you don't have the necessary tools to monitor key components of growing cannabis.. Ph, as well as EC levels play a very key role in the outcome of your grow lol that being said I was just able to save this plant by purchasing both tools but that doesn't mean the plant didn't suffer because of the prior events.. This was a Huge reason behind me choosing to turn this harvest into what i would consider "Solventless Hash Rosin" from "Ice water extracted Bubble hash". Pictures 23 The idea here is the process of using "fresh Frozen Cannabis" this has been discussed many a time online on such sites as instagram and here on grow diaries as well.. I personally have Never tried the process so i decided to try it out and make a judgement for myself.. Video 24 The Cannabis has now been in the freezer for 72 hours making it very well frozen.. as you can tell i struggled getting it all into the 25u Screen Wash Bag. One thing of note i would do differently is i will de-stem my next batch as i also believe this played a part in the amount of plant matter that escaped through the sieves. Photo/Video's 25-28 The idea here is "ice water Seiving" & especially with the bags that I am using here that are only have screen material on the bottom portion of the bag it is very important to have spaces in-between the screens to allow the water to pass directly through the screens into the bottom bucket with the least amount of resistance.. because the hash is so extremely temperature dependant if it gets warm on the side of the bag.. it will stick there and not make it to the bottom to become use able product.. 29 You do not need to use as much Ice as i used here lol... the idea is to keep everything very cold..i certainly achieved that but at the sacrifice of using so much that i ended up grinding product and producing "contaminants" but in the end they are just plant matter that i would be smoking when i rolled up my joint either way so.. I'm not super disappointed.. But it should be noted that what you want to achieve here is a Layering effect where you have the wash bag between two small layers of ice while the "water current" washes the Trichomes away allowing them to be separated by the screens setup below :) Before Starting the machine you should allow some time (i.e.;10-12minutes pre soak to allow the product to become saturated) before the first cycle. By video 32 I have just ran out of ice lol.. Video 33-34 Here I have a tip for you.. to separate the screens that you sieve through.. cut 5 gallon buckets to stretch them across nice and tight.. it'll make scooping your Bubble that much easier ! i learned this from the many "Frenchy" videos I have watched :) Picture 35 Here in lays the problem for most people.. drying your hash without loosing vast amounts of "Terpenes" whilst also stay ever vigilant against mold ! Thanks to all those videos I've watched on youtube.. id like to think this was one of my most successful parts of this process.. Things to Note; Terpenes start to seriously evaporate at temperatures 68F or 20C you need to stay as cold as possible whilst bringing the Relative Humidity in the space down into the 40-30% to stay away from that nasty mold ! I used my cold storage room in the basement.. with a dehumidifier running to keep the space at 45% RH & staying at a constant 15c. All while spreading the hash as thin as possible across parchment paper, on top of the white screens with a fan moving air across both sides of the paper. Pictures 36-38 These are some macros i took in the middle of my drying session I fell in love with the colour. Yes i know the black spots are plant material but they will get caught when i bag the hash & squish the oil out. Thing to Note; at this stage it is important to ensure you 'micro plane" the hash down as fine as you can whilst staying weary of the temperature... any "chunks" will hold pockets of moisture.. that lead to potential problems..ie; mold ... Picture/Video 39-41 Successfully planed bubble hash ready to be bagged and Squished ! Picture 42 Ive decided to follow Pedro.. from Pedros Grow Room and double bag to be on the safe side so i don't have any blow outs. So thats One 25u bag inside one 160u bag ! :) Pictures 43 This is almost 3 grams of the bubble hash from above, already melting in the bag.. this is where i ran into trouble again lol things started getting to warm in the house and i was only able to get one of the three squish's i did on video :( things started getting sticky. Picture 44 This is basically just a photo of the equipment I'm using; 3x5 LowTemp Cage in the frame I built myself, with a 20Ton bottle jack. Something to note here is this is an older Lowtemp model with only a single heating zone which is which i have it closed here heating Both sides of the press :) As well as the importance of having adequate pressure on your plates.. my rig is very overkill for the size of hash bags..lol Video 45 Here is the lovely press video.. its didn't quite work the way i wanted either lol my directional folding wasn't quite tight enough for a big "drip" :) &the Press was set to 65°c Photo's 46-50 are pretty self explanatory :) I had a blow out.. but still managed to pull an 80% return from the hash once squished...& yes it tasted amazing :) Was it worth it in the end... that could be debated.. for some..i understand..its not your thing, but for those of us that are interested in making our own concentrates.. free from Solvents... I wouldn't make it any other way :) If even ONE of you reading this diary finds it helpful to reference for ANYTHING.....even if its "what not to do" ill consider it a success ! Thanks again for tagging along on this garden adventure.. its been one heck of a journey ! Much Love from B.C. Canada, Until Next time, Cariboo
Likes
22
Share
@nonick123
Follow
En este caso es un diario un poco distinto... Tengo en mi terraza (outdoor) una maceta de unos 25 litros, con sustrato reciclado de todos los ciclos hechos con BIOTABS este invierno pasado Durante todo el invierno / primavera, he ido añadiendo a esta maceta los "restos" de estas macetas del indoor, cargados de vida, sustratos y materia orgánica Cada vez que añadía sustrato reciclado, añadía / renovaba la capa de mulch (heno) para proteger la micro-vida Además, ha estado protegido por un techo de metacrilato todo el invierno, para evitar que las lluvias torrenciales de mi zona se llevasen los nutrientes He mantenido este sustrato húmedo con Agua RO A principios de mayo, planté una tomatera (tomate canario) en esta maceta Alrededor del 26 de mayo, decidí dejar caer aleatoriamente una semilla de Gorilla Z Auto que me regaló mi amigo StackFarms Unos días después, nacía con fuerza y vigor una pequeña plántula! 😍💥 Esta maceta se mantiene hidratada con un sistema de riego por goteo (TEMU) muy ingenioso: Utiliza un gotero medico como se usan en los hospitales! Este sistema ha demostrado (en mis pruebas) ser bastante consistente en el riego diario! La maceta con la tomatera + Gorilla Z Auto se mantiene hidratada con 1 Litro de H2O diario (RO o agua declorada, depende como me pille) A divertirse con este experimento! 🚀 FastBuds 15% DISCOUNT code "NONICK" 2fast4buds.com @fastbuds.official 💦 BioTabs 15% DISCOUNT code "GDBT420" biotabs.nl/en/shop/ @biotabs_official 🌱Substrate PRO-MIX HP BACILLUS + MYCORRHIZAE @promixmitch @promixgrowers_unfiltered
Likes
32
Share
05.04. Day 26 under 12 h . Flower 1. Gut.. 06.04. Das wars mit Bioweed. Ade meine guten Vorsätze. Ab heute bug free weed. Spidermites free. Chemie war im Einsatz. Minimalste berechnete Menge. 08.04 oh, diese Stille im Zelt. Nix fliegt zirpt summt herum. (bumm bumm ). Sieht doch gut aus. 11.04. 16 h Licht ab jetzt. Und, Day 31 flower 7. Sehr schöne Entwicklung, wie ich finde.
Processing
Likes
17
Share
This week everything’s went smooth. The plants are stretching like crazy everyday since I switched my lighting from 24 hours to 12/12!! Starting to flower now. Removed some leaves that were blocking bud sites.
Likes
12
Share
Growing and getting fat!!! 💐💐💐
Likes
14
Share
Likes
3
Share
Well today is week five day 44 of flower this girl is fattening up very nicely some nice big colas coming not so much as a cheese smell to her got that musky sweet gorilla glue smell about her
Likes
51
Share
DAY 57 : Changed light schedule to 24/0 to control temps dropping. Problem solved sitting between 22 - 27 at all times now. As you can see from the pics the 3 gallon pot is gonna be harvest a few weeks before the 5 gallon pot although the trichomes are still clear ATM. Still feeding every 2/3 days around 2.5 / 3 liters. The smell of these is just delicious. Day 58 trichomes are still clear, Day 60 Trichomes have started to turn cloudy. Seriously sticky and stinky covered in resin Day 62 - Trichomes are now over 50% cloudy. Gonna flush when the pot is next dry probably Monday ready to havest within the week.
Likes
17
Share
Caminhando para os dias desta jornada, agora levanso somente com água.. Tive algumas dificuldades com a HR no grow devido a alta umidade em minha região que chega a 100%.. Vários dias a HR ficou entre 80 a 90% e infelizmrnte o aparelho desumidificador foi insuficiente para manter o nível ideal para o cultivo, devido a esse fator tive problemas com mofo nos em alguns poucos buds, por sorte não se espalhou para todos os buds e todas as plantas, foram apenas algumas flores que apresentaram os sintomas e logo cortei por prevenção...
Likes
27
Share
Had some issues with her. Thought the ph was off cause my cheap ph meter told me so. i flushed her and got 6.14 from the runoff so I think i had my light too close for too long before moving it and i needed to start adding some calmag but it was most likely my light being to close. She has some burnt trichomes on her and a decent amount of crispy leaves but shes looking better with every water. If anyone can tell me anything that could help that would be greatly appreciated.
Likes
7
Share
still growing fast as fuck. i was falling more and more in love with her as time passed. she was showing signs of hunger so i gave her, her first feed of veg nutes on december 5th 2021. I mixed 1/2 tsp to each gallon. I used a bucket with 3 gallons of dechlorinated tap water. Decmber 8th: same amount of veg to gallons of water with the same 1/2 tsp. phd to 6.4. December 10th gave her a feed honestly dont know how much. id say about 10-20 cups worth of dechlorinated tap water with 1/2 tsp of veg nutes to 3 gallons.
Likes
57
Share
@Zengrower
Follow
The Fruity Donutz have finally stopped stretching and are now fully growing their buds. The two plants are two very different phenos where one is turning into a beautiful purple lady. The ladies are very thirsty and I water them two times per day just to keep up. Overall they look very healty and the buds are developing fast. Can't wait to see how they grow this week! 🌿🌿🌿 Mid-week update Because this strain only has 8 to 9 weeks from seed to harvest I started with a little bit of Green Sensation already to support the blooming. The two plants are developing quite differently. The plant in the back is producing lots of trichomes, even covering the smaller fan leafs as well as the sugar leafs. It would be cool to have leafs with thick resin trails at the end f this grow ✌️. The plant in the front doesn't produce that much trichomes just yet, but it has beautiful purple buds and sugar leafs. Even though they're very different in appearance, they are both beautiful. The smell is getting stronger by the day and *spoiler alert* it's damn fruity 😅!
Likes
25
Share
Day 22 25/07/24 Thursday Still no Feed/water since Tuesday. Been a humid and overcast two days so not as much evaporation as normal. All plants happy and healthy 💚 Video updates Day 23 26/07/24 Friday De-chlorinated watering pH 6 with 5ml calmag to 5L water. Watered each with 250ml and had small run off. I will continue to feed/water with small run offs to help prevent salt build ups. Video update. Day 26 29/07/24 Monday Nice feed today, using de-chlorinated tap water pH 6. They each had 300ml with small run off. All looks incredibly happy and healthy! The Auto Kabul that was mutated and twisted has pulled herself through and is just a bit shorter than the others. Day 28 31/07/24 Wednesday End of week😁 De-chlorinated water pH 6 today with Plagron pk13-14 5ml to 5L Plagron power buds 5ml to 5L Used 300ml of the 5L solution. I will be using these on water days from now on as they are advised to be used every irrigation. We'll see how they perform 💪💚
Likes
52
Share
29 May 2021 I have been super busy and have neglected my little girls the last few days. I started the flowering stage (12/12 light schedule) yesterday, the 28th. I was going to start it on the 26th, but had trouble with the timer. I’m going to stick to my schedule though. Today starts the flowering stage feeding chart, and for this week I’m using the “Transition to Flower” amounts. The water was chilled to 41.5 degrees F, and I began feeding an entire gallon as well. I fed: CALiMAGic 5ml, FloraMicro 7.5ml, FloraGro 7.5ml, and FloraBloom 7.5ml. The initial pH was 6.7 and needed no adjustment. The TDS going in was 851 ppm. Runoff pH was 6.6, and TDS runoff was 1885 ppm. Tent temp was 75 degrees F, and humidity was 50%. I defoliated the living hell out of her today, and rearranged some of her LST points. I also cut some of the lower branches/stems to make the growth more controlled. I have enough to make several clones if I decide to do that. I’m still trying to make up my mind on that. 31 May 2021 My Blueberry Muffin is looking fabulous!! She has adjusted to her massive defoliation with ease and is looking BEAUTIFUL! I’m very pleased with how she’s doing. Both she and her tent mate are looking wonderful. I’m still using the “Transition to Flower” stage, so here’s what I fed: 1 gallon of water chilled to 51.2 degrees F, with CALiMAGic 5ml, FloraMicro 7.5ml, FloraGro 7.5ml, and FloraBloom 7.5ml. The initial pH was 6.7 and didn’t need to be adjusted. The TDS going in was 1054 ppm. She took the whole gallon and had plenty of runoff. The runoff pH was 6.5, and TDS runoff was 2237 ppm. Tent temp was 79 degrees F, and humidity was 44%.