The Grow Awards 2026 🏆
Likes
Comments
Share
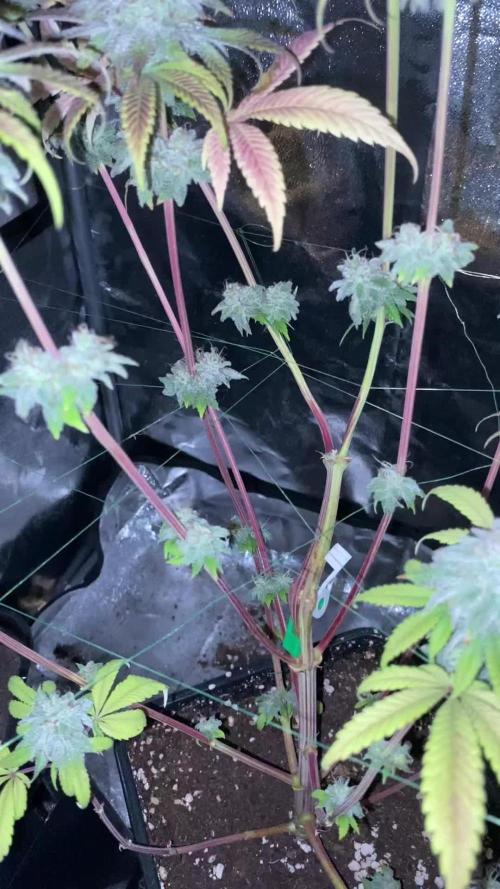
Week 4: Late Flowering Stage Welcome to the eighth weekly update of our cannabis cultivation journey in Germany! As we enter the fourth week of flowering, our strains—Pulp Friction, Cookies Haze, Eleven Roses, Poddy Mouth, Critical Lemon Kush, and OG Kush—are approaching their final stages of development with impressive bud growth and resin production. Key Developments: 1. Bud Maturation: - The buds have continued to swell and mature, becoming dense and resinous. - Trichomes are now fully developed, with milky-white heads and some turning amber, indicating the approaching harvest window. 2. Environmental Management: - Maintained stable environmental conditions with temperatures between 20-26 degrees Celsius and humidity levels around 40-50%. - Continued to ensure adequate ventilation to prevent mold and maintain airflow around the plants. 3. Nutrient and Watering Management: - Adjusted nutrient levels to support late-stage flowering and maximize resin production. - Monitored soil moisture carefully, maintaining optimal hydration levels for the plants’ roots. 4. Final Care and Maintenance: - Continued to support the plants’ structure with stakes and ties to prevent branches from bending under the weight of mature buds. - Removed any remaining yellowing or dead leaves to promote airflow and redirect energy towards bud development. Growing Medium and Setup: - The plants have thrived in a blend of living soil, coco coir, perlite, and clay pebbles, enriched with mycorrhizal fungi cultures for enhanced nutrient absorption. Next Steps: - Monitor trichome development closely to determine the ideal harvest time based on desired effects (clear, cloudy, or amber trichomes). - Prepare for harvest by gathering necessary tools and supplies, such as trimming scissors, drying racks, and storage containers. - Stay vigilant for any signs of pests or diseases as the plants near maturity. Stay tuned for next week’s final update, where we’ll discuss harvest preparations and the culmination of our cannabis cultivation journey. Feel free to ask any questions or share your experiences in the comments below!
Likes
44
Share
11 Sep 2021 Today starts week 2 of the flowering stage and week 10 of life for my lovely Ladies. I did some massive defoliation and pruning the other day and all three of my babies are looking amazing afterwards!! Absolutely beautiful! I have a short video log (I’m not cool enough to call it a vlog), and a few pictures to upload to start this week. I must admit that I really thought I may have overdone the defoliation and pruning, but so far it’s turning out exactly as I had hoped. There are budlets forming at every node, and all three plants are looking healthy and strong. I decided to look at my feed chart and to count backwards from the date that they should be ready for harvest and to arrange their feeding schedule. I made a plan where I can provide a good steady level of nutrients in the proper stage of growth, and schedule time for the flush to be done by the time harvest time arrives. So today I started the Mid-Bloom stage 4 of my Flora-Trio 6 part feeding chart. I’m still giving half the nutrient level until I know there are no issues, then I will adjust to full strength if necessary. At 50% strength each plant was given: CALiMAGic 2ml, FloraMicro 2.4ml, FloraGro 2ml, FloraBloom 4.2ml, Floralicious Plus 1ml, and Liquid KoolBloom 1ml mixed into a gallon of water. The initial pH for all three gallons was 6.3. I wanted to adjust them up, so I added 1.2ml of pH UP to each gallon which adjusted them as follows: C1 - 6.7, and C2/C3 were both adjusted to 6.6. I still don’t have a replacement TDS meter, so only pH was measured in the runoff. Runoff pH was as follows: C1 - 5.9, C2 - 6.1, and C3 - 5.8. The runoff levels of C1 and C3 are still lower than id like, but still manageable. As I mentioned several times above; my plants are looking great, and I plan to keep growing them as they are until this method needs to be adjusted or changed. I’m just letting them grow wild. Granted, I’m trying my best for them to grow the way I want, but I’m not using a support net at all (yet). I say (yet), because once the buds start to bulk up, they may need support to stand upright. If that day comes, I’ll use the net. Time will tell. The temperature in the tent was 82F, and the humidity was 45%. So far my trio is growing beautifully! Enjoy everyone! I am!! 14 Sep 2021 I ended up using only about half of each gallon the other day, so today I gave the rest of each gallon to the perspective plant it belonged to. None of the plants had any real runoff from the amount given today, so I’ll probably start feeding every two days instead of every 3-4. It happens with each grow. The trick is to identify how much they need, and how often. It seems to change with every plant. So as I stated above; each plant received about 1/2 gallon of water and nutrients that was prepared a few days ago. Each plant received CALiMAGic 2ml, FloraMicro 2.4ml, FloraGro 2ml, FloraBloom 4.2ml, Floralicious Plus 1ml, and Liquid KoolBloom 1ml. The pH going in was: C1 - 6.7, C2/C3 - 6.6. As I said above, there wasn’t enough runoff to measure, so I don’t have runoff data today. The temperature in the tent was 84F, and humidity was 57%. I measured each plant and adjusted the lights according to their growth. C1 is now 23 inches tall, C2/C3 are both 23.5 inches tall. I adjusted the lights to all be 15 inches over each plant. Light spill off is still awesome for all three plants, and each one of my lovely ladies is looking absolutely amazing! 15 Sep 2021 My plants are doing AWESOME!! I looked in on them a little earlier today and just sat in my floor and looked at them. They are doing amazing! Absolutely beautiful!! I have used a support (scrog) net for each of my grows so far; till this one. At least so far that is. I may end up putting it in to support the branches once they are loaded with bud, but for right now I have just let them grow as they naturally want too. Of course there are some exceptions to that last statement. At the end of my first week of flower I decided to defoliate and prune them down. I did so much defoliation and pruning that I thought I may have hurt my girls, but nope! They have responded even better than I had hoped. I trimmed off all of the lowest branches that weren’t already long enough to get full light exposure, as well as most of the small intermediate branches growing off of more established branches. The result… every node growing on every branch is developing buds! All of them are getting full light exposure, and ventilation from the fans inside the grow room. These three are looking better than any of my previous plants thus far. I am very pleased with how they’re doing! I’m feeding again today because what I gave them yesterday just didn’t seem sufficient. None of them had any runoff to measure; so I’m going to make sure that they do as well as possible! I’m sticking with the mid-bloom stage 4 of my Flora-Trio 6 part feeding chart at 50% of recommended levels. My plants are doing great at 50% strength so far, so if it isn’t broken, don’t fix it! No deficiencies have been seen, so I’ll keep on keeping on that. Each plant received a mixture of a gallon of water with the following nutrients: CALiMAGic 2ml, FloraMicro 2.4ml, FloraGro 2ml, FloraBloom 4.2ml, Floralicious Plus 1ml, and Liquid KoolBloom 1ml. C1 and C2 didn’t take the whole gallon, but about 3/4 of it. C3 took the whole gallon, but that may be because it is in a bigger pot. The initial pH of each was: C1 - 6.4, C2 - 6.5, and C3 - 6.3. I added pH UP to each as follows: C1 - 2ml, which adjusted to a final pH of 6.7. C2 - 1ml, which adjusted to 6.9, and C3 - 1.5ml, which adjusted to 6.6. I still haven’t gotten another TDS meter, so no TDS data to report. Runoff for all three plants was lower than I expected. C1 was 5.8, and C2/C3 were 5.7. I really expected them to be near 6.2 or thereabouts, but nope. I’m going to have to keep an eye on that. The humidity today was 65%, which is pretty good. The temperature in the tent was 84F. It was over 90F outside today, so hot outside = hot in the tent. 🤷‍♂️ They’re still looking great! Happy growing everyone!
Likes
8
Share
Week 13 for Ztrawberry by Greenhouseseedco Shes really doing quite nicely😇 Going to get her last heavy defoliation at the end of this week plus a feed of BioBloom little top up of 7.5g
Likes
7
Share
Ich hatte zu Anfang der Woche einen zu stark aktiven Boden Leben gehabt was dazu geführt hat dass der Wurzelbereich zu warm wurde und die Nährstoff Aufnahme hemmte. Wie kam das dazu?: In den Töpfen ist jeweils genug Wurmhumus enthalten. Ich habe eine weitere 0,5cm Schicht rauf gemacht und es mit FPJ Gurkenschalen gegossen. (War anscheinend zu viel, Temperaturen ging gut hoch) Bis zum 24.07.25 konnte ich nichts unternehmen als mit angesäuerten Gießwasser zu Gießen. Ph wert des Gießwassers war ca. 5,7. Täglich etwas gegossen. Am 25.07. Haben sich die Pflanzen erkenntlich erholt. Heute den 26.07. Konnte ich etwas entlauben und LST machen. Ab heute konnte ich wieder, das Licht von unten, mit blauen anteil anmachen. Diese Woche wurde nicht gedüngt, wegen dem aktiven Bodenstress.
Likes
3
Share
Alright, so we're moving along with the grow but some of these ladies seem to be struggling just a little bit more than others... they're definitely growing at a great pace but the foliage just looks rough. I stopped the alfalfa Ferment thinking it might be a little to potent for them right now... we'll see how they look after another week. I'm sure they'll all grow out of the funk.
Likes
9
Share
@Trinidad
Follow
15.07.25. Day 53. The flowers on this one is developing quickly. These buds are fatter than anything I've grow for 2-3 weeks into flower. Amazing plant. Yes I need a better light.
Likes
32
Share
🌸 Week 12 From Seed — Week 8 Flower Permanent Marker — Two Phenos, One Epic JourneyWelcome back to the garden, my friends. If you’re just joining the diary now — don’t worry. Here’s a quick recap so you know exactly how we got here: 🌱 Quick Recap From Seed to Now – Two Permanent Marker phenos grew from seed into two completely different personalities: • Pheno #1 — “Aiming for the Moon”: a tower of beauty, stretching past 2 meters, expressive, colorful, loud. • Pheno #2 — “The Compact Queen”: sturdy, dense, bushy, disciplined, with deep greens and beautiful structure. – Both were grown in Aptus organic super soil style, with minimal liquid inputs — just Regulator, Top Booster, and the occasional CalMag. – From week 3 of flower onward, we saw the divergence: stretch vs compactness, height vs density, color vs deep green gloss. – Conditions were challenging (hot summer, fluctuating humidity), but with airflow, careful irrigation, and inner canopy lighting, the garden thrived. – Now we arrive at week 8 flower — the week where everything becomes obvious. The structure, the scent, the resin… this is where Permanent Marker starts telling her story. 🌿 Week 8 Flower — The Week of Truth This is an important week. One of those weeks where the plant stops building and starts finishing. 💥 Bulking Mode Activated Both phenos are packing on weight — visibly, daily. The buds are: – swelling – stacking – becoming denser – pushing calyxes outward – and bathing in trichomes The flower-room smell is now borderline illegal — loud, sticky, sharp, with that signature Permanent Marker funk rising stronger day by day. 🎨 Colors Coming Alive Our tall mama — the one reaching for the moon — is showing magnificent colors: – deep reds – purples – warm fades – cool gradients across sugar leaves This is likely a mix of genetics + low-nutrient organic finish + light intensity + heat swings. A wonderful recipe for anthocyanins to express themselves. ✨ Frost Everywhere Trichomes are exploding on both phenos: – mushroom heads – milky stalks – resin layering onto resin – sugar leaves looking powdered This is the week where terpenoids and flavonoids start reaching their peak volumes — the week where you know harvest is close because the plant smells like she wants to climb into your nose and live there. 🔥 Light Spectrum Love — And the Inner Canopy Glow Let’s give a moment of appreciation to Future of Grow’s Black Series and the ICL inner canopy lighting. These girls are LOVING the spectrum: – deeper penetration – reduced shading – even lower branch development – trichomes forming even in hidden zones – colors enhanced naturally It truly shows what proper spectrum distribution can do — especially late in flower. 🌡️ Conditions — Hot, Humid, and Still Thriving Despite summer conditions trying to sabotage everything: – the plants stayed strong – no PM – no bud rot – no stress signals except the harmless light-tipped albinoing on the top cola of Pheno #1 (beautiful, by the way) This week we maintained: – Temp: high but manageable – Humidity: under control – Airflow: strong and essential – Irrigation: consistent and organic The girls took it all like champions. 🔍 The Final Stretch — What Week 8 Means This is the week where you start to ask the true questions:Are we close? Yes. Very. Is it time to flush? Not on full organic super soil — you simply let the plant finish naturally. One week or two? Depends on trichomes: – Clear → needs time – Milky → soon – Amber → harvest window opens Right now it feels like: 👉 1–2 weeks maximum But she will tell us. We listen. 🏆 Dognabis Cup — The Community Is Alive! People are opening their welcome packs, germinations are popping, and diaries are starting to roll in. You can check all the grows — the links are already attached in the diary. Let’s support each other. Let’s cheer for each other. Let’s make this Cup a celebration of: – learning – growing – connection – and shared passion Every diary is a story. Every grower is a page. Together we write the book. 💚 Gratitude A huge thank you to: Zamnesia Seeds, Ocogenectica Seeds, Aptus Holland, ThinkGrow, Future of Grow, Skunk Magazine, FOG, Grovebags, DaggaDNA, Popeyes Passion, Imperial Seeds, TrolMaster and to every single person following this journey — lovers, haters, learners, creators. You all make this community real. 🌟 To Close This Week’s Report The garden is glowing. The colors are singing. The trichomes are dancing. The finish line is near. Permanent Marker is doing what she does best: being unforgettable. On to week 9, my loves — the final chapters are coming. We can follow weekly updates ***(list will be updated all the time as more growers join)***: 🌱 **Dognabis#09P** (**P**hotoperiod) https://growdiaries.com/diaries/285981-grow-journal-by-sadhus 🌱 **Dognabis#09A** (**A**utoflower) https://growdiaries.com/diaries/286091-grow-journal-by-sadhus 🌱 **Dognabis #16P** https://growdiaries.com/diaries/285519-grow-journal-by-fabisfinest 🌱 **Dognabis #017P** https://growdiaries.com/diaries/285851-grow-journal-by-highgrower0711 🌱 **Dognabis #18P **(**P**hotoperiod) https://growdiaries.com/diaries/265751-grow-journal-by-develgrow 🌱 **Dognabis #18A **(**A**utoflower) https://growdiaries.com/diaries/285549-grow-journal-by-develgrow 🌱 **Dognabis #21P** https://growdiaries.com/diaries/285531-grow-journal-by-mrs-larimar 🌱 **Dognabis#22A https://growdiaries.com/diaries/287996-grow-journal-by-daves-garden710 🌱 **Dognabis #22P https://growdiaries.com/diaries/287990-grow-journal-by-daves-garden710 🌱 **Dognabis #811A Jealousy Diesel Auto https://growdiaries.com/diaries/287216-grow-journal-by-philhsy 🌱 **Dognabis 19A https://growdiaries.com/diaries/289566-grow-journal-by-marijuanaut?lnk=2066296 ***Here are some other useful links:*** *Dognabis Cup on Instagram:* https://www.instagram.com/dognabiscup/ *Explore Aptus Premium Programs:* https://aptus-holland.com/premium-programs/ *Explore Aptus Clean Programs:* https://aptus-holland.com/clean-programs/ *Explore Aptus Super Soil Programs:* https://aptus-holland.com/super-soil-programs/ Happy growing everyone 💚 📲 Don’t forget to Subscribe and follow me on Instagram and YouTube @DogDoctorOfficial for exclusive content, real-time updates, and behind-the-scenes magic. We’ve got so much more coming, including transplanting and all the amazing techniques that go along with it. You won’t want to miss it. • GrowDiaries Journal: https://growdiaries.com/grower/dogdoctorofficial • Instagram: https://www.instagram.com/dogdoctorofficial/ • YouTube: https://www.youtube.com/@dogdoctorofficial ⸻ Explore the Gear that Powers My Grow If you’re curious about the tech I’m using, check out these links: • Genetics, gear, nutrients, and more – Zamnesia: https://www.zamnesia.com/ • Environmental control & automation – TrolMaster: https://www.trolmaster.eu/ • Advanced LED lighting – Future of Grow: https://www.futureofgrow.com/ • Root and growth nutrition – Aptus Holland: https://aptus-holland.com/ • Soil & substrate excellence – PRO-MIX BX: https://www.pthorticulture.com/en-us/products/pro-mix-bx-mycorrhizae • Curing and storage – Grove Bags: https://grovebags.com/ ⸻ We’ve got much more coming as we move through the grow cycles. Trust me, you won’t want to miss the next steps, let’s push the boundaries of indoor horticulture together! As always, this is shared for educational purposes, aiming to spread understanding and appreciation for this plant. Let’s celebrate it responsibly and continue to learn and grow together. With true love comes happiness. Always believe in yourself, and always do things expecting nothing and with an open heart. Be a giver, and the universe will give back in ways you could never imagine. 💚 Growers love to all 💚
Likes
20
Share
@usere
Follow
Add a second net for support and spacing buds. Lamp at 75% 150 W.
Likes
57
Share
behold the epic conclusion of my Medusa F1 odyssey! Week 11 brings us face to face with an absolute masterpiece – our mighty Medusa in all her glory. She has blossomed into a cannabis goddess, and I can't help but feel a mix of pride and hilarity. So, picture this: with scissors in hand and a grin on my face, I bravely took the plunge and performed the cosmic haircut of the century. I snipped the entire girl, leaving her looking like a botanical version of a cool, upside-down pineapple cake! It was a sight to behold, and I couldn't help but laugh at the quirky transformation. With our Medusa delicately suspended upside down, she's now getting ready for her final act of drying. It's like she's doing an acrobatic performance, waving her buds at us from above. Who knew cannabis cultivation could be so entertaining! In all seriousness, though, our Medusa's buds are absolutely mesmerizing. They've reached their peak density and glisten with an abundance of trichomes. The colors are a true botanical wonder, like a vibrant firework display against a night sky. Speaking of trichomes, I continue my daily trichome investigation with the precision of a detective. Each day, I observe those tiny resinous diamonds, searching for the magical moment when they're just right – cloudy with a hint of amber. And the aroma, oh the aroma! Terpenes fill the air with an intoxicating fragrance that makes my nose dance with joy. If only we could bottle this cosmic perfume! Before I conclude, I must extend my heartfelt gratitude once again to Royal Queen Seeds. Their Medusa F1 genetics have granted us this cannabis goddess, and I can't thank them enough for this delightful journey. As we prepare for the final chapter, drying and curing our Medusa to perfection, I invite you all to join me in celebrating the whimsy and wonder of cannabis cultivation. Let's cherish this upside-down adventure, savor the captivating colors, and delight in the celestial magic of our Medusa F1. As always thank you all for stopping by and for supporting me on this journey, i am super passion about growing and fell blessed to have you all with me on this new journey <3 <3 <3 Genetics - RQS MEDUSA F1 Ligth - LUMATEK ZEUS 465 COMPACT PRO 
Food - APTUS HOLLAND 
 
All info and full product details can be find in can find @ https://www.royalqueenseeds.com 

https://aptus-holland.com/
 
https://autopot.co.uk/ 

https://lumatek-lighting.com/ With true love comes happiness <3<3<3 Always believe in your self and always do things expecting nothing and with an open heart , be a giver and the universe will give back to you in ways you could not even imagine so <3<3<3 <3 <3 <3 Growers love to you all <3 <3 <3 Medusa F1 Medusa is a true F1 hybrid created from pure, inbred cannabis lines. She boasts uniform grow traits, mouthwatering aromas and flavours, and plenty of potency. If you're looking to bring stable, elongated plants into your room, tent, or garden, look no further. Mouthwatering Aromas, High Potency, and Mid-Size Plants Though she won't turn you to stone like the mythical goddess after which she's named, Medusa F1 is bound to get you plenty stoned in her own special way. Combining genetics from inbred lines deriving from Sugar Magnolia, a thick and sweet indica, and American Beauty, a fast, fruity hybrid loved for its well-balanced, positive high, the result is an autoflowering F1 variety that produces fresh flavours, a unique cannabinoid profile, and large yields. A very aromatic cultivar with a vibrant concentration of terpenes bearing notes of fresh mint alongside an upfront peppery kick, backed up by hints of fresh fruit, berries, and tangy fuel. Her thick, frosty flowers consistently produce high levels of THC and CBG, as well as high concentrations of myrcene, ocimene, farnesene, and caryophyllene. As a result, Medusa F1 has strong effects that relax and stone the body from head to toe (brought on by particularly high concentrations of myrcene and farnesene) while motivating the mind with an uplifting, creative, and motivating kick (thanks to high concentrations of ocimene). Medusa F1 seeds produce elongated autoflowering plants with long, strong branches and well-spaced internodes. Plants regularly grow up to 80–85cm tall and boast a fast flowering time of just 42–45 days (72 days from germination to harvest). Thanks to her genetics, Medusa F1 produces plenty of thick flowers with big, swollen calyxes that make for very easy trimming. Medusa F1 is very stable, handling stress and unfavourable growing conditions with ease, though she is somewhat susceptible to Botrytis, so make sure to keep tabs on the humidity in your grow room/garden
Likes
11
Share
Likes
14
Share
@MG2009
Follow
04/14/2022 Getting rid of a grape skunk she just isn't doing anything Biscotti Skunk looking good but lemon OG is coming along nicely Been watering by pot weight (by feel) No feeding just water they should all be finished soon
Likes
5
Share
@88rdcl88
Follow
The girls growing nicely and rapidly. Evtithing is ok with us
Likes
5
Share
@jony5
Follow
17,11,2023. Пустил корень. Закинули в рассадочный горшок, 1л. После пророста переедет основной горшок. - Температура 26,4 - Влажность 50% - Верхний Свет 16вт - Полив - 6 ph/180 ppm - На данный момент нет питательных веществ - график освещения 24/0. 4-й День. 21.11. Скинули каску, Кайфуем. - Верхний свет 24Вт - Температура 27 - Влажность 49% 5-й День. Похоже растюха тянется вверх, что не есть хорошо. Увеличил верхний свет. - Верхний свет 30Вт + боковой красный на минимум. - 110 ppfd 4700 lux - Температура 27 - Влажность 45% 7-й День. Вход - 0,2л (647/6.2) Выход - 0,1л (480/6.4) убрал боковой досвет, увеличил верхний свет - Верхний свет - 50Вт 20000 lux 9-й День. Вход - 0,5л (680/5,9) Выход - 0,4 (550/6.4) У растюхи листья светло зеленые, нехватка витаминов. Буферизировал кокос в основном горшке 12L (Perfect Bloom/micro/grow/vj/b52 - 1/1/1/2/2 ml/l) Вход - 2л (700/5.8) Выход - 0.75 (550/6.2) 13-День. Пересадил в основной. - Температура 26 - Влажность 60% - Кольцевал
Likes
15
Share
Ladys Start to drink much more also one of 10 seed bag show off as a Autoflower i pass it to my friend because i dont like auto so i upload video how it looks she got really fruity smell
Likes
10
Share
Hey everyone 👋 This is my second full run pc grow and this time i picked up some good quality seeds and i chose to run Auto Whiteberry by Paradise Seeds because it's one of my favorite strains and it's a short strain to grow so it's perfect for the height of my pc. PcGrow Dimensions: (36.5cm L x 16.8cm W x 35.5cm H) Lights: -Sylvania 6500k 28watt /Total: 56watt Fox Farm Ocean Forest Soil
Likes
56
Share
Bonjour à tous les padawans et maîtres jedis Jour84 arrosage avec 2 litres d'eau ph6.3 Jour86 arrosage avec 2. 5litres d'eau ph6.3 Jour89 arrosage avec 2 litres d'eau ph6.3 LE MEILLEUR MOMENT POUR RINCER SON CANNABIS Le rinçage commence en général deux semaines avant la récolte. Si le plant a une période de floraison de huit semaines, le rinçage doit commencer six semaines après le début de la période de floraison. Il est préférable de regarder de près les trichomes sur le plant pour déterminer quand votre cannabis est prêt à être récolter. Si les petits trichomes commencent juste à passer d’une couleur transparente à une teinte laiteuse et blanche, c’est une bonne indication que les plants peuvent commencer à être rincés. Il faut s’arranger pour que la majorité des trichomes aient changé vers la couleur désirée pour la récolte après deux semaines – ça devient plus facile à faire avec l’expérience, alors accrochez-vous ! Le rinçage peut également être un bon moyen de remettre à zéro la terre quand un plant est toujours en phase de croissance végétative. Parfois, un cultivateur suralimente par accident son cannabis, ce qui provoque un changement de couleur et un flétrissement du bout des feuilles. Ceci est appelé une « brûlure par nutriments ». Rincer la terre peut éliminer les nutriments excédentaires, ce qui aide à résoudre le problème. Cependant, c’est une mesure drastique à ce stade de la culture, alors assurez-vous que le problème soit bien une brûlure par nutriments et non quelque chose d’autre. Le rinçage ne concerne pas que le moment de la récolte. Cette technique peut aussi être mise en place durant la phase de croissance afin de débarrasser le sol des nutriments. Bien évidemment, les nutriments permettent à votre plante de rester en bonne santé et vous assurent des rendements maximaux, mais une trop grande quantité peut causer une accumulation et un état statique durant lequel la plante ne peut plus y accéder. Le blocage des nutriments peut être causé par une accumulation saline ou des niveaux de pH incorrects. Ces deux causes peuvent être résolues par un rinçage de votre plante à l’eau claire. Les fluides viendront pousser les nutriments en dehors du substrat et le débarrasseront de l’accumulation, permettant ainsi aux racines de pouvoir accéder à nouveau aux nutriments. EMPÊCHER LE BLOCAGE D'ABSORPTION DES NUTRIMENTS AVANT QU’IL NE POSE PROBLÈME Au mieux, le blocage des nutriments peut être un problème, au pire, il peut être un vrai désastre. Comme le dit l’adage, il vaut mieux prévenir que guérir. Il vaut mieux prendre de l’avant pour empêcher le blocage des nutriments plutôt que de s’y atteler lorsque c’est trop tard. Empêcher le blocage des nutriments peut se faire par le biais d’un rinçage de routine. En rinçant vos plantes une fois avant la floraison et une fois au milieu de cette dernière, vous minimiserez l’accumulation de nutriments. LES ENZYMES À LA RESCOUSSE Après le rinçage pour contrer l’accumulation ou le blocage des nutriments, vous remarquerez peut-être que vos plantes ont une apparence vert foncé, c’est le signe d’un excès de nutriments. Dans ce cas, certains cultivateurs choisissent d’ajouter une formule riche en enzymes à leur substrat. Au cas où vous auriez oublié vos cours de biologie, les enzymes sont des protéines qui catalysent les réactions. Elles aident à rincer le substrat en décomposant l’amidon, les glucides et les nutriments. Il existe sur le marché toute une variété de produits qui contiennent des formules d’enzymes très efficaces. Si l’eau ne suffit pas à vos plantes, ces petites protéines ne feront qu’une bouchée de l’accumulation de nutriments ! COMMENT BIEN RINCER SON CANNABIS Rincer votre plant de cannabis est un processus simple. À chaque fois que vous apporteriez normalement des nutriments, vous rincez à la place. De l’eau du robinet non traitée est tout ce dont vous avez besoin pour rincer, assurez-vous juste que son pH est sans danger pour le cannabis. La plupart de l’eau de puits a un pH sain et ne nécessite pas de traitement, mais s’il est nécessaire de traiter l’eau de rinçage pour avoir un pH adapté, faites-le. Les ajustements du pH seront donc la seule chose à considérer. Inonder la terre avec autant d’eau fraîche qu’elle puisse contenir. Laissez l’eau durant quelques minutes pour qu’elle puisse absorber les nutriments, puis inondez la terre encore pour rincer les nutriments loin du plant. Si vous cultivez en intérieur dans des pots, notez la couleur de l’eau qui s’échappe du fond des pots. Elle sera tâchée et aura une couleur sale. C’est à cette étape qu’un appareil de mesure des TDS (Total des Solides Dissous) est utile. Si vous récupérez et mesurez le TDS de l’eau « évacuée », elle devrait avoir un taux de 1300ppm, ce qui est assez élevé. Il est important de rincer le plant jusqu’à ce que total baisse à un niveau de 50ppm, ou du moins qu’il s’approche du TDS de l’eau fraîche que vous utilisez pour rincer le plant. La couleur de l’eau d’évacuation va s’éclaircir et apparaîtra plus propre. Vous devez tirer autant que possible de minéraux dissous du plant. Comment et Quand Rincer les Plants de Cannabis Rincer les plants de cannabis avant la récolte peut faire la différence entre les meilleurs têtes ou la plus rude pour la gorge. Cette petite tâche est simple et facile à faire. Ajoutez juste de l’eau ! Attention car le moment du rinçage joue un rôle critique. Le b.a.-ba du rinçage de ses plants de cannabis. Sommaire: 1. Qu’est-ce que le rinçage ? 2. Le meilleur moment pour rincer son cannabis 3. Empêcher le blocage d'absorption des nutriments avant qu’il ne pose problème 4. Les enzymes à la rescousse 5. Comment bien rincer son cannabis 6. Comment rincer ses plantes en hydroponie 7. Les résultats du rinçage de son cannabis 8. Quand éviter de rincer son cannabis Vous avez enfin fini vos cultures et vous vous retrouvez avec un magnifique plant couvert de super têtes, maintenant sèches, vous avez fait le curing et vous êtes prêt à fumer – et pourtant quelque chose ne va pas. La weed semble ne pas vouloir se consumer et quand vous tirez une bouffée, c’est comme si on vous avait donné un coup de poing dans les poumons et vous toussez en craignant pour votre vie ! Le goût est rude et décevant. Si c’est une situation que vous avez vécue, il y a des chances pour que vos plants n’aient pas été rincés correctement avant la récolte. Cette fumée bien loin d’être agréable est provoquée par la présence dans le plant des nutriments et minéraux utilisés lors de la culture, ce qui altère la façon dont le plant se consume. Rincer le plant élimine ces nutriments restants, ce qui améliore la qualité des sensations. Heureusement, le rinçage des plants de cannabis se fait facilement et sans effort, et cela vous permet de produire des têtes douces et délicieuses en un rien de temps. ARTICLE LIÉ Comment Utiliser les Nutriments pour Cannabis QU’EST-CE QUE LE RINÇAGE ? L’acte de rincer un plant implique d’utiliser de l’eau pour éliminer tout nutriment présent dans la terre. Une grande quantité d’eau est passée à travers la terre et drainée sur une base régulière. Tous les minéraux et nutriments présents dans la terre sont rincés avec le temps avec l’eau, ce qui laisse une terre propre. Mais pourquoi vouloir éliminer tous les minéraux de la terre ? N’est-ce pas mauvais pour la récolte ? En fait, cela aide à la récolte de manière significative. Quand les nutriments sont éliminés de la terre, ceci force le plant de cannabis à utiliser tous les nutriments toujours présents dans le plant. C’est comme pour le corps humain. Quand on consomme beaucoup d’aliments, ce que nous n’utilisons pas est transformé en graisses. Dans les situations extrêmes où la nourriture est rare, le corps s’appuie sur cette graisse stockée pour tirer de l’énergie. Comme rincer force le cannabis à utiliser tous les nutriments restants dans le plant, aucun ne devrait rester et altérer les têtes récoltées. Cependant, si vous le faites trop tôt, cela peut nuire à la santé du plant, le moment est donc clé. LE MEILLEUR MOMENT POUR RINCER SON CANNABIS Le rinçage commence en général deux semaines avant la récolte. Si le plant a une période de floraison de huit semaines, le rinçage doit commencer six semaines après le début de la période de floraison. Il est préférable de regarder de près les trichomes sur le plant pour déterminer quand votre cannabis est prêt à être récolter. Si les petits trichomes commencent juste à passer d’une couleur transparente à une teinte laiteuse et blanche, c’est une bonne indication que les plants peuvent commencer à être rincés. Il faut s’arranger pour que la majorité des trichomes aient changé vers la couleur désirée pour la récolte après deux semaines – ça devient plus facile à faire avec l’expérience, alors accrochez-vous ! Le rinçage peut également être un bon moyen de remettre à zéro la terre quand un plant est toujours en phase de croissance végétative. Parfois, un cultivateur suralimente par accident son cannabis, ce qui provoque un changement de couleur et un flétrissement du bout des feuilles. Ceci est appelé une « brûlure par nutriments ». Rincer la terre peut éliminer les nutriments excédentaires, ce qui aide à résoudre le problème. Cependant, c’est une mesure drastique à ce stade de la culture, alors assurez-vous que le problème soit bien une brûlure par nutriments et non quelque chose d’autre. Flushing Le rinçage ne concerne pas que le moment de la récolte. Cette technique peut aussi être mise en place durant la phase de croissance afin de débarrasser le sol des nutriments. Bien évidemment, les nutriments permettent à votre plante de rester en bonne santé et vous assurent des rendements maximaux, mais une trop grande quantité peut causer une accumulation et un état statique durant lequel la plante ne peut plus y accéder. Le blocage des nutriments peut être causé par une accumulation saline ou des niveaux de pH incorrects. Ces deux causes peuvent être résolues par un rinçage de votre plante à l’eau claire. Les fluides viendront pousser les nutriments en dehors du substrat et le débarrasseront de l’accumulation, permettant ainsi aux racines de pouvoir accéder à nouveau aux nutriments. EMPÊCHER LE BLOCAGE D'ABSORPTION DES NUTRIMENTS AVANT QU’IL NE POSE PROBLÈME Au mieux, le blocage des nutriments peut être un problème, au pire, il peut être un vrai désastre. Comme le dit l’adage, il vaut mieux prévenir que guérir. Il vaut mieux prendre de l’avant pour empêcher le blocage des nutriments plutôt que de s’y atteler lorsque c’est trop tard. Empêcher le blocage des nutriments peut se faire par le biais d’un rinçage de routine. En rinçant vos plantes une fois avant la floraison et une fois au milieu de cette dernière, vous minimiserez l’accumulation de nutriments. LES ENZYMES À LA RESCOUSSE Après le rinçage pour contrer l’accumulation ou le blocage des nutriments, vous remarquerez peut-être que vos plantes ont une apparence vert foncé, c’est le signe d’un excès de nutriments. Dans ce cas, certains cultivateurs choisissent d’ajouter une formule riche en enzymes à leur substrat. Au cas où vous auriez oublié vos cours de biologie, les enzymes sont des protéines qui catalysent les réactions. Elles aident à rincer le substrat en décomposant l’amidon, les glucides et les nutriments. Il existe sur le marché toute une variété de produits qui contiennent des formules d’enzymes très efficaces. Si l’eau ne suffit pas à vos plantes, ces petites protéines ne feront qu’une bouchée de l’accumulation de nutriments ! Comment et Quand Rincer les Plants de Cannabis COMMENT BIEN RINCER SON CANNABIS Rincer votre plant de cannabis est un processus simple. À chaque fois que vous apporteriez normalement des nutriments, vous rincez à la place. De l’eau du robinet non traitée est tout ce dont vous avez besoin pour rincer, assurez-vous juste que son pH est sans danger pour le cannabis. La plupart de l’eau de puits a un pH sain et ne nécessite pas de traitement, mais s’il est nécessaire de traiter l’eau de rinçage pour avoir un pH adapté, faites-le. Les ajustements du pH seront donc la seule chose à considérer. Inonder la terre avec autant d’eau fraîche qu’elle puisse contenir. Laissez l’eau durant quelques minutes pour qu’elle puisse absorber les nutriments, puis inondez la terre encore pour rincer les nutriments loin du plant. Si vous cultivez en intérieur dans des pots, notez la couleur de l’eau qui s’échappe du fond des pots. Elle sera tâchée et aura une couleur sale. C’est à cette étape qu’un appareil de mesure des TDS (Total des Solides Dissous) est utile. Si vous récupérez et mesurez le TDS de l’eau « évacuée », elle devrait avoir un taux de 1300ppm, ce qui est assez élevé. Il est important de rincer le plant jusqu’à ce que total baisse à un niveau de 50ppm, ou du moins qu’il s’approche du TDS de l’eau fraîche que vous utilisez pour rincer le plant. La couleur de l’eau d’évacuation va s’éclaircir et apparaîtra plus propre. Vous devez tirer autant que possible de minéraux dissous du plant. COMMENT RINCER SES PLANTES EN HYDROPONIE Le rinçage des plantes en hydroponie est bien plus simple que de se débarrasser des nutriments en terre. Les cultivateurs en hydroponie pourront simplement drainer leur système et le remplacer par une eau au pH neutre. Le rinçage des plantes en hydroponie est aussi un processus bien plus court. Une fois que la réserve d’eau aura été modifiée, les plantes en hydro n’auront pas accès aux nutriments externes. Pour cette raison, un rinçage de deux jours suffira. LES RÉSULTATS DU RINÇAGE DE SON CANNABIS Après la récolte des têtes, prenez du temps pour bien faire le curing pour atteindre le potentiel le plus élevé. Un affinage correct par curing permet de réduire encore plus le côté rude des têtes, en éliminant des choses comme un excès de chlorophylle. Vous serez étonné de voir la différence que ce petite effort peut avoir sur votre produit. Tout votre travail se sentira dans la première bouffée de cette weed douce comme de la soie, qui caresse la gorge comme du miel. Le plus doux de la nature. Vous pouvez donc améliorer la qualité de votre cannabis en ajoutant juste de l’eau ! QUAND ÉVITER DE RINCER SES PLANTES Le seul moment où nous recommandons d’éviter le rinçage de son cannabis est lorsque l’on travaille avec une terre biologique amendée ou un super soil. Ces substrats ont été développés avec précaution afin d’héberger des micro-organismes bienfaisants tels que des bactéries ou des champignons. Cette délicate biodiversité pourrait être éliminée et endommagée par le rinçage. Une fois de plus, l’absence de rinçage ne devrait pas poser de soucis, car aucun nutriment externe ou synthétique n’aura été ajouté au substrat. À la place, les plantes comptent sur les micro-organismes pour décomposer la matière organique et la livrer aux racines. May the force be with you 💪
Likes
6
Share
harvested hb2,ww1,ob3-2nd,gc1,ww2,bg1,bg3,bg4,sp1,hb2,bg2-2,ob1-2 see all results in fotos ____________________________________________ light- and watering schedule: see photos now: 12 plants 2 x Auto Orange Bud > Dutch Passion (early80's) 2 x Haze Berry Automatic > Royal Queen Seeds (2018) 2 x Auto Bubblegum > TH Seeds (late 80's) 2 x Original Auto BubbleGum > Fast Buds Company (late 80's) 1 x Strawberry Pie Auto > Fast Buds Company 1 x Gorilla Cookies Auto Seed Stockers (2015) 2 x Auto White Widow x Big Bud > Female Seeds setup + strategy: 18 seeds 3 x Auto Orange Bud (early80's) 3 x Haze Berry Automatic (2018) 3 x Auto Euforia (late 90's) 2 x Auto Bubblegum > TH Seeds (late 80's) 2 x Auto Bubblegum > Fast Butts (late 80's) 2 x Strawberry Pie Auto 1 x Gorilla-Cookies Auto (2015) 2 x Auto White Widow x Big Bud setup: 18 x gronest 2 liter 60 cm x 120 cm x 180 cm (2 x 4) growtent 4 l humidifier 25 watt axial fan 15 watt clip fan ro-filter bath room with a 50 watts room fan (-> carbon filter not necessary) ...and a lot of odds and ends. grow strategy: max yield by stressing with: 1. tiny shoes (2 l fabric pots standing on 3 plastic rings (4 cm) for max oxygen) 2. tiny growspace (18plants on 0.72 sqm) 3. many strains (8 strains) 4. annoying neighbourhood (mixing old - i.e. bubblegum (late 80's) - with young- i.e. hazeberry (2018) - genetics) 5. no stress by light or food or water 6. unintentionally too much food plus: - no lst - no hst - just leaf tucking - positioning bigger strains (euphoria, orange bud, haze berry) or just bigger phenos on less intense light spots (end of tent + edges) - music-rotation: 24 hrs reggae (for sativas) - 24 hrs classicals (because it's scientifically proofed) - 24 hrs traditionals from the hindukush region (for the indicas) max efficiency (min electricity - max yield): - light: 23 h on - 1 h off - keeping the distance of 18" (45 cm) and dimming to the right par (lux) - value depending on growing stages (see sheet: beginning 185 par ( 10000 lux/100 watt )/end 340 par ( 18000 lux/175 watt )) => ends up in approx. 170 watts in average over max 15 weeks temperatur management: - using approx. max. half of what the lamp can do keeps temperature low: my tsl 2000 is pulling max. 360 watts of the wall - i need only 175 watts, results in less temperature than using a 175 watts lamp - adjusting the temperature by using a humidifier outside of tent: blown in humidity is soaking degrees and is transported out by fan, works much better than doing the same with pure air summer extreme: no humidifier: 36°C / 35 rh - with humidifier: 29°C / 65 rh works for 1-2 weeks of real hot summer days, no mould, no signs of stress in two summers germination: seeding in waterglass spraying "basic"-water: ro-water (22 ppm) + calmag to 180 ppm every 4 - 8 hours until sprouted man versus fungus gnat: 5 days before seeding i'm running the tent with "basic"-watered pots as if there were plants inside - led on, fans on, humidifier on. Fungus gnats coming with the soil might take the chance to come out now for breeding. i'm waiting with a 9 mm rifle. in the past i found 6 gnats in 2 of 8 x 50 l biobizz lightmix bags coming out of the soil. i could eliminate every single gnat successfully ;) rotating harvest: the little ones will be harvested completely when ready. at this point only the top branches of the big ones will be cut...and the new (basic-watered) pots of the new grow will move into the tent. 2-3 weeks later the secod half of the big ones will be cut and the second half of the new grow will move in... nutes: biobizz / soil: biobizz lightmix bloom,grow,topmax,activera,algamic + aminopower instead of bio heaven (too expensive) individual feeding schedule/once a week: veg: 200 - 600 ppm bloom: 600 - 900 ppm water: ro-water with: veg: 100-150 ppm calmag bloom: 150 ppm calmag
Likes
7
Share
Well the finale is here 76 grams from this plant buds are pretty nice and large. Stay turned for next grow !