The Grow Awards 2026 🏆 


Likes
Comments
Share
@TheCannaProphet
Follow
~ FastBuds PAPAYA SHERBET Photoperiod~
Well here we go on another journey together through 'Canna-land' and this one's kinda special... forget that, it's VERY special because this is FastBuds newest surprise for the community, a FEMINIZED PHOTOPERIOD STRAIN!🤯
I was fortunate enough to score these seeds, of which only 1000 were available and can't wait to see what this strain can do! This Papaya Sherbet, according to FastBuds, is a hybrid with a 9-10 weeks flowering period. For a more detailed and accurate description of this strain the following from FastBuds says it best:
"Combining the massive stature of Papaya (Oni Selection) with the strength and resilience of one of our best keeper cuts (Sunset Sherbet), this strain develops into a big, expansive bush adorned with numerous bud sites that later transform into a generous harvest of medium-sized buds. Papaya Sherbet flowers deliver a signature flavor of premium cannabis with subtle citrus undertones that emerge upon inhaling. During growth, her aroma makes for a sweet yet pleasantly bitter fragrance, giving you an idea of what the smoke will taste like. Notably stress-resistant, Papaya Sherbet is a great choice for growers working in challenging environments. She is very forgiving and rebounds quickly from any adversity, allowing growers the freedom to experiment with confidence that she will take everything like a champion she is. This strain embodies resilience, flavor, and abundant yields in every grow cycle."
Sounds like an epic strain and I personally cannot wait for this lady to strut her stuff!😍
________________________________________________________________________________________________________________________________________________________________________________________________________________________________________________________________________________________________________________________
The Setup:
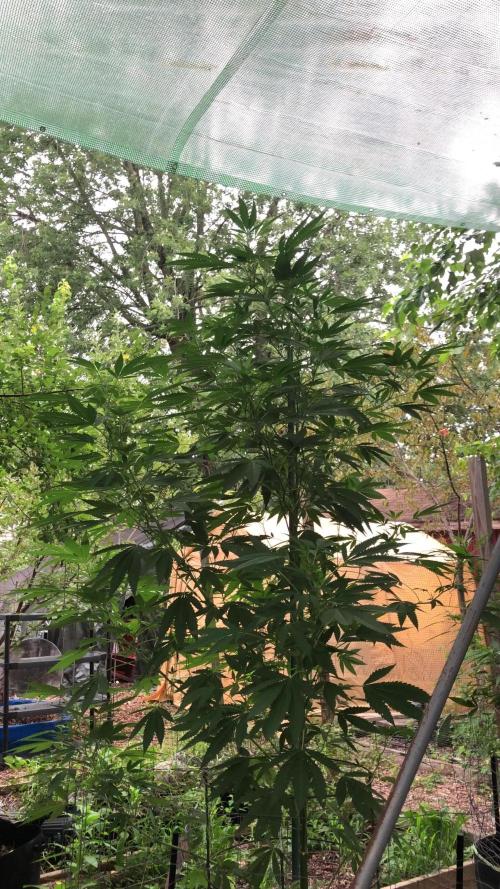
This is going to be an outdoor grow, but I have started the Papaya Sherbet photoperiod indoors as our weather is still a bit too chilly to put a newly sprouted seedling outside (nighttime temp's dipping regularly into the 40's℉).
The plan is simple... let her grow inside under a 19/5 light schedule until the nighttime temperatures are in the mid 50's℉, which shouldn't be long. After which, she'll be moved outside and transplanted into the soil which I have already setup and inoculated with beneficial microbes from BioTabs and slow release dry amendments from Gaia Green. Once she's established herself outside she'll be given periodic top dressings of Gaia Green 4-4-4 and 2-8-4 along with worm castings and Compost Tea's. Her grow area is approx. 5'x5' and I have posts and a trellis net set up already for when she gets bigger to aid in training her. Let the fun begin!🤪💚
________________________________________________________________________________________________________________________________________________________________________________________________________________________________________________________________________________________________________________________
Weekly Updates:
5/31- Week 4 from seed and the FastBuds Papaya Sherbet photoperiod is doing a lot better now that she's going through a growth spurt!
The leaf chewing has mostly subsided now since I have been spraying Neem Oil on her every 2-3 days. She's also beginning to increase in height about an inch per day now and has great color and vigor.
6/2- Yesterday I top dressed the Papaya Sherbet with 2 cups of Gaia Green 4-4-4, 1 cup of Down to Earth Bio Fish along with 1/2 gallon of worm castings. After top dressing and working the amendments into the soil by hand, I watered it in via garden hose with straight well water.
6/4- It rained hard yesterday, so I skipped watering the FastBuds Papaya Sherbet photo today as the ground was still pretty wet.
6/6- The last two days have been sunny and warm so I watered the Papaya Sherbet photo with straight well water from the garden hose today.
Another week gone by for the FastBuds Papaya Sherbet photoperiod and I'm looking forward to next week, as well as the weeks that will follow to see how this lady progresses!
Thank you for checking out my diary, your positive comments and support make it all worthwhile! 💚Growers Love!💚😎🙏

Likes
6
Share
@MindFlowers68
Follow
My gorilla melons transitioning into flower this week. Not much change in height yet but I will get a good measurement next week. I haven't had to water this plant much at all this whole summer but now that I have the canopy up top I'm gonna have to start watering more. Last day of this week got a mix of compost tea with some liquid fish. It got around 8 gallons.
Likes
2
Share
@Aleks555
Follow
Our beauty is now 3 weeks old and has grown to nearly 18 cm tall, continuing to develop strong and healthy. We’ve decided to enhance her nutrition by continuing to feed her with Xpert Nutrients fertilizers, which provide everything she needs for balanced growth.
Additionally, we’ve started using CO2 to further stimulate active growth. The daytime temperature remains at 28°C, nighttime at 21°C, and the humidity is maintained at 65%. We are still keeping the light schedule at 12/12, closely monitoring how the plant responds to these conditions.
A big thank you to Xpert Nutrients for their high-quality fertilizers, and our CO2 experiment promises to be exciting!


Likes
7
Share
@Grisly
Follow
Harvest 2024
Total Hash: 102g
Total Kief: 95g
Total Flower: 3868g/138oz/8.6lb
Total Yield: 4065g/145oz/9lb/4kilo
———-/-////////—vs———-/////————/
Sugar Diesel #1: 117g
Sugar Diesel #2: 313g
White widow Clone: 14g
Dual OG:
112g
LA Affie North Field: 248g
Granddaddy Purple N: 63g
Black Raspberry Kush N: 210g
————————————————-
Total North: 1077g/38oz/2.5lb
————————///——/—————-/
Fruity Pebbles: 184g
Granddaddy Purp S H2: 54g
Granddaddy Purp S H1: 275g
Granddaddy Purp Total: 329g/12oz
Black Rasp Kush S H1: 160g
Black RaspKush S H3: 70g
Black Rasp Kush S H2: 511g
Black Rasp Kush S H4: 17g
Black Rasp Kush S: 758g/27oz
Blue Cheese S H1: 281g
Blue Cheese S H3: 83g
Blue Cheese S H2: 285g
Blue Cheese Total: 649g/23oz
Dr Grinspoon S H1: 485g
—————————————————-
Total South: 2405g/85oz/5.3lb
————————///——/—————-/
North Popcorn: 148g
BC Popcorn: 100g
GP Popcorn: 73g
BRK Popcorn: 65g
—————————————————-
Total Popcorn : 386g/14oz/0.9lb
————————///——/—————-/
Trim: 8lb
—————————————————
————————///——/—————-/


Likes
8
Share


Likes
1
Share
@DrGL_Thumb
Follow
Girls doing well, clearly see all hit with hit substrate 😂 but ChemDawg is despite the hit battling n fast 😂
Likes
19
Share
@Changman
Follow
What an awesome week its been aside from some heat and light stress the ladies are recovering and loving life


Processing
Likes
45
Share
@Kelseyheart
Follow
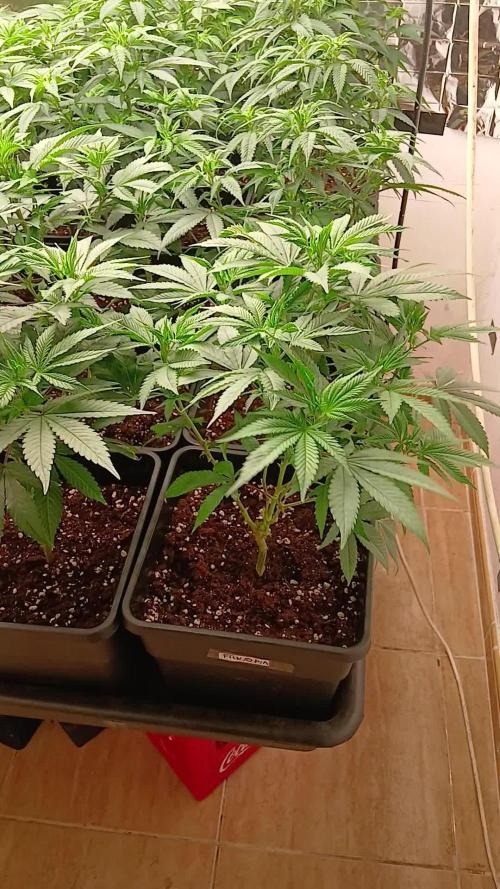
Starting up week 2. So far so good! Looking like strong and healthy little seedlings ! Gonna start with ancient earth nutrients.. .1 per L very mild. Have a feeling these plants are about to have a growth spurt!
Happy growing fam!
Likes
16
Share
@The_green_room
Follow
At the start of my first proper week of growth she seemed to be doing really well. I noticed her stretching quite a bit, so I moved to the light a bit closer. This seems to have done the trick.
Thanks to everyone on Grow Diaries who answered my question about burying some of the stem when transplanting. I decided to move to a slightly bigger pot (from 1litre to 3.8 litres) so that I could bury some of her stretchyness. This was based on advice from you guys - so thank you! She seems to have taken to the transplant well. I made sure the EC and PH of both mediums were very close.
Likes
10
Share
@Kinghaze
Follow
I put the autopot system on and put op a trellis net .
Unfortunately I did not have a scrog net with small compartments , but I will put a second trellis in week 2 of flower with the smaller ones
Likes
15
Share
@Luckydope69
Follow
Die Mädels gehen ab wie Sau, ihnen gefällt das Beet super und sie gehen richtig schön auf. Nun gehen sie auch in die Höhe nicht nur in die Breite.

Likes
83
Share
@Schnabeldino
Follow
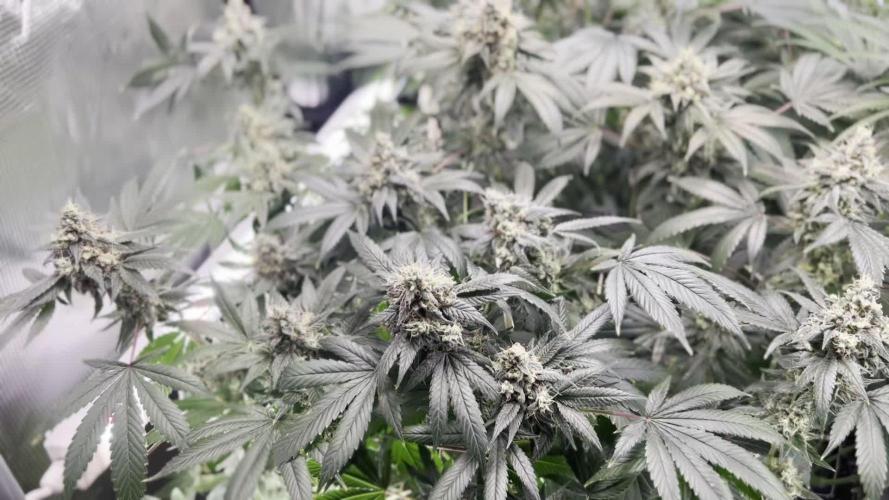
📅 Week 13 | Days 92–98 📅 🌼🌸🌺 Flowering Phase 🌼🌸🌺
Day 98 🌞 – Oreoz
🔸 Oreoz is looking like an absolute showstopper this week. The buds are incredibly dense and completely frosted with thick, glistening trichomes – it almost looks like they’ve been dusted with snow. Resin production is off the charts, especially on the top colas. Trichomes: Mostly milky with some still clear – no ambers yet. She's not quite ready, but getting close.
🔸 Climate control has improved. Humidity started the week at 63%, but with the dehumidifier now running and all clip fans at full power, it's being maintained steadily between 50–60%. That little climate shift is definitely helping – the buds are chunking up without any signs of stress. The slight 2–3°C increase in tent temperature is worth it.
🔸 Nutrients: 1 week of Overdrive (Advanced Nutrients) before the flush phase. Water intake has already slowed down noticeably – another good sign that the end is near.
📈 Current Conditions
🌡️🔆 = 27°C
🌡️🌜 = 20°C
💨 VPD Target = 1.4 - 1.6
💨 Humidity = 63% → Target: below 60%
🔦 PPFD = 900 µmol (12/12)
🔦⌚ DLI = ~38
🛠️ Setup (unchanged)
💡 Lights: 2 x Sanlight Evo 4-120 @ 90%
⛺ Tent: 120 x 120 x 180
🍯 Pot Size: 18 liters
🌱 Medium: Bio-Bizz Light Mix
💊 Nutrients: Advanced Nutrients
💧 Water: Tap water (EC 0.5)

Likes
73
Share
@Roberts
Follow
Deep Forest Auto is moving along. Shevhad another ph bottom out. I am not providing enough irrigation and the feed has been too strong is my conclusions. Organic nutrition is high in salts. Hopefully this will be fully resolved by tomorrow. 🤞🏻she finishes up soon. Thank you Medic Grow, Gen1:11, and Doctor's Choice. 🤜🏻🤛🏻🌱🌱🌱
Thank you grow diaries community for the 👇likes👇, follows, comments, and subscriptions on my YouTube channel👇.
❄️🌱🍻 Happy Growing 🌱🌱🌱
https://youtube.com/channel/UCAhN7yRzWLpcaRHhMIQ7X4g


Likes
12
Share
@reirrac1
Follow
This girl has gotten exceptionally thick and juicy over the last two weeks, and she WREAKS of juicy fruit gum and pungent gas. The trichome coverage is rivaling double grape at this point, and I’m more than ecstatic that I’ve got 4 more beans of this left! I might top her next time around, I’ll probably get a more even canopy that way. Either way I’m very happy with her :)
Processing
Likes
15
Share
@Deli_Weed
Follow
Ya casi por finalizar 😃 estoy muy emocionado por el resultado final, todo pinta bien 👌🏻💯 se puede mejorar aún más pero estoy conforme con el resultado de esta planta 🌱
Esta semana fui bajando la ec poco a poco hasta llegar a pura agua, la semana que viene será de puro flush 🚿 ya para cosechar 🤩


Likes
3
Share
@RedEyeGrowz
Follow
Fed these babies 3 times the entire flowering period if i be honest with yourll and they were test plants to see the resilience of autos
