
Likes
Comments
Share


@Natrona
Follow
Week 10
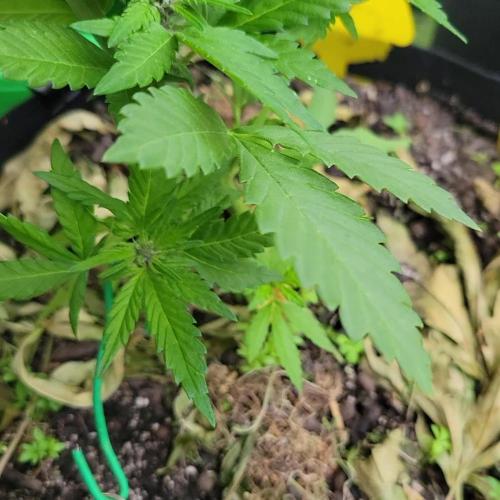
6/9-15 Lemon ladies love the outside. Both are showing yellowing leaves so everyone is getting nutrients with feedings.
6/13 heavy defoliation and limb removal for lemon cake since she's now in flower. Repositioned the scrog after defoliation so the thicker limbs are in the mesh. Drizzle, got light defoliation mostly yellowing fans. Before and after pics and vids.
I saw a Japanese beetle on my Lemon Cake and some small holes in the leaves so I added 1/2 tsp neem to the feed solution 6/12. Also started using fish & kelp.
I'm still watering 1 gal per plant when I feed. With the heat and humidity, I water daily.


Likes
2
Share


@Nebuloso420
Follow
21.05.2026
What can I say?
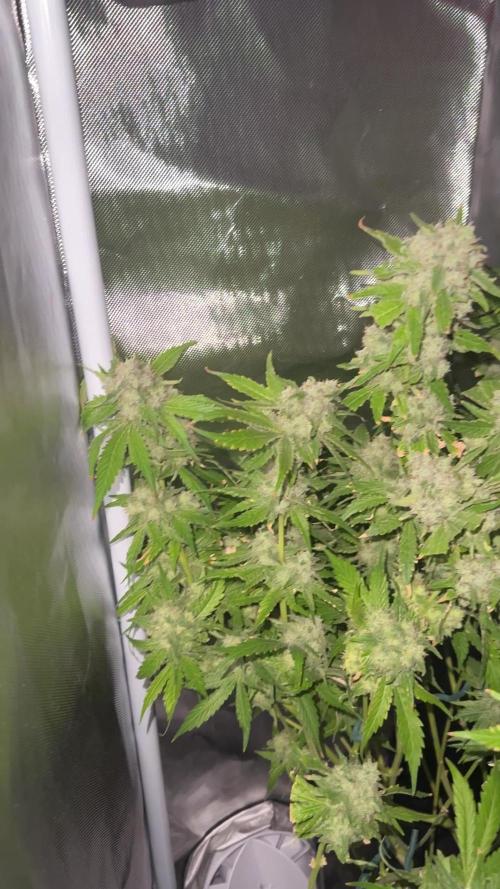
The SuperLemonHaze x Pink Candy is really a vigorous, strong growing plant with a great smell.
With beautiful colors. Its a pleasure growing this plant. Fuck I Missed Out, but it turned out great. She
is stacking up now and the best time begins. Asking myself if I should lower nitrogen already,
which means in my case stop using Biobloom, which also means lowering P/K from this source.
22.05.2026
Gave her 2 liters of water today with only 2g of CompactorBloom on 2.5liters water wich gave me an EC of 1.6
CompactorBloom is a powder wich contains 0-0-60 and is applicated 1 time a week.
Hope my microorganism soil life dont gets fucked and at this moment I think it would have been better to split up the amount on two waterings.
I never watered with an EC over 0.9 before.
Decided to finish Nitrogen at this point because she only has about 2weeks left and its comes from organic sources only.
wont flush this run.

Likes
140
Share


@MrJones
Follow
mrjones - Slurricane #7 S1
🌱Slurricane #7 S1
@inhousegenetics_official
👨🌾🏽GD Grower: MrJones
🔹🔹🔹🔹🔹🔹GOALS🔹🔹🔹🔹🔹🔹
🌞Environment - 75/80℉ and 55% Humidity
💧 Feeding - Advanced Nutrients Organic
⚗️Soil - 50% Ocean Forest / 20% Tupur Royal Gold / 10% Earth Worm castings / 10% lobster Compost / 10% Additional Perlite
🍃Training / HST, Will be topping, Cloning, and creating larger plants, and placing to flower under a trellis
🕷️ IPM - Will be using Green Cleaner" 1 OZ per Gallon, and CannControl from Mammoth alternating between products each month for Integrated Pest Management.
💡Using 480 Watts of LED Lights.
🔹🔹🔹🔹🔹🔹🔹🔹🔹🔹🔹🔹🔹🔹🔹
📜 Rambling - Week 20 / The girls are showing to different Pheno Types, one the bods are starting to amber already, and the other they are not, aside from that they are about the same size, (half the size of golf balls) they are just hard and dense, and the smell is amazing!
🔹🔹🔹🔹🔹🔹🔹🔹🔹🔹🔹🔹🔹🔹🔹
▶️ Sunday - 06.20.21 / Still feeding 1/2 gallon per day, by the end of the week will be stopping the AN Big Bud for a week then starting to flush after that.
▶️ Monday - 06.21.21 / Still feeding 1/2 gallon per day, by the end of the week will be stopping the AN Big Bud for a week then starting to flush after that.
▶️ Tuesday - 06.22.21 / Still feeding 1/2 gallon per day, by the end of the week will be stopping the AN Big Bud for a week then starting to flush after that.
▶️ Wednesday - 06.23.21 / Skipped a water day, the soil is just getting too wet
▶️ Thursday - 06.24.21 / Fed with 1/2 gallon of AN nutrient mix
▶️ Friday - 06.25.21 / Fed with 1/2 Gallon AN nutrient Mix
▶️ Saturday - 06.26.21 / Skipped a feeding today the soil was still moist, went ahead and did the final IPM for the season, this strain has about a 9 week flower time, will taper back on the PPM's this week and start the flush at weeks end.
🔹🔹🔹🔹🔹🔹🔹🔹🔹🔹🔹🔹🔹🔹🔹

Likes
7
Share


@XoticGROW666
Follow
🍬 she finicky to dail in hope in the future I can really dail her in and get pheno a buds of the gushers cake lookin perfect pheno b of the gushers cake looks good tho

Likes
5
Share


@LAShugars
Follow
She’s taking forever and she’s so massive! I think her bud growth has slowed. I had to defoliate a couple weeks ago. She was outgrowing the tent again. I took a lot off of her. That’s probably why the slow growth now I’m thinking.

Likes
13
Share


@BanditHigh
Follow
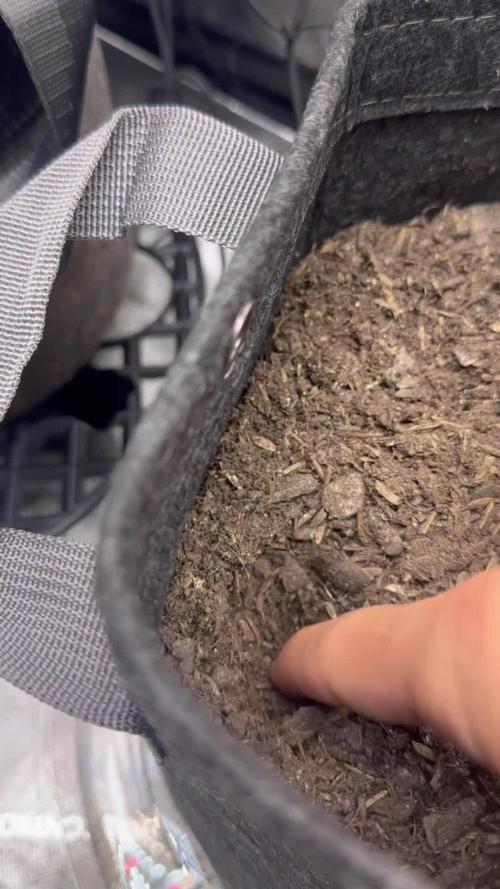
Transplants 75% succesfull , i had to wait for the soil an extra week , but i m sure other ones will keep up .

Likes
9
Share


@DeepRootsGrowTrees
Follow
TRIPLE G by ROYAL QUEEN SEEDS
Week #18 overall
Week #1 Flower
This week she begins her transition into flower 🌼 she's looking good and there's no issues this week and she's dealing with the outside elements she's got some good genetics!! Stay Growing!!
ROYAL QUEEN SEEDS TRIPLE G

Likes
151
Share


@CANNASIM
Follow
------GENERAL COMMENT------
As planed I lowered the base nutrient to 2ml, and took a break from Cal Mag, to release the N a bit, green is on point now.
Tomorrow will catch up with the Cal Mag schedule as usual.
Time for some overdrive, for the rest all good, girls are developing well and buds are getting bigger, no issues.
Smelling delicious! Hope I had some Terpinator to give a go...
------SM.BB COMMENT------
BB is maturing faster you already can see I have cloudy Trichomes, she will be a fast finisher as it looks like...

Likes
36
Share


@Lordshiva83
Follow
Olá companheiros, as flores estão com 56 dias de vida, esta semana estão só a água, porque as folhas estão a fazer garra de águia ( fertilizantes a mais). De resto estão com muito bom aspecto, parece que está a correr tudo bem para o primeiro cultivo indoor.


Likes
9
Share


@RanTanPlan_69
Follow
Week 8 is starting !
Bella is getting very dark (but wonderful) colors. She is flowering fast !
Gigi is making her flowers bigger and bigger.
Patience is the key but I can’t waiiiiit !! Grow ladies ! Grooow !
Quick cleaning was done (dead leaves, 🍁 cutting the small « suckers » so the big flowers get the energy)

Likes
15
Share


@Sid93
Follow
the plant keeps swelling at a slow pace. looks bigger every day and smells stronger


Likes
50
Share


@Igrowneil
Follow
Will update here with smoke and dryed report the drying is nearly done and about time for a cure , she smells great

Likes
12
Share

@El-Ecko
Follow
2 Weeks into Flowering
Daytime temperatures have gone from 15° to 30° in just one or two days. But I really can’t complain… because I needed the warmth, too😅. I decided to do a light LST to help the little side shoots get more sunlight. The little flowers are slowly taking on a beautiful purple hue.
Hopefully, they’ll get really plump and sticky. 😋🤤
Thanks so much for stopping by. ✌️
Likes
33
Share


@microgrowshow
Follow
The stretch I experienced this week has me questioning what a stretch really is anyway, cause I've never seen one like this 😅 ...starting to get a little worried with the tent size though... again, amazed with the structuring of this plant. Comparing to other growers who are doing different fast buds strains, definitely not the same for them. True test will come later into flowering!
Likes
7
Share


Likes
38
Share


@kijani
Follow
she is doing great ... growing thick and bushy. she has about 6 main steams and multiple strong-looking branches on each of the main stems. her roots look good even though they are not bleached white, i should put a microscope on the roots one of these days to see the micro root hairs that high-pressure aeroponics tends to promote in plants. i was not sure how to grow her out - i like canopies but she branched out too much to grow in a 2'x2' space so i may have to scrog her in a larger space.
i must learn how to ask plants to self-fim as she did - i have never done such a good job with my own hands, and may never.
Likes
12
Share


@iLoveGoodWeed
Follow
She has spread very nicely after the LST and now there will be few big collars. She is growing nicely and the buds will get bigger

Likes
8
Share


Likes
Comments
Share

@theChimp
Follow
Week at a Glance
Height:
2.63” → 3.50”
Canopy:
5.0” × 3.0” → 7.0” × 5.8”
Key Developments:
- Maintained its position as the most vigorous seedling in the tent.
- First bottom watering completed with a 30-minute soak.
- Irrigation transitioned to pH-adjusted water.
- Preventative neem soil treatment applied.
──────────
ETHOS Planet of the Grapes continued to distinguish itself as the fastest-growing plant in the garden, producing the largest gains in both height and canopy expansion during the week. Growth remained compact despite the increase in lighting, and the plant responded well to refinements in irrigation and environmental management. By the end of the reporting period, it had developed into a well-established plant with noticeably increasing vegetative momentum.
──────────
Environmental Summary
Average Day Temperature: 76.6°F
Average Night Temperature: 72.1°F
Average Relative Humidity: 70.6%
Average VPD: 0.87 kPa
──────────
Weekly Update
Planet of the Grapes continued to set the pace for the garden this week, showing rapid and consistent growth in both height and canopy spread. New leaves expanded quickly.
Water management evolved as the root system became established. Irrigation transitioned to pH-adjusted water, and the plant received its first bottom watering by sitting in approximately two inches of water for a 30-minute soak. This ensured the entire root zone was evenly saturated while encouraging continued root expansion throughout the fabric pot.
A dilute neem solution was also applied to the soil surface as a preventative treatment after a small number of fungus gnats were observed.
By week’s end, the plant displayed healthy color, broad leaf development, and continued vigorous growth. Its combination of compact structure, rapid canopy expansion, and strong overall vigor is hopefully an early sign for the future development of this plant.

Likes
10
Share


@KcKush
Follow
*Will probably trabsplant these into 1 Gallon Pots in 2 days.
*Nothing crazy
*Only 4 of 5 beans popped.