The Grow Awards 2026 🏆 


Likes
Comments
Share
@eldruida_lamota
Follow
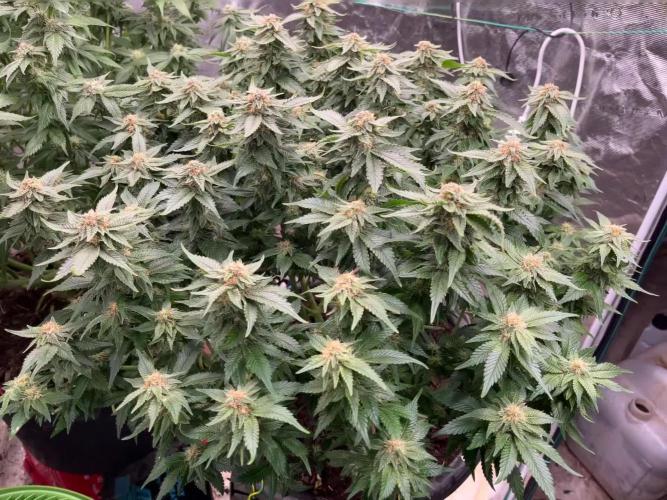
Vamos familia cuarta de floración de estás Punch Pie de RoyalQueenSeeds .
Que ganas tengo de ver el progreso de esta variedad, las plantas están sanas, se ven con buen color.
La cantidad de agua cada 48h entre riegos, nutrientes de la gama Agrobeta.
Esperaremos que no me suba mucho la temperatura , por el momento se mantiene entre 25-26 así que lujo.
Esta vez me pasé un pelín con los productos pero echaré agua destilada y en unos días apañamos.
Estas próximas semanas veremos cómo avanzan y progresan estas flores.
Mars hydro:
Code discount: EL420
https://www.mars-hydro.com/
Agrobeta:
https://www.agrobeta.com/agrobetatiendaonline/36-abonos-canamo
Hasta aquí todo, Buenos humos 💨💨.

Processing
Likes
17
Share
@greennug
Follow
plants looking great dinafem standing out from the crowd.my stardawg cuttings are thriving and a few of the fastbuds strains look beautiful.should be kicking into flower late next week. daily updates until harvest!


Likes
14
Share
@GodZilla_Owner
Follow
Week 10 Update – Full Throttle with Advanced Nutrients 🌱
I’m now feeding 100% of the Advanced Nutrients schedule with all components. I noticed a slight calcium deficiency in the AN plants, so I’ve increased the base nutrients from 75% to 100%. Advanced Nutrients CalMag Xtra remains at 1ml/L, and it has been reliable throughout the grow with 0 EC osmosis water.
BioBizz#1 – BT42
The trichome ripeness is mixed—there are both amber and clear trichomes, so it’s not quite consistent yet. CalMag issues show up occasionally, but nothing that’s throwing me off balance—she’s doing fine! 🤞
AN#4 – BT42
She’s asking for a bit more calcium here and there but continues to dominate BioBizz#1 in terms of development.
EC: 2.5
pH: 6.4
Drain: pH 6.1 (EC not measurable due to organic soil).
AN#3 – BT38
This plant is visually about 2 weeks behind the others. The space between her and the lamp is down to 1-2cm—a disaster, but there’s nothing I can do at this point. PPFD is off the charts (1200), but she’s handling it and developing beautiful buds. Big respect to this strain—the stretch was no joke!
Humidity is well under control at

Likes
72
Share
@Ironlungs
Follow
Alright here we go, let the flowering begin.
Still have just been giving her water straight from the hose. This week I will get the top netting in place.
Likes
5
Share
@Jeb420
Follow
So! A bunch has happend this week: defoliation, stretching and puttin' on some guuuuud weight ^_^
I defoliated the bottom third tier of each plant (about 6 to 10 leaves every 2 to 3 days over the week)
They stretched like crazy, almost doubled in height for 2 of them as usual and the lil bish is coming on strong, with more bud sites and overall best morphology!
And last point of this week's update, the swelling of the flowers has started and is in full gear to produce some beauties :D
See y'all next week ;)

Likes
8
Share
@Pjm70
Follow
6/9 she is 47 days old. Her leaves are dark green. The leaves around the dense buds are thin and frosty.
6/10 48 days old. She is spread some what we'll. There are a few lower buds I would have liked to remove. They're there now. She has fine leaves around the buds. So I think they will get enough light.
Maybe I should have tried to lay the branch over more. I did not fill the pot to the top with soil and with the settling. The plant is low in the pot, this makes it harder to tie the branches.
Next time I want to get the plant higher, so I am able to work better under the branches. Very hard to defoliate the plant.

Likes
5
Share
@WickedWeedQueen440
Follow
Growing for the Growers Gauntlet in discord. Come check it out! There's a bunch of amazing growers throwing down right now for the title of Champion Homegrower! This gelat og is doing amazing. This is the first week of flower and she's already got a lot of amazing bud sites.

Likes
3
Share
@Ieiogrow94
Follow
Eccoci qui...
Tutto va per il meglio, questa settimana si inizia a vedere la resina e ora si inizieranno a formare le cime, per questo aggiungo Sugar Shot di @xpertnutrients vedremo l'evoluzione settimana prossima.
Questa piccola ha un numero di cime veramente clamoroso, sono soddisfatto di come è cresciuta ora però mi aspetto molto da lei....
Grazie a tutti per il supporto🔥🌲❤️

Likes
10
Share
@Rangaku
Follow
She’s getting phat and sticky and really unique smell , bit of defol and keeping the airflow up coz she’s dense as .

Likes
8
Share
@Mo_Powers
Follow
it has now clearly gone into flowering. really nice pistols and if it continues like this, it will become really thick buds. it has got a few yellow leaves but that's not bad.
Likes
2
Share
@Kirsten
Follow
16.2.25:
I decided to check out the lower canopies of all plants to see if I need to get rid of any foliage.
I did get rid of a few small branches and leaves.
However, whilst I was doing this, I saw more garden pegs from my LST remaining.
There were about 6 or more in Pink Mist alone. Additionally, on Watermelon, there were some left in, too.
I'm so annoyed to see that because the plants are really stretching, and I could've potentially disrupted this by leaving the pegs in for all this time without realising it.
🤞 that I haven't compromised things too much. We'll see.
I watered today with 2ltrs of dechlorinated water PH'd to 6.3 containing the following nutrients;
♡ .8g Green Leaf Nutrients PK booster
♡ .5g Ecothrive Biosys
I ordered quite a few things for the garden. I got Greenleaf Nutrients Sea K(elp) and Mega Crop Parts A+B. To go with their PK Booster I got last month. I'm excited to try it all together. Next run, maybe just using these. We'll see how it goes.
18.2.25:
The plants are going crazy for water! Everything is getting used right up so fast!
Today, I decided to add some more Black Strap Molasses to add some carbs and other micronutrients. I'll add the jar with the label in the photos section above.
I watered a very small amount to each plant.
What I put in:
♡ Black strap molasses 150g
♡ 2g Sea K(elp) Greenleaf nutrients.
I dissolved everything in 4ltrs of dechlorinated water PH'd to 6.4.
19.2.25:
I received the majority of the garden purchases that I made. I'm still waiting for the Ecothrive Life Cycle. I wanted to top dress, but it's been delayed unfortunately.
I am using my Greenleaf nutrients products which I bought on Amazon. I got the Mega Crop 2 part system Part A and Part B. I have the Sea K(elp), and the bud explosion PK booster.
I really wanted to get some of their sweet candy asking read many positive reviews. Unfortunately, for me, this is unavailable to buy currently. So that's a little disappointing.
I needed to do a good watering so when my nutes were delivered today, I got excited 🤗
I watered 2ltrs of dechlorinated water per plant, PH'd to 6.4, containing the following nutrients:
♡ 1g Mega Crop Part A
♡ 1g Mega Crop Part B
♡ .5g Sea K(elp).
The plants drank this up within a few hours.
I'm going to try and hold off on watering in hopes that my Ecothrive Life Cycle will arrive so I can top dress and water it in then.
20.2.25:
My Ecothrive Life Cycle arrived yesterday, and the plants are ready for their top dress and a good watering in.
I have some Biobizz Light Mix, Canna Coco,and perlite. I'm going to use this as a base to mix my amendments in.
I'm going to fill my 5 gallon bucket with about 4.5 gallons of my top dress mix. I will distribute this across 6, 4-5 gallon pots. Then I will water in well with Greenleaf nutrients Mega Crop Parts A+B and Sea K(elp).
I've made a crude attempt to video mixing my top dress. Don't listen to the audio. lol, my YouTube didn't stop playing whilst I recorded this 😂
So anyway, I added the following amendments to the above base mix of 4.5 gallons;
♡ 3 TBSP Ecothrive Life Cycle
♡ 3 TBSP Vitalink Bat Guano
♡ 3 TBSP Ecothrive Charge
♡ 1 TBSP RHS Mycorrhizal Fungi granules
♡ 6 TBSP Ground Cinnamon.
Likes
24
Share
@Basementganja
Follow
Week6 of bloom, feeding Cal-mag+Floranova Bloom, both at 1tsp/gal. Each plant receives a glug or two from a 1gallon mixture. Runoff is removed.
New Clones of different phenos have entered the arena!
Happy growing!

Likes
43
Share
@Sejnik
Follow
Biobizz květy se od posledního týdne o něco zvětšili a vypadá to ze ještě trochu porostou. Zvětšil se i objem pryskyřice. Vůně ale není moc výrazná.
Florganics nevykazuje nějaký pokrok ani po přidání dodatečných živin.
Rozdíl můžete vidět na fotografiích.
Likes
15
Share
@Budz_Bunny
Follow
Currently running a grow with a brand-new, unreleased strain from @supersativaseedclub.
Here’s how the first two weeks have gone – really curious to see what’s next!
Big thanks for letting me be part of this journey
Likes
5
Share
@Foxtrotoscar
Follow
Small harvest but was due to the over feed of CAL-MAG I had quite early on but still pulled through and flowered almost and OZ. Really nice Sativa from Barneys Farm.

Likes
16
Share
@Mrg7667
Follow
Major defoliation/ lollipoping that happened this week right on day 20 my main concern was looking for more hermies (due to stem cracks from lst) and also cut out any lower branches that where going to make larfy buds.
I only cut up the branches untill the point that the budsites where at least a nice pistil cluster (10and up ) some branches got a good 6-7 inches shaved off some more like 2-3 just depends on the plant with so much variety. Also my plants are like touching the lights it just wont let me mark less then 4inches i have the ability to raise my light another 2inches so i will definitely be doing that. For now i have the taller branches off to the sides so the can outgrow the light without burning.
Smells finally starting to come in with more gassy earth coming from DD and devine chocolate GG4 smell coming from the mellows
Still see some nitrogen toxicity not sure if should cut all nutes in half considerIng week three biogrow increases to 3ml/L

Likes
2
Share
@PapaHarry
Follow
Big nugs I’m excited for end weight, looking at 1.5-2oz update after dry i had 66.5g or just over 2oz!!

Likes
4
Share
@OG076
Follow
Jetzt ist es kurz davor die Bilder sind von vor 1 Woche, nur ich hatte keine Zeit sie hochzustellen hier, und in 8-11 Tagen ist dann endlich meine erste Ernte

Likes
4
Share
@adam_pawloski87
Follow
@twenty20mendocino Ateam R&D Update ~ Let’s Go day 18 of 🌸almost 3 weeks in an we are looking great! Gave em another aggressive trim up some lollipops this week hopefully wasn’t too early but hey it’s we learn as growers, but they are bouncing back super nice, praying a looking happy y’all! Can’t wait to see what these girls do over the next few weeks, y’all have to keep them eyes peeled for next weeks update. Y’all have an amazing productive rest of your day as well as great rest of your week! Hope y’all enjoy, peace love an positive vibes to all y’all Cheers an blaze on 😶🌫️💨💨💨💨

Likes
5
Share
@Deltatigrou0169
Follow
Bonjour les amis,
Je viens tout juste de faire mes photos et vidéos, ça va faire 1 semaines que j'ai commencé à leur mettre de l'engrais (pro organic) mais apparemment mes fifilles ne le supporte pas elles commencent à me faire des taches (marron jaune). Du coup je les est mis en rinçage et après je leur mettrais du purin d'orties fait maison. J'espère vraiment qu'elles vont se remettre d'à plomb, je serai vraiment triste 😥 si je les perds.
Je vous dit à plus tard les amis,
Bonne journée à tous 🙂👍👍👍

Likes
1
Share
