The Grow Awards 2026 🏆 


Likes
Comments
Share
@nonick123
Follow
Día 9 (10/06) N/A
Día 10 (11/06) N/A
Día 11 (12/06) Llueve mucho. Humedad alta por aquí. Eso les favorece
Día 12 (13/06) Se empiezan a desarrollar las hojas verdaderas a una buena velocidad! Todo en marcha! 💨
Día 13 (14/06) Riego ligero 100 ml sólo H20 EC 0,5 en previsión del trasplante en el día 15 de la planta
Día 14 (15/06) Se nota que estamos en el día 14 desde germinación y la mayoría de las plántulas van viento en popa!
Día 15 (16/06) Hoy procedemos a trasplantar a las chicas a su maceta intermedia de 6,5 litros
Se prepara con 5,5 Litros (85%) de sustrato PRO-MIX HP BACILLUS+MYCORRHIZAE + 1 Litro de Insect Frass (15%) + 65 gramos de Earth Vibes Super Soil (10 g/L substrato)
Se llena la maceta de sustrato con las manos (limpias) y rompiendo los trozos más gruesos, para que el sustrato esté aireado y esponjoso, sin presionar
Se coloca una maceta vacía de 1L para que quede la forma perfecta de la maceta donde están las plántulas (ver fotos)
Se espolvorea la parte proporcional de la probeta de microorganismos sobre el agujero de trasplante
Se saca la plántula de su maceta actual (bonitas raíces 😍) y se coloca en la maceta final
Se riega muy lentamente hasta percolación profunda con H2O EC 0,5 pH 6,5
Se coloca mulch (acolchado) de paja para evitar traspiración excesiva y cuidar a los microorganismos del suelo
A ver como reacciona al trasplante!
💦Nutrients by Lurpe Solutions - www.lurpenaturalsolutions.com
🌱Substrate PRO-MIX HP BACILLUS + MYCORRHIZAE - www.pthorticulture.com/en/products/pro-mix-hp-biostimulant-plus-mycorrhizae

Likes
2
Share


Likes
41
Share
@MrHightimes
Follow
Fun Contest. Maybe coulda gone a week longer but i was ready! And trichomes were done enough

Likes
57
Share
@SmokieMcPot
Follow
2 Girls 1 Cup week 10?? Looks like WG still has a few weeks left on her. GC on the other hand... is technically already dead to me, I've properly mourned her loss. Just need to keep her out of the way (and alive).
Day 63- my TDS meter was accurate the whole time.. had to dial it back up.. I'm an idiot.. but these girls have been rocking out at over a thousand for weeks now and not really showing signs of burn. Few tips here and there. Crank the P/K up in this week's feed. RES change tonight. Modified GHE late bloom aggressive feed. TAP water so there's no added N from the calmag needed with RO. Breakdown as follows:
5gal TAP water - 137ppm
Micro- 33mL
Grow- 35.5mL
Bloom- 50mL
RES totals after ph corrections [email protected].
=============================================================================================
Day 64- GC seems to have blown up since yesterdays stabbing.. i took a vid, which ended up being a little too long. didnt want to wait for it to upload so i canceled. may clip the part where i went psycho on GC main and upload later. she may get stabbed a few more times before this is all over. thinking about drilling a hole or two in WG within the last few days, and the 48hr dark before chop chop. (when the time comes of course)
=============================================================================================
Day 65- I don't think I ever disclosed my tent is in a closet... vid tonight shows it. Also shows how much head space I have above it for a TALLER tent.. a 4x4x80 would fit this current space REAL nice.. could make em taller as well. One thing I need to think over before the next run. I did cut GC back some tonight. Was creating a shadow on WG, and I didn't want it smacking in the fan again. That got annoying quick the other night while trying to sleep. WG still fattening up. Top offs have been with bubbled/aged TAP. Tonight I gave em a G/B 5/10mL shot since numbers are dropping from top offs and consumption.
=============================================================================================
Day 66- i know i didnt add a comment for the day... but i DID upload pics. must have not saved. noticed when updating timelapse with the days footage, my diary is missing pics from 66. damnit! maybe i should quit uploading so many damn videos.
=============================================================================================
Day 69- WG starting to show signs of its end. Brown spots on a few random leaves here and there. Checked tricomes tonight and were like 90% cloudy 10% clear. Hope they start to amber up within the next week. Haven't hit the A/C yet, and Temps are reaching 86! I can say that I have noticed less of an odor when opening the tent. So I think I'm nuking them terps.
=============================================================================================
As always, thanks for stopping by and checking out my current grow experiment.
Link to YT vid of the day 27-67 timelapse https://www.youtube.com/watch?v=N5MbUBjJCYM


Likes
Comments
Share
@BruWeed
Follow
☘️22/11 - La semilla se hidrato en agua durante 24hs.
☘️23/11 - La puse a germinar en papel húmedo.
☘️25/11 - Ya germino y aproximadamente media 3cm. Ese mismo dia la coloque en un vaso chico con un poco de tierra. En una semana ya la traspaso en una maceta de 10L y ya queda en esa maceta hasta el final.
☘️27/11 - Broto el plantin. Se encuentra bien por el momento. Por lo que noto viene rápido su desarrollo.
☘️Voy a dejarla 2 semanas en crecimiento con luz 18/6. Una vez que este en flora lo cambio a 12/12.
☘️El banco de semillas comenta que en indoor todo su desarrollo es de 75/80 días.
☘️El banco aclara: una variedad para cultivadores experimentados ya que, si se producen diferentes factores de estrés en el cultivo, es una variedad que puede dar alguna inflorescencia masculina en un 2% de los ejemplares, por lo tanto es un dato a tener en cuenta dada su descendencia americana.
☘️Los productos que voy a estar utilizando son los de advance nutrients en toda su etapa.
☘️Con el ph voy arrancar en 5.8 hasta llegar a 6.4.
☘️En estos días estaré publicando mas imágenes de como viene.
☘️🇦🇷Podes seguirme en Instagram como @bruweed_arg para mas contenido.

Processing
Likes
Comments
Share
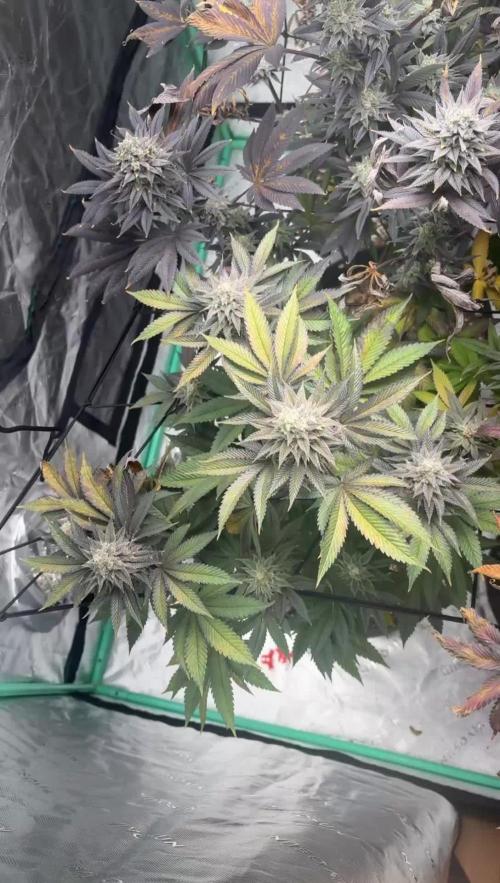
@Mr_nugs_lover_David
Follow
Beautiful pheno of Black cherry punch with that purple color, amazing sweet aroma just like her sisters. Fat dense nuggets, can't wait to smoke this super sweet flowers. You guys can't imagine how sweet black cherry punch is, can't believe the 5 phenos have the exact same aroma however only 2 are purple. Let's see what happens guys peace ✌️💚❤️ #probioticgardening #organic

Likes
9
Share
@Krissci
Follow
Day 2 - LST and topping if possible before transition to flower.
Slow for separate branches to grow


Likes
179
Share
@Tropicannibis_Todd
Follow
💩Holy Crap We Are Back At It And Loving It💩
Growmies we are at DAY 49 and she's just killing💀it👌
👉We are in full flowering mode and she's doing great 👈 Everything is looking good even the Tiny Cup 🥤
So Shit , I gave them just a tad to much nutes at the start of feeding 👈 But I have since fixed it
So I'm still doing some low stress training 🙃 and some defolation 😳
Lights being readjusted and chart updated .........👍rain water to be used entire growth👈
👉I used NutriNPK for nutrients for my grows and welcome anyone to give them a try .👈
👉 www.nutrinpk.com 👈
NutriNPK Cal MAG 14-0-14
NutriNPK Grow 28-14-14
NutriNPK Bloom 8-20-30
NutriNPK Bloom Booster 0-52-34
I GOT MULTIPLE DIARIES ON THE GO 😱 please check them out 😎
👉THANKS FOR TAKING THE TIME TO GO OVER MY DIARIES 👈
Likes
39
Share
@GrowWiththeBro
Follow
Half gallon nute feed.
Trichomes still a little glassy. Dense budding 👌🏾. 60-65 days for both ladies will open the window.
Flushing soon.


Likes
18
Share
@TheGreenLeopard
Follow
Oh lovely looking plant. Straight up looks a Cali girl. Have a lot less
Complicated grow this time with just tipping - kinda miss the trellis…but all good have too much work to do

Likes
4
Share
@Canadian_Bud
Follow
28-9-2019
Out of the 3 different strains I am growing right now.This purple Kush is doing absolutely marvelous. No sign of deficiencies at all. The main stock is so thick and fat I am totally surprised( larger than a thumb) leaves are lush green and no tip burns anywhere. As soon as my new 940 watt Conversion bulb gets here (this week) It's flower time baby.😎

Likes
248
Share
@OrganicNature420
Follow
And so it starts ..... 🌱
Germination date 🌱 12/07/2021
Day 1 15/07/2021
Strain 🍁 Humboldt Purple Matcha (2nd time)
(Sherbinski x HSO)
THC%• 20-25
💡 Mars Hydro FC4800
• Power draw 480W + 5%
• Max coverage 5 x 5
• LED 2070pcsSamsungLM30B1&Osram660nm
• Max Yield 2.5g / watt
• Noise level 0 DB
• Removable Driver +2m cable
• Daisy chain (multiple lights)
https://marshydroled.co.uk/products/mars-hydro-fc-4800-led-grow-light-samsunglm301b-commercial-greenhouse-medical-indoor-kit 🇬🇧
https://www.mars-hydro.com/buy-fc-4800-480w-4x4-energy-saving-full-spectrum-commercial-led-grow-light-mars-hydro-for-sale 🇺🇸
PROMO CODE • (ORG420) DISCOUNT 👍🏻
marshydroled.com
⛺ Mars Hydro 120 x 120 x 200cm
📤📥 AC infinity 6inch
💧 10lt dehumidifier
❄️ 3.1kw air con system
💉 Nutrients GreenBuzzLiquids
Organic Grow Liquid • 1-4ml until 2wk flower
Organic Bloom Liquid • 2-4ml flower stage
Organic More PK • 2-4ml +wk3 of flower
Organic Calmag • 1-2ml/lt whole grow
Fast Plants Spray • first 3days at night lights off
More Roots • 2-5ml veg +2wks flower
Fast Buds • 5ml +wk2 of veg until 1wk flower
Humic Acid Plus • 2-5ml whole grow
Growzyme • 2-5ml whole grow
Big Fruits • 2-5ml flower stage
Clean Fruits • 5ml flush 1wk
Ph powder
Root Gel
Living Organics
https://greenbuzzliquids.com/
🥥 Growing Media • Coco Coir
Notes 📝
Light was set at 35% but raised it to 50% as I needed another degree of heat. Removable driver is a god send. I have it on bricks outside the tent to help consume some heat from the driver. I will wait until these girls are adult veg until I start upping the light %
New Nutrients have started well 🌱 fast plant Spray seems to of worked nicely and love the Organic farm smell they all give off
Happy growing fam ❤️🌱🍁👍🏻

Likes
6
Share

Likes
17
Share
@Naujas
Follow
She is much prettier than she was a week ago :) I remembered that I have my first grow light, which is more compact and it will give me more space, so I changed my light, now the girl's side branches get light too:) I add a lot of video memes, because I really want to win Iphone16 pro ;) and those who don't take risks don't drink champagne:) good luck to everyone.
Likes
16
Share
@Chaos85
Follow
everything coming along nice density being created benefits from the added cal mag can be seen even in the old damaged leaves turning out to be a great grow


Likes
3
Share
@Aerogrower1104
Follow
I am browsing this in an ottoman as a stealth grow it only smells when I open the top and even when I do it doesn’t smell up the whole room. Plenty of growth. I had a little root rot and cleared it with peroxide and water method. Hopefully harvesting next month

Likes
2
Share
@ProlificGrowth410
Follow
Having trouble keeping humidity down have to keep the tent cracked open
Likes
Comments
Share

