
Likes
Comments
Share


@Kagesan
Follow
Hello grow friends!👋👋👋
After 57 days after planting the seed, it was finally time. Harvest time.
The smell had already changed completely over the last week. More fruity, or nuances of flavours that were completely unknown to me in connection with cannabis.
I weighed all the buds individually and came up with a total wet weight of 203 gr. wet weight.
I'll come back after the taste test.😋
➖❗➖❗➖❗➖❗➖❗➖
Update 03.06 24
After 7 days of drying, 40 g of my harvest are now in my humidor for curing.
In each 600 ml jar there are
20g Wurlz and two 4 gram 58% Bodeva packs.
A total of 45g dry has come out of the 203g wet.
I can't wait to see how it tastes when it's ready.

Likes
Comments
Share


@GreeneScene
Follow
Day 15 Update : Decided to grab a tape measure to check canopy heights on a whim and discovered that my light was hanging 35 inches from “Cellie” Cereal and Milk . Wowzers 👀! So I raised the plant to be 26 inches from the light that I also dimmed down to about 40% . It works out that I can try to get the most out of the end of flower stretch for the older gal who shall no more than be mentioned for reference to accentuate the great glorious glamorous “Cellie”.
The humidity plummeted after I did a major defoliation of the older gals so I adjusted the airflow rate of the lower in-line fan and the upper inline exhaust fan with the carbon filter .
I lowered them both to the lowest setting & the humidity returned to “normal”
Let me explain my reasonings/thinking behind my adjustments which are experimental at BEST.
It’s worth also mentioning without having to preset a single thing on my 70pint Dehumidifier located inside this tent it is legitimately only plugged into my PRESET humidistat controller which is set to 50%-46% RH WITH an alarm on highs of 55% and lows of 43% . In real life what this translates to is when this humidity controller triggers the dehumidifier ON @50%RH immediately the fan of the Dehumidifier begins running. However this does not help the rising humidity that is occurring (it will reach 55%-60.2%RH ). Given a fixed amount of time , the condenser(atleast what it sounds like . .again, it could be anything) turns on . It is when this “condenser” “sounding” component begins working that the humidity IMMEDIATELY plummets down to my low point of 46%
So to make a long story short the humidity gets vacuumed to 46%RH & the dehumidifier turns off, bc of the PURPOSEFUL EXPERIMENTAL TWEAKING making all air exchange fans low leveled the humidity slowly but steadily rises to 50%RH then the dehumidifier is triggered on but only the fans initially and the humidity eventually reaches 55%RH-60.2%RH & then the humidity gets all its hair snatched out by the dehumidifier and drops back down to 46%RH.
😮💨😮💨😮💨😮💨 with all that said of anybody was even interested per my tents leaf canopy height temperature average good to great OR LITE GREEN TO DARK GREEN VPD for my temperature begins @ 60 & ends @ 52 which is kind of a perfect storm for OUR GIRL “CELLIE” oooooooorrrrrrrrrrr sssssssoooooo I think/hope .
She still hasn’t needed watering since being transplanted, she should now ready and willing to stretch those toes and we need the opportunities to top water that soil a few times to make those dry amendments available to her .
More pics of later the week coming as we go . . Hopefully . Diligence is a practice
Day #17: giving her some water today, no specific amount just until she feels the right amount of “heavy”. She was given 3 different batches of water once ph’d to 6.3 once ph’d to 6.7 one ph’d to 6.5. She’s grown an inch in 2 days.
Also swapped out the smart hygrometer system to a different brand . So far it has all the capability I was looking for but I need to run 2 more experiments to know for certain it lives up to my needs and its price tag 😁
Day 18 Update: she grew an inch taller nice 👍
The smart hygrometer system has reported/experience Bluetooth failures twice already(although I don’t know exactly what that means considering I purchased this for it’s Wifi capabilities )
I didn’t think to check it whilst I was away so I cannot yet say If it meets my final expectation/need
I bought a soil ph meter & it indicates “my mix” is at 3.1 ph 👀 hmm 🤔 I’m wondering if this is a must fix or can I get by .eventually she will be transplanted and at that time I can use my new digital soil ph probe to construct her new blend moving forward but I am curious is I mixed another batch at 3 something ph would it matter ?
In the beginning I wasn’t ph’ing any of my watering just because I assumed my soil mixture was highly acidic because of the 70ish pecernr peat moss base . I also assumed that it would be acid fixing for the water I put in it and therefore wouldn’t need to ph it and I did just fine just giving plain old tap water when thirsty until I experience VPD issues & in an effort to pinpoint what my exact issue was and how to fix it I of course eliminated all the variables and dialed in on my ph of my feed water and now my soil so it leaves me wondering does the soil need to be relatively 6.1 ph or is the 3.1 I’m flying at alright also . I checked the other 3 currently in here getting through flower & two of them are in the 3’s for ph & one of them is 6.2(the largest of them all) how ever she was the largest of them all always and oddly enough I mixed one big batch for them and transplanted them at the same time so I get two of them having the same ph as “Cellie” but the other that is in ph heaven is an oddball
Should I top her here or supercrop later hmm I need to decide my vision for this thing
Day 19 Update: ponytailed her youngest internode for about 16hrs she aggressively popped out of it twice ! It didn’t even work for 24hrs when I try it again it’ll be before the internode is so strong . Also rigged up a 16in oscillating wall-fan that currently being held with 2 zip ties , 2 rubber bands , & a smidget of duct tape and MAJORITY OF FAITH keeping it in place . The biggest plus to my added circulation is that I got the 16in fan for ! A win is a win . Pics uploads will be held for the next 3 days until the end of week 3 upload .
Drop a thumbs up
Day 20 Update : THE FAN FELL! But no one was damaged or injured . I re-rigged it . This time with duct tape , 3 popsicle sticks , 2 heavy duty zip ties & 1 regular strength zip tie . SHES SOLID NOW 😂 I did some solid rigging this time & have videoed my handy work .
Also I forgot to turn my A/C back on before leaving the house so temps and humidity skyrocketed and swung for 9 hours until I got home . The temp in the tent was 84.4 and the humidity went from 42.4 to 57.5 to 42 every three mins.
Day 21 Update : SHES A PRETTY GIRL. RQS says Cereal Milk is a slightly sativa dominant hybrid but the pheno of this particular seed seems to lean more towards indica I’m not mad at it ! I’m getting more stoked to see what she can do. She still hasn’t received any additional water since day #18.

Likes
16
Share


@Sur_cannabico
Follow
Partimos la segunda semana de floración de nuestras green gelato de Royalqueenseeds! Alimentadas con Nutrientes quemanta e iluminadas con el #spectrumboard de 75w de heavengrowligths. Ya notamos el desarrollo de las primeras flores, aplicamos los nutrientes específicos en la dosificación recomendada para la semana en la que va 🤟🏻
Likes
72
Share


@Tripaholic88
Follow
The video is for WEEK 7 NOT Week 8 guys i cannot edit it for some reason. Regardless FB#1 is still flushing and i plan on harvesting her on day 60 i believe. FB#2 is about 2-3 weeks behind her and still putting on weight! check out the video!💪👌


Likes
4
Share


@Pokerdud
Follow
Den Bericht werde ich erst später fertig stellen. Entweder heute noch oder erst morgen.
Die Buds sind noch im curing und haben 12-16 Tage drying hinter sich.
Likes
25
Share


@Kakui
Follow
Veg22, riego con 3.0 EC y pH 5.9, drenaje promedio de 5.8 pH y 2.6 EC(muy bien), primer riego con Sensizym para limpiar un poco las raíces, y este será el último riego de vegetación con Voodoo Juice, Tarantula y Piranha.
Se hizo una pequeña defoliación de las hojas abanico más bajas y se volvió a ajustar el LST, ya van tomando la forma final.
Veg23, creciendo bien.
Veg24, se mide la temperatura de las hojas 22°C y se compara con la temperatura del indoor 23°C, con una humedad de 50% RH, la calculadora arroja un valor de VPD=1.24 kpa, lo que está dentro del rango óptimo.
Veg25, hoy toca una pequeña defoliación y probaré también hacer un último apical en 2 o 3 plantas a modo de prueba.
Al final, tomé un gran riesgo, y hice varios apicales extra y una defoliación más grande de lo que tenía en mente, tengo fe que resultará bien 😎👌
Veg27, riego con 0.8 EC y pH 6.0, drenaje de 6.0 pH y EC 2.0, se están alimentando y creciendo bien, quedan casi 2 semanas para pasar el fotoperiodo a 12/12, espero que crezcan suficiente para esa fecha.
Veg28, un par de hojas de 2 plantas presentan mordidas tipo oruga, revise y no encontré nada, aplique spray insecticida, espero no siga pasando. A parte de eso siguen creciendo bien, quedan un poco más de 10 días para el paso a 12/12.


Likes
145
Share


@Salokin
Follow
Hello Growmies,
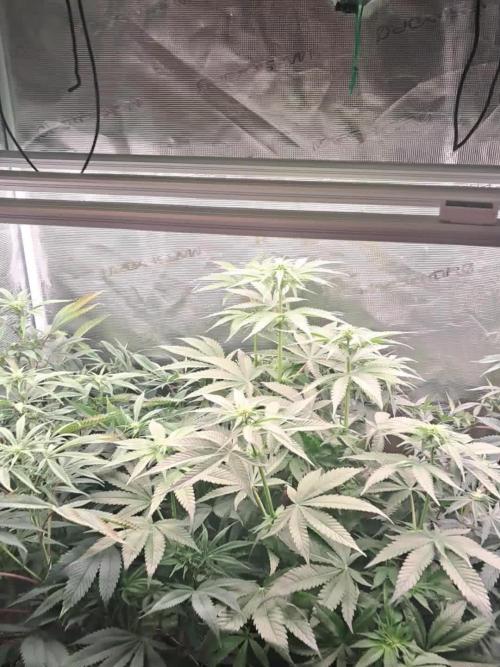
Week 16 unfolds with a sense of closure and accomplishment as we approach the final stages of this remarkable journey.
Throughout the week, the plants have undergone a meticulous flushing process with RO water, purging the last remnants of nutrients from the soil. This intentional cleansing is met with a positive response from our plant, as she gracefully transitions into the closing chapter of her life cycle. The effects of the flushing are vividly apparent as she starts to reveal her autumn colors. A captivating mix of purple and sandy brownish hues is painting her buds, creating a visual symphony that signifies the culmination of her growth.
In assessing her readiness for harvest, the trichomes provide valuable insights. The presence of approximately 10-15% amber trichomes suggests that we are nearing the optimal moment. However, a few scattered white hairs indicate the possibility of a slightly early harvest—perhaps by a mere couple of days. As we witness the plant's response to the flushing process and the emergence of autumn colors, it's a poignant moment to reflect on the entire journey. The care, attention, and shared experiences have converged into this final phase of growth.
In the coming days, we'll carefully monitor the trichomes and continue to observe any changes in her appearance. The anticipation for harvest is palpable, and every detail is scrutinized to ensure a perfect culmination.
I want to express gratitude to each of you who have joined me in this journey—your observations, enthusiasm, and shared joy have made this grow truly special.
Stay tuned for the next entry, where we'll delve into the harvesting process and celebrate the fruits of our collective labor.
Likes
7
Share

@Grow4ever
Follow
Die Girl Scout Cookies verläuft in der vergangenen Woche insgesamt unauffällig und stabil. Erste Blüte- bzw. Vorblüteanzeichen sind vorhanden, womit auch sie sich im Übergang in die frühe Blütephase befindet.
Im Gegensatz zu den anderen Pflanzen zeigte sie bislang keinen nennenswerten Stretch. Das Höhenwachstum blieb moderat, die Internodienlängen haben sich kaum verändert. Die Pflanze behält dadurch ihre bisherige Struktur.

Likes
9
Share


@crystal_garden_0
Follow
End of week 7. Everything is going great. Strong Candy smell, very sticky dense buds. Looking forward to smoking them. Fast plants, flushing has begun. Thanks everyone
Likes
422
Share


@Crashoverite
Follow
Hi everyone 😁
Welcome back on another week update.
If you interested to see the full week update. Please revisit this journal as will be posting daily updates.
Thank you for such a great support 😊 me and my🍌💜👊 girls loving you all 💚💚💚
So far everything is going great. Girls are healthy and happy. This week I will be increasing nutrients, continue with leaves tucking and perhaps will install scrog net by the end of the week.
Wishing you all a wonderful week ✨🍀✨
06/11 day 29
Watered 500ml each pot and sprayed with water and fish mix solution.
08/11 day 31
Girls started growing faster. Good few cm in to all of the directions in one night. Watered again with 500ml each pot as belive that they need just a bit more time for the first runoff experience.
11/11 day 34
It was a Spa day for the 🍌💜👊 girls.
Full package;
1st - removed 7-10 fan leaves from each girl.
2nd - LST on few longer branches
3rd - shower with fish mix and water solution.
4rd - Watering 500ml for Athena and approx 300ml for Xena.
12/11
What a great and a bit busy week with my girls. Perfect response on yesterday selective defoliation and stretching. No signs of any stress. Girls are strong 🍌💜👊💪
So far I am very pleased how this grow going 😁
Thank you all for such a amazing support 😊💜
Peace and love brothers and sisters ✌️💚
Likes
5
Share


@Drtomb
Follow
Plants are looking awesome. Skullcap is extremely frosty, the whole tent reeks and no hiccups. I've noticed that the (14) pineapple express #2 seems to be less dense of a bud cola, its looking like the (15) Pineapple express #2 is the better version. If it doesn't tighten up this one's out of the running. I already got rid of the skullcap mom, great quality, but not the quantity I wanted to see.


Likes
23
Share

@MyWetPussy
Follow
The plant was harvested on the 73rd day. It was hung not as a whole plant but by separate bud sites. Bud sites had the larger fan leaves removed before the drying process. Temps for the drying were 62F 55%RH for 10 days. She then had a quick cleaning of sugar leaves and jarred for cure. Final report will be coming shortly.😍
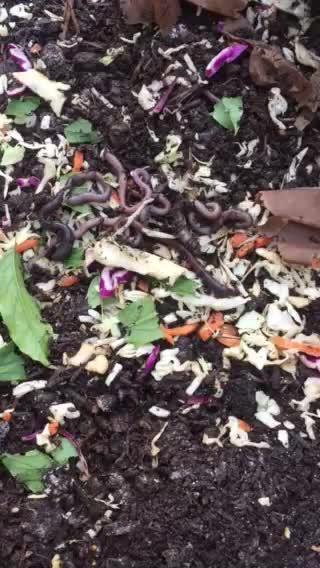
Final report: (Smoke report not loading comments) After months cured in a jar I rolled up a joint and smoked it. It had a nice smooth smoke with the flavor of vanilla cake/cookie . She also had a hint of citrus. After the harvest was done I prepped the area for next year's outdoor grow. I will continue to prep the area for the next few months by adding goodies to the area to bring in the worms.😍
Likes
13
Share


@DrewbieDoobieNoobie
Follow
1st week of flush is done the expected results is the fade, this ladies are coming to the end of their cycle. one more week of just water, I will flush again on 2/1 then let them dry out in the pots for the last week 13. When they are dry I will black out for 48hrs to increase the Trichomes and then the chop. they look to have slowed down in growth from the time-lapse I don't think they will get significantly bigger than they are now. so I hope the flush will help with the smoothness and curing and white ash as a result.


Likes
6
Share

@Chef_LA
Follow
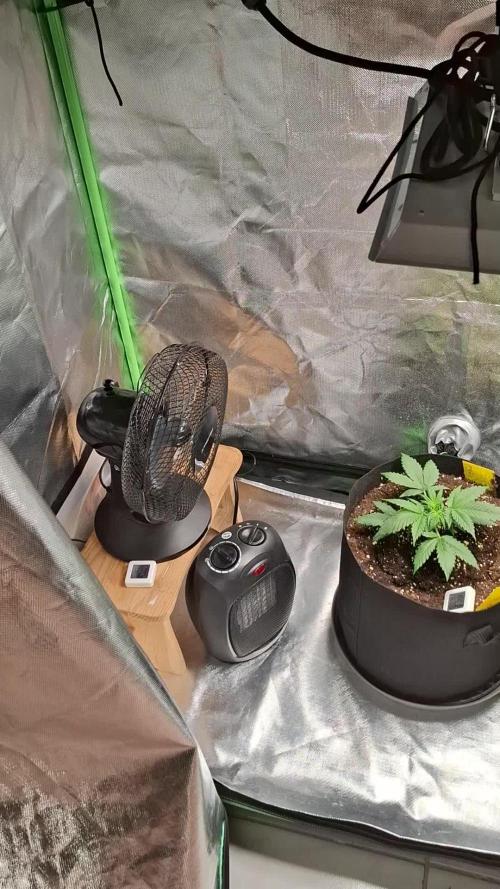
Die Pflanzen sehen zwar gesund aus aber sie haben fast kein Wachstum 🤔. Ich weiß wirklich nicht was da schief läuft. Habe schon mit der Lichtstärke experimentiert aber weder etwas mehr noch etwas weniger brachte eine Veränderung.
Für Anregungen oder Tipps bin ich offen und würde mich freuen von euch zu lesen.
Am Gießen, Dünger oder der Temperatur kann es nicht liegen. Hatte schon öfter Automatics mit dem Setup.
Likes
1
Share

@TTerpz
Follow
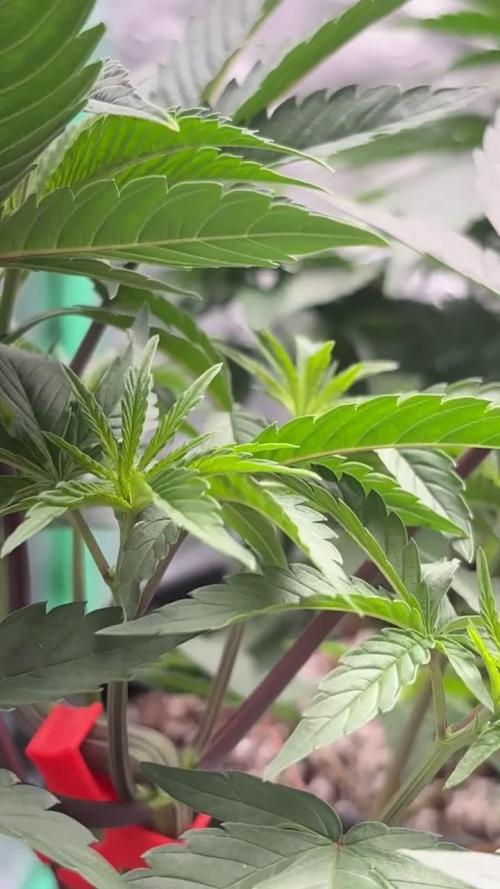
Start of week 4
Fed w nutrients: 7/11/25
Fed with water 7/13/25
Fed with nutrients 7/16/25
Likes
21
Share


@Whitebelt
Follow
Week 8 - second week of flower
One plant is much smaller - still not confident on sex of any of them ... maybe that small one is a male - I’m guessing they’re all female tho. Either way i may need to slaughter that little guy - the other plants are just overtaking the tent - might not be worth keeping that little one in there.
Update 6/5/19 - I’ll take some updated pics tomorrow - I’m 95% sure I have FOUR out of four female plants.
Just picked up some yucca to try - and I got some more led hangers so maybe I’ll upgrade the lights today - the rapidLED far red flower initiator isn’t coming until Wednesday unfortunately but I have two more SolStix I could add.
Update 6/5/19 - far red flower initiator and the two (now 4) solstix are installed - I need to make a simple aluminum frame - maybe this weekend
Picked up some 29% H202 to clean the rez tank and pumps and filter etc (not to put in the nutes for the plants tho!)
Got a better air pump and airstone for the rez.
New Vivosun oscillating fan - wtf!? Made for grow tents but can’t turn without stopping on the sides of the tent!? - I emailed them maybe it’s defective.
Likes
2
Share


@GanjaNesh
Follow
I decided to give the Girls one more veg week while i tried to gently adjust the ph. Although just managed to achieve a 7.5
Plants are getting bigger and I have limited space so they are going to flowering anyway.
Guess the ph was high due to dolomite lime I added when measuring with unclaibrated ph meter and got misreaded 5.5ph
I plan to add some bokashi and worm castings aiming to get to the 6.5 ph.
Girls are looking fine only some leaves yellowing thanks to the ph locking some of the nutes.
