The Grow Awards 2026 🏆 


Likes
Comments
Share
@greencultivator
Follow
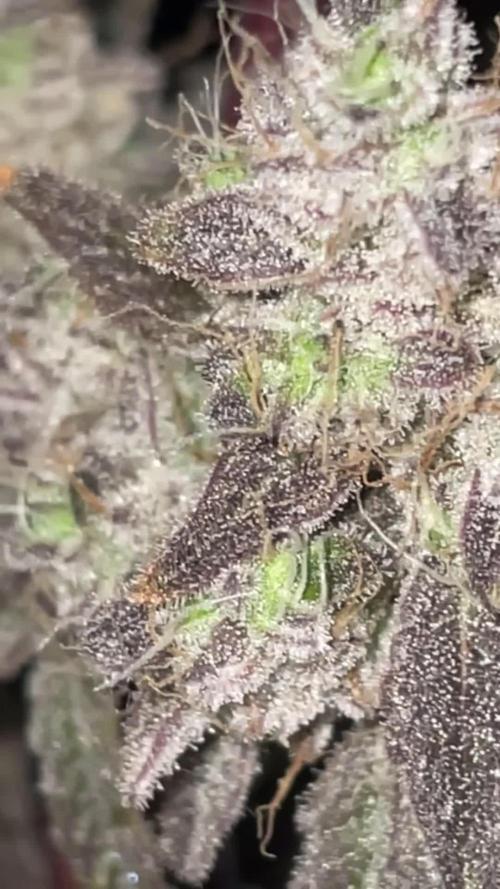
Die Terpene entwickeln sich sowie die Trichome. Buds schwellen weiter an.

Likes
17
Share
@laurenceofarabia
Follow
I'm extremely happy with how she's turning out, I want to give her another week, ideally 2.


Likes
36
Share
@Ganjagrandaddy
Follow
UPDATED ENTRY DAY 64-THE CULL:They have finally finished. After waiting very patiently and thinking this would go on forever, these fruity little beauties are done. I have now put them into the dark for 36 hours before I chop them and hang them for a low and slow dry ( approx 10 days at below 19°c and rh 50%) . I haven't used the Harvest option as I want to be able to complete the information correctly without going back and using edits. They have been a brilliant strain to try for my 1st ever auto run and I will definitely be on my list again if I do another. Their small stature and finish time are better suited to a more natural grow and mild lst for lights penetration i.m.o . I am looking forward to seeing their final yield as they feel rock solid on the big stemmed girls.
Will do a full report once I have a final harvest to add. peace and live folks , see you on here in about 2 weeks total.
63: I thought these would be finished at this point but from close up inspection with my loupe , we still have mostly clear trichs in the house. Their overall look is amazing. opening the ten teach day and seeing them standing proud with their beautiful colours is a blessing. I love this strain for appearance and if it smoke like it looks , I will be a happy life long fan.
#1 Is feeling nice and tacky when i touch her but also has a greasy feel too. she smells amazing of sweetness and definitely berry. Her size wont break any records but if I grew them again I would leave them to grow their normal height as #3 is.
#2 is the nicest looking for size of them all and has me just staring at it when I get the chance. They are so close to the end now and it is killing me waiting.!!!
#3 Is the girl left to grow after her very pale start and veg period sonos the tallest structure wise .She doesnt have weighty buds like her sisters but certainly looks good now.
I think it is their last week now for sure.

Likes
34
Share
@Southwest_budders21
Follow
Candyman is now 99 days old!
Day 49 of flower and they are looking unbelievably beautiful and smelling crazy strong. I am aiming to do one more feed and then a 7-10 day flush if they are all ready anyway. I really am gutted i couldn't take cuts of pheno 3 😭 all in all I'm super happy with this run.
Update: day 53 of flower and they just look unbelievable 😍 nearly time for a 7-10 day flush. I've now lowered the light intensity for the final weeks
Likes
9
Share
@Colo420
Follow
Buenas buenas! Acá arrancando semana, ya lavando estos cocos para cortar próximamente...
Las primeras fancy ya las corte y están secas, en proceso de curado


Likes
24
Share
@BelSun_420
Follow
First let's prepare the soil.
My mixing is done by eye, I don't use measurements to mix the products. I've been using the same products for a while now, so I'm used to seeing the texture and color of my soil to know when it's good. (sometimes I make it up too and it might not go so well😏🔥)!
First time trying Mammoth p , Myco Chum and Companion plants.
-------------------------------------------------------------------
Pound Cake Auto :
THC- 28%
Type- Hybrid
Smell- Very Strong
10 weeks S to H
S = 02/08/24
Banana Purple Punch:
THC- 30%
Type- Indica
Smell- Moderate
8 weeks S to H
S = 02/08/24
(FAILD) Sour Jealousy Auto:
THC- 29%
Type- Sativa
Smell- Strong
(REPLACE )
LSD - 25 Auto:
THC - 21%
Type - Indica
Smell - Strong
10 weeks S to H
S =10/08
-------------------------------------------------------------------
-------------------------------------------------------------------
Likes
4
Share
@ArtisticGrown
Follow
Hello I hope we are doing good. It's been one heck of a week for me. So turns out we have one female! Yes sir 👏
Feeling good about that! I've kept the other 2 olants outside for the whole week. Keeping em in the shade bout half the day. They have transitioned well.
In the moment my 2x2 is in use. But once it's not I'll be utilizing it. Puting one of the Diamond Belle males in the tent to allow him to flower.
I'll do what I can to get a pollen harvest for yall!!! I think that'll be super dope! Lotta hard work. But we got this! Loving ebery moment learning a lot a lot over here.
I'll keep the lady in the 4x2 for the rest of bloom ✨️ away from the males aiming for the precision quality 👌 as always.
Hit up cha boy "Nate tell em I sent cha @ beanpatchseeds.com & get chu some beans he's got a fire line up on them feminized seeds. Also da cbd strains if you're interested.
Happy growing
Likes
2
Share
@el_cultivito
Follow
Just picked this little lady up from Dr. Greenthumbs in DTLA. It's a Magic Melon Auto started by Dark Heart Nursery on 2-28-20.
Current set up:
- Vivosun grow tent (36x20x62)
- Mars Hydro TS 1000W LED
- Vivosun 4in Inline Fan & 4in Carbon Filter
- Oscilating Fan 4in
This week's training: LST Tie Down
- Tied down the top to be at the level of the next node to channel the auxins to the lower nodes and start widening the canopy

Likes
20
Share
@Robin87
Follow
Same as there big sister, 54th day of flower.. These plants haven’t had any work done what so ever, not one leaf has been removed from the start, no folding of leaves, literally just left to flourish in there “natural” environment, and I couldn’t be more happier with what’s inbetween the “mess”😂.. buds are swollen and ❄️, stinking of 🍋.

Likes
5
Share
@Stick
Follow
So far so good! She didn't get affected by mold whereas two other plants in the room started to show bad signs, I lost two tiny colas but this GBK is safe. Colas are getting almost as big as a soda can. It seems that the foxtailing has stopped so I guess my quantum board was too close, dimming the driver down was the good thing to do. Stay tuned! 😎

Likes
45
Share
@AsNoriu
Follow
No training, just hope for them to deliver.
Day 57 . All is good, small doubts about FD3 but she has to make it or bin it ...
Future looks brighter, other girls form some buds and 50 g is looking achievable at least on couple of them ;) Future will show ;))
N went down as feed chart, still no huge hopes from them....
Some leaves look hungry, couple redish stemps with mini Mag def on FD and thats all for now....
Day 58 Morning. Girls starts to love it 4 sure. Droped down temp by 2 degrees from 28 to 26, they liked it even more. Hope it will stop pistils going amber in begining of flower ...
In the midle of the day all will get molasses and cal mag, leaves a bit too bright, hope molasses will boost bacterias and last bits of N will be used. Increasing level of Top-Max aswel.
So feed looked like :
Heavy feed
Water with silica
Water
Water with molasses and CalMag
At the end of the week they will get heavy feed again.
Day 58 Evening. New attack system ;)) instead of 2-3-3 , girls regrouped into two heavy rows and now go like 2-2-2-2 ;))))
Girls are drinking really fast, still get only around 1.5 liters every second day. For auto i quess its ok. In couple hours afer feed they pray, so its a good sign always ...
Day 60. Heavy feed day, they started to bulk up everyday, really nice to see them everytime.
Day 61. They are bulking up. Thats all i have to say and i really really like it ;)))
Day 63. End of week. Everything looks fine, just i really would want to defoliate them a bit, but dont want to stress at the same time. They look too sensi for me.
All 3 FastDiesels started to show Mag def even on stemps, gave stronger cal mag water mix just for them. They need it often and a lot.
Happy growing !


Likes
4
Share
@KannaGrowing
Follow
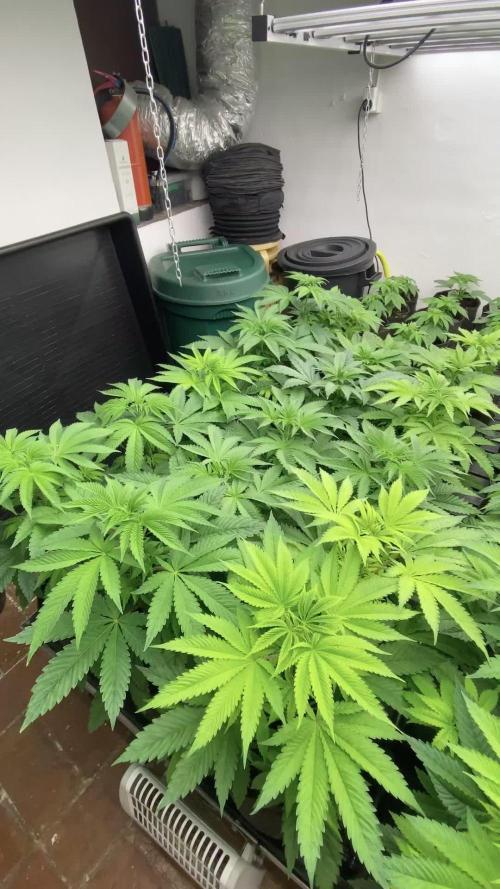
Ha llegado el momento de pasar a la fase floración.
Ajustamos nuestras luminarias LazerLite Pro 720w a 12 horas y subimos la potencia al 50%.
Seguimos con riegos alternos de fertilizante y agua.

Likes
3
Share
@High_Grade_Dadli
Follow
Lil younging coming good towards the end of the week jus decided to send dem to flower...get a lil smoke and allow the mother to continue do their thing until cut day...other than that everything is going accordingly also got back 1 of the plants that I had sent on a breeder project she's full of pollen sack now(female chromosome only) should have some feminized seeds once all goes well...gonna double up the breed and also do a


Likes
6
Share
@EKWCR
Follow
I attempt to do an early SCROG but the plants are already too rigid for that, so i will train the branches and the trunk slowly to soften the tissues.
My objectif is to do a U SCROG.
Likes
Comments
Share


Likes
9
Share
@Budking420
Follow
This lady is amazing shes facebook famous now too over 34k likes. Really enjoying this grow it was a pleasure. I believe she is ready but gonna push her through for another day. I've got a ton of stuff hanging now so I'm not in any rush & I enjoyed this run. This is by far my most popular diary & plant for that matter. Check back next week to see just how fast she dries & cures. Always remember its 4:20 somewhere!!!!


Likes
25
Share
@crystal_garden_0
Follow
Great week. Everything is going amazing. Plants have gotten huge in size. So far biggest auto I have grown, hopefully all goes well. I'm smelling lemon starting
Likes
10
Share
@Cannabeast40
Follow
Week 3 and a repot is done and now in day 3. Finally it’s settling down after the repot, which was not pretty at all😂
Hope to get some massive plants this run 🌱
________________________________________________________________________________________
Light from @MedicGrowLED 😎
NEO 780 LED🔥
780 Watt⚡️💥
PPF of 2184 μmol/s & 2.8 μmol/J🔥
Full Spectrum V1/F1 🌈
WiFi smart connection & Smart Aura Control 😱