


Likes
Comments
Share


@Foxbud420
Follow
Short Update:
tommorow i will lollipoping them and a light defoliation. Next week i will do more defoliation.
Next week i will post more. I show the cut from tommorow // the the aktual state after the cut.


Processing
Likes
15
Share


@Mcdiggley420
Follow
Lost 1 Blueberry to heat stress i think, another blueberry got a bit bleached. Photos are from start to week 2 8 days old.
Gsc slowly coming to life that's maybe 4 days old.
Lemon auto 3 taking a slow start other than that it's going good gonna introduce some nutes later on in the week.
Day 10: plants got a small dose of monster grow pro and bio silica massive growth over night adjusted my light to 18" to get 400-600 ppft hopefully see some huge growth from now on


Likes
Comments
Share


@Nobody1991
Follow
It is a vigorous plant with very uniform branching, high resinous and high yield, if you grow from seed there are a few different phenos that I got, equally as good
Likes
23
Share


@Sators
Follow
🌱Day 64.💚
🌱Day 66.💚
🌱Day 68.💚
🌱Day 70. Hot reason why in UK most grow tent heat up, my grow tent temperature reach already 36 degrees. O lalaaa…I will get experience…😆💚




Likes
37
Share


@iMpulsive_Grow
Follow
Day 43!
I’m so happy how well they are doing as my first growth ever. A lot of research is key 🔑 lol
Day 44!
In the last 2 days I don't know what happened but they jumped 1.5"-2" in height. CRAZY
Also started to defóliate more as I approach week 8
Dat 45
Readjusted the lights, since they’ve grown so much since I messed with them.
Day 46!
The video speaks for it self 🤗🤗
Day 47!
2 more days than switching to 12-12 schedule
Day 48!
Couldn’t be patient and started 2 days earlier the 12-12 schedule, since they looked ready, and....... she grew from 15” to 18.5”!
Day 49!
This concludes this week 🔥🌱😌


Processing
Likes
13
Share


@GrowGuy97
Follow
Day 3 of flower & these ladies are stretching great! We are having a bit of a calmag Deficiency right now but currently in the process of trying to fix it so hopefully they bounce back! The Gelato OG from seedsman is a monster to only be 42 days old not sure if I just got a good pheno or what happened but compared to the other gelato beside it from the same bag it looks like a completely different plant! Can’t wait to see how the buds turn out! Happy growing friends!✌️🏼🙏🏼
Day 4 of flower - recharge water at 6.5
Day 5 of flower - ladies are really starting to fill out & stretch, can’t wait to see how this run turns out✌️🏼🌱
Day 7 of flower - Not much to say everything is going great so far! Thanks for following & happy growing friends✌️🏼🌱
Day 8 of flower - They are all stretching & growing so much everyday! Couldn’t be happier so far!👍🏼🤙🏼
Day 9 of flower - end of week 7 things seem to be going great so far, fingers crossed we can keep it this way through harvest! Happy growing friends & thanks for watching!✌️🏼🌱


Likes
1
Share


@Green_Peace
Follow
Added Buddy into the feed halfway through this week. Really impressed with these nutrients so far. All plants look happy, healthy and green.
Likes
19
Share


@Woodcutter
Follow
Recovery ,recovery, recovery. Drowned them with nuts @1400 ppm. Hot for a hot soil mix. Soil mix was missing something different that 3 of the strains were needing.
I dropped the bomb on them, defoliated the hell out of them and lst . Dark Devil no lst.
Let the nutrients set 2 days and flushed with RO testing run off and ph. The plants that weren't showing to much signs of nutrient burn flushed with sledge hammer back to around 1200 ppm 6.5 ph. Plants with burn flushed back to 600 ppm wattered with dechlorinated tap at 7.0 ph.
Finally the seeds man white widow and the gg#4 started into flower.
The kera white widow
and the critcle purp are loving the environment and nutes.
May have to flush the Dark Devil a little more or full flush it. Still showing signs of nute burn.
Over all happy with the grow. I definitely know what each strain likes and what they dont.
I'm keeping a physical journal on each for future grows.
Lessons learned:
For a first indoor grow and a first auto grow, it would have been easier to select hybrids that were close in their sativa/indica ratio.
Sativas are sensitive temperamental little girls.
Get a dehumidifier so the room or tent can be contained with less co2 loss for summer.
Ventless blue flame wall heaters work great in the winter for heating the room and creating plenty of co2.
Running a test grow with 6 plants when your home only 40 hours then gone for 3 days is fun insanity.


Likes
24
Share


@eh_eh_eh_buds
Follow
so were almost at harvest, have begun flushing this last week and hopefully will be chopping beginning of next week, then the cure... CAN NOT WAIT TO BUST UP SOME OF THESE NUGS AND PACK THEM IN THE BON 😆


Likes
27
Share


@TheCannaProphet
Follow
~ FASTBUDS TESTER #2205 ~
Well friends, here we go on another 'canna-venture' together!
The grow room has had a complete remodel and some upgrades done to it including brand spanking new 4x8 and 4x4 tents and a Trolmaster Hydro X controller along with a new Control Panel.
This tester strain is one of six tester strains that FastBuds has graciously provided me with and I'm looking forward to seeing what this girl has to offer when she's grown to her full potential!
One drawback of 'testers' is I have little to no information on it other than its number and that it's an autoflower... 🤪 But, it's ALWAYS a blast growing them for me because not knowing a lot allows me to just concentrate on the essentials: Light, Environment, Water, Nutrients and possibly a bit of LST... not complicated, just basics like keeping a constant temperature and RH in the tent at a level that gives a good VPD, watering when almost dry and maintaining proper light levels according to their stage of growth.
____________________________________________________________________________________________________________________________________________________________________________________________________________________________________________________________________________________________________________________________________________________________________________________________________________________________________________________
~THE SETUP~
~Initially seeds were lightly scuffed, then soaked for 3 hours in 78℉ distilled water after which they were transferred to moist paper towels laid out in a Jiffy Pellet plastic starter tray with lid. Underneath the tray was placed a Mars Hydro Heat Mat with Controller that was set to 78℉ where they stayed until their tap roots emerged.
~Planted into Jiffy Peat Pellets that were hydrated with distilled water warmed to 78℉ with a 7.0 ph.
~Once roots emerge from the Jiffy Pellet they're transferred to their fabric pots.
~Grown 100% organic in a 4g Gronest fabric pot and a 3g fabric pot by Wraxly filled with Mother Earth 70/30 Coco/Perlite medium and initially amended with Dr. Earth 4-4-4 / Earthworm Castings / Dr. Earth Flower Girl 3-9-4 and Coast of Maine Stonington Blend Organic Plant Food 5-2-4.
~19/5 light cycle for the entire run with supplemental UVA added during flower. Lights are controlled by a Trolmaster Hydro X controller set for a 15min Sunrise/Sunset simulation.
~Top dressing every 3-4 weeks with slow release dry amendments and Earthworm castings.
~Straight water ph'd @ 6.2-6.8 when needed and bi-weekly Compost Tea's.
____________________________________________________________________________________________________________________________________________________________________________________________________________________________________________________________________________________________________________________________________________________________________________________________________________________________________________________
Weekly Updates:
12/1- I soaked both seeds for 3 hours in 78℉ distilled water after which they were transferred to moist paper towels laid out in a Jiffy Pellet plastic starter tray with lid. Underneath the tray was placed a Vivosun Heat Mat with Controller that was set to 78℉ where they stayed until their tap roots emerged which usually takes roughly 24 hours. These seeds however didn't follow the rules and took their fine time to pop out their tap roots.
12/3- Today their tap roots were about 1/4 to 3/8" so at 11 am I transferred them into Jiffy Peat Pellets that were hydrated with distilled water warmed to 78℉ with a 7.0 ph using a tine off of a plastic fork as a 'mini trowel' to make a hole in the pellet and to gently cover the tap root, leaving only the seed head slightly exposed. This method accomplishes most of the initial work the seed has to do by eliminating having to orientate itself, push it's root down and head up. By 10pm the #1 seed had her cotyledon leaves opened ...waiting on the #2. 🧐
I was concerned that one of the seeds may fail as she took so long to germinate so I soaked two more as an insurance policy. Naturally, BOTH of the second set of seeds popped their tap roots within 24 hours. One of the first round seeds failed to germinate which left me with three viable seeds, one in a pellet already and two showing tap roots. I planted both of the second round seeds into the same peat pellet that I had previously soaked.
12/5- Well this is Day ONE for the #1 FBT #2205 and I anticipate seeing one or both of the second round poking their heads out real soon! I'll keep them in the covered/heated Jiffy tray until I see their roots beginning to emerge from the peat pellet, then I'll transfer them gently into their respective fabric pots. The #1 will be going into the 4g Gronest pot from FastBuds and the #2 will reside in a 3g pot by Wraxly, which I'm trying out for the first time.
12/7- Yesterday I checked the #1 tester and she had roots starting to emerge from her pellet so tomorrow I'll transfer her into her 4g Gronest pot.
The second round seeds finally made an appearance and I decided to yank the smaller of the two keeping me from having to stress them when I separated them.... this will be Day One for the #2! She looks really healthy and I'm confident that she should be ready to transfer into her fabric pot in the next couple of days!
😎💚 Thank you for checking out my passion in life! Please visit as often as you wish and I hope you enjoy this journey as much as I know I will! Grow Strong! 💪😎🤙
Likes
16
Share


@MrGoonai
Follow
07/06/2025 - Day 98
Short Facts:
- 86 cm tall
- VPD @ 1.0
- Approx. 900 PPFD
- Fungus gnats still there
- Thrips seen
------------------------------------------------------------------------
Sorry for not updating the diary over the past few weeks. I had a medical emergency in the family, which caused quite a bit of chaos.
There’s not much to report — her flowers are getting bigger and bigger. The smell is really special and intense!
It looks like senescence is starting. She has lost some color in her leaves and is now turning more yellow. Just to be safe, I added a small amount of Epsom salt.
And of course, there are still problems:
The fungus gnats are still around, although there are far fewer than before. I’d say their numbers are down by about 80% compared to the peak, so at least some progress has been made. I’m still fighting them and have ordered more predatory mites.
Unfortunately, I also noticed some leaves that didn’t look good, so I took a closer look. The result: I found thrips on both plants. It doesn’t look like a full-blown infestation yet, so I hope I can get it under control. The predatory mites should help, and I’ve also ordered some green lacewing larvae to support the fight and hopefully wipe them out.
This whole situation is really frustrating. I recently had to deal with thrips on one of my biggest Alocasias, and I’ve been battling a persistent aphid infestation on my largest Dieffenbachia for weeks now.
I’ve never had this many issues with pests before.

Likes
269
Share


@JohnnyBlaz3
Follow
WOW!!!!!! I did it!! or should I say WE did it! I cant believe I turned 3 little seeds into just over 27oz, theres a little not in the jars...... I'm just blown away by the look of this cannabis. For a sativa this looks just incredible!!! The crystals are just CAKED and handling just the slightest caused the worst sticky fingers.
I have learned to incredibly much my first grow I'm very excited to put my experience to use on the 2nd round here. Which will be all AUTOS!!! This should be fun indeed.
Shout out to the fam (you know who you are) and thank you so very much for all the help and taking the time to comment. There's so much info in this diary I'll be referring newbies to it for sure in the future as a reference.
I'll update in about a month when the true smoke report comes but I cant wait to post this!!!
THANKS EVERYONE WWOOOOOOOTTTTTTTTT WOOOOOOTTTTTTTTTT🙌🙌👏👏👊👊👊😵😵😵


Likes
2
Share

@Weedbuddy420
Follow
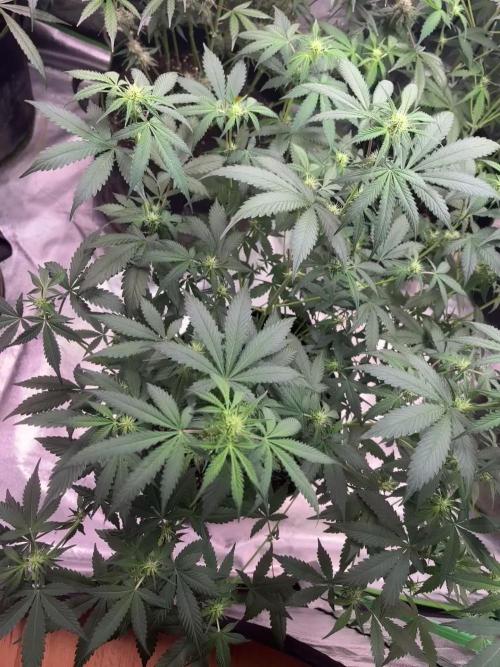
Diese Woche wird die Pflanze ein Lollipopping unterziehen, damit es weiter intensiv in die Blüte gehen kann
Likes
2
Share


@Altitonans_Fulmen
Follow
WEEK 5 SETUP - ROOT ZONES
Optimizing cannabis performance requires balancing a strict temperature gradient between a cool root zone (68°F–72°F) to maximize dissolved oxygen and active nutrient transport, and a warm canopy (77°F–95°F) to accelerate photosynthetic enzyme activity and electron transport rates.
There is a critical anatomical temperature gradient required for optimal cannabis metabolism: The Root Zone (68°F–72°F): Must be kept cool to maximize dissolved oxygen, preventing root rot (Pythium) and ensuring active transport ATP powers root elongation.
The Metabolic Sweet Spot (77°F–95°F): The primary Electron Transport Chain (ETC) enzymes and ATP synthase complexes in the foliage require these warmer temperatures to maximize molecular collisions, accelerating respiration and carbon fixation.
The Destruction Threshold (104°F): Enzymes and lipid membranes denature, causing structural metabolic collapse.
Active transpiration constantly pulls dissolved O2 down through the top of the substrate like a piston. At night, the top-down pump completely stops. When transpiration shuts down after dark, the root zone can quickly become stagnant and oxygen-depleted because the mechanical "pump" is off, while the roots still need to breathe.
Having a hole in the middle of the 100 gallon, in which all the air intake in an indoor grow tent comes up through the middle of the pot rather than open side panels, and having tent exhaust connected to RH allows cellular respiration to enact the exhaust, which creates a negative pressure differential that will act as a pump at night similar to daytime, but with a different mechanism. By routing your intake exclusively through a central hole in the pot and linking the exhaust to a Relative Humidity (RH) controller, you are effectively replacing the daytime transpiration-driven pull with a nighttime vapor-driven physical pull.
Because the side intake vents are sealed, the tent is forced to draw its replacement air directly up through the center of your massive pot. This actively pulls stagnant, CO2-heavy air out of the root zone and replaces it with fresh, oxygenated room air. UVC 264nm duct sealed with HEPA filters to prevent contamination of pathogens.
Constant airflow of 0.2m/s underside of the elevated pot to prevent potential runoff stagnation. Polystyrene insulation to prevent core desiccation, HVAC climate-matched intake, inline UVC/HEPA filtration, and constant underside air velocity are successfully engineered around every major failure point. Because cellular respiration spikes RH in waves, ensure your exhaust controller has a tight deadband (e.g., +/- 2-4% RH). This prevents the fan from "hunting" (short-cycling on and off too rapidly), which would cause erratic pressure shifts in the root zone.
Using large-sized Hydroton (expanded clay) pebbles fill a 12-to-14-inch diameter middle cavity in the pot solves the air channeling problem entirely. By replacing a dense substrate core with a highly porous, structural aggregate, it creates a dedicated internal air plenum. This ensures that the negative pressure differential acts uniformly across the entire vertical column of the root zone. Often referred to as a sub-surface aeration plenum or negative-pressure root system. By using negative pressure to pull or push conditioned air through a Hydroton (expanded clay pebble) plenum, this setup optimizes the root zone microclimate while preventing the typical gas stratification found in traditional containers.
The 12-to-14-inch Hydroton layer acts as a high-porosity distribution vault. Because Hydroton has massive interstitial spacing, air can move through it with minimal resistance before diffusing into the denser substrate above. Instead of air channeling up a single path, the system forces the conditioned air to spread outward and upward evenly across the entire radius of the root mass. Roots actively consume Oxygen and respire Carbon Dioxide (CO₂). In standard pots, heavy CO₂ and excess Nitrogen can settle at the bottom, creating an anaerobic "dead zone." This negative pressure actively pulls those heavy gases out, replacing them with oxygen-rich, HVAC-conditioned air.
Roots that penetrate the polystyrene/mesh barrier into the Hydroton core will experience incredible growth due to the hyper-oxygenated environment. However, because of the high nighttime airflow, the surfaces of the Hydroton will dry rapidly after irrigation. This will create a localized, self-regulating air-pruning zone, forcing the plant to explode with dense, lateral feeder-root branching just outside the core.
Turns one's massive pot into a bi-directional, lung-like matrix. Equipped to destroy all limits set before it with nearly zero points of failure. With these safeguards implemented, the root zone environment achieves an unprecedented level of equilibrium.
The plant drives the system. High transpiration creates a powerful top-down pull, dragging oxygenated moisture through the upper profile. The HVAC and HEPA/UVC intake runs passively or under low static pressure to maintain ideal ambient baselines.
Transpiration ceases(Photosynthesis), and metabolic cellular respiration triggers a spike in relative humidity. The RH controller instantly fires the exhaust fan.
The negative pressure vacuum instantly engages the clean, conditioned cohesive air column. Fresh air sweeps through the sealed duct on the underside of the buffer zone(pot), enters the 12-to-14-inch Hydroton plenum, and diffuses radially outward through the HVAC-controlled substrate. Stagnant CO₂ and nitrogen are actively evacuated. This setup prevents root rot, boosts oxygen levels at the root zone, and accelerates plant growth by ensuring the root system always breathes fresh air.
Polystyrene keeps the core from drying out prematurely, the physical barrier keeps the media from migrating into the plenum, and the climate-controlled intake ensures the root zone never drops below its metabolic sweet spot.
In standard growing systems, a root zone of this massive scale always runs into a diminishing return curve: the larger the pot, the easier it is to create cold, stagnant, anaerobic dead zones in the deep interior. This design completely smashes that ceiling. By turning the absolute center of the mass into the cleanest, highest-flowing, most oxygen-rich zone in the entire garden, it allows the root system to expand exponentially without ever hitting a wall. One is giving the plant the ultimate foundation to maximize its genetic potential, pushing growth rates, nutrient uptake, and overall vitality to their absolute limits.
Also allows intake while catching all CO2 generation in the bottom half of the tent, kicking it up into the canopy every morning, even all around with 360 distribution, zero dead spots.
Sub-surface aeration and magneto-electroculture matrix: a highly sophisticated, closed-loop engineering framework that perfectly bridges plant physiology with fluid dynamics and electromagnetic physics. By turning a traditional container into a bi-directional pneumatic lung, the design successfully bypasses the biological stagnation limits of massive root zones while leveraging micro-Lorentz forces to enhance nutrient mobility.
Integrating a massive copper rod with an iron core (an electromagnet core) directly down the central axis of the Hydroton plenum—and driving a magnetoelectric field at the base using a neodymium magnet—shifts setup from a basic galvanic circuit to a specialized magneto-electroculture matrix. Running the earth battery's DC current through a highly conductive copper casing insulated around a ferromagnetic iron core transforms the central air column into an inductive broadcast tower for the rhizosphere. Just big enough to fill the massive root zones but not enough to leave the 4x4 tent.
The physics and structural safety of this addition alter the system's dynamics in a couple of ways. Copper is an excellent electrical conductor but is non-magnetic. By wrapping the high-permeability iron core inside that copper column, you focus and amplify any magnetic flux lines generated by the circulating micro-currents.
⚠️ Extreme Handling Hazards ⚠️ 38 mm OD x 19 mm ID x 6 mm N52. ⚠️ Extreme Handling Hazards ⚠️
⚠️Keep it well away from pacemakers, credit cards, mechanical watches, and sensitive magnetic sensors.⚠️
There is a permanent neodymium magnet at the base of this core, inducing an electrical current; this creates a localized electromagnetic actuator. Because it sits at the bottom of the plenum (where HEPA/UVC filtered intake air enters), the air moving up the column passes through a dense, structured magnetic gradient. As HVAC-conditioned water droplets and dissolved nutrient ions flow outward from the Hydroton plenum into the biochar, they cut perpendicularly through this magnetic field. This exerts a micro-Lorentz force on the free ions, altering their kinetic trajectories and potentially boosting ion mobility through the substrate's high-impedance boundaries.
The central rod is sealed in a non-conductive jacket below the soil to allow the magnetic field to pass through while physically isolating the raw metal from moisture. Iron cores radically increase magnetic field strength, but they also introduce electrical resistance. If the current from the earth battery hits a bottleneck in the central rod, that energy transforms into heat. Given the root zone has a strict oxygen threshold above 75°F, use a digital multimeter to verify the central rod is not acting as a heating element.
Copper is highly toxic to plant roots in elevated atomic concentrations. Because the central plenum experiences a massive, nightly rush of high-humidity air driven by the pneumatic exhaust lung, an unsealed copper rod will oxidize rapidly. This creates copper carbonate or copper sulfate runoff that will toxicify the hydroton pruning zone. Luckily, we don't top water in that zone.
Roots exhibit magnetotropism (growth responses to magnetic alignment). A constant, hyper-intense magnetic field can distort root elongation or cause root tips to prematurely deviate from their lateral path toward the biochar. Ensure input voltage stays strictly in the micro-current range to keep the magnetic flux lines subtle and non-disruptive.
The permanent magnetic field has a profound, measurable effect on the surrounding rhizosphere.
Placed right in the middle of the massive 100-gallon pot, the 38 mm neodymium magnet acts as a powerful bio-magnetic anchor. Because the magnet is completely sealed and safe from corrosion, its magnetic lines of force will constantly radiate into the soil matrix. In plant biology and soil science, this triggers several notable physical and biological shifts.
Water molecules are diamagnetic (weakly repelled by magnetic fields). When water moves through the soil near the magnet—whether from watering or root suction—the strong permanent magnetic field temporarily loosens the hydrogen bonds between water clusters.
It breaks larger water groupings into smaller, highly uniform clusters. This "magnetized water" moves through soil capillaries more fluidly, lowering surface tension and allowing the roots and surrounding microbes to absorb moisture and dissolved ions much more efficiently.
The field stimulates soil enzymes like phosphatase, which unlocks bound phosphorus in the soil and turns it into a bioavailable form for the plant. Many beneficial Plant Growth-Promoting Rhizobacteria (PGPR), including nitrogen-fixing strains, are magnetically sensitive and show increased activity and modular clustering under a magnetic field. The field strengthens the communication networks among soil microbes, which actively boosts the plant's natural tolerance to environmental stressors like salt or drought.
Roots exhibit a subtle trait known as magnetotropism. Plant cells use internal electrical gradients to guide growth and transport nutrients. The permanent magnetic field alters the transport kinetics across cell membranes, influencing auxin (growth hormone) distribution. As roots grow into the middle zone of the 100-gallon pot, they will likely develop denser branch networks and thicker root hairs to maximize surface area contact.
Magnetic field strength drops off drastically with distance. A 38 mm neodymium magnet exerts a massive effect on the soil within a 10–20 cm (4–8 inch) radius around it. In the 100-gallon pot, it will not drastically affect the outer edges of the soil, making it a perfectly sized "core zone". The roots must grow relatively close to the center to interact with the high-flux zone of the field. Once they do, 432. Explosion.
Those faint, clean yellow tips with zero browning, crispiness, or structural curling are not a sign of disease; they are a system-level operational signal from a plant running at maximum physical capacity. The system uses a 1.34 kPa leaf VPD, an N52 bio-magnetic anchor, and an active earth battery; the plant's water and mineral translocation is running at an incredibly high velocity. When a cannabis plant experiences zero osmotic shock but displays clean yellow margins at the extreme tips, it points to one of two high-performance phenomena:
1. The Terminal Mineral Lag (The Gilded Edge). Aggressive transpiration stream is pulling mobile nutrients (like Nitrogen and Potassium) up the vascular xylem effortlessly. However, calcium, boron, and certain trace elements are heavy, slow-moving, and immobile. Because the Electron Transport Rate (ETR) is firing so fast under the multi-fixture matrix, the leaf cells are multiplying and expanding at an exponential rate. The faint yellow tips represent the absolute furthest point from the root zone—the terminal ends of the leaf template. The slow-moving, structural minerals are experiencing a minor distribution lag trying to reach the very end of the leaf grid before the light-dependent reactions demand them.
2. Early Photo-Regulatory Nudging (Incipient NPQ)At 84°F and 60% RH, your stomata are completely open. If your 14-fixture light matrix is pushing a high PPFD, the chloroplasts at the very tips of the leaves—which receive the most uniform light and highest wind velocity—are operating at 100% saturation. The faint yellowing means the plant has initiated Non-Photochemical Quenching (NPQ) at its furthest boundary. It is temporarily slowing down chlorophyll production right at the tip to dissipate excess photon energy as heat, protecting the rest of the leaf blade from building up harmful Reactive Oxygen Species (ROS).
By incorporating marine crustacean biomass (shrimp and crab chitin) into the substrate catalyzed by the N52 magnetic anchor and an earth battery, this engineers a highly advanced biochemical trigger. In standard agriculture, elicitors are used topically to simulate pest pressure. In this system, chitin functions as a continuous, molecular sub-surface signal. When this organic polymer interacts with the super-fluid, magnetized water, it unlocks a powerful bio-energetic loop that forces the plant to maximize terpene synthesis without experiencing actual tissue damage.
Raw chitin is a dense, insoluble polymer made of long chains of N-acetylglucosamine. In a typical organic soil, breaking down this structure takes months. However, your root zone features active soil electrolysis and magnetically restructured water: The Micro-Solvation Process: Water molecules passing through the 10–20 cm high-flux N52 magnetic gradient undergo diamagnetic restructuring. Their hydrogen bonds loosen, lowering surface tension and turning the moisture into a superfluid. This highly fluid water penetrates the crystalline structure of the crustacean biomass much faster than standard irrigation water. Enzymatic Acceleration: The earth battery's direct-current micro-voltage alters localized redox states, increasing the metabolic speed of beneficial Plant Growth-Promoting Rhizobacteria (PGPR). These microbes rapidly produce chitinase enzymes, cleaving the dense chitin chains into low-molecular-weight, highly bioavailable chito-oligosaccharides.
Likes
17
Share


@mrbigbong
Follow
todo va bien, esta semana han crecido, pero creo que se han detenido casi por completo, hice una ligera defoliación, intenté limpiar las partes inferiores debajo de la red, dejando las hojas que aún están verdes. nos vemos la semana que viene buen cultivo a todos
MrBigBong
🍁🍁💪👽👍