The Grow Awards 2026 🏆 


Likes
9
Share
@KcKush
Follow
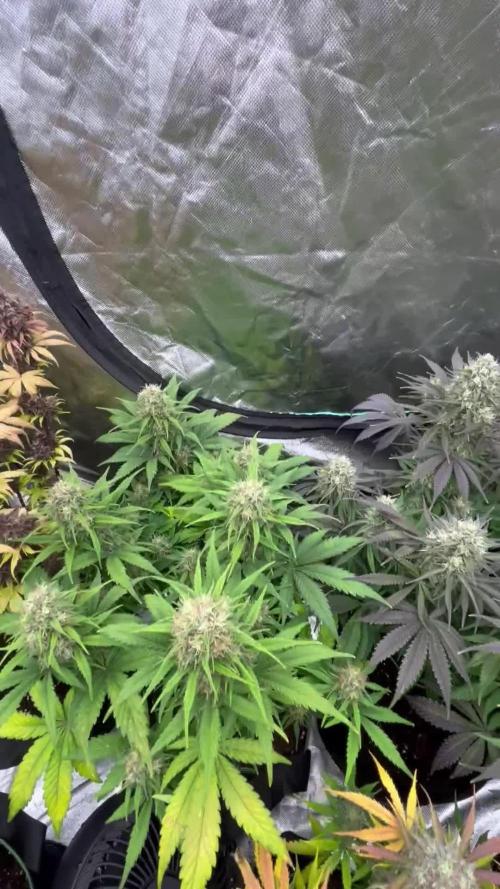
*Increased Ppm from 750 to 800
*1st week of flowering actually Tomorrow is :D
* I got different phenols. Ones short, ones wide, and the other one is a mixture of both let’s see which one comes out better.


Likes
2
Share
@High_Grade_Dadli
Follow
#1 first week in and she putting on some lovely blossoms....tied down a few of her branches (LST) and she is jus spreading her wings
#2 diet seemed to be a off so increase potassium looks like it balanced out..jus watching it to see....also lock off extended hours of light so she can start to get ready to go into flowering
Likes
9
Share
@Canna055
Follow
Frostbanger Auto + Lemon Cherry Cookies geerntet und muss sagen die duften schon verdammt lecker der Rest sieht auch gut aus werde im Laufe der nächsten 2-3 Wochen die restlichen Ladys ernten sobald mir die trichome gefallen
Muss sagen das war eher ein Semi-guter Run es war einfach zu viel und ich hätte in der Blüte viel mehr Dünger geben sollen aber egal wieder etwas gelernt;)

Likes
103
Share
@SwissKush
Follow
Day 50 - growing well
a. what an interesting plant! she is small, but mighty!
b. I think we are going to have some flowers soon, still hard to tell
c. she should stretch up a bit this week, the stem is so thick on this plant
d. this has been so interesting grow! These buds will be HUGE!
e. added in GH Bloom (Pro Bloom) with this mornings 1.5L feed
Day 51 - growing very well
a. she is drinking so much water, the same amounts as if she was a monster
b. per advice of fellow growers I will not be blowing the ppms out of the water like normal for this plant (but I might anyway, hehe)
c. i can see the future flower sites forming
Day 52 - growth explosion overnight
a. she is drinking alot of water right now!
b. I hope this plant goes for 120 days!
Day 53 - tops are emerging
a. she has about 10 tops that are emerging from the shrub
b. the smell is so strong
c. removed the CO2 generator as flowering is beginning
d. i will remove about 10 big fan leaves today, they are not getting any light, and are crowding up the airflow
Day 54 - wow!
a. she is growing very well!
b. i lowered the LED to 40cm, at 100% intensity, the tops are begging for light!
c. we are going to have some big buds for sure!
d. removing those large old fan leaves really proved to cause her to explode in growth
Day 55 - she is really reaching!
a. everything is going well with the she hulk, she is really hulking out everywhere
b. she looks like she is begging for more nutrients, so I may just say fuck it and blast her to the moon with nutes!
Day 56 - she is eating everything I put into the DWC
a. the nutrient intake has become really high, the ppms are dropping so hard
b. keeping the PH at 6.5, she is growing like a monster
Likes
25
Share
@cheetah844
Follow
The tallest one of the bunch to date by a few inches.
I topped and defoliated every plant. I'm trying to form them into canna-bushes. Hopefully I'm doing the correct training procedures to make them all grow that way both indoors and out.

Likes
141
Share
@Tropicannibis_Todd
Follow
💩Holy Crap Growmies We Are Back💩
Well growmies we are at 42 days in and everything is going as good as it can👌 Afraid she's had some major issues but that's just how it goes folks 😉
👉 Shes a short chunky little plant 👈 We got some very pretty colors😍 👌 She's got some odd colors kinda like tiger leafing,😉
Lights being readjusted and chart updated .........👍rain water to be used entire growth👈
👉I used NutriNPK for nutrients for my grows and welcome anyone to give them a try .👈
👉 www.nutrinpk.com 👈
NutriNPK Cal MAG 14-0-14
NutriNPK Grow 28-14-14
NutriNPK Bloom 8-20-30
NutriNPK Bloom Booster 0-52-34
I GOT MULTIPLE DIARIES ON THE GO 😱 please check them out 😎
👉THANKS FOR TAKING THE TIME TO GO OVER MY DIARIES 👈


Likes
27
Share
@R_Dank
Follow
Before and after the defoil!!
Slow flush with water only, cleaning them veg nutrients away!
Net down to manage the stretch in next 3 weeks 🤞 first time using this tech, I usually just topt like a radical!!

Likes
19
Share
@GERGrowDesigns
Follow
🥦 Vegetative Week 2 Eternity Grow Cup 2026 Sticky Broccoli Feminized
Stage: Vegetative Phase Week 2
Day: Day 14
🌡️ Environmental Adjustments
During Week 2, the grow environment was slightly optimized to support stronger vegetative expansion.
-Temperature: stabilized around ~26°C
-Humidity: balanced to 55-60 % to support transpiration and root activity
-Light Schedule: 18/6
-Light Output: controlled to maintain steady, stress free growth
-Airflow: improved for better stem strengthening
🌱Strain Specific Observation Sticky Broccoli
-Strong structural genetics
-Good stress tolerance
-Balanced vegetative energy
-Its reaction to topping indicates solid resilience, which is promising for upcoming canopy shaping!
Vegetative Week 2 marked a clear transition from simple growth to intentional structure building. With topping completed and root development supported, the foundation for an even and productive canopy is now in place.
Thanks for following along , feedback and discussion are always welcome.
See you in Veg Week 3 🌿✨
Likes
6
Share
@momsbasement_exotics
Follow
little bit of nute burn but im still happy with how they look going to begin flushing them soon with just water and a little calmag every other water.

Likes
31
Share
@BigDaddyK
Follow
Big yielder, went a bit purple on one of them towards the end, smells of orange to me.....00000

Likes
7
Share
@Whitemexican27
Follow
This strain was just what I was looking for. After the previous trauma of letting my plant grow WAY too tall, I went into this grow looking for something much shorter and manageable and this was exactly it. The tying down at times were a pain, but one of those things that’s better in the long run. The transplanting kind of screwed me up a bit. Not only did I not really fill the pot enough, but I put them in horribly. The soil was falling apart and it was just an ugly mess. Trying to OD the plants wasn’t part of the plan either but they bounced back just fine. All in all it was a very easy strain to grow. The dry amounts of each plant are as follows. Plant 1: 48.2 grams. Plant 2: 51.8 grams. Plant 3: 46.4 grams. Plant 4: 50.1 grams and Plant 5: 51.2 grams for a total of 196.4 grams (7.8 oz’s)

Likes
34
Share
@Gorrilla420
Follow
Another week gone for this plant and she’s took really well to the training implemented last week. Knuckled both of the main branches last week and kept the biggest branch tied down ans as you can see she’s shooting up from doing so. Should get few more tops now and bush out. She’s come on lovely these past few weeks after mowing munched on by slugs and I personally didn’t think would recover from it but I was so wrong! Ones she gets strong again from the knuckling I will tie all heads down to get more light into the middle. Next time down will give her some bio grow but this week shes had plenty of rain. Been ate a little by slugs so put some copper tape around stem to help keep them off.
That’s all this week happy growing 🌱
Likes
5
Share
@gr3g4l
Follow
Iniciamos la semana de bajo estrés doblando las ramas y terminamos podando bajos dejándolas ya listas para pasar a floración.

Likes
8
Share
@rorrobz25
Follow
Hola cultivadores.
No había podido actualizar antes por problemas personales pero aquí estamos denuevo.
La planta se agiganta poco a poco, ya, de aprecia una mayor cantidad de pelos.
Se añadió Bud Candy para agilizar los azúcares y estos sean absorbidos por la planta. De igual manera se subió la dosis de Bio-Bloom y de Fish-Mix.
Likes
3
Share
@Strangelet
Follow
Cold week. Rain and clouds most of the days. Just 1 feed, too many nutes on soil.
Likes
36
Share
@Salokin
Follow
Hi growmies,
unfortunately I skipped a day checking on the reservoir and the plant must have consumed a lot more water than expected, probably due to the heat we are experiencing where I live, since I realized tip burn getting worse everywhere I checked the ec, which was close to 3 😳, topped up with RO water right away and this seems to have stopped it. Other than that I don’t think it bothered the plant too much either, as she keeps on swelling bigger and bigger. A&B fertilizer was reduced already and once, either next week or the one after I’ll start flushing, depending on the stage of ripening.


