The Grow Awards 2026 🏆 


Likes
Comments
Share
@GoldenWeedGrower
Follow
Legend
Timestamp: 📅
EC - pH: ⚗️
Temp - Hum: 🌡️
Water: 🌊
Food: 🍗
pH Correction: 💧
Actions: 💼
Thoughts: 🧠
Events: 🚀
Media: 🎬
D: DAY, G: GERMINATION, V: VEGETATIVE, B: BLOOMING, R: RIPENING, D: DRYING, C: CURING
______________
📅 D64/B27 - 18/06/24
⚗️ EC: 1.0 pH: 5.2
🌡️ T: 26°C H: 80%
🌊 FLUSH
🍗
💧
💼 FLUSH first day
🧠
🚀
🎬 1 TL video
______________
📅 D65/B28 - 19/06/24
⚗️ EC: 0.2 pH: 7
🌡️ T: 26°C H: 80%
🌊 FLUSH
🍗
💧
💼 FLUSH second day
🧠
🚀
🎬 1 TL video
______________
📅 D66/B29 - 20/06/24
⚗️ EC: 1 pH: 6.2
🌡️ T: 26°C H: 80%
🌊 15 L
🍗 CalMag - Bloom A-B - Bud Candy - B52 - Overdrive
💧
💼
🧠
🚀
🎬 1 TL video
______________
📅 D67/B30 - 21/06/24
⚗️ EC: 1 pH: 6
🌡️ T: 26°C H: 70%
🌊
🍗
💧
💼
🧠
🚀
🎬 1 TL video
______________
📅 D68/B31 - 22/06/24
⚗️ EC: 1 pH: 6
🌡️ T: 26°C H: 70%
🌊 15 L
🍗 CalMag - Bloom A-B - Bud Candy - B52 - Overdrive
💧
💼
🧠
🚀
🎬 1 TL video
______________
📅 D69/B32 - 23/06/24
⚗️ EC: 1 pH: 6
🌡️ T: 26°C H: 70%
🌊
🍗
💧
💼
🧠
🚀
🎬 1 TL video
______________
📅 D70/B33 - 24/06/24
⚗️ EC: 1 pH: 6
🌡️ T: 26°C H: 70%
🌊
🍗
💧
💼
🧠
🚀
🎬 1 TL video

Likes
27
Share
@MindFlowers68
Follow
Another rough week. Thought I got aphids but now as I'm posting this after some more research it looks like I may actually have Neoseilulus fallacis. I only sprayed them down with water and got lady bugs. Been sick the last week as well so I cant really smell whats going on. Been having a hard time keeping the humidity below 60% at night but i finally found a budget dehumidifier that works okay

Likes
27
Share
@RDWCGrowing
Follow
4/1/2023
Week 7- Day 1 of Veg (Day 59 overall)
Water Change Day!!!
Water was really low it was just above the hump in the Res cutting it close to not having enough water in the system to keep it going. They drank a lot making it close going the full 14 days. I am still going with the previous grows and adding 36 Gallons but even looking at the root I think the SILICA is working and the roots are further along at this point than in previous grows. This next two weeks will watch how much they drink and how low my Res starts getting, and will make a decision on changing the water weekly from here on out or still keep on the plan of every other week until Week 4 of Flower.
Added 36 Gallons
Mammoth SILICA= .5Mil/Gal = 18Mil
CALMAG= .5Mil/Gal = 18Mil
Root Drip= 1Mil/Gal = 36Mil
FloraMicro = 5.4Mil/Gal = 194Mil
FloraGrow = 4.2Mil/Gal = 151Mil
FloraBloom = 4.6Mil/Gal = 166Mil
ORCA = .5Mil/Gal =18Mil
PPM= 536
PH=5.84
PPFD=500
Tent Temp= 76.5
Water Temp= 71.4
Humidity= 58%
4/2/2023
Week 7- Day 2 of Veg (Day 60 overall)
Not much today, PH was at 5.81, I brought that back up to 5.90. I took care of some badly needed defoliation in each of the back sides .. I was able to see some really good clone material to use on the lower backside of each of the plants. I will be taking two clones from each to breed over the next few weeks depending on when I am going to flip them.
4/3/2023
Week 7- Day 3 of Veg (Day 61 overall)
A little FIMing, A little Topping, and a Little bit of defoliation.
Might have to take my clones during the week this week, I am trying to wait until Saturday to hit week 8 but again they are getting all over the place and I need to trim some of the sides and lower areas.
4/4/2023
Week 7- Day 4 of Veg (Day 62 overall)
I decided to take my clones and clean up the lower half of the plants. I took 2 clones from each plant to go into the cloning machine.
4/5/2023
Week 7- Day 5 of Veg (Day 63 overall)
Water Temp is sitting at 73. Right in my ideal range for my setup.
Ideal range 70-74
My Temp Tent is my ideal zone75.6
Ideal for this grow 70-78
The lights are still waiting the switch to flower to get maxed out...
The Humidity is coming in right at 60% I love it..
I took so much off yesterday I figure it was a good day to let them rest.
4/6/2023
Week 7- Day 6 of Veg (Day 64 overall)
I needed to Defoliate some and I topped a little. The plants might force me to flip them soon. Next Wed is the 10 week mark half way through the 20 weeks. The net is Bingo... Which means that If/when the plants hit the net I will have to flip them. The Net is set to the max height that I can let them get based on the Breeders Stretch report 75%.
4/7/2023
Week 7- Day 7 of Veg (Day 65 overall)
#3 is 22 inches Tall, #2 is 19 Inches Tall.
Net is set at 24 inches. Net is also set as my Bingo point, if they hit the net then I have to flip no matter what to account for the Breeders recommended 75% Stretch allowance. I think I am going to have to flip right at the 10 week mark of the Competition which is Wed 12 Apr.
I topped a little, I de-foliated a lot to start getting it ready for the anticipated Flip.

Likes
1
Share
@LokalGrenz
Follow
8/4
Finally got humidity in the range I want things are looking decent some yelling tips and leaves I’m sure it’s from lack of magnesium some times I add some but my lazy days I just say oh well I know it’s from the RO water
Likes
6
Share
@MadeInGermany
Follow
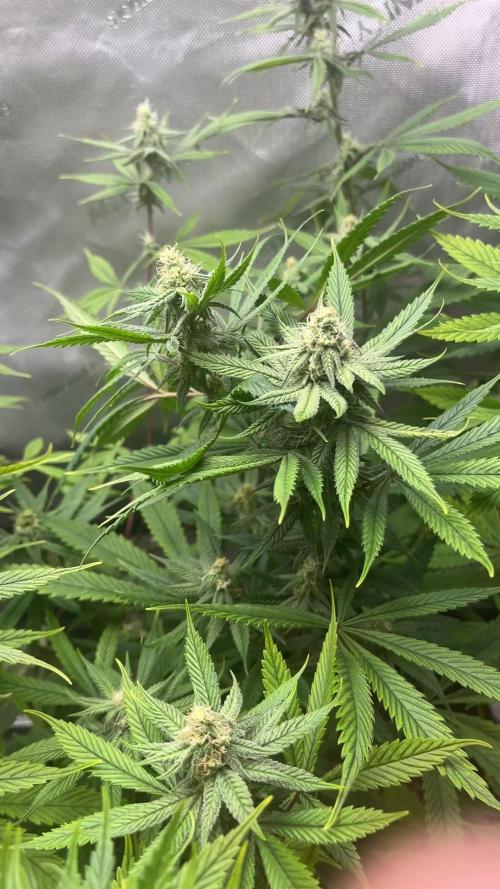
Flowering day 22
since time change
to 12/12 h.
Hey guys :-)
Another great week that is over.
They all develop exactly as it should be 💚.
Since the last leaf and substrate application against tripse, I finally haven't seen any of the little biters 👍.
Watering was done twice this week with 1.3 l each time (see table above for nutrients).
The lowest shoots were removed so that the energy is not wasted in the lower part :-) .
Otherwise, as always, everything was cleaned and checked.
Fresh osmosis water was filled with stale tap water in a 100 L tank for the coming week 👍.
Have fun and stay healthy 💚🙏🏻
👇🏼👇🏼👇🏼👇🏼👇🏼👇🏼👇🏼👇🏼👇🏼👇🏼👇🏼👇🏼
You can buy this Nutrients at :
https://greenbuzzliquids.com/en/shop/
With the discount code: Made_in_Germany you get a discount of 15% on all products from an order value of 100 euros.
👇🏼👇🏼👇🏼👇🏼👇🏼👇🏼👇🏼👇🏼👇🏼👇🏼👇🏼👇🏼
You can buy this Strain at
https://pcg.international/shop/pcg-int/
Water 💧 💧💧
Osmosis water mixed with normal water (24 hours stale that the chlorine evaporates) to 0.2 EC. Add Cal / Mag to 0.4 Ec Ph with Organic Ph - to 5.8 - 6.5
MadeInGermany

Likes
28
Share
@Professor_Chaos
Follow
Beginning of week..
These girls are not looking too bad.. I believe the leaves are not spreading much of those issues anymore.. The medium is still spittin out acidic runoff tho.. The only thing I can think of is the roots from previous runs weren't completely removed.. The decomposing roots inside the medium may make the medium acidic af... But I still don't know 100%.. I read that in 1 forum but again.. Idk 100%.. *sigh.. I really hope I can complete this run with no major issues or hurting yields too much. Keeping my fingers crossed that this will somehow just fix itself lol.. Ugh.. But I am not giving up! I WILL fill this 2x4 tent with MASSIVE ETHOS COLAS! Gonna be topping soon.. As soon as the main stem is long enough to cut and still be able to leave some stem so that the top 2 branches don't spit. These 2 plants have very different branch sizes.. I believe its because of the light not being able to penetrate as much of the branches on the ETHOS Cookies due to the fan leaves being on such short stems. The Mandarin Cookies may take over more than half of the tent.. But that shouldn't be a major issue.. As long as both are getting great light penetration, I'll be happy.. Still not sure if I am gonna LST and ScrOG or just LST.. I really wanna ScrOG and try ir out. I just hope I do it right.. I think I may have it figured out.. Need a little more research! But the girls are doing good.. Temps are getting kinda high here and there.. But they don't seem to mind too much. I will be upping the FloraGro and keeping the Hydroguard in the mix, also.. If it can help with root issues in hydro, maybe it can help my issue too... It says it can turn decaying matter into food for the plants.. So I guess we shall see!...
Later that night...
So I fed late today and checked the runoff, as I always do.. It had been 3 days since I last watered/fed (flushed actually.. Then added 1L of nutes so she wouldn't be hungry)...
*going in (each):
- 3L @ 1000 PPM 6.4 pH
*runoff:
- Mandarin Cookies: 150 PPM 6.0 pH
- ETHOS Cookies: 200 PPM 6.0 pH
... So the pH is possibly starting to balance back out! The runoff still did not contain this feeding or the last feeding when it comes to TDS in the runoff.. Unless these girls are drinking/eating it up like that! The roots at the drain holes are looking massive and healthy as can be! I can't imagine they are doing bad in there.. And they are growing quite well.. But I can't wait to get these girls going!!!.. Oh yeah.. I went ahead and topped them both.. Both have 6 nodes.. That is all.. Going to let these girls just start branching out and going to try and not mess with them much (if anything just tie some bramches down to help them all kinda even out.. A.k.a... LST lol) till it is time to lollipop and get ready for flower! Just feeding/watering and tucking leaves when I can so the new colas can start doing their magic! So excited!!!
Next day...
I found some Coca-Cola crates.. I'm gonna use them to raise the pot and saucers off the ground.. The saucer has been holding moisture underneath and creating a bit of a mildew-ey smell.. So now, I make sure I rinse the entire saucer.. Top and bottom.. With all the airflow in the tent, theybwill dry in 60 seconds no problem!.. But now the tops are 12 inches from the light.. The power is still at 25%.. And now the girls are getting around 300 - 350 μmols/m2/s or whatever it is lol..
Mid week..
Went ahead and fed her again today. I added the Kushie Kush (bloom booster) because it contains the most Potassium.. That is what most of these marks on the leaves are from, I believe.. The runoff pH came out at 5.8 and 5.7 today.. *sigh... I really need this to clear up.. Hmm.. Maybe FloraKleen??? I guess that's all I have left to try.. Flushing multiple gallons every day for 3 or 4 days wasn't enough.. It helped.. But damn, I think I need to pull out ths big guns to clear this up.. Gonna see what happens next watering (2 or 3 days) and see what the runoff is then.. May set it to go in at 6.5 or something.. Idk... Ugh.. I really wanna just try hydro lol.. I bet one plant in a 5 gallon bucket would do awesome in this tent with a ScrOG! Hmmmmm.. Lol...
End of week..
Went ahead and lollipopped a little. Both plants.. Also tied some of the longer branches down some.. Once the higher up branches are a little longer, I can then get them all tied down and begin figuring out if I should ScroG.. All depends how this ETHOS Cookies does in the next week or so.. On to the next!...

Likes
Comments
Share
@Alien420
Follow
Ha sido una buena planta ya que los cogollos muy grandes se me pudren en ocasiones y este tipo de flores estiradas y separadas unas de otras ayuda a una optima aireación. El rosin sale muy bien con olor a gelato.


Likes
119
Share
@Rangaku
Follow
70 days in for these girls and they are progressing the way they should be and getting fatter , there are a few dried up taco leaves from a bit of heat pumping out of the HPS so I changed the air flow to be more directly blowing the cold air up and the hot away from the buds and out the exhaust.
I had to recalibrate the ph meter also , luckily I did as it was about .8 out of calibration but I haven’t seen any signs of abuse on the plant yet hopefully I caught it in time .
I harvested a top bud off one of the smaller bud arms off the pineapple as we haven’t had fresh bud in over a year and honestly you can’t even tell where it’s missing , weighed 12g wet so hopefully we get an eighth or something to chop up .
Maybe two weeks left for the pineapple and 4 for the GZ .
Likes
31
Share
@Coopmc
Follow
Man she going to be amazing I got a small bud I took off last week I’m smoking. It is like a Rainbow of colors blew up in my mouth!!!
Braking her down for bud wash and dry!

Likes
10
Share
@SamDo
Follow
Week 28 – Flowering Week 5
This week represents an important transition phase in the Pineapple Upside Down’s flowering cycle.
Early floral sites are clearly evolving into real buds.
Density is starting to build, and the plant is visibly shifting from initial flower formation toward true bud stacking.
This change is now easy to observe in photos, making this a critical stage not to miss.
To support this transition, PK levels were slightly increased.
The goal is not to force growth, but to ensure the plant has sufficient resources to bulk steadily and without stress.
Light intensity remains unchanged from the previous week.
PPFD has not been increased yet, as the plant is responding well and stability remains the priority.
Nutrient management and environmental consistency are the main focus this week.
pH is monitored closely and maintained within a 5.8 to 6.2 range to ensure optimal uptake during this sensitive phase.
No other major interventions were made.
The strategy remains simple: observe, maintain balance, and allow the plant to progress naturally into heavier bud development.
See you next weeek.

Processing
Likes
5
Share
@Cannibalgardens
Follow
I love the genetics at seedstockers these girls I hit from then have been doing amazing taking the life I have given them . The growth has boomed since I put them into bigger pots now I'm looking forward to next week and how the growth continues on ..The training has been going so dam good ...cheers canna fam .

Likes
68
Share
@Hawkbo
Follow
I made so many mistakes during this run I can't even believe we made it to this point. The flowers aren't great but they're aight considering. I tested some run off and ppm was 3000+. I was consistently hearing the condensate pumps go off which made me think I was getting run off not realizing it was from the dehumidifier. The pics were taken on Thursday and after 2 days of flushing they look better and have swelled up a little bit. I sprayed dr zymes for the thrips 3 days in a row to try and knock them out. I know spraying in flower is never great but the zymes evaporates and really had no noticeable negative effects on the buds (pistil burning or residue) and I havnt seen a thrip or any damage in a few days. I also got the full line of Marrone bio grandevo, venerate and regalia which ill incorporate into a weekly ipm starting next run. I'm gunna wash the buds at the end. Hopefully all the dumb shit I do this run I can learn from and improve. Day 49 I've dropped the base nutrients and have them on 8 grams per gal of full tilt with some aptus additives and enzymes. The multi strain makes it tricky as a few really need 70-80 days but at this point I just want to wrap it up asap. I'll hand feed the 3 or 4 plants that still need the base probly.


Likes
13
Share
@hanzSour
Follow
no tabaco and meat only water and weed
without soaking directly into the soil
lightmixbiobizz /0.3l cup
lokal growshop Mycorrhizamix

Likes
21
Share
@BlackDragon22
Follow
Sicuramente c'è stato un piccolo blocco settimana scorsa, ho visto una crescita un po rallentata, dovuta forse alla piccola carenza di calcio, secondo me..somministrato quindi cal mag per prevenire che vada oltre!
Likes
9
Share
@Mychakrapong
Follow
during the flowering stage I used bio water from yellow ripe fruit that I made myself that check ppm before water the plants
Likes
33
Share
@cheetah844
Follow
Sadly OG Kush didn't survive the kitty attack ⚰️
I did put in an extra REG Blueberry OG when I first started all of the seeds so I will replace this journal & updates with that 2nd Blueberry OG. I'll update with that starting next week, it is the same age as all these other plants.
I just have a feeling it's going to be a male though, it's running for the sky very early on versus the other Blueberry OG.


Likes
33
Share
@Darksoul
Follow
In the end of the flora. Maybe two more weeks (one week for rippen another week for flush)
My first time hydro with scrog gone very well! Thanks a lot Jah =)

Likes
20
Share
@eldruida_lamota
Follow
Que pasa familia, última semana de floración de esta farm cheese de genofarm, y que decir, es increíble vaya aroma y vaya flores repletas de tricomas.
Lleva su limpieza de raíces ,después se controló ph temperatura y humedad todo el cultivo, de principio a fin.
Variedad de 10 para trabajar en indoor, ideal para SOG .

Likes
42
Share
@Zurban_Poison
Follow
Good day everyone!
The most beautiful sunset in the world is the Blue Sherbert Sunset !!)))
she's just huge! I did not expect such a size .. and I think I was a little late with switching to flowering .. it could have been earlier .. if I only knew that it grows so fast)) but it’s a sin to complain when your plants are so healthy and big))
I can’t wait for the flowering to start) she’ll just blow up her brain with flowers and beauty!)) I can’t wait!
I no longer correct the branches .. now they are on their own, and only grow to the top .. I think to do defoliation after the beginning of flowering .. let's see ..