
Likes
Comments
Share


@GermanBoy69
Follow
The plant grows. I have now added an oxygen pump to the water tank. Let's see what effect that has. You can see the progress every day. I've also bought some phosphoric acid to keep the PH down (hopefully).
My water tank is very large, about 75 litres. I also have a few holes in the lid, so a lot of rainwater gets into the tank through this and also through the openings in the pots. Never had to top up the water yet lol.
At the end of the fourth week I'm happy with the growth, especially as it's my first plant.
--------------------------
Die Pflanze wächst. Ich habe mittlerweile einen Sauerstoffpumpe in den Wassertank gegeben. Mal sehen wie sich das auswirkt. Man sieht den Fortschritt jeden Tag. Ich habe außerdem Phosphorsäure gekauft, um den PH-Wert endllich stabil unten zu halten (hoffentlich).
Mein Wassertank ist sehr groß, ca. 75 Liter. Außerdem habe ich ein paar Löcher im Deckel, so dass dadurch und auch durch die Öffnungen in den Töpfen viel Regenwasser in den Tank gelangt. Musste noch nie Wasser nachfüllen lol.
Am Ende von der vierten Woche bin ich zufrieden mit dem Wachstum, vor allem da es meine erste Pflanze ist.


Likes
18
Share


@Ageddd
Follow
She is starting to getting fat, at the begginning of this week, it was raining, but in the middle of the week, sunny days are appearing, and she is loving it, drastically increased eating levels, in 1-2 days, lower leaves started to yellow, but i noticed soon and gave a good dose with 4ml/l Top BLoom + some carbohydrates, Top Candy 2ml/l, and now she is lovin it.
That purple colours appearing...no words... Simply a blessing, even more beautiful :D
Last videos are about what i think are Chemtrails, like ie said before, the week started with rainy days, but when the sun came, this kind of biodegradable material appeared again like it is usual, it could be identified as spiderwebs if you dont look closer, but when you touch it is like soap and disappears... Guys and Ladies, let me know what you think if you want to stick a comment :)
Take Care GD !!!
Likes
20
Share


@PureMedicin
Follow
It is getting real bushy in there and i have some thirsty plants. Tent is getting pretty packed and the stretch is on.
I might have to water almost everyday, I suspect them to be on the edge of rootbound. Should have went with 14 liter pots or might even 18.
Smell is amazing and they are starting to get sticky when i pick fan leaves. Defoliation is coming at the end of next week tho. But it is really bushy i have been picking tons of leaves so far. Tempted to strip them sooner than 21 days into flower but we will see.

Likes
36
Share


@MadeInGermany
Follow
Info:
Unfortunately, I had to find out that my account is used for fake pages in social media.
I am only active here on growdiaries.
I am not on facebook instagram twitter etc All accounts except this one are fake.
Harvest day 67
since time change
to 12/12 hrs.
Hey everyone Finally it was time for the lady to be harvested :-).
The buds smell very tasty and look very good so I'm really excited.
The trichomes are 70% milky and 30% amber.
As always, it came to the darkroom 48 hours before harvest :-).
There it will now remain after harvesting at 62% humidity for 8-12 days before it is put into the jars for fermentation with 62% boveda packs :-).
As usual, the last update will come after the fermentation.
Until then, I wish you all the best and stay healthy 🙏🏻
You can buy this Strain at
https://www.barneysfarm.com/blue-cheese-34
Type:
Blue Cheese
☝️🏼
Genetics:
Blueberry
X
Original Cheese
👍
Vega lamp:
2 x Todogrow Led
Quantum Board 100 W
💡
Bloom Lamp :
2 x Todogrow Led
Cxb 3590 COB 3500 K 205W
💡💡☝️🏼
Soil :
Bio Bizz Coco
☝️🏼
Fertilizer:
Green House Powder Feeding
☝️🏼🌱
Water:
Osmosis water mixed with normal water (24 hours stale that the chlorine evaporates) to 0.2 EC. Add Cal / Mag to 0.4 Ec Ph with Organic Ph - to 5.5 - 5.8

Likes
200
Share


@Ferenc
Follow
Day 51, 31st of October 2020:
Hiya!... Time goes fast basically I went on holiday only for 6 days so my friend looked after them.... and miracle happens
....
Ladies and Gentlemens ... They impressively grew 20 cm.... look at them explosion ... I had to do LST and gave them darkness one day and switch the lamp to 12/12 from today....
They want to flower
....
The smell is getting stronger as well I bought extraction fan system with filter which is already in arrived today but not in use yet.....
Everything seems to be good and everything will continue the same way well from next week pump a lot of nutrition they will need it ;)
Cheers!


Likes
54
Share


@TheCannaProphet
Follow
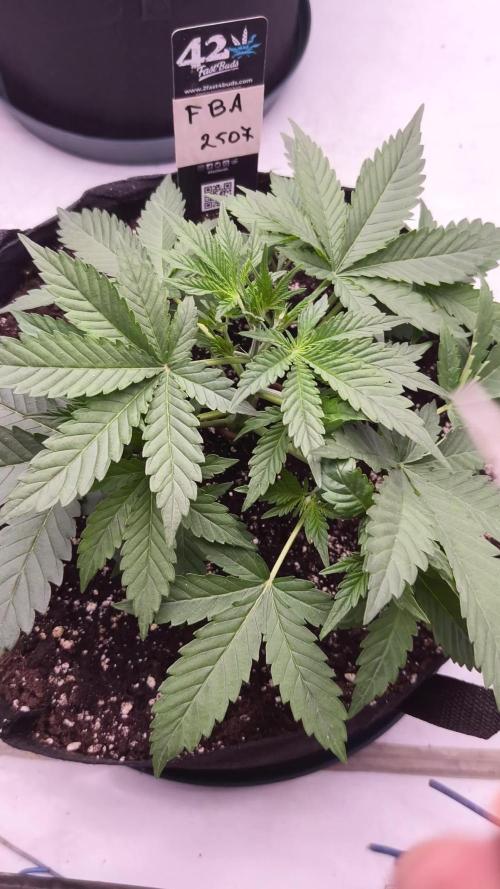
~ AirCube Active Oxygen Ebb/Flow System sponsored by GrowAce, featuring Strawberry Gorilla Auto by FastBuds ~
Well guy's and gal's here we go again on another exciting Autoflower run together! This time will be different as I will be doing a 'Hydroponic' run utilizing the AirCube Active Oxygen Ebb/Flow System by GrowAce, who were kind enough to sponsor me for this run, so it should be interesting to see what results I get and have some fun along the way!
•Let me first tell you about this 6 Pot Ebb/Flow system from GrowAce:
"The AirCube system is the one and only Ebb & Flow grow system on the market that combines the benefits of air pruning with a fully automated Ebb+Flow system! With the AirCube's proprietary fabric pot in bucket design, this system is guaranteed to outgrow any other Ebb + Flow system on the market. The results speak for themselves- grow MASSIVE roots that result in MASSIVE fruits!
Air Pruning- Air Pruning only happens with fabric pots. As the roots reach the fabric walls of the pot, they penetrate and grow into the breathable fabric. Once penetrated, the roots are exposed to air, which causes the tips of the root to dehydrate and naturally prune themselves. This natural pruning process forces the roots to grow tons of lateral fibrous feeder roots. This results in a plant that utilizes the entire root zone and fills the entire pot with tons of roots. These fibrous feeder roots are incredibly effective in uptaking water and nutrients, resulting in a plant that grows healthier and more vigorously!
Oxygen Benefits- Without oxygen, nutrient absorption cannot occur. On a molecular level, oxygen is needed to transmit nutrients across the cell walls and into the roots of a plant. With the AirCube's proprietary bottom lifted draining design, the system actively draws all of the water out of the bucket pulls vital oxygen into the root zone.
Maximum Versatility with Any Grow Medium: The AirCube System is the only system on the market that allows you to use any growing medium you like. Use coco coir, soil, peat moss, perlite, vermiculite, hydroton, rockwool or any other medium you wish! This system is the most versatile Ebb and Flow bucket system in today's hydroponics industry.
Temperature Control- with the fabric pots constructed with highly porous polypropylene fabric, heat dissipates easily and effectively. Unlike standard plastic pots, heat isn't trapped in the root zone. Heat in standard plastic containers can reach temperatures of up to 125 degrees. When this type of heat is trapped and unable to escape, it can damage your plant's health and limit the potential of your harvest. Growing in the AirCube System, plant roots grow cooler, healthier, and more vigorous.
Largest Pots in its Class- this system features 5 Gallon grow buckets, the largest pot size of any other ebb and flow hydroponic system in the market.
Modular and Expandable- start with 6 grow buckets and expand up to 36 grow buckets with the optional 105 gallons PopTank reservoir!"
For my medium and nutrients I decided to also switch things up from my regular Organic runs, going with Plagron Nutrients and Root Royale 70/30 Coco/Perlite. When filling the fabric pots with medium, I first added just under a gallon of horticulture perlite from Nor-Cal as a base layer to ensure good drainage and then filled the remainder with the Root Royale.
•Now for one of my favorites, and award winning strain from my friends at FastBuds... Strawberry Gorilla Auto:
I'll be running Strawberry Gorilla Autoflower which is a 55/45 Sativa/Indica Hybrid. "ATTENTION ALL! Due to our continuous efforts in evolving our breeding process, we are proud to confirm that our Strawberry Gorilla Auto has now become one of the most potent autoflowers in the world! Paving the way to our recent success where she ranked on top & brought home the gold at the very first American Autoflower Cup in California. Moreover, she proved that not only modern autoflowers can compete with photoperiods, but they can even beat them in their field. At the most recent edition of the Farmer’s Cup and competing against various photoperiodic strains, Strawberry Gorilla Auto took home the title of 'Highest Combined Terpenes' in the highly sought-after 'Home Grow Hash' category, with an impressive 97.163 mg/g total terpene content! Our exceptional genetic selection's crowning Strawberry Gorilla Auto strain is a spectacular hybrid known for producing yields of up to 600 gr/m2 in 70 days. This is a very manageable grow that can reach heights of up to 150 cm - due to its magnitude we recommend it for more experienced growers, as a huge plant may be a little overwhelming for first-timers. This show stopping sativa heavy hybrid is perfect as an all day smoke, producing a taste bud tingling, pungent berry and diesel terpene-rich flavor combo that leaves you with a grin from ear to ear, a perfect choice for those looking for a day-and-night autoflower! "*
*References: GrowAce.com, 2fast4buds.com
______________________________________________________________________________________________________________________________________________________________________________________________________________________________________________________________________________________________________________________________________
The Setup:
• AC Infinity 4x4 tent
•AC Infinity Cloudline T6 Exhaust Fan w/ Controller 67
•HLG 650R w/UVA Bar *** For some reason GD does NOT have a listing for the USA version of the 650R so I selected the closest match to it.
•AirCube Active Oxygen Ebb/Flow 6 pot System
•TrolMaster Hydro-X Controller for light
•AutoPilot APC8200 co2 controller fed by a 50# tank
•16" Hurricane oscillating fan and 8" floor fan
•Tent cooling via filtered outside air delivered by AC Infinity Cloudline T6 fan
•BlueLab instruments: PH Pen and Truncheon Nutrient Meter
______________________________________________________________________________________________________________________________________________________________________________________________________________________________________________________________________________________________________________________________________
Weekly Updates:
12/20- Week 7 of flower and the end is drawing ever closer for these three Strawberry Gorilla's from FastBuds!
Today, I started off this week with a drain/clean of the AirCube reservoir, after which I filled it with 80L of well water and added in the Plagron Nutrients (Green Sensation first, then 'A' & 'B' base nutrients, finally the Royal Rush). After the nutrients were added and the EC checked ( it's 2.0), I ph'd the solution to 5.7 @ 68℉.
12/22- I'm continuing with six feeds per day @ 900+/-ppm's, the HLG 650R is at 100% power 28" above canopy and they are getting 4 hours of additional UV during the middle of the light cycle. Tent temp's are running 68-75℉ at a RH of 40-45% and co2 levels are running 650-900ppm.
12/24- The #1 and #2 plants continue to be the better looking of the bunch, with the #2 being the 'one'. The #3 plant continues her struggle but has a generous coating of trichomes covering her flowers!
12/25- ~🎄MERRY CHRISTMAS!🎄~
12/26- Seven weeks of flower and only a couple more to go! I'll be starting to flush these ladies in the coming week and they should all be beginning to fade soon! Hope to see you next week! Growers Love!💚
💚 Thank you for checking out my passion in life! Please visit as often as you wish and I hope you enjoy this journey as much as I know I will! Grow what you love, Love what you grow!💚

Likes
12
Share


@Cultiuherba
Follow
Sin problemas. Siguen muy fuertes, ya no tengo espacio en altura, llegan a 5cms del foco.
Esta semana introduzco un booster orgánico y un potenciador de flora de aptus. Todo orgánico.
Siguen engordando sin problemas, una presenta algunas hojas amarillas, parece insuficiencia de nitrógeno, pero lo veo normal en el momento que estan.


Likes
14
Share


@JustChillTHC
Follow
Week 3 - Pre-Flower
Good a little nuteburn I quess, this week only pH'd Water.
I think the Nuteburn is because I used Root Juice for a longer time then advertised, so yeah.


Likes
37
Share


@NewbieLearner
Follow
This was a beautiful strain to grow. With her flowers getting big towards the end of harvest as well as the purple colours! I would definitely recommend that you try grow this strain. The buds are super dense and very well formed. An absolute treat to smoke and look at.


Likes
37
Share

@NewbieLearner
Follow
Yet again another amazing run from the blue cheese. Barneys really got it right with this strain. Dense, frosty, smelly, Big heads literally everything i look for in a strain. Not too mention the high is the best! I love a good cheese smoke and harvesting this strain just as the trichomes fill with milky cloudy colours I fell gives the best high. Energetic and uplifting and just all around amazing! 10/10 would recommend!
Likes
23
Share


@HideAndFly420
Follow
Day 71👋🌱
I started flushing some days befor. I think I’ve got 20 days left but this lady eat a lot of feeding this last weeks so I give some more flushing. Buds looks full of all
What they needs also if now they need to get fat and fat. :) let’s see what’s happen.
Giving ph controlled water at 6.2/6.5, I check TDS to water owerflowing from pot, bringing it to 50ppm from 400.
Now I’ll start checking trichomes every three days, I’d like a 60% white and 40% amber
Day 72👋🌱🌱
Hi all growers, how is going? 😊
I'm at my first real flush for this Orange, i gave 10 lt of ph controled water and was checking ppm from water coming out. i gave water unitl it reach 400 ppm, my water is 200 ppm, i hope i'll bring it to 50 ppm for next flush in 3 days.
i think bud are going to bloom nice this last days befgore harvest, i can feel it :D
Day 74👋🌱🌱🌱🌱
Soil is already quiet dry, smell is increasing rapidly. Today I’ll give another e 1 lt of water and Sunday I’ll do another flush. I think will go up to 90 days. Bud will get fatter and fatter🏆.
Maybe I could have fertilise two times more, but anyway I’d not a big problem, I’ve been feeding them a lot since the beginning so a more long flush won’t be a problem at all.
Can’t wait to the harvest.
Day 77 🌱🌱🌱🌱🌱🌱🌱
Just posting some trichome pictures, waiting to some changement before publishing some new pic of the lady.
Keep washing it with ph controleed water that looks always cleaner, i think i'll be cutting the most high bud some days before the rest of the plant.
Can't wait anymore
Let’se go! ❤️🌱
Any suggestion is really welcome :)😋🌱🌱


Likes
25
Share


@Mr_ZAF_Budz
Follow
Hello Canna Fam,
So it is the end of week 3 of 12/12 and the ladies are starting to fill out nicely.


Likes
48
Share

@MadeInGermany
Follow
Info:
Unfortunately, I had to find out that my account is used for fake pages in social media.
I am only active here on growdiaries.
I am not on facebook instagram twitter etc All accounts except this one are fake.
Have fun with the update.
Flowering day 35
since time change
to 12/12 h.
Hey everyone :-).
Every additional week is extreme 😃.
The buds are starting to develop really well and the growth has stopped.
The water was freshly prepared.
Otherwise nothing happened during the week.
Have fun and stay healthy 🙏🏻
You can buy this Strain at
https://www.amsterdamgenetics.com/product/kosher-tangie-kush/
Type:
Kosher Tangie Kush
☝️🏼
Genetics:
Kosher Kush
X
Tangie
👍
Vega lamp: 2 x Todogrow LED CXB3590 COB 55 W
1 x Sanlight S2W 62 W
💡
Flower lamp : 2 x Todogrow LED CXB3590 COB 55 W
1 x Sanlight S2W 62 W
💡 ☝️
Grow Aero System : Growtool 0.8
☝️
Fertilizer:
Canna Aqua Vega A + B , Canna Aqua Flores A + B , Rizotonic, Cannazym, CANNA Boost, Pk 13/14, Canna Cal / Mag, Canna Ph - Grow, Canna Ph-Bloom
☝️🌱
Water:
Osmosis water mixed with normal water (24 hours stale that the chlorine evaporates) to 0.2 EG. Add Cal / Mag to 0.4 Ec Ph with ph- to 5.2 - 5.8
💦 💧


Processing
Likes
54
Share


@Mimi420
Follow
Hi growers!
The kushes are buding nice!Bubba kush started to coloring a litle.Dutch kush have such a nice smell.Loove the smell that is coming from the tent!
Stay green!🌱

