
Likes
Comments
Share


@mulch
Follow
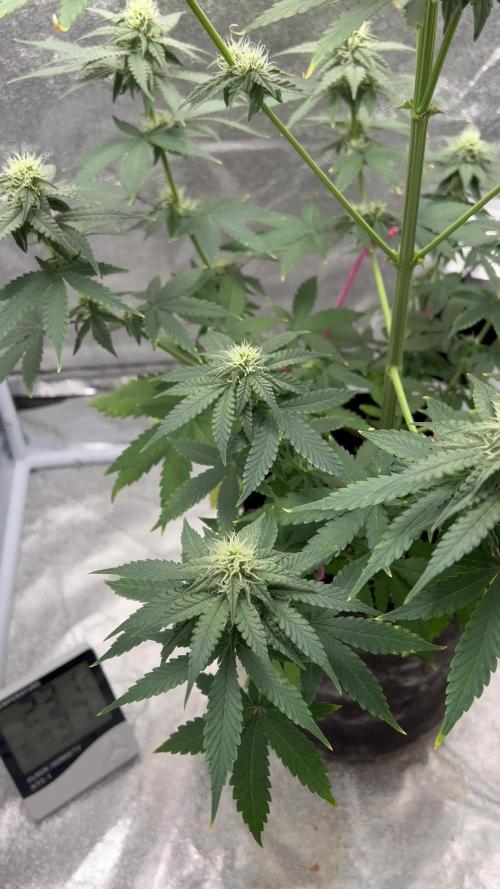
8/4/17 Calling this Flower but still feeding late veg nutes until stretch is over. Feeding every other day is indeed a labor savor, just over 30 minutes to water and vacuum as long as everything is pre PHed and prepared. I bought a pressure sprayer to more evenly water, but it won't work as it took about 20 minutes to water 1 plant with 1.5 gallon.s Not efficient enough, sadly.
Lights are moving up once or twice a day. The time lapse camera will have to be adjusted as the tent is becoming overgrown. We have pre flowers everywhere, and Kush is 1st to flower. A couple other flowers forming, but oddly not any on the auto speed buds.
I bought a dehumidifier to deal with lights out and post watering humidity spikes, and it said it had a pump so I could pump the water into a bucket outside the tent, but it apparently is just gravity. Between all my gear and the newly expanding canopy, it is starting to get crowded in the tent. I may have to return it, but I really don't want to as the size has it fit right where I need it.
I think I found out what was eating my plant leaves. It was me. I accidently hit a leaf on Reek'N today with the shop vac while I was cleaning the runoff and it tore the end off a leaf and looked identical to the damage seen last week. On 1 hand, this is good news as we are still pest free (knock on wood), but on the other hand, I was careless with my girls. Shame on me. I will be much more careful in the future.
I( am noticing what might be nute burn on some leaf tips on a few plants. I have not increased the PPMs since going to an every other day feeding, and am getting consistently more runoff than I was getting, PPMs of runoff are mostly around under 200 more than I am putting in, so the frequency must be burning them. I may back off one day and see what that does and adjust the schedule as needed. I could use the break, too ;)
As long as they are stretching, they get Veg nutes, then a feeding or 2 of transition, then start flower nutes. Getting nute burn prior to changing PPMs was probably a good thing to alert me to back off the frequency of the feeding a bit, since they liked this PPM before with no complaints when feedings were spaced further apart.
8/5/17 They did not feed today as I am still monitoring the minor nute burn. I am starting to think, since I did not raise my nutes, that this nute burn is the result of me slowly lowering humidity to reach flowering VPD, in which case, the lower RH is causing the plants to transpire more and take up more nutes, hence the very minor nute burn I am seeing. I didn't consider the humidity to be a variable until a few minutes ago, but that would likely explain the issue. If so, I am pleased I got so close to optimal nutes that a variation of 5-10% less RH would cause this and concerned with recalibrating feed to this. It's a learning experience, tho, fo sho.
They are still happily growing tho, I have had to raise my lights twice in the last 24 hours and anticipate moving them up once more today, so I guess I am still mostly giving them what they want. The Kush is the tallest at just over 22 inches. The Mango Cream, the shortest at just over 14 inches. I may have to destroy time lapse continuity to better match heights with lights as in full flower, they move to around 12 inches (they have been at 18 inches through veg). I likely won't be too aggressive on light placement both for spread and to avoid light burn in flower. We shall see.
8/6/17 LMFAO I am starting to look for a home for 2 of the Auto Speed Buds. Nothing against them in particular, but I may need to make room and I have 3 of them and only 1 of every other strain. Things are going a bit bonkers in the tent and unless I want to see them fight to the death, I may have to make room. I will monitor things and decide.
What I thought was burn might actually be a def. I have consulted on a forum and have been persuaded to up my ppm at the same ratios. It makes more sense than burn, tbh, so I am going to go for it, new measurements to come, first feeding with new ppm tomorrow. Going to go 50% stronger in late stage veg and see how they respond, and perhaps will pick up the every other day feeding again.
8/7/17 New feeding based on slight def, full strength GH base nutes, EC 1.6, PH with white vinegar to 5.7
FloraMicro 5 ML gal
FloraGro 5 ML gal
FloraBloom 2.5 ML gal
CalMagic 2.5 ML Gal
Armor SI 1 ML gal
Roots Excelerator 0.5 ML Gal
Drip Clean .5 ML Gal
Photosynthesis Plus 3 ML gal
SM-90 2.5 ML gal
Ful-Potential 2.5 ML gal
FloraBlend 2.5 ML gal
Floralicious 1ML gal
1.79 EC after nutes and additives
cross your fingers that it is not too hot
Soon move to transition nutes, drop Roots Excelerator and add FloraNectar
So the plants were drier than I anticipated and the PPMs coming out were LESS than going in! I think the bump in nutrients was a good idea. We will see how these five handle it.
8/8/17 Just fed the other 5 full nutes, no trace of burn on yesterday's group. Light still going up twice a day. I am finding it very difficult to water and handle the Auto Speed Bud #1 in the center. The canopy is QUITE thick. The Kush is now over 10 cm taller than the breeder estimated for an indoor at over 70 cm. I am going to continue to feed every other day until they force me to feed every day. I am also going to continue with Veg nutes next feeding.
8/9/17 still growing, keeping the new full dose feeding. Will likely start upping the GH additives too. Kush is now over 80 cm.
8/10/17 As we wrap up week 6, Kush is getting close to 90cm, 50% taller than expected. 2 of the SPeed Buds are still in preflower, oddly. Everyone is healthy and getting huge. Having issues watering the plants in the middle because of the thickness of the canopy.
Last night my Raspberry Pi got into a boot loop. Since I run the time lapse with that, I have to do an emergency new setup to get the time lapse rolling again. I am putting together a tutorial to make one yourself and will have info when it is completed. There will be some disruption to the time lapse from thi missing time period, but honestly, I have been having to move the camera up so often because of the growth it will likely not matter much.
The plants are so big, I may push the next feeding past GH recommendations. Most people advise not to go anywhere near that, but the plants are so big and thriving so well and already got a bit of a def, I want to see if I can push them a little more by late flower. I have given full strength nutes and GH additives today to 5 of them, so will monitor and likely increase base trio ppms if all goes well.


Processing
Likes
1
Share


@Teddy01500
Follow
Bonjour à tous,là semaine c’est bien passé pour mes bébés 👍 toujours traité avec douceur 😜. Elles entre dans leurs 4ème semaine de floraison 😉. Un grand merci à tous à très bientôt salut 😜.


Likes
7
Share


@Bones
Follow
This is my Northern Lights i got in a freebie pack quite a while ago. I planted it in my veg room for kicks as i have never been interested in growing an auto. Im lucky enough to have two tents so I use my Veg room for experiments and cloning as well. As you can see even though I germed it a week after my Blue Dream (check my diary :)) it quickly turned into this monster.
SO
For your pleasure I present my first Auto, lets see how she does!

Likes
8
Share


@eldruida_lamota
Follow
Vamos familia que ya actualizamos la cosecha de estas zkittelz de Mafia seeds.
Vaya flores que se han marcado repletas de tricomas, parecen escarcha y las flores se marcan aromas bien dulces.
Es una variedad bastante fácil de cultivar pero al tener un periodo de floración algo más largo, hay que estar pendiente de alimentarlas bien, gracias Agrobeta en mi sala es posible.
Temperaturas máximas en 24 y mínimas en 20 y una humedad estable en torno al 36%.
Las mantuve 10 semanas, ya las vi bien maduras y ya tenía tricomas ambar así que les di matarile.
Agrobeta:
https://www.agrobeta.com/agrobetatiendaonline/36-abonos-canamo
Mars hydro:
Code discount: EL420
https://www.mars-hydro.com/
Espero que disfruteis este diario, buenos humos 💨💨💨.

Likes
2
Share

@Alexgrow
Follow
На некоторых листьях появились симптомы передозировки, немного снизил ppm, в целом выглядит не плохо, рост заметно снизился

Likes
55
Share


@nonick123
Follow
Día 57 (10/03) Riego con 400 ml H2O EC 0,45
Día 58 (11/03) Los cogollos no paran de engordar y ponerse duros como rocas 😍💥
Riego con 500 ml H2O EC 0,45
Día 59 (12/03) Se muestra llena de tricomas! Espectacular!
Riego con 500 ml H2O EC 0,45
Día 60 (13/03) Riego con 500 ml H2O EC 0,45
Inicio un experimento a ver cuantos días aguantan sin regar habiendo regado dos días seguidos con 500 ml, ya que voy a estar 3 días fuera la semana próxima....
Día 61 (14/03) No riego
Día 62 (15/03) A las 48 horas las macetas empiezan a estar ligeras, aunque no secas, pero NO van a aguantar 3 días sin riego
Riego con 350 ml H2O EC 0,45
Día 63 (16/03) Aplicación de 0,5 Litros de PK Booster Compost Tea de nuestros increíbles amigos de BIOTABS
🚀 Khalifa Genetics - https://khalifagenetics.com/product/lemon-blanco-v3/ @khalifa.genetics
💦 BioTabs 15% DISCOUNT code "GDBT420" biotabs.nl/en/shop/ @biotabs_official
🌱Substrate PRO-MIX HP BACILLUS + MYCORRHIZAE @promixmitch @promixgrowers_unfiltered
💡2 x Mars Hydro FC1500 EVO Led Grow Light (2024 NEW FC 1500-EVO Samsung LM301H 150W LED) - https://marshydro.eu/products/fc1500-evo-led-grow-lights/ - https://www.amazon.de/dp/B0CSSGN5D8?ref=myi_title_dp

Likes
13
Share


@BlackForestGrower
Follow
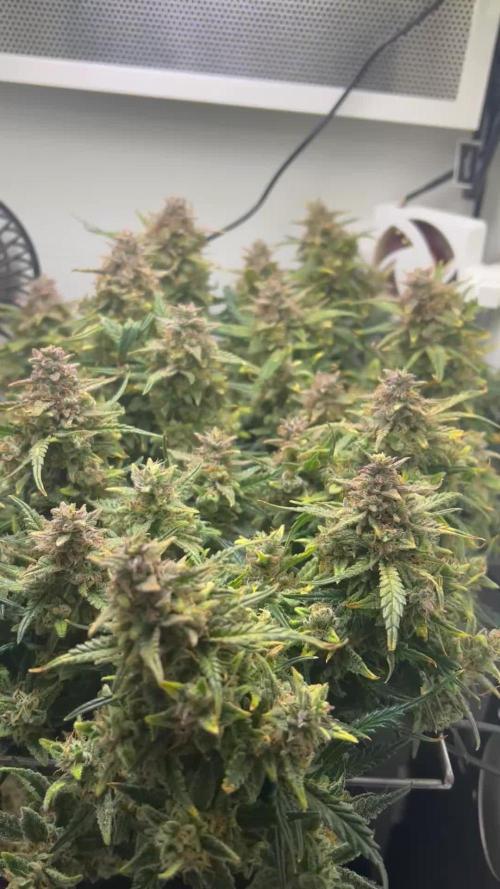
After 72 hours of darkness, the RS11 x HOLLYWOOD was hung in the drying tent at 55–60% humidity.

Likes
17
Share


@HighZenBerg
Follow
Welcome back to my indoor grow with the beautiful White Skunk Automatic from White Label.
In week 4, she started to grow faster and taller…finally ! The temperature in the grow room got a little lower and the plant seems healthy.
This week I startet with LST to expose more light to the side branches. Hopefully she will respond good to it.
Keep in touch !
Cheers,
HighZenBerg

Likes
78
Share


@Hou_Stone
Follow
I continue to do a little defoliation on my 4 Banana Krumble
They grow well with strong secondary branches but a little less height than the other varieties present in my culture
This week with supports I start trying to balance the height of all my plants so that they are approximately the same distance from the lamp
------------------------------------------------------------
💧Watering
On average I water each pot with:
Day 36 : 0.75 Liters
Day 40 : 0.75 L
I use tap water, adjust the ph to around 6 and water
💧Spraying
I mix a little black soap and neem oil in 1L of water and spray everything in the tent just before my lights go out, keeping any electrical appliances away while I spray. I try to soak all the plants. and I repeat this 2 times this week and the next before the buds appear.
I do this to keep pests away and reduce the risk of mold.
------------------------------------------------------------
🔥❄️Temperature of the week :
Day : 19-23°C (Humidity : 60-75%)
Night : 16-18°C
Outside the tent it is around 17°C with 70% humidity
------------------------------------------------------------
🚀Equipment of the week ⭐️ :
It's starting to smell a little too green in my house, I'm adding my carbon filter this week
Light FC3000 Mars hydro. power 95% at 45cm
Extractor 6 inch Mars Hydro + carbon filter . power 3/10. ON 24/24h
1 oscillating fan, on 45 minutes / off 15 minutes in loop (I reduce its use at night)
------------------------------------------------------------
📜Links :
🌱Banana Krumble seeds :
https://shop.greenhouseseeds.nl/feminised-cannabis-seeds/usa-genetics/banana-krumble/
Mars Hydro : 5% off with my discount code "houstone5" 💪
https://www.mars-hydro.com/?acc=hou-stone
👨🚀My Instagram :
https://www.instagram.com/hou_stone420/
------------------------------------------------------------
☮️Thanks for your visit 💚🤸♂️
Likes
16
Share


@AestheticGenetics
Follow
4/1/25
She has super long, almost spider web type pistils that are super beautiful. I can see the calyxs packing on under neath the pistils and forming the buds.
She has a nice stacking to her. Maybe 6+ nodal cola.
Shining, fuzzy, glistening trichomes stretching out across the fan leaves.
Top Dressed with 2Tsp of Bloom, 1tsp of Microbe Charge, and 1Tsp Bloom Booster.
Ive also been trying a new method for the top dressing efficacy. I got the idea while watching build a soil using the earth box.
I have started covering the soil with some aluminum foil to kind of act as a cover so the feeder roots will come up to where the top dressing is. which seems to be working fairly well and simply.
4/6/25
She is producing super nicely so far. Seems to be thinner, longer buds. But i can visibly see the buds forming calyxes underneath the pistils. Very bulbous and full calyx stacking
4/7/25 the buds are starting to pack on some weight. everything looks happy and

Likes
57
Share


@Salokin
Follow
Hi Growmies
Eight weeks into our cultivation journey, Epic Buzz has shown a resilience and robustness that exemplifies the best of indoor growing. The transition from vegetative to flowering is a critical time, and our plant is meeting it with a vitality that bodes well for the coming bloom. Here’s what’s happening:
The root system of Epic Buzz is nothing short of spectacular, having completely filled and begun to overflow the confines of the net pot. Such vigorous root growth is a sure sign of a healthy and thriving plant. Since being topped, the Epic Buzz has recovered admirably, pushing out a lush canopy of large fan leaves and new growth sites. This process is crucial for maximizing yield and ensuring even light distribution across future bud sites. The plant has been moved under the Sanlight Q4V2 and has had its light cycle switched to 12/12 to initiate flowering. This change marks the beginning of a new phase of growth, one that will see the plant mature and start to form buds. The plant has been diligently cared for with a feeding regime tailored for this stage of growth, with a high dosage of Orca and Canna Boost to fortify its vigor as it transitions into flowering. With the Biscotti strain nearing the end of its cycle, Epic Buzz will soon have a dedicated space to expand and flourish. The next move will be into a tent where it can truly shine as it enters the full flowering phase.
The journey with Epic Buzz continues to be a source of pride and excitement. As we move into the flowering stage, each new development brings anticipation for what's to come. The strength and beauty of the plant at this stage—lush, green, and full of life—are the rewards of careful tending and a passion for growing.
Stay tuned for the next update, where I'll share the early flowering developments and the plant's adjustment to its new home.
Stay Lifted
Salokin

Likes
8
Share


@AERO_Grower
Follow
6° Semana- Aeroponía - Están muy bellas las raíces, están 100% sanas. Se realiza poda apical al quinto nodo,una pequeña defoliación y luego se aplica LST a las más grandes, muy contento con el crecimiento actual.
---------------------------------------------------------------------------------------------------------------------------------------------------------------------------------------------------------------------
6th Week- Aeroponics - The roots are very beautiful, they are 100% healthy. The fifth node is topped, and a little defoliation and then LST is applied to the largest ones, very happy with the current growth.


Likes
7
Share

@Snipes420
Follow
She is almost finished. About 45% cloudy on trichomes others are mostly clear except the brown hairs those have some amber on big main bud sites.
She does still make new pistols with white hair but not so many white hair pistols left (only lower canopy)
I will be checking if she starts drinking less water and nugs stop fattening up.
Plant has a strong tangy smell and is very sticky on budsites and sugar leaves.
Her leavs do show some sort of problem/stress. The yellowing is either a nutrient problem/ph problem or yellowing due to age but i assume first one. Shes only getting water atm no nutrients


Likes
Comments
Share


@DawgPoundFarms
Follow
Nice color changes on MF Roy #4 this pheno has been interesting from start to finish! Excited to see what the upcoming harvest and dry/cure has in store!
Likes
6
Share


@grout893
Follow
The sun has come back and they spent quite some time outside. They have been growing well and I started to try some LST. But something is not right, there are stains on the leaves, an insect and more interesting creatures or shrooms. I don't know what to do.

Likes
24
Share


@Frank_cultiva
Follow
Las 4 nenas del scrog iniciaron con el ciclo 12/12 el día 05/11/2021: están siendo alimentadas con advanced nutrients(dosis indicadas en la foto de la tabla)
-micro
-blom
-grow
-b52
-rhino skin
-big bue
-bud ignitor
-bud candy
-sensi cal mag xtra
Las 2 nenas en macetas de 30LT 18/6:
por el momento están siendo alimentadas con advanced nutrients(dosis indicadas en la foto de la tabla)
-micro
-grow
-blom
-b52

Likes
11
Share


@adam_pawloski87
Follow
This week has been great! Germination on all 4 Pre 98 Bubbas and 2 Dirty Blondes was a success!! We planted them in there pots an through out the week we gave em each a very light spray down of pure water phd at 6.5 and by Friday they all popped out the soil Let’s go!!!!! Next week we will start light feed on nutrients , so y’all keep them eyes peeled for next updates an I appreciate y’all for following my grow !!😶🌫️💨💨💨🙏🏻💚💯🤙🏻

Likes
19
Share


@valiotoro
Follow
Wonderful color😈
The smell is divine🤩
The trim was super easy & the buds are dense & super sticky👌
Likes
7
Share


@Sunstonedgrows
Follow
We are staring week 4 of flower! Currently at Day 22 and feeling good. The plant is still getting watered every other day and honestly looks great. Looking forward to seeing when this guys starts getting into deep flower.
This week, we doubled the feed to 2 tbsps of the Flower girl. I also have her about 2 tsp of the kelp meal. I think this will be 1 of 2 kelp meal feedings. Going forward we'll be doing some compost tea now and then to support flower and increase the brix of these flowers.
Cheers until next time
-DJ Sunstone
