
Likes
Comments
Share


@KannaGrowing
Follow
Esta semana seleccionamos las plantas más adelantadas de nuestro cultivo, para colocarlas bajo la nueva luminaria Led LazerLite Pro 720 de The Pure Factory, con la potencia ajustada al 50%.
Miramos de que las cuatro variedades estén representadas bajo el led y bajo las lamparas HID, de esta forma podremos ver las diferencias entre los dos sistemas.
Seguimos con nuestra rutina de fertilización para la fase vegetativa Grow Soldier + Green Mystic by JUJU Royal y CALMAG de BioBizz.
Al final de la semana, cambiamos el ciclo lumínico para pasar a 12/12 Floración.

Likes
3
Share


@PatronEl
Follow
I found a humidifyer the same day, that somehow arrived the next day! I use rubberbands to manipulate the canopy into being more flat and then I waited how it looks. I think I should bend it a bit more, but I am scared to hurt her ..
I also silicone for the sealing, to be bit more sure, because it didnt look good enough for me. I am still not satisfied and will remove everything and start from scratch after this lady. I want the sealing to be absolutely perfect!
But she looks really good to me. I like how it works, and it feels way easier than imagined! since I stayed with the all mix when the soil arrived, I dont think I need to feed it until bloom, since I heard, that the all mix has nutritens for 4 weeks

Processing
Likes
31
Share


@Endriu
Follow
Hello Bros and Sis!
How you doin?
I'm back with some amazing strains from Royal Queen Seeds (thanks goes to James), Biological Seeds, and finally have the pleasure to try Humboldt genetics! YAY!
Let's start saying that I've upgraded my tent to a 0.90*0.90*1.60m (3*3*5ft), so more space for the beauty and a more neat space for work&play! 😍
This time I've want to grow some Kush, to see and taste what everyone talk about, and something classy like the Royal AK (never tried before) and UK Cheese Auto, I wanna try with my own hands the speed of the fast flowering Speedy Chile and Candy Kush and make a jump into CBD's strain with the Pink Doctor... that's all, guys!😀
The girls are 1 week old and seems fine. A little stretch for them beacuse I prefer that than an heat stress caused by the MH upon their tiny heads.
I try to follow the "Organic path" as much as I can do, and don't feed the plants until they really needed to, and I guess they don't ask for because the soil of choice is Plagron Allmix. I enriched some lightmix by Biobizz with 25/27gr of Vertafort pellets, for the Pink Doc that hasn't popped yet, so maybe I'll upload some new pics in the next days.
As usual come and say Hi!
Ciao!


Likes
14
Share


@420DeepGrow
Follow
Gracias al equipo de MSNL Seeds, Marshydro, XpertNutrients y Trolmaster sin ellos esto no sería posible.
💐🍁RS11:
RS11 es uno de nuestros nuevos híbridos 50/50 perfectamente equilibrados. Creamos RS11 cruzando Pink Guava x OZK x Sunset Sherbet con la intención de crear una variedad que ofrezca medidas iguales de efectos edificantes y relajantes. Aclamada como una de las variedades más sabrosas del mercado, su sabor agrio y dulce a bayas viene con un potente rango de THC del 27% al 31%.
💡TS-3000 + TS-1000: se usaran dos de las lámparas de la serie TS de Marshydro, para cubrir todas las necesidades de las plantas durante el ciclo de cultivo, uso las dos lámparas en floracion para llegar a toda la carpa de 1.50 x 1.50 x 1.80.
https://marshydro.eu/products/mars-hydro-ts-3000-led-grow-light/
🏠 : Marshydro 1.50 x 1.50 x 1.80, carpa 100% estanca con ventanas laterales para llegar a todos los lugares durante el grow
https://marshydro.eu/products/diy-150x150x200cm-grow-tent-kit
🌬️💨 Marshydro 6inch + filtro carbon para evitar olores indeseables.
https://marshydro.eu/products/ifresh-smart-6inch-filter-kits/
🍣🍦🌴 Xpert Nutrients es una empresa especializada en la producción y comercialización de fertilizantes líquidos y tierras, que garantizan excelentes cosechas y un crecimiento activo para sus plantas durante todas las fases de cultivo.
Consigue aqui tus Nutrientes:
https://xpertnutrients.com/es/shop/
💻 Trolmaster Tent-X TCS-1 como controlador de luz, optimiza tu cultivo con la última tecnología del mercado, desde donde puedes controlar todos los parametros.
https://www.trolmaster.com/Products/Details/TCS-1
📆 Semana 2:
Fantástica semana, estan creciendo de una forma espectacular gracias a la ayuda de @marshydro, @xpertnutrients y @trolmaster.
Se puede apreciar un tercer nudo y se ven aparecer las primeras futuras ramas, espero que todo siga asi.
Esta semana espero trasplantar a la maceta definitiva.
Potencia de la lámpara: 50%

Likes
27
Share


@Ganjagrandaddy
Follow
Data....
So there we have it. Another harvest in the bag and some very nice nugs of Zamnesia Biscotti to wait to dry and cure to perfection. The strain has been great to grow with no issues with anything I threw at it. I didn't see the need to use anything to minimise the iverall size of my plants but went with the nutes to see what the results would be. We will get a better idea once dried and cured with a yield per plant to go with too. I am not expecting g a huge yield based on their overall medium size bit rhe buds look so sweet amd smell amazing of a pineapple type sweet and a fuel type undertone. I think a cure will really bring out the best in these. Roll on the final report. Thank you Plagron and Zamnesia for the opportunity to try these out.
Thanks for sticking g with me for this one and hopefully some nice bud porn in the last post once finished. Be


Likes
8
Share


@Listening2thestatic
Follow
Welcome to week 3 of my tiny pot grow....
Herbies just been chillin' taking in the sites and smells of the grow tent. Livin' his best life.
Plant is coming along fantastic! A few nodes have started to appear. Will probably be able to start training by the end of the week. Still just watering every other day when dry with 1-1/4 Oz.
Day 26,
Start of the LST! She bent.....
White pistol hairs shooting out of the top new growth. We are either are in flower, or very close to it.
Day 28,
She's in flower and recovered well from the LST.

Likes
3
Share


@Goldenweeds
Follow
Pflanzen kamen bei mir an.
Alle gesund und haben den Transport gut überstanden.
Selbst in den Tagen darauf keine Anzeichen für Stress.
Bei mir sollen die jetzt nochmal nen Schub machen, getrimmt werden und dann in die Blüte geschickt.
Licht läuft momentan auf R49 W99 B99.

Likes
62
Share


@masterofsmeagol
Follow
7/19 Rained all last night. Weather report says it will be rainy for several days. I "suited up" did some slight defoliation and fed two gallons to the garden. Still need to apply BT and get inside and prune with clippers. I'm hesitant due to this huge rash but I need to find a way to do this. Plants look good just need to be cleaned up.
7/20 No water as it's been pretty rainy. Thunderstorms tonight and rain tomorrow. I'll have to wait to apply either Spinosid or BT (as a preventative). I took down the tarps on the back. The wind isn't bad. Usually it's like a wind tunnel but I think this was the right decision. They are still attached at the bottom so the cam go back up quick if high winds come. Considering top dressing with cow manure. It's what I have on hand. I also need to find time to defoliate inside the plants. I'll have to do it when it's wet I guess to avoid the moths. I saw nests at my girlfriend's house on a bunch of apple trees so maybe I got this rash there. I hope so.
7/21 I watered despite some of the soil being damp. It MIGHT rain today but even if it does it wouldn't REALLY give my plants the water they are used to. I also cut some branches inside the plants. I have a lot more to do though. I found a brown-tail moth caterpillar crawling on the soil of one of those buckets outside my cage. Leaving his little poisonous hairs behind. I killed it with fire. I'll update after I spray and/or prune. Humidity is 98% today 70 degrees at 9am. "I'm going to need a bigger boat."
7/22 I put the tarps back up after finding the tall unsupported plant looked all blown over. I removed it from the cage. It's a 30 gallon tote so it opened up my area a little more. I watered this morning as it's supposed to be a nice sunny hot day. Later I plan to LST that seedling that I just left in the 30 gallon tote and kinda neglected. At least I didn't show it the love I had the clones. It's in reveg as well (the only one) and I'm questioning whether it might have a better home elsewhere. I'll check it out when I go for my evening inspection. Looks like possible thunderstorms tonight so I don't know if spraying is feasible. Thank you to all who have been following and helping me on this journey. Much cooler than it has been 65 degrees at 10:30am.
7/23 Watered this morning. I also did some defoliation and pruned lower limbs. I need a night without rain so I can continue with my IPM. I see pillar damage so it will probably be BT that I use. I weed Wacked around the cage this morning and was planning to feed but I ran out of time. The girls will have to wait until tomorrow to eat. The garden looks very healthy as a whole. Slight issues here and there but nothing an outdoor grower wouldn't expect. It's been a great year for growing cannabis thus far! I'll do another video once I get the cage weed Wacked.
7/24 Watered slightly before I Fed two gallons to the garden. Still have leaves turning yellow and falling off but I think its normal. At least the same thing happened the last two years right around this time. Plants have EXPLODED in growth and look great. The stretch is real. I took a minute video that might or might not upload. Took a few pictures too. Internet is pretty slow so I'll probably have to upload pics tomm. Reached the 80s today. Nice and sunny. Oh and walking down to the garden is like getting punched in the face by a skunk lol. The smell is incredible.
7/25 No water as it is supposed to rain today and they drank pretty good yesterday. Still need to defoliate a bit. A few of the seedlings are reveging. That's ok though. I hate seeing leaves die but looking at my previous diary (and the paper one before that) it seems to happen the same time of year right when the stretch starts. For the most part the garden is in preflower so I may start the next week as flower. I also STILL need to spray preventative. I don't really have a problem (besides slight pm and a few random critters but hey it's outdoors) but I need to keep up with the IPM. Im super happy with progress this far.


Likes
3
Share


@Lesjardiniers420
Follow
We had a heat wave this week the seedlings where in direct sunlight sins they popped so they handled it very well and it seems that they are using up a lot of nitrogen so I just started feeding them a few days ago with 500 ppm of veg nutes .


Likes
7
Share


@Mr_nugs_lover_David
Follow
This plant has developed very nicely without any issues and so I decided to transplant the 10 plants I'll be growing with the complete biotabs organic line, I Transplanted this lady on day 39 since seed and I've prepared the 50L pot using 5 Slow release tabs, using 25g for every 5L of soil of startrex and sprinkled mycotrex in the transplant hole just a couple of grams maybe 3, and then I watered the soil once the transplant was done, I watered applying to the water 1ml per liter of orgatrex and 1g per liter of bactrex
Likes
27
Share


@Master_weeda
Follow
Bonjour à tous les padawans et maîtres jedis
Toujours arrosage avec 2 litres d'eau ph6.3 à laquelle j'ajoute madame grow
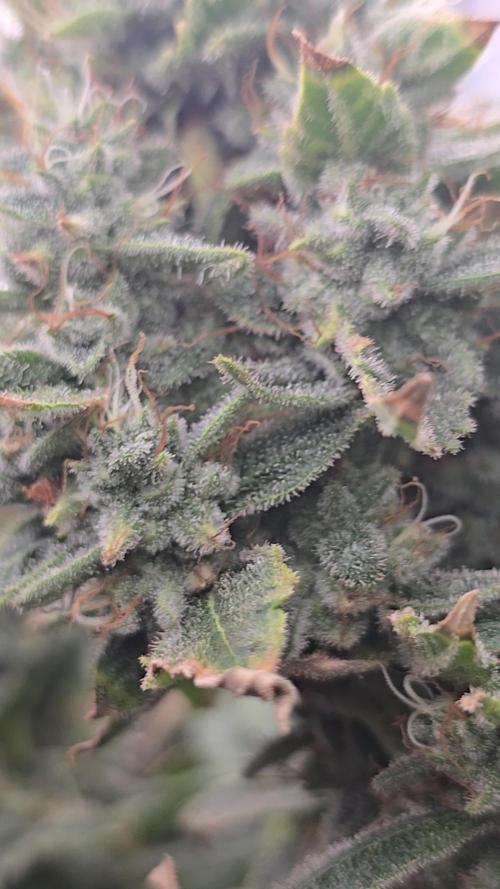
La plante est saine avec de jolies têtes chargée de trichomes

Likes
8
Share


@Australianbuds
Follow
In start week 4 flowering! Doing well! Starting to fatten out now! The 2 smaller ones are Bruce banner and are 2 weeks behind the rest in flower!

Likes
Comments
Share


Likes
14
Share

@The_Holy_Herb
Follow
Hello everybody!
This was the last week for this little Titan F1, yesterday the plant got harvested and now is hanging upside-down in darkness.
Is hanging as a whole plant, I was afraid to wet trim it before as my humidity is not always in the best value ranges.
So I preferred to be on the safe side and avoid super fast or excessively drying after a wet trim.
I will have a little more work to do during DRY trimming but is ok, is just 1 little plant.
In this last two weeks not much was going on.
Just soil flushing and constant checking on trichomes every 2/3 days.
This was the last week, the plant again got only plain water adjusted to the right pH, around 6.4.
2 liters of water every 2 days.
For a total of 6 liters this week.
Yesterday at day 85 the plant FINALLY got chopped down. A little late on the schedule, it took her around 10 days longer than RQS indicates.
Overall from my observations it looked like the plant could go longer that's why I kept her till day 85.
Also the trichomes were not ready yet (somewhere around 90%).
Before harvest I actually checked the trichomes for the last time and FINALLY they were all nice and milky. Almost 0 lucid or transparent. I chopped her in the perfect moment I believe.
In the last days I lowered a little bit the intensity of the light to 50%, I noticed that on the main cola the terpenes were evaporating. The light was too close and definitely too strong.
This was due to my latest lightning upgrade. From 70 to 100 watt. I should have kept the old lighting on untill the end of her life even if was for just 1 week.
Anyway the new light it gave her benefits, the plant definitely got more beefy with the new illumination. But also got some light burn and stress. But the most important thing is that the plant survived this journey and now is drying up.
So the last two days before harvest the light was at 50%, in fact the plant recovered so well and the main cola started to smell again. Im sooo happy.
There are some purple spots on buds 💜 from light stress and genetics of course.
Regarding drying and curing the plan is:
Drying in darkness for 7-10 days. Temp 17 celcius and around 51-53% humidity.
Curing inside air sealed jars with Boveda humidity packs for about 1 or 2 months. I dunno if go for the 62% or the Boveda 58%. I think i will start with 62% and then decide if I like it or needs couple % less.
Of course in one week after is dry I will do the first smoke test without curing it, im too excited and impatient, it was 3 months maaannn, time to smoke test it now. I will keep 1 or 2 grams and the rest will go in the jar for the final cure.
Honestly I never look at the dry weight, is a bit too vague, full o little branches, leaves... Just not important for now.
Next week when I do the dry trimming I will update with the last pictures and the final dry weight.
Thanks to everybody and see you next week.


Likes
16
Share

@Ccclever030
Follow
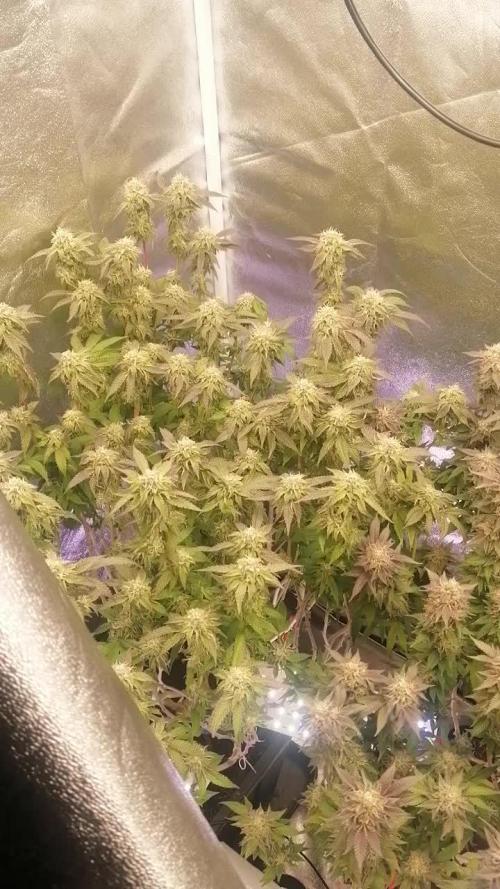
29.09.25 Blütetag 49
Noch 6 weitere Tage können die Damen noch Dünger ertragen, danach heißt es langsam flushe für 10-12 Tage.
Folgendes Programm steht an:
29.09.25 Blütetag 49 kein Gießen
30.09.25 Bt50 GHF PK-BOOSTER + AN Sweet Bud
01.10.25 Bt51 Wasser je 1l
02.10.25 Bt52 AN Overdrive + Biobizz Topmax
03.10.25 Bt53 Trocken - Kein Gießen
04.10.25 Bt54 Bud Factor X
05.10.25 Overdrive + 0,25g/L GHF PK-BOOSTER
Danach nur noch Wasser, Hesi Power Enzym, und Carboload von AN
Voraussichliche ernte AppleFritter / PermaFunk am 15-19.10.25
Die LaBomba wird wahrscheinlich noch 20 weitere Tage brauchen bevor ich die flushe

Processing
Likes
42
Share


@Dunk_Junk
Follow
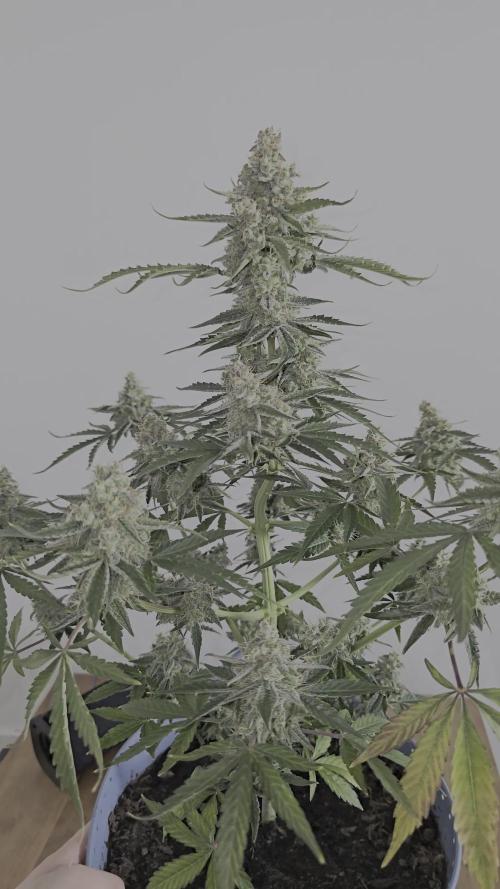
A solid 13cm vertical growth this week but look at how much she has bushed out!
I think she's going to make a very nice adult plant.

Likes
226
Share

@yan420
Follow
This two were part of another diary and got moved out due to space reasons at VW8 and moved back indoors at VW20
https://growdiaries.com/diaries/218151-auto-god-s-glue-grow-journal-by-yan402
13.09.25 VW21 Both are looking good and are developing tighter nodes than when they were outside, I'm going to have to keep cutting them back every once and a while I also applied nematodes against thrips and fungus gnats.
20.09.25 VW22 some spots and some yellow leafs, I think it's a root problem, probably root bound, but both seem healthy and are getting thicker so maybe just top up with Coco coir and give a slight different nutrient schedule less Tri Part Bloom could do the trick MAYBE lol.
27.09.25 VW23 Topped up the pots with extra coco coir and trimmed the side roots a bit, both plants were root bound 📹
03.10.25 VW23 did a HST/LST session 📹
12.10.25 VW25 Done a major HST session to try and keep them in line with the Sunset Sherbet GF I have going in the same tent, rest in the video 📹
17.10.25 VW25 ffj/fpj/fish 30 → 60 ml
19.10.25 VW26 it just became a one plant diary, keeping #5, #6 gets it's own diary for testing nutrients.
20.10.25 VW26(?) Feed tweak: added 3 g Calcium Nitrate/ 30 L (≈ 15 ppm N + 10 ppm Ca)
24.10.25 VW26 did a defoliation and trimming session 📹
25.10.25 VW26 I'll be repoting tomorrow, 26.10.25 VW27 rest in the video📹
27.10.25 VW27 Epsom Salt 0 → 2.5, Calcium Nitrate 3 → 9 g
01.11.25 VW28 CalMag 60 → 30ml, TriPartBloom 20 → 30ml, Magnesium 2.5 → 3.5g
04.11.25 VW28 no more yellowing between the veins and no new spots, the changes to the schedule worked, rest in the video 📸
09.11.25 VW29 Did what I'm hoping is a last cleanup 🎥
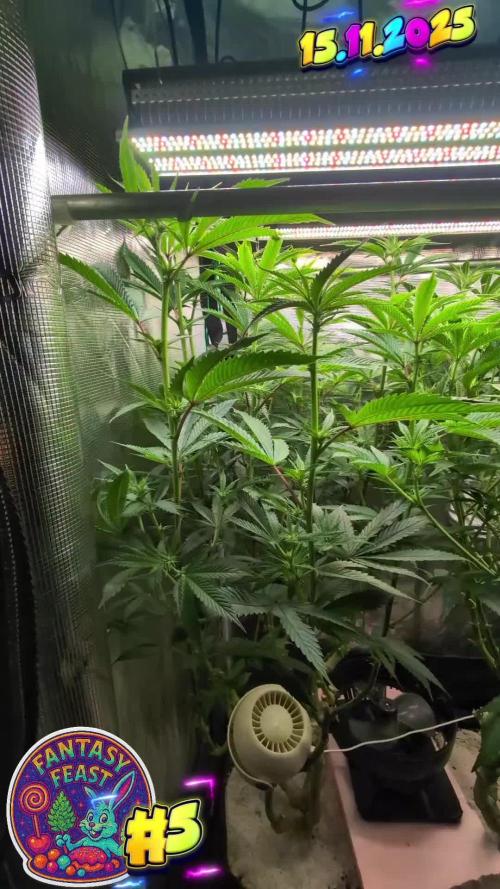
12.11.25 VW13 Did another cleanup in the tent 🎥, also switched to the FERMAKOR PK Micro schedule, (10.11.25) added Phosphoric acid as a pH down in preparation for flowering
14.11.25 FW1 FERMAKOR PK Micros 40 → 50 ml
22.11.25 FW2 Calcium Nitrate 40 g → 35 g
🌱💦🌱💦🌱💦🌱💦🌱💦🌱
Day to day tasks & actions 🌿
🌱💦🌱💦🌱💦🌱💦🌱💦🌱
15.11.25 VW29 – no feed no water
16.11.25 FW1– no feed no water
17.11.25 FW1 – Fed 3l of #1 → 1l runoff
18.11.25 FW1 – Fed 3l of #1 → 1l runoff
19.11.25 FW1 – Fed 3l of #1 → 1l runoff
20.11.25 FW1 – Fed 3l of #1 → 1l runoff
21.11.25 FW1 – Fed 3l of #1 → 1l runoff
22.11.25 FW1 – Fed 3l of #1 → 1l runoff
(*RUNOFF reused for indoor house plants)
🍶💧🍶💧🍶💧🍶💧🍶
💧 Nutrients in 30 L #1 Veg — FERMAKOR
🍶💧🍶💧🍶💧🍶💧🍶
💧 Calcium Nitrate (Calcinit / Nitcal):
45 g → 40 g → 35 g
= 1.33 g/L → 207 ppm N + 253 ppm Ca
= 1.17 g/L → 183 ppm N + 224 ppm Ca (current)
💧 PK Concentrate (FERMAKOR Base):
30 ml → 40 ml → 50 ml
= 1.00 → 1.33 → 1.66 ml/L
→ balanced 1:1 P:K + light micros (from extract)
💧 Home-made FFJ/FPJ (Fish + Veg):
30 ml
= 1.00 ml/L
Epsom Salt (MgSO₄·7H₂O):
8 g
= 0.27 g/L → 26 ppm Mg + 35 ppm S
💧 Fetrilon Combi 1 (Micros):
0.5 g
= 0.017 g/L
→ Fe 0.7 ppm • Mn 0.7 ppm • Zn 0.3 ppm • Cu 0.3 ppm • B 0.1 ppm • Mo 0.02 ppm
Phosphoric Acid (pH down) + Citric Acid (chelation):
→ First set pH with phosphoric acid
→ Add a little citric only if extra chelation is needed
💧 Target pH: 5.8 – 6.0 (drop test yellow-green)
📦 TOTAL Inputs:
60 ml → 70 ml → 80 ml / 48.5 g per 30 L
= 2.00 → 2.33 → 2.66 ml/L + 1.62 g/L (current)
⚙️✂️⚙️✂️⚙️✂️⚙️✂️⚙️
✂️ Tools & equipment ✂️
⚙️✂️⚙️✂️⚙️✂️⚙️✂️⚙️
✂️ 2× MarsHydro SP3000
⚙️ MarsHydro 150mm ACF Ventilator
✂️ Trotec dehumidifier (big unit)
⚙️ Mini no-name dehumidifier
✂️ Kebab skewers (LST – stainless)
⚙️ Wire + roast skewers (LST assist)
✂️ Scissors (HST)
⚙️ Vacuum (for spills & cleanup)
✂️⚙️✂️⚙️✂️⚙️⚙️✂️⚙️✂️⚙️✂️⚙️
🍒🍭🍬🌈🍒🍭🍬🌈🍒🍭🍬🌈🍒
🦄Fantasy Feast ( Seeds)🦄
🌈🍒🍭🍬🌈🍒🍭🍬🌈🍒🍭🍬🌈🍒
Species: Hybrid (Regular)
Genetics: The mother is Unicorn Whip by Dirty Bird Genetics. The father is Charcuterie by Cannarado Genetics.
Effect: Unknown Mixed effect body and head high
Flavor: Some phenos are Skunky gassy fruity, some are fruity sour citrus with a chemical touch and a touch of skunk
Flowering: Estimated 8–10 weeks
Resistance: Strong — Testing phase done
YouTube Link: https://youtube.com/-m8h?si=A7x4Zlr2kj-_ga31