
Likes
Comments
Share


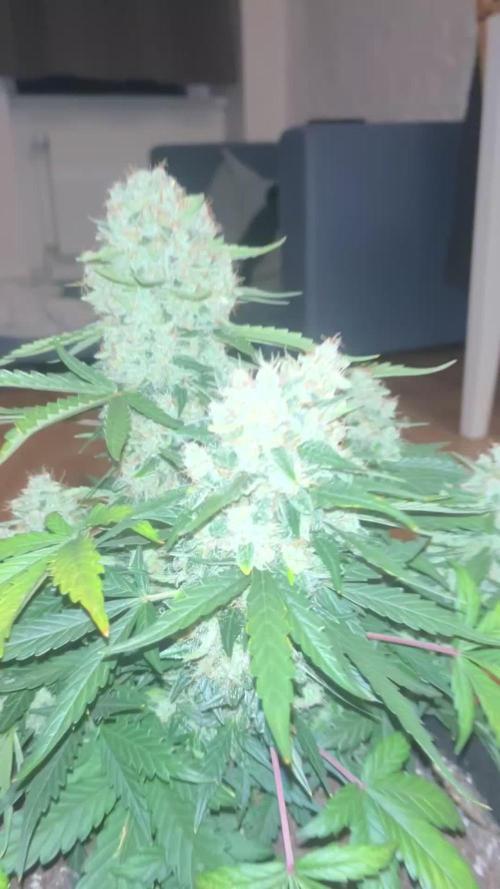
@PhinolaGreen
Follow
10. Woche
Pheno 1 kriegt jetzt keinen Dünger mehr, da die Ernte kurz bevor steht. Pheno 2 braucht easy noch 2-3 Wochen länger

Likes
1
Share


Likes
114
Share


@GMSgrows
Follow
Girls feed has been increased to max for outdoor in the ground grows. 1500 ppm 3.0 ec and their all doing fine. The Gelato K is getting huge. Going to tie string to every big branch to keep them from breaking. Very long branches and very heavy just with the leaves. No branches have snapped yet, just waiting on string coming today. Bring the branches back up frrom their bent down positions. Crowding out the branches underneath.
Thanks to all the looks and likes.
Thanks to Kannabia for some fine seeds.

Likes
2
Share


@Mxtrader144
Follow
Definitely can't wait to grow this strain again with all autos and run 18/6 the entire time.

Likes
76
Share


@BB_UK
Follow
Took a while to get there but OMG little note quick! So I started her in a 1 litre pot and stuck her on top of a 1.5L Pepsi bottle with the top chopped off! And she yielded heavily for that amount of soil a whopping! 224.63 wet weight so can’t wait to see what she holds dry because them buds were like boulders! So dense! I will be back to document her dry weight and then a couple of weeks later with the update on the smoke report! But I know it’s going to be so loud! She has deep pungent aromas like gassy and sweet! She’s going to be a powerhouse! She was a little over as today a banana developed but that just tells me “well done” timing just right! She’s a little long for my taste of auto but I do suggest anyone grow her she’s amazing! In the end!


Likes
9
Share


@OrihimeDelta
Follow
Nothing notable this week. The ladybugs continue to have a grand time. LST is continuing well, and it’s looking nice and bushy!

Likes
13
Share


@GanjaFarmar
Follow
Day 57 from seed and these BCN’s are smelling the best so far. Very citrusy smell! I think this is my last week of feeding these girls, and straight to flushing the plants next week. Im going to give them an extra week or two and see how it goes!

Likes
41
Share

@Hempface86
Follow
So this should be the last week of veg, as my other plant will be coming down later on today!! I will say this.I know she is definitely ready.It's been a long veg cycle, which is a testament to the growdots, which say only 4-6 weeks before you should flip... Mind you I have reported it's twice now and in both times I added fresh dots.. i just hope she doesn't become too big and overtake the 2.3x2.3x63.. i have a feeling she's going to be a good size plant... As always, big shout out and thank you @Grow4releaf.. I hope everybody's doing well.God bless and happy growing RIPCK

Likes
31
Share


@JeyGanesha
Follow
Bellissima la mia prima zstrawberriez.e sono sicuro che anche a livello di potenza e terpeni è fantastica.... Poi vi dirò anche qual'è l'effetto di questa ztrawberriez....


Likes
11
Share


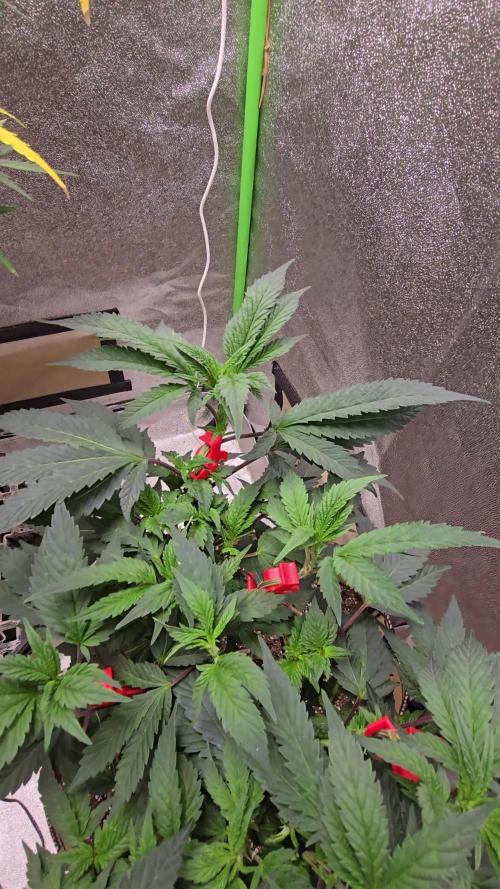
@BrigadeDesTerps
Follow
Jour 76
Et commence à développer leur pistils
Les plantes sont saine et prennent beaucoup de hauteur je dois en palisser quelques une
J’ai fais un thé de compost oxygéné pour les booster pour la floraison
Recette :
5g cendre coque de ricin
25g biochar
5 gr levure de bière
4gr pollen d’abeille
7gr ortie micronisé
5gr spiruline
10gr tourteau de karanga
8gr Kelp
20gr zéolithe chabasit
5gr de consoude
3gr hydrolysât de Kelp
5gr vers de farine
12,5gr bactérie soluble
5gr levure saccharomyces cerevisae souche myco 6420
12,5gr de prêle sauvage sécher
125gr lombricompost
2gr big foot mycorhize gold
Mycorrhizae (400 propagules per gram)
Endomycorrhiza
Glomus aggregatum -100 propagules/gram
Glomus etunicatum – 100 prop/gram
Glomus intraradices – 100 prop/gram
Glomus mosseae – 100 prop/gram
Bacillus subtilis – 350,000,000 cfu/gram
Bacillus licheniformis – 200,000,000 cfu/gram
Bacillus megaterium – 200,000,000 cfu/gram
Bacillus simplex – 200,000,000 cfu/gram


Likes
38
Share


@IbeBryBry
Follow
Had to pull the trellis because watering was getting to difficult.
She is doing beautifully, dark intense tones of purple, with just a hint of candy(specifically smells of grape needs IMHO). You did it 420FB, you have a new customer for many years to come. Yall knocked it out of the park on this strain.
✌️ ❤️ 🌳
Likes
25
Share

@Hempface86
Follow
Today is day 75 and this girl is on her final stretch this very well maybe her last week.. I discontinued the terp tea bloom and the silica and she got her last little bit of recharge yesterday and that's it water from here on out.. very excited for this one she smells very good and looks very good.. a big thank you too Sensible Seeds for the opportunity to grow this and I highly recommend you guys check them out as they have one of the biggest warehouses of seeds I've seen and if you want seeds in bulk there is nowhere better to look also they have thousands of strains so if there's something you're looking for odds are they have it.. I hope all is well God bless and happy growing ✌️😎
https://www.sensibleseeds.com/
Likes
7
Share


@Stickygreens420
Follow
10/3/2022 is officially 1 week from germination. All three plants are looking good so far. The Orange Bubblegum continues to lag the other two, but it's growing. I just watered 1 liter per plant on 10/2 and the pots are still heavy, so all I've been doing is a slight misting to keep the top soil moist. Waiting for my barley straw to show up, so I can start building a mulch layer. On 10/4/2022 the top of the soil was dry about 1 to 2 inches deep, so I watered about 1 liter across all three plants, so about 1/3 liter per plant. The bags were still fairly heavy, so this was mainly to keep the top soul moist. I've always used bottle nutrients with a dry down period, but from what I've researched, you want to keep the living soil lightly moist. I'm a bit skeptical so we will see how it goes. Using very little water in these early stages to avoid suffocating the roots (hopefully 🤞). On 10/6/2022 the pots started getting lite, so I did a full water of 1 liter per pot, using ThermX 70 and Fish Shit. Everything still looks healthy. On 10/8/2022 I added my barley straw as a mulch layer. Also, add a little less than 1/4 cup ground gnarly barley from Build-a-soil, with some worm castings as a top dress. Lightly watered to moisten the straw and top dress. Hoping the straw will slow the drying of the top inch or two of soil and prevent the light misting I've been doing.
Avg. VPD: .8
PPFD: 300
DLI: 20

Likes
16
Share


@the_medicine_grow_uk
Follow
So she’s a week into flush with only about 10% amber trichomes so has a few more days yet. The bud size isn’t moving but the density of the buds has definitely increased.
Let me know what you think. 🙌🏼🙌🏼

Likes
5
Share


@DanisgrowD
Follow
Hi growmies!
Here it is as i promised the harvest post for the two lil ones, 1 more papaya to finish my first growdiarie!
Goodsmokes 🏻💨
Processing
Likes
2
Share


@devilspeakcannabis
Follow
These are coming along well! They are very happy and are growing vigorously. They started developing lots of pistils over the past couple days and they look super healthy. I have been watering heavily and they are soaking it up. The far right plant is still much taller than the others but not much I can do about it at this point. Thankfully it seems like they have stopped stretching for the most part. Hopefully all their energy will go to making big buds in the coming weeks!


Likes
82
Share


@UnorthadoxDude
Follow
Hello growmies!
Welcome to week seven of An Epsilon Adventure! Massive thanks to both Shogun and Royal Queen Seeds for sponsoring this grow!
I have just completed the final defoliation for the three least advanced (and largest) girls. I have also rearranged the tent again to try to maximize the space available and light usage.
I have not fertigated for 5 days after the last fertigation was a flush without coco base. I am struggling with humidity at the moment so I have been trying to let the plants go more dry than usual.
Daily Updates
###
Week 7 Day 2 02:30 7/8
Heavily defoliated plants 1, 5 & 6 and removed some of the lower branches. Rearranged tent then photographed & measured:
Plant 1 is now almost unbelievably 2nd tallest at "only" 141cm in height! Her stretch has just about ended.
Plant 2 has stopped stretching at 111cm and is 2nd most advanced into flower.
Plant 3 has stopped stretching at 95cm and is most advanced into flower.
Plant 4 has stopped stretching at 100cm and is 3rd most advanced into flower.
Plant 5 has gained 6cm this week and may add few more but she is pretty close to done stretching at 119cm.
Plant 6 has gained 22cm this week and isn't quite finished. She is now the tallest plant in the series at 142cm.
###
Week 7 Day 2 07:00 7/8
Fertigated 1.6l each
###
Week 7 Day 4 02:00 9/8
Fertigated 1.6l each reduced coco a/b to 2m/l each.
Spent a bit more time photographing and videoing to try and capture the changes and the developmental differences. These 140cm+ plants are going to STACK. I am bracing myself for a lot of trimming and a monster harvest. 🙏
The current order of maturity and likely order of harvest is 3 2 4 1 5 6. I think the first and last plants will be at least a week apart in harvest, perhaps 2 or 3.
###
Week 7 Day 6 23:00 11/8
Fertigated 1.6l each
The smell in the tent is there now, really not that strong but there are 6 plants motoring through flower here now so it's not insignificant either.
Plant 3 is absolutely stacking now, she's more or less run out of space around her cola and is now growing some foxtail like structures, exciting!
Plant 6 the least mature is 2-3 weeks behind plant 3, but her stretch has finally stopped at 144cm.
Took wide angle in tent photos today.
All of the girls are drinking a lot now, but especially plant 1 who is really thirsty.
---
Thanks for reading growmies! 👊
==========
Tent: 120cm x 120cm x 180cm
Light: 600w HID Elite Dual Spectrum HPS + Angel Wing Reflector
Air: 5" duct fan system with carbon filter ~300 m3/hour + RAM 9" floor fan + 4" intake fan
Pots: Air Pruner Fabric Pots 30l - UGro XL Coco + horticultural grade perlite (~20%)
Seeds supplied by Royal Queen Seeds https://www.royalqueenseeds.com
Nutrients supplied by Shogun Fertilisers https://www.shogunfertilisers.com/en
==========