
Likes
Comments
Share


@GermanGrow182
Follow
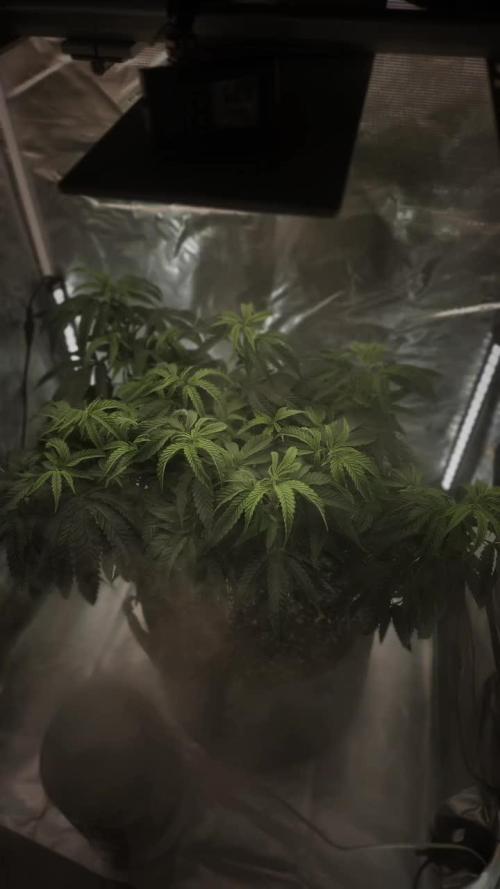
War 10 Tage im Urlaub. Die erste Woche wechselhaft und verregnet, dann 3 heiße, schwüle Tage. Die automatics bauen schön Blüten auf, Apple fritter Auto sind am weitesten, dicht gefolgt von sweet zz Auto, dann creamatic und critical Auto ( die brauch noch minimum 5 Wochen..) Apple fritter Auto vielleicht noch 2 Wochen. Die feminisierten wachsen gesund und verzweigen schön .
Es läuft gut. Bis nächste Woche ✌️

Likes
19
Share


@GoldenWeedGrower
Follow
Legend
Timestamp: 📅
EC - pH: ⚗️
Temp - Hum: 🌡️
Water: 🌊
Food: 🍗
pH Correction: 💧
Actions: 💼
Thoughts: 🧠
Events: 🚀
Media: 🎬
D: DAY, G: GERMINATION, V: VEGETATIVE, B: BLOOMING, R: RIPENING, D: DRYING, C: CURING
________________________________
📅 D56/V49 - 10/01/24
⚗️ EC: 1.1 pH 7.2
🌡️ T: 23 °C H: 58%
🌊
🍗
💧
💼
🧠
🚀
🎬 Added Time lapse video
________________________________
📅 D57/V50 - 11/01/24
⚗️ EC: 1.1 pH 7.2
🌡️ T: 23 °C H: 58%
🌊
🍗
💧
💼 Big Defolation and LST
🧠 Preparation for blooming stage
🚀 Finally she has her space back, so all the grow box is for her 😊
🎬 Added 4 pics
________________________________
📅 D58/V51 - 12/01/24
⚗️ EC: 0.9 pH: 7.6
🌡️ T: 23 °C H: 58%
🌊 Added 4L
🍗 Added Bud Candy - B52
💧
💼 Added ScrOG net. Defolation and LST to prepare the blooming stage
🧠 Blooming mode almost ready
🚀
🎬 Added Time lapse video and 1 pic
________________________________
📅 D59/V52 - 13/01/24
⚗️ EC: 0.9 pH: 7.6
🌡️ T: 23 °C H: 58%
🌊
🍗
💧
💼
🧠 pH is rising too much, but I'll not adding nothing for now
🚀
🎬 Added Time lapse video
________________________________
📅 D60/V53 - 14/01/24
⚗️ EC: 0.9 pH: 7.4
🌡️ T: 23 °C H: 58%
🌊 Added 6L
🍗 Calmag - Grow A-B- B-52 - Bud Candy
💧
💼
🧠 It's time to bloom triggering, in the next days I'll change the water for flush and bloom nutes
🚀
🎬 Added Time lapse video
________________________________
📅 D61/V54 - 15/01/24
⚗️ EC: 0.1 pH: 7.4
🌡️ T: 23 °C H: 58%
🌊 RES Changed 💦💦💦. Flushing until tomorrow
🍗
💧
💼 Passed lights to 12-12 (21.00 ON and 09.00 OFF)
🧠
🚀
🎬
________________________________
📅 D62/V55 - 16/01/24
⚗️ EC: 0.1 pH: 7.4
🌡️ T: 23 °C H: 58%
🌊 Flushing almost finish, all is ready
🍗
💧
💼 Made some LST
🧠
🚀 Let's BLOOMING !! YEAHHHHHH 🎉🥂
🎬


Likes
11
Share


@StickyFingah420
Follow
La fase de engorde sigue viento en popa y una fragancia dulce inunda cuarto de cultivo junto con unos atractivos colores.
Día 70, Día del último Riego con fertilizantes y desde ahora serán 15 días solo con agua y enzimas para obtener un resultado más limpio.

Likes
13
Share


@GrowGuy97
Follow
Flower day 24 - Ladies are coming along great! A few are having calmag deficiencies but nothing major, other than being a bit crowded I couldn’t be happier with the grow so far! Thank you to everyone following & happy growing friends!✌️🏼🌱
Flower day 25 - Humidity is at 47% temp is at 79F - Ladies got watered today at 6.5 PH , a few got some calmag. Happy growing friends!✌️🏼
Flower day 27 - RH is 51% Temp is 81F - Ladies got fed today, I got the fox farm Dirty Dozen kit is so the got a lot more stuff this week hoping it helps! Happy growing friends!🌱✌️🏼
Flower day 29 - Noticed some PM on one of the Gorilla zkittlez😫 have her pulled out of the tent right now apply neem oil hoping she will bounce back!


Likes
106
Share


@Natrona
Follow
Sponsored grow 👉WeedSeedsExpress👈
Harvest
Love Potion grew in my AC Infinity 4x4 with 4 other plants. I harvested her April 12, 90 days after germination. Love Potion demonstrated strong resistance to mold, bud rot and pests. Based on her appearance of burnt and curled leaves, she did not recover after overfeeding then flushing in mid growth cycle. I trained her hard by topping her twice and tie downs to all limbs. Even though Love Potion is an auto, she seemed to tolerate this stressful training.
Because of the mix of strains growing in the tent, no smell was discernable. Now as it hangs by herself, she smells fruity and sweet. Love Potion remained under 2 feet tall after topping. Even without topping, she would remain short. This would make Love Potion very good strain for small closet grows. Love Potion grew without difficulty or issues. Produced a nice outcome. Wet weight 358g.
Your likes and comments are appreciated. Thanks for stopping by.
Thank you @WeedSeedsExpress for this opportunity to grow your strains.
Growers love 💚🌿
💫Natrona💫


Likes
7
Share

@GREENPHOENIX6262
Follow
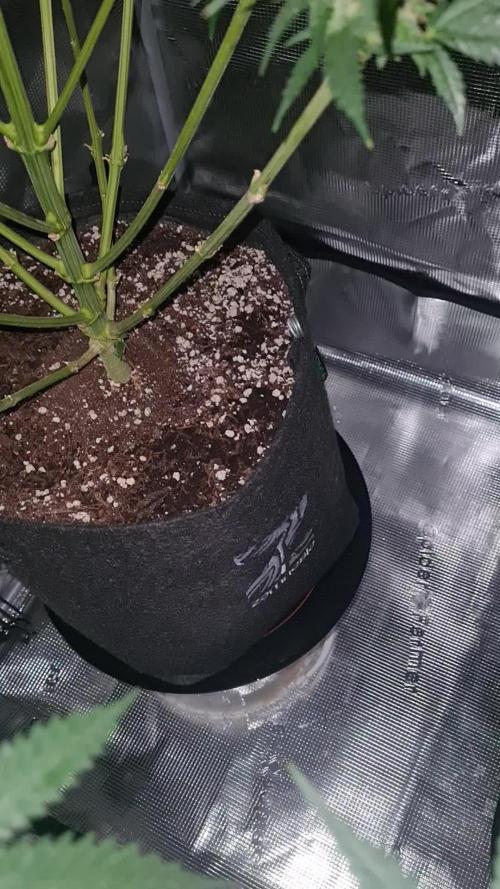
01/26 - (Clone mother) - She got a little funky last week and was in recovery mode for about 2 days - She has since then recovered (24hrs) and is performing amazingly - Running high temps High humidity - 2 part feed (Clean/Nute) on micro-dose program.

Likes
34
Share


@AbroCadabro
Follow
I just added weeks 5 and 6 into one week because I didn't really have time to post last week.
There seems to be a problem with my plants that I can't quite figure out. The only commonality that I changed with both plants since the last grow is the microbe Inoculant that I bought from NPK. The Black Afghan that I harvested back in November didn't have these microbes added to the soil and it grew into a monster. I am beginning to wonder if these microbes are stealing food from my plant. Even though these microbes are sold as "flowering" microbes. I'm beginning to think they are starving my plants.
Also, I am technically 7 weeks from the flip to 12/12. So I may just be at the end of the flower period for these plants. I checked the Tricomes and they are mostly cloudy with about 5-10% amber. Normally at this point I would be cutting out the nutrients and letting her consume her leaves. However, she has already started to so that and now I don't know what to do. I just don't know. So... lesson learned. Stick to the basic nutes and stop trying to make this job harder than it needs to be. KISS

Likes
35
Share


@Bud_Spencer
Follow
Hi Grower!
Day 42
This Bluematic wakes up my interesst to this great Strain. I never think that this comes so nice , all circle runs with RQS Easyboost i only give Water every day. 😉
Thanks for follow.
Bye,Bud


Likes
Comments
Share


@Lynx_361
Follow
07.07.2025
Flowering day 9 and rooting day 9. Both, flowers and roots show up now.
08.07.2025, 09.07.2025 | Flowering day 10 and 11
Did some lollypoping
Likes
3
Share

Likes
17
Share


@4chuk
Follow
Dec. 4 - Week 9 begins.
Dec. 6 - I removed some dead and dying leaves.
Dec. 7 - Photo update.
Dec. 10 - Timelapse uploaded. This poor girl, the sometimes infrequent waterings may yet be her demise. In the video after the plant droops the leaves come back much more yellow since they're being sacrificed for the greater good. I've been aware that plants do this for many years, but I think it's still pretty neat to watch happen over just a few seconds.

Likes
10
Share


@HideAndFly420
Follow
Day 71👋🌱
Started flushing. Giving ph controlled water at 6.2/6.5, I check TDS to water owerflowing from pot, bringing it to 50ppm from 400.
Now I’ll start checking trichomes every three days, I’d like a 60% white and 40% amber.
Day 72👋🌱🌱
Hi all growers, how is going?
Second flush, baut maybe the real first one😎,
i gave 10 lt of ph controled water (6.5) and was checking ppm from water coming out. i gave water unitl it reach 400 ppm, my water is 200 ppm,
i hope i'll bring it to 50 ppm for next flush in 3 days.
This lady is so fat, and tasty already i can smell chocolate and pinus, i'm sure they're going to fatten up 😋😉
Day 77🌱🌱🌱 🌱🌱🌱🌱
Keep washing it with ph controlled water, water now looks cleanest and buds are really blooming now, leaves are loosing color in favour to buds, i think i've got ther 6.7 days left to this lady cut.
Let's see!!!!
Let’se go!😋
Likes
9
Share


@VIPgrower
Follow
Day 37 of flowering week six lsd look good tips a little burnt but I’m not to worried keeping nutrients low about 3/4 strength 1.4 ex 770 to 800 ppm drinking lots watering about every four days feed water feed water
Likes
13
Share


@FlavoursUk
Follow
Back with a new week, the beginning of week 6 and wow, the girls are really starting to show off their fall colours and frosty colourful buds.
EC has been slightly lowered and I have dropped cal-mag to ensure a good flush later on in the grow. PK has been increased and the girls are fattening up. pH has been drifting so trying to keep a close eye on this to enable the correct uptake of essential nutrients at this critical stage.
Follow the youtube and Instagram for a more in depth follow along. Links are on growdiaries profile page. Stay tuned for the next update

Likes
15
Share


@OutdoorGandalf
Follow
~english below~
Beide Pflanzen entwickeln sich - trotz des nicht so guten Wetters - prächtig. Topf #2 ist nun 49 cm hoch und Topf #3 67 cm, der Größenunterschied bleibt stabil.
Es entwickeln sich mehr und mehr Blüten, wie auf den Videos zu erkennen ist.
Da es immer noch einigermaßen windig ist und ich nicht so recht weiß, was ich den beiden Pflanzen zumuten kann, hab ich beide mittlerweile mit Bambus Stäben abgestützt.
Und durstiger sind sie geworden, mit einem Liter alle 3 Tage kommen die beiden aber aus.
Der Duft wird auch etwas intensiver auf dem Balkon.
Aber dank meiner Blumenkästen welche mit gut duftenden Blumen bepflanzt wurden, ist in der Umgebung nichts von meinen zwei Hübschen zu riechen.
english
Both plants are developing splendidly - despite the not so good weather. Pot #2 is now 49 cm high and pot #3 67 cm, the size difference remains stable.
More and more flowers are developing, as can be seen in the videos.
As it is still quite windy and I don't really know what I can expect from the two plants, I have now supported both with bamboo sticks.
And they have become thirstier, but they can both get by with a liter every 3 days.
The scent is also getting a little more intense on the balcony.
But thanks to my flower boxes, which are planted with fragrant flowers, you can't smell anything of my two beauties in the area.
Likes
16
Share


@Geili_Seili_fireinfireout
Follow
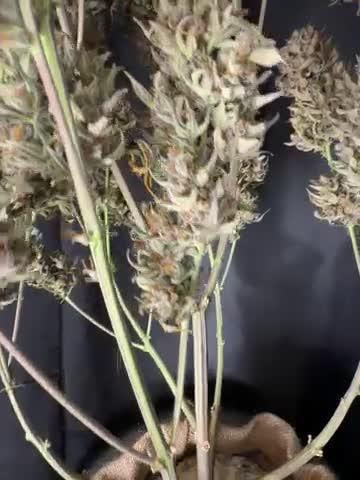
Haben noch ein bisschen angeschoben. Aber minimal. Hab hier den seltenen indica pheno erwischt😅😅🤷♂️
Sie duftet seit gestern schon einbisschen nach den legendären weihrauch zitus mix👌
Bin gespannt was noch passiert. Kenne nur die sative phenos von haze. Darum auch eher zu früh in der blüte um ne woche ca🤷♂️😊
(Gibt schlimmeres🤷♂️ jetzt weiß ichs ja😋)
Die geilsten und saubersten stecklinge gibts wie immer bei ROOTS_FARMS AT👌🔥💚


