
Likes
Comments
Share


@Pjm70
Follow
7/7 17 days old. Calling this her first week of veg. She did not appear to be growing much for a few days after being transplanted. However in the last couple of days she has been putting on height.
Now that she is growing again it seemed like a good time to top her.
Topped her at the fifth node. A few of my previous grows I topped at the single leaves. This gave me two main branches that I just tied down. Then let all the branches grow up. Gave me a very uniform plant.
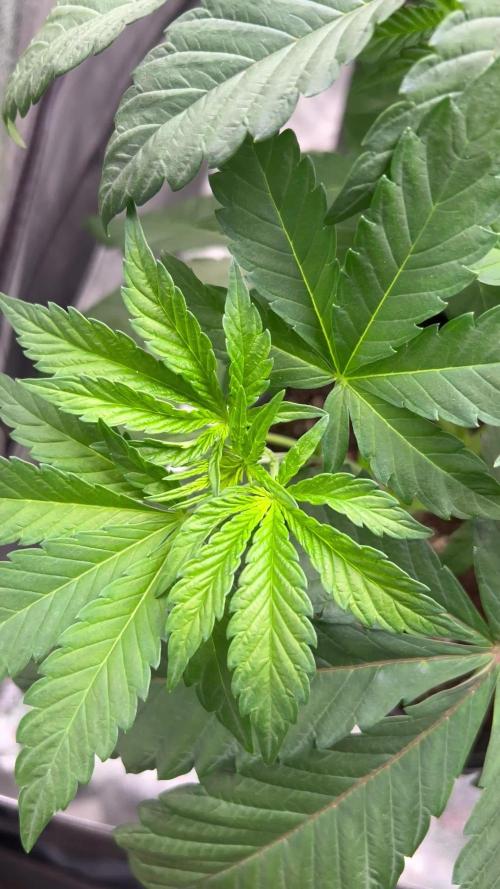
7/9 She has a very healthy dark green color. Her branches almost immediately started growing after being topped. I can see the difference in 2 days. Her nodes are very close together.
7/10. This lady has huge tits/leaves. Her leaves are so big they’re blocking out the light for the branches. I used some coat hanger to pull the leaves out of the way.
Really her leaves are huge for her age. They’re almost the size of my hands and I’m 6,3. I pulled 1 leaf off to help open her up some. I will do some reading on this strain. I believe as she gets older she will look more sativa. Right now she looks heavy indica.
7/11 She broke ground 21 days ago. She graduated into veg 4 days ago. This plant is growing very nicely.
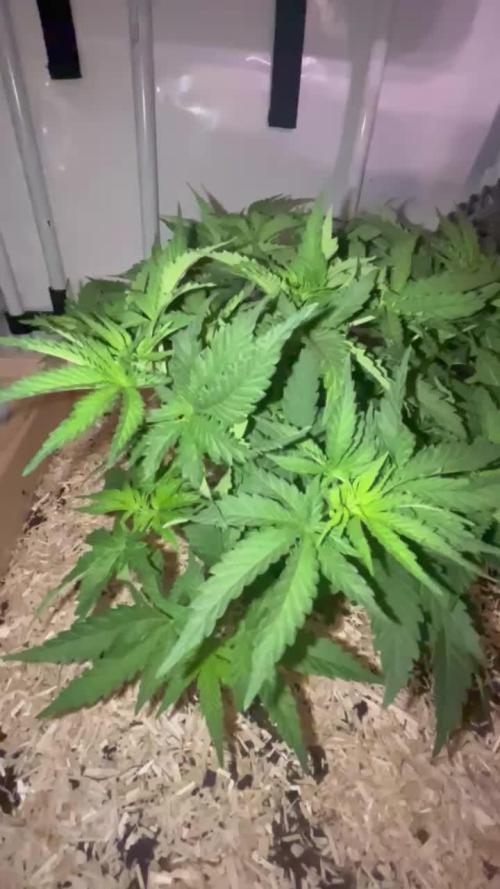
7/14 25 days old. Gave her water with liquid kelp. Her branches are quickly growing to the top. Would love to do some defoliation but I’m not. Other than a few 3 blade leaves in the center. Absolutely love her dark green color.
So far the living soil is doing a great job. The company says just water. We will see.
Ethos Genetics is top shelf. My friend grows mostly Ethos and these plants are just amazing. I was hunting for old school so I didn’t grow any Ethos until now. Old school is gone. I have never saw buds like these Ethos. This plant needs to come out close to or better than my friends.
She is growing in organic living soil and her color is great. The only thing I added was myco supreme on her roots. The next time I water her she will get some liquid kelp and humic acid.
The plant is relying on the living soil to eat. So I want to make sure her root system is very healthy and able to process nutrients.

Likes
25
Share


@Silverback_Guerilla
Follow
10/23:
I fed today with One, sweet & sticky, signal, superthrive, silica, and a little ca/mg.
10/27:
Fed today with one, signal, sweet & sticky, silica, beastie bloomz, kangeroots, and humic acid.

Likes
13
Share


@cookingwithninja
Follow
Pretty happy with this grow. Going to either reveg 1 and pop s2 for next or do all s2. Absolute 0 herm through all flower and all plants.
Chopped them. Will try to reveg 2
I am very baked
Likes
44
Share


@Aedaone
Follow
As soon as I got these seeds I dropped them in a bowl of water @10am on April 30th. Planted directly into soil 7pm at sundown on the 30th. I wet the soil before planting. We had good temperature for germination week. The evenings were still lower 60's but the days warmed up above 70 °F. May 1st it was cloudy but 80° F. We had good sunshine on the 2nd. We received a heavy rain in the afternoon and intermittently that night into the morning of the 3rd. Our temps cooled off with the rain and we didn't get above 72° F on the 3rd. Two popped on the 3rd and the last one on the 4th. It was a little wetter than I prefer, but our soil drained well and fastbuds genetics can handle the less than perfect condition. The above listed nutrients were premixed into the soil at the listed rates per gallon of soil.

Processing
Likes
20
Share


@No_Clout
Follow
Still looking smaller than usual but I think it could be down to the genetics I’m not sure, I saw a little brownish/orange burn spot on the tips of Grapey Walter #2, it dosent look like nute burn but not to sure it’s an issue at the moment.
Did the first bit of LST of these girls tonight and hopefully they will respond well and start bushing out letting the dident branches catch up.

Likes
21
Share


@TonyTrichomes
Follow
- Wk 7 of Flowering
- Added some Liquid KoolBloom to the mix this wk
- Not sure if this is a bad thing to introduce suddenly but I got my hands on some and though 'what the hell'
- buds are getting much fatter, not sure if this is a direct result though
- started feeding at lower PH to absorb more manganese but then what looks like a manganese deficiency started popping up in my BD plant, will monitor run off PH and EC
- plants still small amazing and are starting to show some heat stress signs because I lowered the humidity in the tent gradually by 2% every day until I got down to 43%
- some of the leaves are starting to curl so I'm guessing it's stressing the plants slightly
- I've read it's good to lower humidity for the last few wks of flower for good taste/smell, so we'll see
- trichomes are more abundant but I was expecting more tbh, we'll see what happens in the next few wks!


Likes
11
Share


@JoeyGonz
Follow
Sorry abou the colors using an old iPad.. When she buds I'll worry about color.. Now just little pre's and lots of green... Been gone for a while.. Had the tent on auto for a bit had to go to Cali. But came home to them just busting out all over.. I'm sure it's frowned upon by many but I transplanted 2 weeks into flowering, the two fimmed girls.. I was super gentle with the roots didn't go crazy losenning them. The next day they just perked up so nicely. I think they will ultimately be better for it. Not gonna transplant the big mainlined one she just looks great,already looking frosty. Overall very happy. Hope you all like
Likes
4
Share


Likes
2
Share


@Mr_nugs_lover_David
Follow
She looks as healthy as can be,super beautiful strain to grow,she's ina super soil full of life in a 15l pot,let's see how she keeps developing.

Likes
22
Share


@Marquise_ao_Sul
Follow
For me growdiaries its very good because help to manage my weeks and get schedulle!
I can compare and talk to another growers its nice!000000
Likes
32
Share

@BudVision
Follow
Hi Growers,
Midweek defoliation of the lower growth was done to improve airflow and direct energy to the upper canopy. The plants handled it well, so two days ago I flipped them to 12/12.
———————————————————————————
V polovině týdne proběhla defoliace spodního patra pro lepší cirkulaci vzduchu a nasměrování energie do horní části. Vše zvládly dobře, tak jsem je před dvěma dny přepnul na 12/12.
Peace and happy growing ✌️
Likes
7
Share


@Ctrellis90
Follow
Looking good so far going into our second week of flower.
Lots of new hairs and flower sites that are super close together so the inner node spacing is minimal at best.
Should stack up quite nicely in the weeks to come.
Stay tuned!


Likes
4
Share


@Growyourownathome2x2
Follow
Thursday 16th march day 59 Harvested a couple days earlier then planned as my humidity was getting a bit high and worried about risking mold I decided to chop, have to get a good dehumidifier soon, everything looking lovely, nice and dense with very strong fruity potent smell definitely the best looking plants I have grown to date not the biggest buds but they look quality, chopped plants whole gonna do my best to keep the temp and rh% in the dry room as close 60/60 as I can to get a nice slow dry, 🍁😎 I only took the wet weight from 1 plant back left plant was 270g with large fan leaves removed


Likes
33
Share


@AshBrand
Follow
7/18/21 - They are looking good! Harvest day is coming and we are excited. We have just a few days left. Giving ph 6.0 water.
7/19/21 - Everything looks good. On track for harvest!
7/20/21 - Looking good. Just a few more days left before we chop. The final ripening is going on.
7/21/21 - We are preparing the drying room. The buds look awesome! We have mason jars for curing after the dry.
7/22/21 - These plants stink so good! Tomorrow we cut both plants down! They will be drying in 70 degrees temp and 56% humidity.
7/23/21 - We pushed back harvest one day due to a medical emergency. No biggie, the plants will ripen one extra day.
7/24/21 - HARVEST DAY!! - We cut the plants, removed all fan leaves and hung in a temperature/humidity controlled room. More pics/videos/weight and more will be added when we are finished drying and we post our harvest results. The smell is of strong pine and a little sweet. We are very excited to try the smoke. (See video)

Likes
38
Share


@DogDoctorOfficial
Follow
Get ready for another thrilling update on our magnificent Triton Biscotto Lime in Week 6 of veg. This girl is on fire, and we're taking her journey to new heights. Buckle up and prepare for some green-thumb adventures!
This week, we embarked on an important mission: Integrated Pest Management, or IPM for short. Now, before you imagine tiny superhero capes on mites and nematodes, let me explain. We introduced beneficial nematodes into the soil to combat unwanted pests and keep our garden in tip-top shape. These microscopic warriors wage a battle against harmful critters, defending our beloved Triton Biscotto Lime like true heroes.
But that's not all! We called in reinforcements in the form of Spical Ulti Mite and Swirskii. These beneficial mites are like our garden's own special forces, launching a full-scale assault on any unwanted pests that dare to enter our domain. It's like a botanical warfare with a twist of camaraderie and a sprinkle of microscopic excitement.
Now, picture this: Triton Biscotto Lime, surrounded by her nematode army and mite squad, ready to defend her green kingdom. It's a battle of epic proportions, where our fierce defenders work tirelessly to protect our plant from any unwanted intruders. And hey, who knew mites and nematodes could be such amazing allies in the quest for a thriving garden?
In addition to our IPM efforts, we continued to pamper Triton Biscotto Lime with love and care. We ensured she received the optimal lighting she deserves, with a mighty 500 PPFd (Photosynthetic Photon Flux Density). It's like giving her a VIP pass to a cosmic light show, fueling her growth and setting the stage for botanical greatness.
As we revel in the wonders of IPM and provide Triton Biscotto Lime with the best possible care, we can't help but marvel at the magic unfolding before our eyes. The harmony between our plant and these tiny defenders is like a cosmic dance, showcasing the power of nature's intricate balance.
And here's a fun little joke for you: Why did the mites and nematodes form a rock band? Because they knew how to harmonize and strike a chord with their garden audience!
In summary, Week 6 of veg has been a week of pest-fighting heroics and cosmic collaborations. Our Triton Biscotto Lime stands strong, backed by her nematode army and mite squad. Together, they create a force to be reckoned with, ensuring a healthy and thriving garden environment.
As we continue this green-thumb journey, let's celebrate the power of beneficial allies, the wonders of IPM, and the magic that happens when we join forces with nature. May Triton Biscotto Lime grow stronger with each passing day, and may our garden be a haven of harmony and botanical bliss.
Stay tuned for more thrilling updates, my fellow gardeners. Until next time, keep those mites and nematodes rocking and rolling, and may your green thumbs continue to flourish!
As always thank you all for stopping by for the love and for it all, hope you all surrounded with love , health and blessing of all kinds <3 <3 <3
Genetics :
TRITON BISCOTTO LIME - @SeedstockersOfficial
All info and full product details can be find in can find @
https://aptus-holland.com/
https://seedstockers.com
https://autopot.co.uk/
https://lumatek-lighting.com/
#aptus #aptusplanttech #aptusgang #aptusfamily #aptustrueplantscience #inbalancewithnature #trueplantscience #growerslove #dogdoctoofficial
With true love comes happiness <3 <3 <3 Always believe in your self and always do things expecting nothing in return and with an open heart , be a giver and the universe will give back to you in ways you could not even imagine so <3 <3 <3
More info and updates @
https://growdiaries.com/grower/dogdoctor/official
https://instagram.com/dogdoctorofficial
https://youtube.com/channel/UCR7ta4DKLFMg2xxTMr2cpIg
<3 <3 <3 Growers love to you all <3 <3 <3
<3<3<3 have a bunch of other journey going on, fell free to stop by and say hi, don be shy <3<3<3
Strain info :
Triton Biscotto Lime Fem seeds
You are standing before a feminised weed seed that comes blessed from the cradle, as she’s born from the cross of two genetics that are all the craze in the current cannabis scene. On the one hand, Oreoz Mintz, one of the winning horses of the new generation of the Girl Scout Cookies family; on the other, Lemon Tree.
This is an epic parental lineage that results in a hybrid with a slight sativa dominance and dazzling qualities, with a short flowering of just 8 weeks and THC levels that can reach up to 22%, causing a very energetic and euphoric effect which is perfect for social events or if you’re looking for top creativity.
Triton Biscotto Lime is a feminised strain that’s very easy to grow indoors, although she reaches her maximum potential when grown outdoors bathed by the sun of warm climates like the Mediterranean. She loves light and an aerated substrate, which allows for good oxygenation of the roots and helps the plant absorb the maximum number of nutrients. In return you will get dense and compact marijuana buds in a neon green colour which are sprinkled with amber pistils and covered in a glaze of beautifully crystallised trichomes.
As her name suggests, her aroma and flavour are a subtle mix of earthy sweetness with a citrus touch, calling to mind a tasty cookie dessert with a lemon base and some hints of Diesel. A highly addictive flavour that you’ll be happy to taste free of any guilt for wanting to repeat the experience over and over again.
So if you’re looking for a feminised marijuana seed that represents the best of the current cannabis scene, with high-calibre properties that contribute to her excellent reputation, then Triton Biscotto Lime has arrived on the market to meet your expectations. Try her now and become hopelessly devoted to her
- Friendly reminder all you see here is pure research and for educational purposes only -

Likes
Comments
Share

@MyLittleGarden
Follow
Vegetationswoche 8 - 08.06. – 15.06.2026
In der achten und gleichzeitig letzten Vegetationswoche wurde nur noch wenig an der Blue Sunset Sherbert gearbeitet. Ziel war es, die Pflanze möglichst stressfrei wachsen zu lassen und ihre natürliche Entwicklung zu beobachten.
Im Verlauf der Woche wurde sie einmal mit etwa fünf Litern Wasser gegossen. Zusätzlich kam leichtes Low-Stress-Training zum Einsatz und einige größere Blätter wurden entfernt, um die Pflanze etwas auszulichten und den unteren Trieben mehr Licht zugänglich zu machen.
Die Blue Sunset Sherbert entwickelte sich in dieser Woche ausgesprochen gut. Sie blieb zwar weiterhin eher kompakt, baute dabei jedoch eine sehr schöne und gleichmäßige Struktur auf. Besonders auffällig war die runde, buschige Wuchsform mit zahlreichen Seitentrieben und einer dichten Verzweigung. Insgesamt wirkt die Pflanze gesund, vital und sehr ausgewogen aufgebaut.
Ursprünglich war geplant, die Pflanze über ein SCROG-Netz weiter zu trainieren. Im Laufe der Vegetationsphase fiel jedoch die Entscheidung, auf das SCROG zu verzichten und stattdessen den Grow etwas kompakter und schneller abzuschließen. Da die Pflanze bereits eine schöne Form entwickelt hatte und die verfügbare Fläche zunehmend einnahm, erschien der Zeitpunkt für die Umstellung passend.
Am 15.06.2026 wurde schließlich der Lichtzyklus von 18/6 auf 12/12 Stunden umgestellt, um die Blüte einzuleiten.
Damit endet die Vegetationsphase nach insgesamt acht Wochen und die Blue Sunset Sherbert startet in ihre erste Blütewoche. Nun wird sich in den kommenden Wochen zeigen, wie sie auf die Umstellung reagiert und welchen Stretch sowie welche Blütenstruktur sie entwickeln wird

Likes
12
Share


@Gardens_of_Of
Follow
- Streching is almost fully stopped.
- Had to elevate the pot of Kings Kush 10 cm more as Chemical Bride is significantly bigger in size.
- A big defoliation and Lollipoping are applied on 18.06 which kind of stunned the growth for the next 1-2 days.
- Humidity has been a very big problem in Berlin due multiple storms this week as it cruised around 70-85 % outside whole week.
- VPD fluctuated this week between 0,75 and 1.7 kPa , averaging at 1,15 kPa. Lower than last week…
- Tent temperature fluctuated around 22 at night and 26 Celsius at day time, averaging at 24.2. Slightly higher than last week even though iI have increased the inline fan speed on 16.06.
- Humidity fluctuated crazy between 50-75% this week, averaging at 61.6.
- This week, I kept giving increased Ph (6.8) of water as the medium Ph is still under 6 cruising around 5,8.
- Trichome development has started, already seeing frosting on Chemical Bride.
- White pistils are slowly turning orange on Kings Kush.

Likes
3
Share

@Oyziphar
Follow
Also this week, very sunny 🌞🌞🌞 with nice summer temperatures
Plants are ripening fast 🏾➡️ and they are very smelly 🌷🌷🌷
I noticed a little bit of budrot in plant #3 👺 I removed the affected flowers 💀
The last time I gave the plants a liquid booster with OPF 4:2:8 ; Fulvic 25 ; Yuccah ; Biovin liquid ; Earthworm compost extract.
Big Thanks to Luc from Plant Health Solutions / Bioplantenvoeding dot nl 🙏🙏🙏
Plant #1 ; height : 113 cm
Plant #2 ; height : 96 cm
Plant #3 ; height : 100 cm
Plant #4 ; height : 84 cm

Processing
Likes
13
Share


@GrowGuy97
Follow
Got everything moved around & the new carbon filter, fans & lights so hopefully I got better coverage with less power👍🏼 Topped 1 of the Gelato OGs today was getting way taller than the rest we will see how she bounces back! Everything else seems to be going great!
Day 22 topped & trimmed them up a bit
Day 23 started LST on a few
Day 24 started mainline on one of the GZ
Day 25 trimmed them a little more today

