
Likes
Comments
Share


@Shizzlemanizzle
Follow
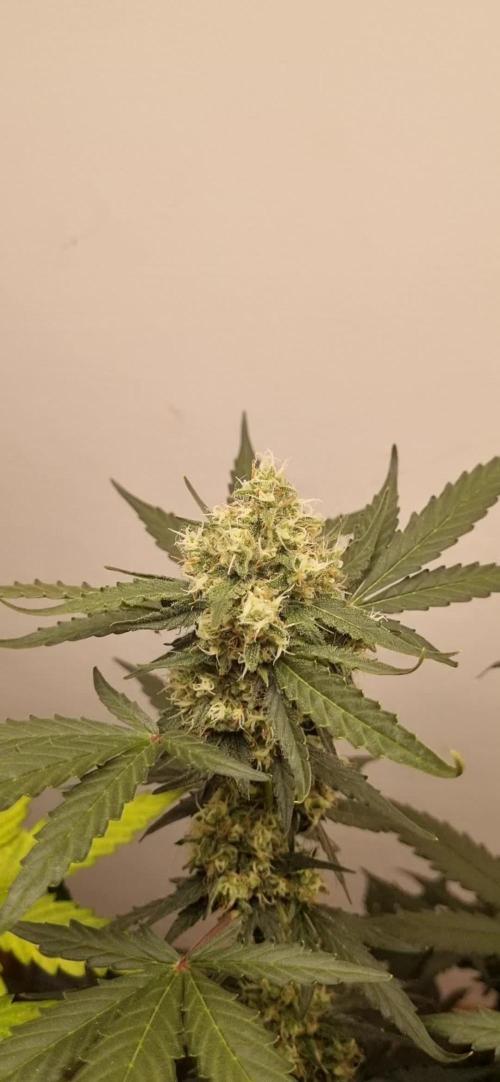
Day 36
Done nothing just let them grow and trimmed a few leaves
Day 37 - watered them with feeding. Decreased the amount by 25% except the base nutes. Added 12ml CalMag on 4L water by request of the community.
If leaves curl down more, I will consider a flush.
Day 38
No feed. Color changed from the middleone overnight, I think that’s a good sign. Maybe someone can comment on that 💪🏽. For me it looks very good, I know a few leaves show signs of nutrient burn but I decreased already and no new signs appeared
Day 39
No feed until tomorrow.
Day 40
Fed them with very low amount of fertilizer. I aimed for a ppm of 1000 but I went a bit higher until I have osmosis water . Runoff ppm was 2000, but I have to say I am measuring ppm since this week and will fix this problem
Day 42
No feed

Likes
5
Share


Likes
11
Share


Processing
Likes
Comments
Share


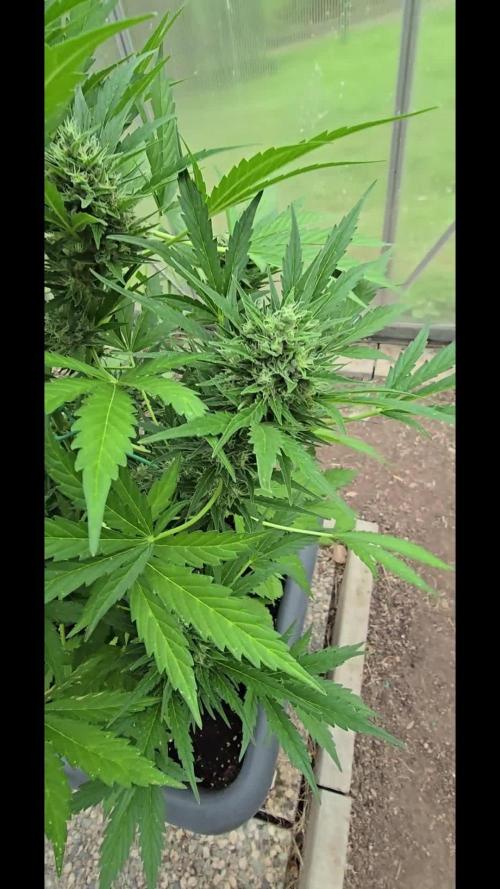
@Grownewgenetics
Follow
we opened these diaries the bsfseeds guys give us these Strains to testing.
the rainbow on week 3 the oldest and one on week 2 , the two really beautiful and become beautiful Jung lady's really quick.
the small one is the San Fernando Valley also from b.s.f.seeds , to our bad we get just one of these and take 3 week's.

Likes
3
Share


@Dillydablabs
Follow
Waiting for equipment like a broke b!@#$ but when I got it it was like Christmas 🎄🎄🌳


Likes
4
Share


@Trinidad
Follow
30.04.2025 Day 58
Not much to report. Chemdawg still stretching. The other are fatten up and producing nice trichomes becoming visible to naked eye. Smell are strong. I can tell which one is tropicana cookies now base on the heavy citrus smell. So by process of elimination the other one has to be banana purple punch. I'm going to add final part solution today by mixing it with 5 liter of water and adding to reservoirs. All except Chemdawg.
Likes
20
Share


@DreamIT
Follow
Sponsored by:
🎆ANESIA SEEDS🎆-💡VIPARSPECTRA💡-💐GREEN BUZZ LIQUIDS💐-🛠️WEDRYER🛠️
28/7 they grow monstrously well, next week they come into bloom
2/8 it took a few days of absence to discolor the leaves and dry out the soil. Today I will be watering properly with Green buzz nutrients fertilizers before sending them into bloom
__________________________________________
Personal advertising (contains affiliate links)
__________________________________________
🦄 The varieties of Anesia seeds all have an extremely high content of THC and cannabinoids. They were bred specifically for the effect and therefore find wide applications for medical purposes as well.
✅https://bit.ly/Anesiaseeds_
__________________________________________
Did you know that Green Buzz Liquids fertilizers are 100% vegan? A complete line of products ready to give the best to each of your plants! Visit the site and see my journals to see how they work 🦄
🤯 And with the code "dreami t" you will immediately receive a 15% discount on your purchases
✅https: //bit.ly/GreenBuzzLiquidsPro
__________________________________________
👀 Are you looking for a good lamp to start with? 👀
🌞Viparspectra has something more than the others, take a look at their site.
⏩ Use "GDVIP" for an extra discount on amazon or "DREAMIT3" for an extra 5 %% discount
👀 Search for it on Amazon
✅Amazon USA: https://amzn.to/30xSTVq
✅Amazon Canada: https://amzn.to/38udUVe
✅Viparspectra UE: bit.ly/ViparspectraUE
✅Viparspectra USA: bit.ly/ViparspectraUS
______________________________________________
🌈 Tired of blowing on your weed hoping it dries quickly? Check out the Wedryer website! You will find a well-made accessory that will help your weed dry in just 8-10 days without the annoying risk of finding mold or other annoyances! (no affiliate links)
✅https: //bit.ly/Wedryer_
______________________________________________
📷🥇Follow the best photos on Instagram 🥇📷
https://www.instagram.com/dreamit420/
Backup
https://www.instagram.com/dreamit4200/
🔻🔻Leave a comment with your opinion if you pass by here🔻🔻
🤟🦄💚 Thank you and good growth 💚🦄🤟

Likes
4
Share


@GREENPHOENIX6262
Follow
06/13 - Flipped into flower - today will be "DAY 1" of flower (Pre-flower) - I will feed only clean water for about a week to remove any excess veg nuts and salt accumulation - I will introduce flower nutes in about 2 weeks starting with with low dosage flower fuel, phosphate and potassium, as the weeks progress I will add more nutrient components. Feeding program will continue on the Vivosun drip emitter and a Exhale C02 bag will be added to the tent as well.
06/15 - Day 2 of pre-flower so much going on - still just clean water feeds until next week - I would like to bring down with salt build up from the veg feeds and as well bring down the EC/PPM values just a bit before introducing the flower nutrients - I will be picking up the lights about 4 to 5 inches as it stands the out main colas are only about 4 inches away from the touching the light and I would like to negate li

Likes
4
Share

@Pechu420
Follow
The growth is very good. Plant 3 has the fewest buds, is the smallest, and seems slightly more indica than the others. Plant 4 has very striking colors.
12/12 from seed
Watering with filtered tap water every 2/3 days, when the pot is lighter, 500-1000ml
Soil:
peat, coconut powder, perlite, carbonized rice husk, sheep manure and worm humus. essential mineral mix, vegetable flours, vegetable cakes, biochar, bokashi EM1 and other organic inputs, Algae ascophyllum nodosum
small pots 3,7liters // 1gallon
light: lm301h-evo
120watts with other plants
Likes
7
Share


@HowieMcHowie
Follow
Es hat sich viel getan. Das Wetter war gut. Die Luftfeuchtigkeit und die Temperaturen sind teilweise extrem (40 Grad / 25 %Luftfeuchtigkeit). Die Pflanzen stört es soweit nicht. Die Auto Orange hat den Anfang gemacht. Mittlerweile (Tag 36) zeigen alle ihre Vorblüte. Die Auto Orange sind beide um die 60 cm. Die Lemon Kix sind alle sehr groß geworden. Da kratzen 2 an die 90 cm. Sie fangen auch an zu riechen. Der Wasserbedarf steigt auch. Giessen muss ich alle zwei Tage. Batboost bekommen sie bei jedem mal. Bloom wird bei jedem 2 Mal gegeben.
Ein gewisses LST habe ich durchgeführt. Die Pflanzenbieger kann ich höchstens 2 Tage dran lassen. Sind sie länger dran brechen mir die Triebe am Bieger. Wahrscheinlich wäre das runter binden und am Topf befestigen die beste Option.

Likes
30
Share


@WeWantItToGrow
Follow
It was another great week here in the grow room plants have come leaps and bounds low stress training is really having a huge effect on canopy density and i cannot be happier

Likes
6
Share


@HUMO_Cultiva
Follow
We start the first week before sprouted! We are excited to look the grow on RDWC!!

Likes
9
Share


@buckyfellini
Follow
Probably only a couple weeks left, so I changed the DWC water to just pH adjusted tap water; pistils are slowly changing color, still less than half are turned. Trichomes are crystal clear and the buds are looking frosty.

Likes
23
Share


@Cannabis_King
Follow
She is coming long nicely the trichomes are maturing slowly but I'm patient.

Likes
4
Share


@CraigGrowsOK
Follow
Trimmed up both plants, they didnt yield too much but every single nug they did produce was coated in trichomes. Top notch bud for sure. I have several more going that Vegged alot longer and have ALOT more budsites that will be going into flower this week. They will yield much more for sure.
Likes
96
Share


@Tonino
Follow
What can I say about this one she’s my pride and joy she’s got so much buds growing on her it’s amazing I just hope that in the next couple of weeks they will swell and fatten up besides that I couldn’t be happier she’s got a beautiful fruity smell and an amazing frosting I’m planning to feed her for another two weeks And then will start flushing
Description
Candida (CD-1) has the highest CBD and lowest THC content of any strain currently available on the seed market. It was named after the founder of Medical Marijuana Genetics’ late mother and means ‘bright light’ in Latin.
Our Laboratory results show CBD levels of between 20.6% and 10.9% CBD with THC levels rising with higher CBD levels - but never passing 1% THC. The balance between CBD and THC remains more consistent than any similar strain.
With these ratios of CBD to THC, the anti-psychotic capabilities of the higher levels of CBD outweigh the relatively small amounts of THC, and effectively remove the "high", psychological effect, ensuring a non-psychoactive cannabis plant.
Candida can be grown both indoors and outdoors. It is recommended for all environments and grow-media and has a unique lemon flavour and aroma that compliments its medicinal properties. CD-1 will flourish in any climate. It has impressed many with its highly vigorous early growth
Candida will noticeably produce two different phenotypes; a sativa and an indica. Initial research has suggested that the sativa phenotype will produce lower, whispier yields often associated with sativa strains. We have noticed to date that the sativa pheno produces higher CBD counts. In comparison, the indica pheno will produce bigger, denser yields with lower CBD levels but still with significant CBD content. It is recommended to give good care to the sativa phenos as these can be harder to manage and will have larger distances between the internodes making the plants more vulnerable.
Generally, the sativa pheno is better suited to making extractions than to smoking and vaping, whilst the indica pheno is suitable for all.
Characteristics
BREEDER/BRAND Medical Marijuana Genetics
GENETICS ACDC x Harlequin
VARIETY Indica / Sativa
FLOWERING TYPE Photoperiod
SEX Feminised
THC CONTENT 0.3%-0.9%
CBD CONTENT 10.6%-20.6%
YIELD 400 gr/m2
GROWS Greenhouse, Indoors, Outdoors
FLOWERING TIME 9 weeks
MEDICAL CONDITIONS ADD/ADHD, Anorexia, Anxiety, Autism, Depression, Epilepsy, Inflammation, Seizures, Stress
MEDICINAL PROPERTIES Depression, ADHD, Anorexia, Epilepsy, Autism, Anxiety, Inflammation, Seizures, Stress.
AWARDS 2nd place CBD category. Spannabis Champions Cup Madrid 2017

Likes
6
Share


@Gardens_of_Of
Follow
Green House Feeded one is enjoying life and keeps stretching. Advanced Nutrients one moved to left top corner and she seems to be doing better than last week. Light intensisty is at 90% in 50 cm distance.


Likes
4
Share


@SpliffDoc
Follow
First sign of preflowers, it's been 7 days since the flip. I'm just winging it like I do with everyday life 🤣😆
They both seem happy enough, if anything the watermelon looks like a could pull back on the nitrogen a little but we'll see.
(Update... 14 days since flip)
The cheese was a male, absolutely gutted. I thought I was seeing things when I saw male sac, none where open so got it in time but how can it just be a straight up male when they're supposed to be feminised seeds? Crazy bad luck or what? If anyone wants to chuck their two cents in I'll happily take the knowledge. The seed was Cheese from Barneys, I've never had this problem with them before but it knocks my confidence with them a bit.
On the other hand the Watermelon Zkittlez is coming along nicely, next week's update will be updated on Monday. Peace ✌️

Likes
32
Share


@TerpyTears
Follow
Hello Growmies
Hope you are doing well and everything is growing in the garden. I needed a social media detox. Was only busy posting which my ladies suffered from. So I only concentrated on my lady. But now I miss you all and I'm looking forward to admiring your grows again 💚 the Icc is almost finished, I'm very happy and I'm looking forward to telling you how delicious it is.
Thank you very much 😁✌️💚
Likes
5
Share


@Bread_n_Buds
Follow
** This week, just quick photos from the growbox. Sorry, I'm harvesting now, so I can't get everything done.
Our L.A. Kush Cake #3 is almost ready. The flowers are turning color and swelling very nicely, and it seems to be turning black, becoming another fantastic dark plant like the first one. It had smaller flowers, but it was beautiful. This plant is medium-sized, but it's spectacular. It's well-proportioned, and the flowers are plump and firm.
Classic 10-liter Zamensia canvas pot
Techniques chosen: The plant was treated with 16 toppings, then trimmed of unnecessary buds, i.e., those that didn't grow well.
We're 100% organic and 1000% Plagron, as always.
The soil we've chosen is the recently launched Plagron Bio LightMix, which will allow us to get the growing process off to a smoother and more reliable start, without the sudden changes that liquid fertilizers can cause. A week is more than enough, so let's not overdo it.
We're in now the flush only water but used plagron on every phase of growing and soil too.
Choose your favorite style and calculate your results on the website:
www.plagron.com
Our new 720W Spider King lamp from Vanguard Hydroponics is now at 80%
Z - https://www.zamnesia.io/en/531-growshop
Our L.A. Kush Cake looks amazing, try it!
Z - https://www.zamnesia.io/en/11097-zamnesia-la-kush-cake-seeds.html
Z - Want to take your growth to the next level? Now you can with Zamnesia's LA Kush Cake. Originally bred by Seed Junky Genetics from a Wedding Cake and a Kush Mints, this indica-dominant strain produces large quantities of resin-coated buds, rich in sweet terpenes and a relaxing effect.
LA Kush Cake seeds produce stocky plants that thrive in any environment. Indoors, they require only 8-9 weeks of flowering to produce dense, trichome-rich buds with a pine-like structure and very compact calyxes. Outdoors, LA Kush Cake can be harvested in early October. Plants produce up to 600 g/m² indoors and 850 g/plant outdoors. In the right conditions, LA Kush Cake can develop intense purple hues that add to its appeal. As you open the jars of these buds, you'll feel a wave of pungent vanilla terpenes wafting through the air, balanced by spicy notes of pepper and mint. Whether you smoke or vape, you'll be instantly intoxicated by its distinctive flavor, with a velvety, creamy aftertaste followed by a powerful yet functional high. Enjoy a relaxing effect that will melt away any tension while keeping your mind clear: perfect for unwinding, enhancing intimacy, or simply enjoying a pleasant smoke. If you need to stay focused, you can: LA Kush Cake relaxes the body while leaving the mind clear and focused, making it the ideal choice for experienced smokers seeking a dynamic, active euphoria that lasts all day. Want to try a potent, productive, and delicious strain? Don't wait: buy LA Kush Cake seeds now and start growing her premium buds at home.
You know it, but I recommend it: here you'll find so many wonderful things, practically "all the best nature has to offer."
Z - www.zamnesia.com
Music //
www.radionula.com
+ Feng Shui Music
+ 432 Hz Frequencies
