The Grow Awards 2026 🏆 


Likes
Comments
Share
@Mrs_Larimar
Follow
2024-07-20
I'm focusing solely on the Indoor Girl in this report. The Outdoor Girl will receive a separate update
once she shows more signs of flowering. This week's photos showcase the Indoor Girl's journey
from start to finish, and she's been an absolute joy to grow - truly an easy-going plant.
I'm fascinated by her structure, which boasts a perfect ratio of leaves to buds.
Remarkably, I never had to remove a single leaf to improve light exposure. I only topped her twice
to open up the canopy. She grew vigorously and effortlessly, requiring just some nutrients and top dressing to keep her happy
during the transition to flowering. Her daily water intake was consistently around 1 liter minimum, with only four feedings throughout the entire growth cycle.
The result is a plant crusted with trichomes - glittery and gluey, perfect for extraction. Harvesting was a breeze
due to the ideal leaf-to-bud ratio. I've kept her remains and continue to water and feed her in an attempt to revegetate.
Meanwhile, her outdoor sister is thriving in a hot and sunny environment.
I adore her aroma profile, which features only the most pleasant terpenes. The scent is reminiscent of various citrus fruits
- pink grapefruit, orange, mandarin, and tangerine - with a creamy touch that's reminiscent of a delicious dessert. There are also floral notes of lavender.
I'll continue documenting the Outdoor Girl's progress here. I'm certain I'll grow this strain again, as it has proven to be stable,
well-composed, superbly structured, and delicious.
Well done, Seedsman!

Likes
18
Share
@All_our_small_plants
Follow
5000 ml jeden 3 Tag in der Neunten Woche
pH-Wert: 6,2
EC-Wert: 1.4 mS/cm
Temperatur: 30ºC
Luftfeuchtigkeit: 50%
Schädlingsbekämpfung: im Moment haben wir keine Anzeichen das es was zu bekämpfen gibt, sobald die ersten Anzeichen da sind werden wir handeln :)
Düngemittel: Brenneseljauche self made hat einen EC wert von ca 1.4
Besonderheiten: Sie wurde nun in den Outdoor Bereich
-Tag 60 Heute wieder Wasser mit etwas Jauche. Von den Farben her ist sie klasse aber ist leider irgendwie nicht das was wir uns Erhofft haben, Sieht eher aus wie so ne Roggen Pflanze 😓 wird auch warscheinlich nur so ein 10 Gramm sein. aber wir wolten es ausprobieren.

Likes
4
Share


Likes
13
Share
@Hroma
Follow
Segunda planta en ser cosechada tras 62 días floreciendo.
Muy fácil cultivo y muy buen resultado.
Puesta a secar el 10 de Marzo.


Likes
10
Share
@Prilyfe13
Follow
11/25/2025
New week and new water. I can't figure out why my pH is so messy. Always swinging super wide. This morning for example was 4.6 pH on both plants. The mix concentration went up to 1000 ppm on both as well.
The big difference I'm seeing is what's in the water. Papaya Cookies has clean nutrient water while Lemon Cherry Cookies has root debris in it. No clue why it's happening. Hell I don't even know if this is a thing. But it's happening. Hopefully with the water swap, it'll go away.
Maybe I'll have to dunk the roots in a different bucket to try and clear the stuff off. It's too bad I can't bring the whole plant to the sink. Lol.
I could spray the roots down. As it is, that's never gonna happen. So aside from having my cousin come over and hold the plant up while I clean out the roots, I think I'm stuck with this and have no idea what it is or how to fix it.
Personally I think the roots are self pruning. Why? Maybe the concentration is too high and it's eating away at the roots. I doubt it, or it could be not enough oxygen. Don't know how to fix that. My air stone is bad ass. But it's the same air stone and setup in Papaya Cookies, but no debris or old roots. Could it be because the size of the root ball? The one in Lemon Cherry Cookies is massive while the other one is big, but not massive like this one. Could that be it? Who knows. All I know is I need to figure it out. Any ideas anyone?
Other than that, it's a new week and a new bucket of water. I think I'm gonna cut the nutes back a little bit from last week. Maybe they will actually show issues if there are any. I'm only cutting back a little bit. Just the bloom nutes. Instead of 1.25 teaspoons per gallon, I'm gonna cut it back to 1 teaspoon. If it shows signs of deficiency, I'll add a little bit more. But I have a feeling they will be happier with a lighter dose.
Now I can't tell when these ladies will be done. I'm saying another 2 weeks. I said the same thing last week, but I'm not so sure now. They still have tons of white pistils. Especially Lemon Cherry Cookies which is odd. That's the one who should be done first. However, Papaya Cookies has more orange pistils and denser nugs. I really hope both plants come out masterfully. And I really hope they finish at the same time. I'm using this tent for drying. I don't have space for my 2x2 anywhere. Small apartment. Anyway, so yah, drying on the 3x3.
Speaking of 3x3 tents. I'm pretty sure either one of these plants would have filled this tent out. They both filled out wide and deep. Luckily they aren't too deep where I can't access the back, but one of these would have filled out the tent. Especially with the training I could have done with that much room. I think they stopped growing where they stopped because of the size of the space. I bet if they were in a 4x4, they would be much bigger. Because they grow to fit the space. Or at least that's what I'm discovering.
Of course there's the one off that grows to be a beast, but that was a one time thing. And I'm pretty sure the seeding had something to do with it.
Anyway, I'm getting. A 4x4 eventually and will find out if my theory is correct. At least with autoflowers, that is.
Photoperiods may be a whole different story. Actually based on how they grow, it's a completely different story. We can manipulate photos in how they grow and even when they get switched to flower. It would make perfect sense that a photo grow as big as they can in in a smaller space with manipulation.
Anyway, rambling over.
Alright everyone. I have changed the water and this reads. 5.85 pH for both.
Papaya Cookies has an EC of 1.458 and TDS 725 ppm
Lemon Cherry Cookies EC 1.65 and TDS 809 ppm
We'll see what it's at in the morning. Don't really know why the mix is higher in Lemon Cherry Cookies, it's still low enough though. I have a feeling I should dunk both of them in plain water just to get the rest of the debris off. And maybe some of the nutrient buildup off. At least I think that might be the problem.
11/26/2025
2 days over the deadline, but whatever. I'm gonna get some damned good bud if I can fix this issue I'm having.
Specs:
Papaya Cookies:
EC: 1.701
TDS: 838
pH: 5.5 pHed to 5.85 2 hours ago now it's 6.1 (ummmmmm?)
Lemon Cherry Cookies:
EC: 1.765
TDS: 885 ppm
pH: 6.1
Well that's not good. I changed out the water and cleaned the buckets out. It has to be the roots. How the hell do I clean the roots? Or well, rinse the dead stuff off? I changed the water. I made sure the water they went into was clean as well. I have questions. Questions that need answers. To the forums! Hopefully I find a solution.
Good morning. Afternoon for us.
Lemon Cherry Cookies:
PH: 6.05
EC: 1.77
TDS: 885
After pH: 5.8
EC: 1.80
TDS: 888
Papaya Cookies:
pH: 6.44
EC: 1688
TDS: 837 ppm
After pH: 5.8
EC: 1.70
TDS: 848 ppm
11/27/2025
Papaya Cookies:
Before:
pH: 6.35
EC: 1.955
TDS: 977 ppm
After:
pH: 5.75
EC: 1.634
TDS: 829
Lemon Cherry Cookies:
Before:
pH: 6.5
EC: 1946
TDS: 967
After:
pH: 5.85
EC: 1.693
TDS: 843 ppm
Lost power last night while the lights were on. 11 hours of no light and now it's lights out, so another 4 hours of dark. Not too sure what I should do. Should I turn the lights on? Or should I leave them in the dark until lights on? I feel like turning the lights on now when it's not lights on time would really mess with the light schedule and possibly cause some issues. I'm gonna leave them off.
As we can see above, the concentration of the mix is still rising. But the plants aren't showing any signs of real stress. Or at least stress that could be seen. Still not sure what to do. I'm hoping the top off of plain water will help. But I think I need to dunk them both in a bucket of clean water a few times to get all the excess salts off the roots. That's what I think is causing the problem. The roots somehow have buildup in them and it's releasing it in the water. Or something like that. Maybe? I dunno. I think I figured out the debris in the buckets. It's from handling the roots when I remove the plant for pHing. Only Lemon Cherry Cookies though, her root ball is so large I have to lift half of it out of the bucket to put it in the reserve tank. Maybe the oils on my hands are causing issues? Maybe?
So the two issues combined today with the power outage and the water mix still out of whack, I'm afraid there will be some sort of stress that we can see when the lights turn on. Let's hope it's mild.
The environment was also pretty bad this morning. It was 56° in the house this morning. Apparently I lost heat and power last night. So it was cold and without the fan on, it was really humid too. Like 74% humid. But I think it was cold enough for nothing to start to grow. At least that's what I hope.
I might have to change Lemon Cherry Cookies water though. There's a subtle smell about the water. I might change it today. We'll see how it turns out when lights come on. If I'm having the same issue with the increased EC and TDS I'm swapping out the water. I might have to buy some hydrogaurd or something. Maybe that will help clear out whatever is going on. I was thinking peroxide, but I'd rather use things that are designed for Hydroponics.
I might change Papaya Cookies water as well, there's nothing funky about it, but the concentration is still rising. I'll pump a gallon out and replace it with plain water... Again. Maybe I'm just giving them to much to start. It's about 20% lower than the regular dose. Now that I think about it, that's pretty high. And these plants aren't big. Maybe I still need to drop the bloom down. Maybe the boost as well? I dunno. I'm gonna drop the Bloom nutes to 0.75 teaspoons per gallon. Should be 3 teaspoons for the 4 gallons of water. Let's see if I can get it to drop below 800 ppm and stays under there.
11/28/2025
AM readings.
Papaya Cookies:
Before:
pH: 4.9
EC: 1.857
TDS: 945 ppm
After:
pH: 5.8
EC: 1.816
TDS: 934 ppm
Lemon Cherry Cookies:
Before:
pH: 6.35
EC: 1.865
TDS: 934
After:
Didn't do anything. Will top off with pHed water this afternoon.
I want to see if they will do their thing with the higher concentration. Still, I know it's not good, but I really don't want to keep pulling Lemon Cherry Cookies out and mess up the roots. Btw, I've decided the issue with the debris in the water is because of me handling the roots when I pull the plant out of the bucket. I have to left about 2/3 of the roots by hand. So if I leave it alone in the bucket, and pH with top offs, I should be fine for the rest of the week. If the mix reads any higher, this afternoon, after lights out, I'll pull a gallon and replace it. But that means I have to handle the roots. I guess we'll see.
11/29/2025
I forgot to record today's measurements before I adjusted. Papaya Cookies had plummeted pH. 4.6. the EC and TDS were actually not too far off.
Lemon Cherry Cookies on the other hand swung super high, guzzled a ton of water and spiked both the EC and TDS. We are talking a TDS of 1200. How?! I dumped a gallon of plain water in. It fixed it for the most part. This thing is taking in like zero nutrients. I've been advised that the issue with the pH swing is probably the size of the roots compared to the bucket. They said it is most likely shedding roots due to the size. I assumed that is based on a ratio.
Ok, done. Lights turned off before I could get to Lemon Cherry Cookies. However I did dump the gallon of water in. Should be fine. 3 more days and we can change out the water and do a much lighter dose. Here's the afternoon specs.
Lemon Cherry Cookies:
pH: 6.5 (high)
EC: 1.794
TDS: 882 ppm.
Papaya Cookies:
pH: 6.3? (Apparently I did not do my measurements right.)
EC: 1.644
TDS: 820 ppm
So that was just after lights out. So I couldn't take them out and adjust the pH again. But, Papaya Cookies keeps crashing, so this should at least get through all the nutrients she needs.
Lemon Cherry Cookies on the other hand has been swinging up. With her pH up at 6.5, it's gonna spike even more. Maybe not though. I did add that gallon of plain pHed water. I need a bigger bucket. Lol.
Anyway, the environment has been pretty good these past few days. Very happy with that. I've been following the VPD for the most part. So far it's right on the money beteeen 1.49 kPa and 1.59 kPa. While lights out hangs out around 1.30 kPa. Temp is 68° and humidity is 44% for a perfect environment.
Day temp is 75° and the humidity at 45%.
11/30/2025
Morning Readings:
Papaya Cookies:
pH: 4.68
EC: 1746
TDS: 866
Lemon Cherry Cookies:
pH: 6.49
EC: 1904
TDS: 950
Adjusted:
Papaya Cookies:
pH: 5.6
EC: 1519
TDS: 760
Lemon Cherry Cookies:
pH: 6.2
EC: 1753
TDS: 876
So let me explain the way I did things today. Plain water for each. I left the water completely alone for Papaya Cookies and added that with its pH of 8.0. That mixed in pretty nicely. Not good enough, but close. After lights out, I'll probably pull both plants and pH them properly. But I'm trying to avoid lifting, moving or agitating the roots of both plants in any way. Obviously I'll have to pH properly at some point today or tomorrow.
12/01/2025
Measurements this morning were off. This time though, Lemon Cherry Cookies pH swung down to 5.6. That's new. But of course her EC and TDS were high again. So still not taking in nutrients. But she drank a gallon of water. Something is going on. I only lifted her a little bit to see where the air stone was.
Papaya Cookies had a super low pH as per usual. Which is really bad. Her leaves are starting to show signs of serious deficiency or pH damage. I don't know the difference yet. But I do know there's definitely an issue. Anyway, her EC and TDS weren't that far off. So I dumped half a gallon of pH rich water to bring the lower pH mix up. Spot on at 5.8. it also lowered the EC and TDS. Not much though. Unfortunately, my water pump is too big for the access panel. I need to get a smaller one. Then I could pump the water out, pH and pump it back in. Oh well. Next time.
Environment is good.

Likes
3
Share
@Unculti_responsable
Follow
Bueno esta semana le dimos engorde y un riego con guano , no veo que estén engondarno mucho así que seguro lo vamos a dejar unas semanas más de lo previsto , para cosechar cuando estén bien gordos los cogollos

Likes
57
Share
@MadeInGermany
Follow
It's finally here 😀.
Both phenotypes are in the fermentation phase 😍.
The grow was a lot of fun, so I thought I'd make an Iolator hash out of leaves and a little bud and a little oil out of both phenotype buds.
Cannabis:
The grow:
Both grew beautifully.
Your stretch was normal and it didn't cause any problems.
Feeding :
You received GHSC bio Grow once in the vegi phase and GHSC Bio bloom twice in the flowering phase.
GHSC enhancers were added every 2 weeks. That was just the right amount for both : 1:.
Optic:
The appearance of Phenotype 1 is almost completely purple 😍.
Pheno 2 is coated a bit purple with a mixture of silver from the resin :-).
Smell / taste
Pheno 1 tastes very fruity.
You can really say that it tastes like a tangerine in the finish : 1:.
Pheno 2 also tastes a little fruity but with its distinctly stronger note in the Kush direction. Both very tasty : 1:.
Storage:
The cannabis is stored in glasses in a dark place where the temperature is between 19-22 degrees.
The first 2 months of fermentation are boveda packs 62% in the jars. Then the 58% come in.
Since I was in the mood for a few specialties again, as mentioned above, I also made Hash Oil and Ice Oilator hash.
Let's start with Video 1 (BHO) Hash Oil production:
Hash Oil:
Process:
Small grated cannabis goes into the Dexso tube.
Below is a container in the PTFE film that serves as a base so that the oil can be easily removed at the end.
At the top we give the Dexso gas through the Dexso tube filled with cannabis.
The result is a mixture of the gas and the cannabis oil.
We put the bowl with the mixture in a hot shot of water but make sure that no water comes in at the top.
We let the whole thing simmer for 20 minutes so that the first gases can evaporate.
Then everything goes into the vacuum chamber so that all remaining vapors can really escape and we have a pure product 😁.
The whole thing is carried out for 2-3 days until the oil is ready 😀.
I can only recommend everyone to vaporize oil in a dabbing rig 😍.
Taste:
The taste is extremely delicious.
In the finish, it tastes much more like mandarin than the buds 😀.
Optic:
The oil is very shiny to matt.
If you pull it apart, it becomes light as honey :-).
If you roll it up, it's very conceit.
Consistency:
The oil will become a little harder in the silicone storage after a short time.
However, if you take it in your hand, it can be pulled and kneaded very easily after a few seconds.
That was it with the oil production.
So let's continue with the Ice o Lator 😀.
Making the Ice o Lator:
I took all the remains of the leaves and placed them in the small net.
Then the IO maker is first made about 1/3 full of cold water with water.
I add 3-4 kg of ice cubes and wait about 15 minutes until the water is below 0 degrees.
As soon as the temperature is reached, I put in the net with the leftovers and set the timer to 15 / on and 10 / off.
I run the whole thing 3 times.
Then the complete broth is passed through the sieves (160, 120, 73 and 25) in a bucket. After sifting everything is spread out on a ceramic plate and poked very small with a knife.
The whole thing comes in a dark place and is then allowed to dry for about 3-4 days.
As soon as the hash has dried, it comes into the press for a few hours at a little temperature.
The result is a kneading oily Ice o Lator 😍😍😍.
Optic:
The optic is partly reminiscent of that of oil :-).
Consistency:
The ice o lator has a very soft consistency :-).
You can roll up small sausages while smoking 😁.
Taste:
The taste is very medicinal. But very earthy and smoky finish : 1:.
All the screenings are very good but the 25 and 73 are the best 😃.
That was it with the production to see everything again in Video 2.
So we come to the end of a beautiful passage ☺️.
Finally, I would like to say that I would like to thank Sweet Seeds for the sponsorship and for providing two such great genetics 🙏🏻.
If anyone has any questions about this type, oil or ice, I will answer as soon as I can.
I wish you all a lot of fun with this big update :-).
Have a nice start to you and your families into the new year and everyone stays healthy 🙏🏻.
Let it grow 🍀
MadeInGermany
You can buy this Strain at :
https://sweetseeds.es/de/red-mandarine-f1-fast-version/
Type:
Red Mandarine F1 Fast Version
☝️🏼
Genetics:
Red Poison Auto®️ (SWS39)
X
Tangie (California Orange x Hybrid Skunk)
: 1:
Vega lamp:
2 x Todogrow Led
Quantum Board 100 W
💡
Bloom Lamp :
2 x Todogrow Led
Cxb 3590 COB 3500 K 205W
💡💡☝️🏼
Soil :
Canna Coco Professional
☝️🏼
Fertilizer:
Green House Powder Feeding
☝️🏼🌱
Water:
Osmosis water mixed with normal water (24 hours stale that the chlorine evaporates) to 0.2 EC. Add Cal / Mag to 0.4 Ec Ph with Organic Ph - to 5.5 - 5.8 .
Likes
25
Share
@pifflestikkz
Follow
Day 45
17/08/24 Saturday
Another watering today using de-chlorinated tap water pH 6 only.
Lemon skittles and XXL ammo are tall, bud nice and smelly plants!
The Kabul is more of a dense compact build, I'm excited to see what they grow into 😍
Picture and video update ✌️ 💚
Day 48
20/08/24 Tuesday
Feed today using de-chlorinated tap water pH 6. With Plagron PK13-14 and power buds.
Noticing the stretch stop, and now packing out there bud sites 💪💚
Vid + pic update ✌️💚


Processing
Likes
24
Share
@GrowGuy97
Follow
Day 76 Flower day 21 - Ladies are looking extremely healthy & have been growing amazing! All 3 have gotten extremely tall & are all starting to bud, can’t wait to see how they turn out! Thanks for following & happy growing friends!🙏🏼✌️🏼🌱

Likes
165
Share
@Tropicannibis_Todd
Follow
💩Holy Crap Growmies We Are Back💩
So what do you say we have some fun 👈 We got some EXOTIC SEEDS 👉 👻👻👻MONSTERMASH👻👻👻 😛
Well my friends we are just at the 63 mark and as you can see shes doing great 👈
👉 So folks , she's been quite the little monster , and she's building some nice buds 👈 Shes the only one that hasn't had any real issues 😎
Lights being readjusted and chart updated .........👍
👉I used NutriNPK for nutrients for my grows and welcome anyone to give them a try .👈
👉 www.nutrinpk.com 👈
NutriNPK Cal MAG 14-0-14
NutriNPK Grow 28-14-14
NutriNPK Bloom 8-20-30
NutriNPK Bloom Booster 0-52-34
I GOT MULTIPLE DIARIES ON THE GO 😱 please check them out 😎
👉THANKS FOR TAKING THE TIME TO GO OVER MY DIARIES 👈


Likes
42
Share
@GODSGIFT_2005_JM
Follow
COMMENTED BY
GODSGIFT_2005_JM GODSGIFT_2005_JM 18 February 2022
⛺️ MARSHYDRO
💡VIPARSPECTRA
🍼GREENHOUSE FEEDING BIO GROW
🌱 WEEDSEEDEXPRESS
Likes
1
Share
@HUUDUUH
Follow
Just a little bit of bokashi this week.
Beautiful!
So ready to flip!!!! 👾
2 more days 🤲
-
I noticed that the leaves were somewhat drooping and it wasn't due to lack of water. I asked the GPT for help and the advice was to reduce the ppfd. I was going a little over 600 in the center, I thought that since they weren't burnt it was ok, but I realized that there's no point in going over and expecting a good response. Less is more now. Just hold on for a smooth flip for the flora.
Likes
8
Share
@Weedganja420
Follow
Ha sido una de las mas productivas de las 8 que tenia en el pequeño armario.
Voy a repetir esta cepa en mi siguiente cultivo ya que me ha encantado.


Likes
4
Share
@LittleBigTrees
Follow
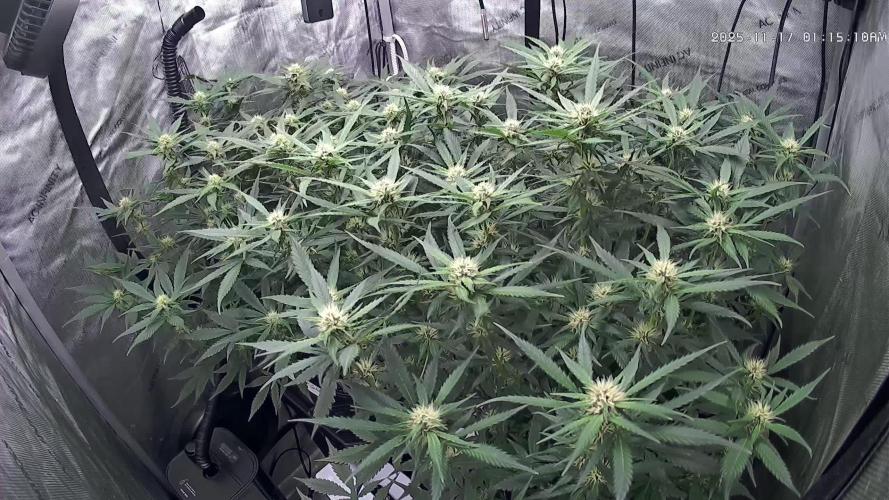
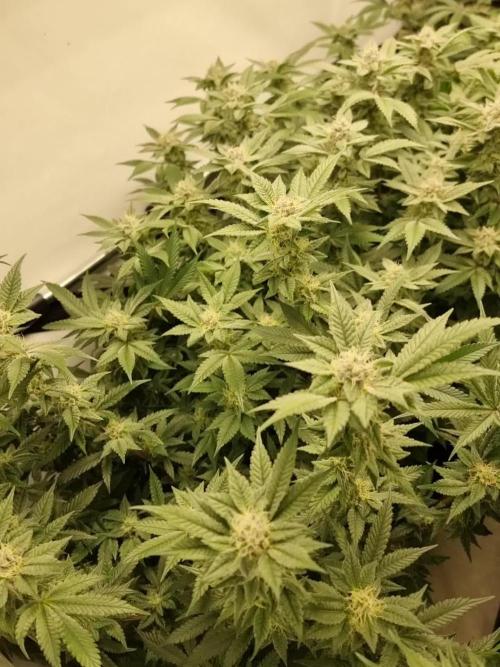
Trichomes are covering the surface of the plants now. The smell is citrus and gas.
I might take one or two plants down early to see how different the high is and how different the taste is. The smell really changes from week 6-9.
Still feeding full strength with 20% run off.
Likes
12
Share
@StonedandSteady
Follow
AutoBlueberry 11th w/ 6th W/ Flower breed by #DivineSeeds #DivineSeedsSquad #DivineSeedsBreedingCompany
4th feed of #NukeHeads Nutrients #PlutoniumBloom Check out these Lush Ladies and those Awesomely Purple Budz with Trippy Trichomes Growing on! I'm also trying to make and/or convert one of my Budz into a Polyploid (Bigger and More Bulbous Bud) This AB is Flowering out and her Smells are Super Strong of Gasy and Candied Blueberries! I recently Trained down her branches to expose more Bud sites and Removed the Biggest fan leaves to expose the Bud site's to this Glorious #OsreeQB1000w Full Spectrum Grow Light! I've also Super Cropped, Topped um, Defoliated, Leaf tucked, and Implement the 3D's method like my Broski #TigerfishOrganics to remove the Dead, Dying and Diseased leaves!
Origin:Afghani/Thai
Type:50% Indica/ 40% Sativa/ 10% Ruderalis
Flowering:56 days
THC:22%
Harvest:400-550 g/m2
Height:110-150 cm
They were Growing under the #Growatt600w and in my #TopoLite 24×24×48 Grow Tent but I've Upgraded and Updated it to my #OsreeQB100W I'm also using #TNBNaturals #TheEnhancer Co2 Despersal Canister and using thier Ph⬆️⬇️ for my Decolinated Tap Water!
Green and Growing Up Great! She's Growing into her 6th week of Flower! She's Growing in my special blend of ProMix potting mix, a 1/2 bag of Earthworm castings and 2 light handfuls of Diatomaceous Earth mixed Up well for before transplanted! Diatomaceous Earth: Diatomaceous earth is made from the fossilized remains of tiny, aquatic organisms called diatoms. Their skeletons are made of a natural substance called silica. WHAT IS DIATOMACEOUS EARTH?
In a nutshell, DE comes from the fossilised remains of small marine organisms called diatoms. Over a 30 million year period, these hard-shelled algae collected on the bottom of bodies of water, eventually forming into a type of sedimentary rock. Fast forwarding, it wasn’t until around 1836 that a German peasant Peter Kasten discovered the ivory-coloured, powdery substance while drilling a well in northern Germany. Ever since, the usefulness of DE for multiple purposes, including industrial and horticultural applications, has been well-reported. Just sprinkle some diatomaceous earth on top of your soil and watch mother nature's secret weapon work its magic.CONDITIONS THE SOIL
When it comes to growing cannabis, everyone strives to provide the best soil to grow the best plants—but there’s always a way to make it even better. Making the soil a better medium is called soil conditioning, which is exactly what diatomaceous earth does. It works by improving the retention of moisture in your potting soil, holding a large amount of fluid and drying at a rate that’s much slower. This natural soil additive also helps to retain nutrients and allows for better oxygenation of the substrate. NATURALLY CONTROLS PESTS
DE is an all-natural, safe-to-use substance that doesn’t harm the cannabis plant with toxic chemicals. The nature of diatomaceous earth makes it useful against most types of insect infestation you might be experiencing; and unlike chemical insecticides, insects can’t develop a resistance to the effects of DE. So once they’re gone, they’re gone for good. DE is an abrasive. and when used as an insecticide, it gradually scrapes away an insect’s exoskeleton, absorbs the fluids, and dehydrates insects and other critters to eventual death. IMPROVES PLANT STABILITY
When using DE in your soil, it can be especially beneficial as it frees up nutrients so that they are made available to the plants as needed. This works via the silica content of DE being absorbed into the plant tissue, which helps improve the plant’s ability to respond and receive more nutrients as DE activates. This in turn results in greater yields and better stability under small pH fluctuations!
https://divineseeds.net/
https://instagram.com/divine.seeds?igshid=osxe2v7en33v https://divineseeds.net/
Thanks Again to All my Friends, Family's, Teams, Sponsors, Followers and Subscribers!!! Your Genetics are Merry Magnificent, Mega Marvelous and Mighty Medical! Love um!!! I really Can't stress enough how Thankful and Grateful I am of All of you and what you've Shared with Us! Means the World!!! It's definitely a Pleasure being able to Grow with these Phenomenal Grow Lights! Please Enjoy! BudBrothers4-Life! Cheers Famz!!! Much Props and Much Topz!💯🔥 #Osree #GrowStarStore #Growatt #TNBNaturals #TNBTeam #GrowYourOwn #Bliss
https://instagram.com/osree.light?utm_medium=copy_link
https://instagram.com/as420.ca?igshid=1f116alw054wp
The Grow Bags: https://www.as420
https://instagram.com/tigerfish_organics?utm_medium=copy_link
https://www.facebook.com/Tigerfishorganic/
#TigerfishOrganics YouTube Channel Link: https://youtube.com/channel/UC6OSXTda1JYaVNoCxdcYqIg


Likes
25
Share
@Elpicor
Follow
Start 25/10/2024
Harvest Day 74 - 06/01/2025
92 cm jet fuel was the taller
No flush, flawless finish 2 ml a week an half before harvest then just watering with pH 8.
Smelling exactly as described in Sweet Seeds site, a fruits explosion, special thanks! They sent me a lot of free stuff Thanks!
Also thanks to Grow Diaries as my best professor ever...and obviously all of you sharing your magic experience, see ya next two weeks maybe
Likes
6
Share
@valiotoro
Follow
Hello everyone👋
Week 2 for my girl
They are doing very well,growing at fast pace and with a beautiful green colour on the leaves.
Have a nice day 😎🔥
They are under the mars hydro FCE-6500 + UV55 5min/hour💡
