
Likes
Comments
Share


@DeepRootsGrowTrees
Follow
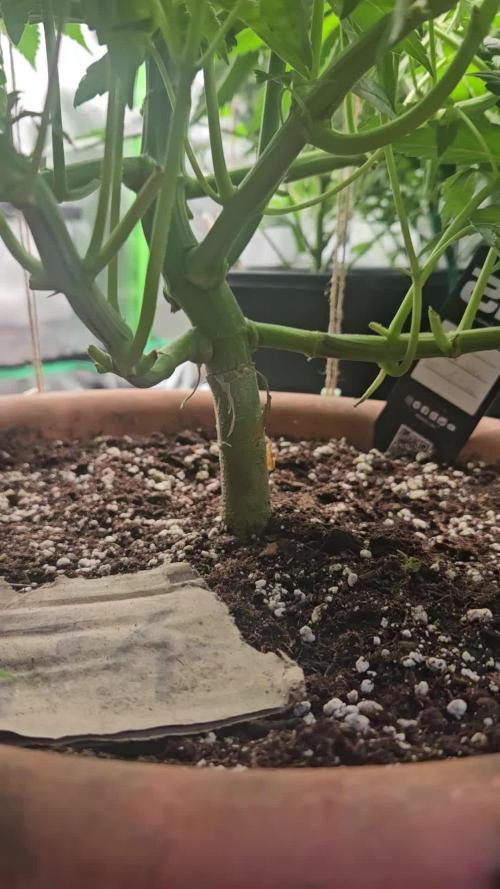
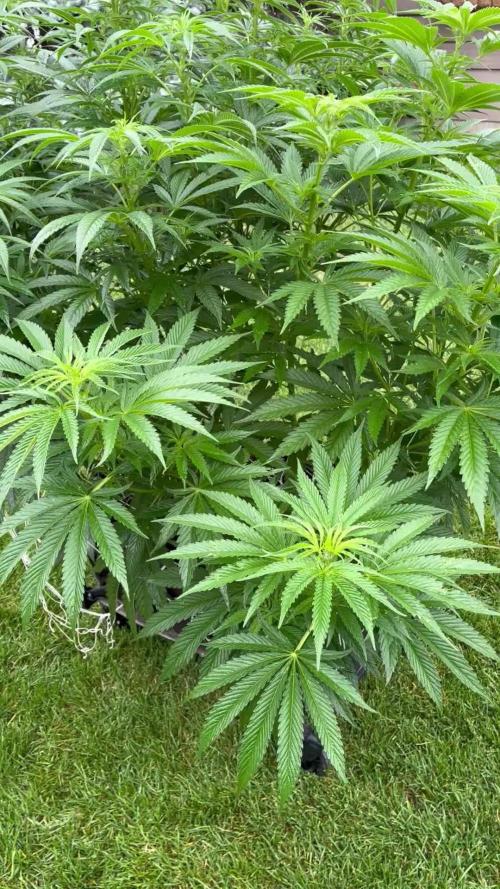
JOANNE'S CBD / ROYAL QUEEN SEEDS
WEEK #9 OVERALL
WEEK #8 VEG
This week she starting to look much healthier and she growing at a nice rate overall a good week! Stay Growing!!
Thank you for stopping by and taking a look it's much appreciated!!
Thank you ROYAL QUEEN SEEDS!!
JOANNE'S CBD / ROYAL QUEEN SEEDS

Likes
2
Share


Likes
4
Share


Likes
11
Share


@DeXterMazoR
Follow
Hello Guys the last few days.. Now is in 48h in the dark.. Next post is the harvest..
Take care and be safe💫💫💫

Likes
125
Share


@SlowpokeFuegobud
Follow
🍊 🍋 🍮 🍭 🍊 🍋 🍮 🍭 🍊 🍋 🍮 🍭 🍊 🍋 🍮 🍭
Welcome to week 7, dear friends!! 😘
DAY 42
Moved to a new tent wih a new LED 💡
DAY 44
Watered with 2ml A+B und 0,7ml C4 + vitalize and enzym+ +2ml calmag 💧
Topdressing with Vitabrix
DAY 46
Watered with 2,5ml A+B und 1ml C4 + vitalize + 2ml calmag + enzym+ 💧
DAY 48
Watered with 3ml Bigfruits + Humics + 2ml calmag + vitalize + epsom 💧
Watered with nematodes. 🐛
Thanks, everybody!! 💚 💚 💚 Grower love!!! 😘🙏 🌱
_________________________________________________________________________________
SETUP:
80x80x180 cm Zelsius
240W Full Spectrum LED IR UV dimmable
DW240H-A6-HS
Heatsink color red
LED Chips:
512pcs SAMSUNG LM301H + 24pcs Osram 660nm + 8pcs Osram IR 730nm + 8pcs UV 385nm
Color mix: 2700K + 4000K
2,8umol/J
Driver HLG-240H-C2100B
Coverage: veg 5x3ft / flower 4x2ft
Product size: 628x205x68mm
Green Buzz Nutrients
Shouts go out to my sponsors @GreenBuzzNutrients, thanks so much for your support! ❤️
If anyone would like to try their amazing organic products, use code GD42025 for generous 25% discount (for orders of minimum 75€) ✨
https://greenbuzznutrients.com/
Mills Nutrients
Biobizz Lightmix
custom exhaust fan 320/270cm³/h
Carbon Active Granulate 240cm³/h
tab water pH 8 - EC 0,25 with Calmag to 0,5
Advanced Hydroponics pH minus Grow + Bloom to pH 6.2
🍊 🍋 🍮 🍭 🍊 🍋 🍮 🍭 🍊 🍋 🍮 🍭 🍊 🍋 🍮 🍭

Likes
226
Share


@Kitties_and_Colas
Follow
~_~_~_~_~_~_~_~_~_~_~_~_~_~_~_~_~_~_~_~_~_~_~_~_~_~_~_~_~_~_~_~_~_~_~_~_~_~_~_~_~_~_~_~_~_~_~_~_~_~_~_~_~_~_~_~_~_~_~_~_~_~_~_~_~_~_~_~_~_~_~_~_~_~_~_~_~_~_~_~_~_~_~_
08/13/21:
😺Week 5 is here!!🐱 they're growing fast and the yellowing seems to have corrected on its own (keeping the feeding routine consistent)
.. we removed some growth from the mainline and topped at the ends (we decided to try topping at 3rd node for a wider plant, we'll see what happens lol), our goal is for 4-6 mains per side. All the BigBud plants need to be re-potted this week into their final homes..we're running a little low on promix so 50% will be reused..thanks for reading, drop a like if you made it this far lol..we'll update midweek ❤️🐱💡🌱
~_~_~_~_~_~_~_~_~_~_~_~_~_~_~_~_~_~_~_~_~_~_~_~_~_~_~_~_~_~_~_~_~_~_~_~_~_~_~_~_~_~_~_~_~_~_~_~_~_~_~_~_~_~_~_~_~_~_~_~_~_~_~_~_~_~_~_~_~_~_~_~_~_~_~_~_~_~_~_~_~_~_~_
8/14/21
😽Everyone was up-potted to 5- 6 gallon containers toady..I also cleaned out a tent and moved a light, creating a space just for the ILGM Big Bud 😺👌
~_~_~_~_~_~_~_~_~_~_~_~_~_~_~_~_~_~_~_~_~_~_~_~_~_~_~_~_~_~_~_~_~_~_~_~_~_~_~_~_~_~_~_~_~_~_~_~_~_~_~_~_~_~_~_~_~_~_~_~_~_~_~_~_~_~_~_~_~_~_~_~_~_~_~_~_~_~_~_~_~_~_~_
8/16/21:
😺I think my transplant solution was a little too spicy for them, we're starting to get glossy and claw (pics) but no dead tips yet..definitely water only for a little while...
~_~_~_~_~_~_~_~_~_~_~_~_~_~_~_~_~_~_~_~_~_~_~_~_~_~_~_~_~_~_~_~_~_~_~_~_~_~_~_~_~_~_~_~_~_~_~_~_~_~_~_~_~_~_~_~_~_~_~_~_~_~_~_~_~_~_~_~_~_~_~_~_~_~_~_~_~_~_~_~_~_~_~_
8/18/21
😻Crazy fast new growth after last topping despite looking over fed.. this seems to be a very forgiving strain.. A+ so far 👊🐱
~_~_~_~_~_~_~_~_~_~_~_~_~_~_~_~_~_~_~_~_~_~_~_~_~_~_~_~_~_~_~_~_~_~_~_~_~_~_~_~_~_~_~_~_~_~_~_~_~_~_~_~_~_~_~_~_~_~_~_~_~_~_~_~_~_~_~_~_~_~_~_~_~_~_~_~_~_~_~_~_~_~_~_

Likes
3
Share


@Andres
Follow
She is a large plant. There is still a couple of weeks left in his flowering. Summer ends in this part of the world and temperatures are low. Although the.orange is not cold, the minl is 17 C. I am happy with this strain of ripper seeds

Likes
20
Share


@Buddyman75
Follow
They were eating and growing at a fast rate. I had to Increase the water almost 50%. Happy growing
Likes
10
Share


@Rabidreject
Follow
Nothing has realy happened since I cropped the royal cream....It is just hanging. Decided to do a dry trim so that it takes longer to dry due to the fact I am having to just use my cupboard so the humidity is pretty low. Leaving the leaves on just means It takes longer to dry.
I am going to crop the Easy Bud in the next few days when the mood takes me.
I had 4 left over R. Cream seeds left over because I informed them that. bought 2x 3 packs and only 2 seeds germinated so they sent me another packet which is REALLY good of them and the sort of thing that means I would definitely use Royal Queen Seeds again, for sure!
The trich's are basically all cloudy with a few clear. I cant see any amber but my loupe is a ridiculously cheap Chinese piece of crap. I will invest in a microscope camera so I can hook it up to my phone or MacBook. It is way too hard to keep everything steady In order to see what is popping with my sexy trichomes.
Obviously feeding has stopped for about a week now. I forgot to change it In the diary last week so will try and correct that now..
I know it is not strictly relevant but I had to go somewhere earlier and took a video because I was able o walk in the middle of a main road in my town which Is usually packed full of cars, especially at the time I was walking on it. It is a time that makes me even more glad I grow my own. I really need to buy the bigger tent, lights and re-locate to the bigger, more subtle cupboard (not the one i am using to dry my weed in the video I posted) and then I will be able to effectively ScrOG the 2 or 3 plants I have, in order to maximise yield so I can be totally self sufficient with regards to my cannabis medicine.
UPDATE - MONDAY
I just realised I have made a proper idiots mistake an missed out on some much tastier buds because of it. OK, so I got paid today, so I though I would treat myself to some of them cheap COB chips I used for my last grow because hey were super cheap and actually really effective considering the price. I ordered 2x 100w 6000k veg spectrum chips with a solderless connection for my power. I also ordered one of these heatsink + reflector. https://www.amazon.co.uk/gp/product/B01MT824NP/ref=ppx_yo_dt_b_asin_title_o01_s00?ie=UTF8&psc=1
My thinking was that I have a spare heatsink here that the old citizen CLU-048 is attached to so I was going to fit one of the chips into that and the other into the heatsink and fan I bought. This hought process lead me to go ad retrieve the old citizen LED and I thought I would try it. Still didn't work, then suddenly I thought it could be a simple blown fuse so I changed it aaaannnnd.....still doesn't work. doh!
I started to remove the COB holder and COB from the heatsink (it was just glued to it using thermal compound) and when I laid it on the table I decided to test the driver without the COB holder on the tiny off chance it might work...nope
I then realised maybe I got the + and - the wrong way round, tried again and boom works perfectly. The connection from the holder to the cob had bent slightly off contact.
Really annoying that this whole time I could have doubled my photons to the plant, however, really nice that I don't have to spend a load more money on lighting in order to upgrade into the new room.
So all I have to do now is spend money on a pre-drilled heatsink and a new metal COB holder for the citizen.
Likes
2
Share


@Alpinefarmer
Follow
Ciao a tutti,
eccoci di nuovo, sono passati 8 giorni dall'ultimo aggiornamento.
oggi siamo arrivati al giorno 40 di fioritura, i fiori sono raddoppiati di dimensioni e sono gia duri come delle pepite che si riempiono di resina giorno dopo giorno aromatizzando tutto il locale di agrumi.
Negli scorsi giorni ho avuto un problema di sovrafertilizzazione, dopo una mia prima analisi penso sia un accumulo di nutrienti immobili contenuti nei concimi AN che ho aggiunto alla mia solita fertilizzazione dato che volevo azzardare e vedere se ci fossero dei miglioramenti.
Era dall'ultimo post che le piante iniziavano a mostrare segni di una concimazione troppo sostenuta, nella vasca l'EC era 2.4 e a partire dal giorno 35 dopo ogni 24 ore avevo un aumento dell'EC di 0.3-0.4, cosa che regolavo aggiungendo acqua riportandolo ad un valore di 2.4 e aumentando il PH a 6 per vedere se le piante riuscissero a metabolizzare meglio i nutrienti in eccesso, pensando che le piante lo avessero sopportato dato che le conoscevo e sapevo che potevano mangiare tanto tanto. ERRORE *****
il giorno 39 sono intervenuto cambiando la vasca e mettendo solo acqua con PH=5.8 che cambierò giornalmente almeno fino al giorno 41. quando poi tornero ad aggiungere i concimi ma ad una dose inferiore.
per il momento posso dire che l'aggiunta dei concimi AN non ha avuto gli effetti desiderati sulla dimensione dei fiori. Quantità e qualità della resina e dei suoi terpeni non posso notare alcuna differenza dato che attualmente le temperature sono relativamente basse e preservano bene tutti i terpeni motivo a cui attribuisco il loro grande profumo che come detto è inebrianti, adoro chiudere gli occhi e annusare le cime PURA AROMATERPIA :P
Vi direi addirittura per il momento di aver esagerato con i prodotti e ho pure speso soldi inutilmente creandomi un problema di concimazione

Likes
97
Share


@CANNASIM
Follow
GENERAL COMMENT.
So the RQS STRESS KILLER AUTO is down. Now we have the NL to manoeuvre and try to keep her alive for the final flush.
RQS NORTHERN LIGHTS AUTO COMMENT.
Many but slim colas emerged, showing extreme spotting and deficiencies, but gained weight since last week and started turning purple, first time that happens.
So now the final flush started and hope, afraid taste could be off, because of the problems i ran in with her, probably a good strain to considere light feeding, the smell is very gentle, a good strain to do stealth.
10-14 day to go! Yield could be amazing but will be common because of the locks, nothing out of the curve in my opinion, something to retry and correct to deal with this strain. Not turned on or off by her just feeling neutral and glad she made it.
Trichomes wise she is just ready, mostly cloudy, she will finish with some amber will do a nice sleeping aid.
Trim job will be a pain on this one because i will clean all the small affected spotted leaves.
Likes
43
Share


@valiotoro
Follow
Hello everyone 😎
Week 2 for my girl
She is doing very well,growing at fast pace and with a beautiful green colour on the leaves.
Have a nice day 😎
Likes
14
Share


@RakonGrow
Follow
Tag 78 :
+ 2L Flaschenwasser
++ Dünger mit wenig CalMag
+ final PH 6.10
+ Abends
Tag 79:
Trichome an den äusseren Buds aufgenommen . Ende der Woche ist Erntezeit .
Video hinzugefügt.
Tag 80:
es war heute echt mal 44%rH und das bei normalen Temperaturen .
Tag 81:
Komplette Entlaubung und Vorbereitung zur Ernte . Bleibt noch die Nacht so im Stofftopf (fast trocken) .
Tag 82:
Ach ich hab mich doch mal entschlossen mit 1.5 Liter Flaschenwasser + CalMag ein paar Spülungstage zu machen . Dieses im Vegetativen Zelt mit der 100W von Spiderfarmer auf extrem niveau (25cm Abstand) . DAs ballert nochmal schön auf die Trichome .

Likes
12
Share


@another_grower
Follow
Started with new fertilizer, just to end the cycle. Concentration of 1200 ppm
Some leaves degradation can be seen. Watering has intensified. Flushed both with 5 liters of tap water.


Likes
18
Share

@Mannirumpel420
Follow
Nach einer Woche auf 12/12 zeigt sie nur vereinzelte weiße Härchen.Momentan ist die luftfeuchte im zelt sehr hoch,ungefähr bei 80 Prozent.Glücklicherweise ist die Blütephase erst am anfang.Ich habe sie weiter heruntergebunden,damit die unteren Triebe mehr licht abbekommen.
Likes
6
Share

@Northern_Ent
Follow
July 19: second week of force flowering for Mimosa Shot. She’s doing fine and height wise has mostly caught up to the other plant in the wagon.
Defoliated the understory to remove small buds and most fan leaves. Left some big fan leaves down below but took most out to improve airflow.
July 21: doing fine.
July 22: Foliar spray with Epsom salts and potassium silicate in the morning. The magnesium in the Epsom salts seems to help with the yellowish new growth.
July 23: added another loose Scrog net layer this morning. Tying the net to water bottles to open up canopy to sunlight.
July 25: watered yesterday with some leftover water from steaming beets for dinner. That water likely had lots of N because beets are high in nitrate and the plants look really green today.

Likes
5
Share


@littlefoot
Follow
This thing gets bushy no matter how much I trim. Just letting her be and hopefully see some height this week.
Got better bud clips and wire...


Likes
14
Share


@Chedderbob112
Follow
Av had a good week been busy dunno exactly wot a want tae dae hear feel like a constantly want mere paitience is the key Rome essential built in a day
Processing
Likes
29
Share


@CanadianFillmore
Follow
Welcome growfessors to flowering week 5 of the Super Lemon Haze. This lady is growing happily and bud sites are steadily plumping up. She's also starting to stank real nice, citrus is in the air!
Thanks for stopping by 👽🌳
