
Likes
Comments
Share


@Kappa420
Follow
High temps, plants are extremely short and progress very low. Added some rhino skin to help.

Likes
8
Share


@eldruida_lamota
Follow
Que pasa familia, vamos con la segunda semana de floración de estás Zkittelz de Seeds Mafia.
La humedad está entorno al 50%,y la temperatura la tengo entre los 22/24 grados.
Controlamos en ph en cada riego a 6.2.
Y el agua que utilizo de riego suele estar estancada entre 24 / 36 horas.
Cambie el fotoperiodo a 12 horas, hasta aquí todo bien, tienen un buen color, ya van progresando y creciendo a buen ritmo, vemos cómo avanzan estas semanas y como avanza el progreso de las flores.
Mars hydro:
Code discount: EL420
https://www.mars-hydro.com/
Agrobeta:
https://www.agrobeta.com/agrobetatiendaonline/36-abonos-canamo
Hasta aquí todo, Buenos humos 💨💨💨

Likes
23
Share


@blazin_skywalker
Follow
This plant is flexxxxing! 💪💪💪
Day 18 - I am so impressed with the boom of growth from this plant! She's looking healthy as ever after her feeding yesterday. I'll take a picture of her root system when I change the reservoir. She's going to be a beast!
Day 21 - Approaching topping day. This chick means business. This has been smooth sailing so far! Her leaves are so big, healthy and green. I increased my LED to full spectrum.

Likes
44
Share


@MadeInGermany
Follow
Info:
Unfortunately, I had to find out that my account is used for fake pages in social media.
I am only active here on growdiaries.
I am not on facebook instagram twitter etc All accounts except this one are fake.
Hey everyone :-)
Another nice week goes by and it is slowly becoming a bush from training 😊.
This week it was poured 2 times with 1 l each time (For nutrients, see the nutrient table above).
She was trained once again with topping.
You still have some time until it blooms until space is free :-).
Otherwise everything was checked and cleaned like every day.
Have fun with the update and stay healthy 🙏🏻
You can buy this Nutrients at :
https://greenbuzzliquids.com/en/shop/
With the discount code: Made_in_Germany you get a discount of 15% on all products from an order value of 100 euros.
You can buy this Strain at
https://www.amsterdamgenetics.com/product/super-silver-haze/
Type:
Super Silver Haze
☝️🏼
Genetics:
Haze x Skunk #1 x Northern Lights
Type:
70% Sativa – 30% Indica
👍
Vega lamp:
2 x Todogrow Led
Quantum Board 100 W
💡
Bloom Lamp :
2 x Todogrow Led
Cxb 3590 COB 3500 K 205W
💡💡☝️🏼
Soil :
Canna Coco Professional +
☝️🏼
Nutrients :
Green Buzz Liquids :
Organic Grow Liquid
Organic Bloom Liquid
Organic more PK
More Roots
Fast Buds
Humic Acid Plus
Growzyme Big Fruits
Clean Fruits
Cal / Mag
Organic Ph - Pulver
☝️🏼🌱
Water: Osmosis water mixed with normal water (24 hours stale that the chlorine evaporates) to 0.2 EC. Add Cal / Mag to 0.4 Ec Ph with Organic Ph - to 5.8

Likes
Comments
Share


@ISCA_Abi_In_Da_HOoD
Follow
hello we are in the second week of growth I have just planted them in new cups which are a little less than 1 l.
I started using root growth fertilizers and a little microbial.
For the moment they seem to like it so we will continue to fatten them once a week and in the meantime we will use the silicate from T.A. I thank sweet seed I thank everyone who has followed me since the beginning. thank you see you very soon kisses 🍋
Likes
6
Share


@ManxLife_420
Follow
Starting to pick up a bit of bulk now. I'm reluctant to remove some of the fan leaves, because I maimed my first grow lol. So I'm using soft plant wire to hold the fan leaves aside. Allow as much light through to the new nodes


Processing
Likes
24
Share


@GrowGuy97
Follow
Day 21 - Ladies are looking nice & healthy! Everything seems to be going great, one is still growing a little slow but all in all extremely happy with this grow so far! Thanks for following & happy growing friends!✌️🏼🌱
Day 22 - They are really starting to take off now😍😍
Day 23 - not sure if it’s the pheno type or the nutrient but the plant that is getting the Technaflora Nutrients is starting to get a little bigger🤷♂️🏼
Day 24 - Babies are really starting to take off😍😍 got my New420GuySeed gear in today as well👍🏼🙏🏼
Day 25 - Starting to really grow now, the smaller of the 3 I starting mainlining today to do another comparison at harvest time!
Day 26 - Another good day of growth! Thank you for following & happy growing friends!🌱✌️🏼
Day 27 - End of the week & these ladies just keep looking better & better😍

Likes
151
Share


@BioBuds
Follow
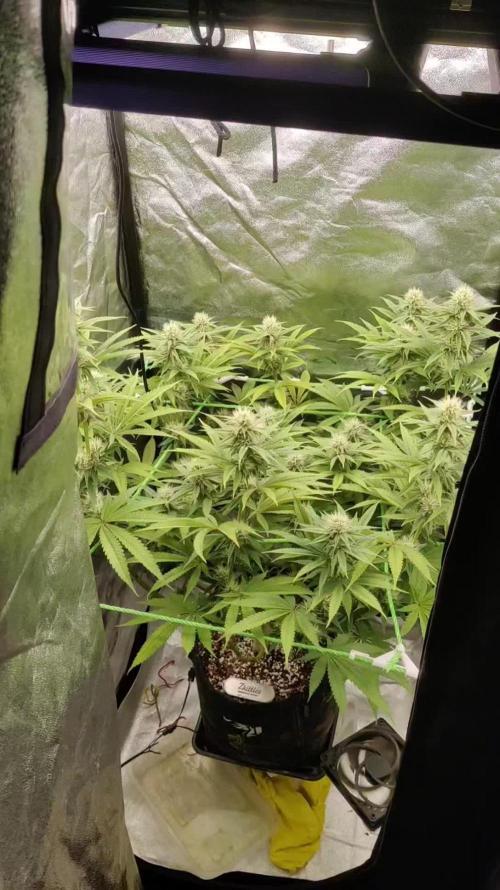
Well, what we feared, became a reality, one of the regular XTrakush plants is a male. This is why I planted two and I'm happy it seems to be only the one. But with the canopy going nice and full it hurt to get it out. Of course, I hoped to have two females but nature went its course. Considered leaving it in, to pollinate the others, or keeping it somewhere, but I do not have the space or light for it.
Thus with pain in my gut, I went about getting her out. I notice a nice developed root system, very healthy, which was very hard to get loose. After shaking the soil off I have a rootball the same size as after my whole grow last time. I could lift the whole 57 ltr bag by lifting the plant. Sturdy stem, thick solid branches. This is what I was aiming for and it works. The soil again is proving itself to be a winner.
The light this low gives some higher temps as expected, but manageable within ranges. The SP-3000 is performing really well and I cant wait to see the bud development coming weeks. I'm sure it will deliver a great amount of bigger buds looking at all the flower sites and the thick branches that support them.
Remember to check in on www.mars-hydro.com, they have awesome deals now for Black Friday!
I'm giving more water now, once in two days instead of three. They seem to need it with the higher temps. The plants seem to take the light well on only 45 cm.
I've started adding the BAC Organic Bloom Nutrition. It is designed to work with the microorganisms I added with the micro life. With this I do a little bit of Calmag, but not so much, since I don't see any evidence of shortages, again proving my soil is dialed in for growing under LED perfectly.
All in all, even with a minor setback, all is ready to pull in a mega harvest.
Thanks for checking in again!! Hug Bud & Sunshine.


Likes
19
Share


@Sergio_721
Follow
So far it seems to be fine even if the high humidity worries me even if the temperatures are still high then they have stopped growing and will finally focus on the flowers and slowly we recover these small deficiencies
Likes
5
Share

@DerEkstaseHase
Follow
Der Geruch wird intensiver!
Es riecht so unglaublich lecker, etwas nach Haze und stark nach tropischen Früchten!
Wachstum ist gut, die Blüten werden schön dick :)

Likes
19
Share


@Naujas
Follow
well, she is already showing signs of flowering, it's a pity that she didn't get to spend another week in vegetation :) Well, that's okay, she looks healthy and beautiful to my eyes:) which makes me happy :) good luck with the growing :)
Processing
Likes
10
Share


@Reaper
Follow
start of week 2 veg,
i put an aquarium heater in my res to keep the temp 21 celcius
also added an extra airpump in the res with the waterpump
roots are already in the water
i used CFL so far i might hang my led above them now

Processing
Likes
5
Share


@xxBudgetAutosxx
Follow
Started watering plants every 72hours with a pint of water.
Seem to be starting to grow faster now and I can now tell which one is the sweet tooth auto 😂😂😂

Likes
86
Share


@CANNASIM
Follow
------GENERAL COMMENT------
Girls are moving forward without troubles, i'm pleased not having to deal with issues.
I'm breaking down the feeding schedule like:
Sensi Base + Bigbud*(or pk booster) + Recharge > VeloKelp+Natures Candy+Bigbud*. So there is constant feed, every other day mixed in 1.5l water. Once a week i give Cal Mag 2ml /l.
Not touching the girls with any HST or stress since I switched to flower. Is the first time i'm running recharge from the beginning to the end, have to say that is solid.
------GG.AK47 COMMENT------
What a pleasure to see that many colas and a vibrant girl giving fruits! 😎👊 I'm very curious to see the results in this one, solid strain! Aroma is gasy and diesel like.

Likes
43
Share


@Esoteric_growing
Follow
Really happy with the quality, only had three plants so yield was down on usual.
The THC content was absolutely insane, two of the phenos had a zkittlez terpene and the other was more gelato leaning.
This is my favourite strain of barneys to date👍
Likes
6
Share


@DogDoctorOfficial
Follow
Week 1 Flower – Roller Coster Haze (Zamnesia Seeds)
Lights Flipped, Ride Ascending
The ride has shifted — welcome to Week 1 of Flower for the Roller Coster Haze girls. We’ve officially flipped the lights to 11 hours on / 13 hours off, marking the start of their journey into bloom. While they’re not showing any floral signs just yet (no pistils or preflowers), this moment is crucial, it’s the beginning of the shift, and everything that follows builds from here.
⸻
Why 11/13 Light Cycle?
Most growers run 12/12 — and while that’s great for many strains, we’ve chosen 11/13 for a specific reason:
🌒 Shortening the light period can help trigger earlier flowering and more aggressive hormonal shifts, particularly in sativa-dominant or haze genetics like these.
🌘 In nature, light hours gradually decrease, and this slightly shorter photoperiod mimics late-season sun, signaling to the plant that it’s time to reproduce.
In our experience, this encourages a quicker transition into flower, sometimes with denser stacking and better resin development down the line. The trade-off? Slightly less daily photosynthesis, but with the right lighting power and nutrition, it more than balances out.
⸻
Nutrient Shift – From Start to Top
As we flip into flower, we’ve also transitioned our nutrient formula to support the shift in energy:
• Removed:
• Aptus Start Booster – previously used to support early-stage root development and vegetative vigor.
• Introduced:
• Aptus Top Booster – same application rate (0.25 ml/L), but designed to stimulate early flower development, improve transition timing, and lay the groundwork for bloom stacking.
Why this change?
Because the hormonal shift has begun. We’re no longer supporting root initiation, now we’re priming the plant for floral identity, helping her internal systems prepare for the stretch, calyx development, and bloom site stacking.
Our base feed remains:
• Regulator – 0.25 ml/L
• CalMag Boost – 0.25 ml/L
• All-in-One Liquid – 1 ml/L
• Top Booster – 0.25 ml/L
⸻
Growth & Structure Update
These girls are branching like mad, spreading their wings and showing incredible vegetative structure just before stretch kicks in. Both phenotypes are looking stunning:
• Pheno #2 & Pheno #3
• ~55 cm in height
• Both with 8+ nodes, symmetrical branching, and healthy internode spacing.
• Deep green leaves, upright posture, and zero signs of stress or deficiency.
We’re expecting these girls to stretch considerably in the coming weeks, and we’re ready for the ride.
⸻
Environmental Snapshot – The Summer Stretch Begins
Despite high temps, the girls are thriving. Here’s a readout of current conditions:
• PPFD: 760 µmol/m²/s – measured via TrolMaster MBS PAR sensor, ensuring accurate canopy-level intensity.
• Temperature: 31°C
• Humidity: 50%
• VPD: 2.23 kPa – yes, on the high side, but manageable for the moment.
• CO₂: 632 ppm
We’re aware that VPD is a touch aggressive, and we’re standing by for the arrival of the new AC unit to bring that back into optimal range. Still, the girls are handling it like champions, no curl, no droop, just upward movement and new growth.
⸻
Lights & Control Ecosystem
Our lighting and environmental control setup continues to perform beautifully:
• ThinkGrow Model One LEDs
• Future of Grow LEDs
• TrolMaster Tent-X Controller – managing:
• CO₂
• Temp & Humidity
• PPFD
• Device sync
• Spider Farmer GGS Controller for extraction fans
• Dual 6” exhaust systems with carbon filters
• One 6” filtered intake
• All airflow dynamically managed via AeroFan + Spider Farmer extraction, allowing clean in/out cycles, keeping the air fresh and responsive.
This is a precision ecosystem, designed to respond, not just run.
⸻
Final Thoughts – Lifting Off
This may be Week 1 Flower, but it’s really the moment of lift-off. The girls are still pre-flower, yes but this is the space where momentum builds, energy collects, and the transformation begins. We’re shifting from vegetative growth into reproductive focus — and if this week’s energy is any sign, we’re in for a glorious bloom phase.
The Roller Coster Haze journey continues , and it’s gaining speed.
Let’s grow together,
– DD (DogDoctorOfficial)
⸻
📲 Stay connected & join the ride:
• Instagram: @DogDoctorOfficial
• YouTube: DogDoctorOfficial Channel
• GrowDiaries Journal: GrowDiaries Page
⸻
Powered by the Best – Gear & Genetics
• Genetics – Zamnesia: https://www.zamnesia.com/
• LEDs – Future of Grow: https://www.futureofgrow.com/
• LEDs – ThinkGrow Model One: https://www.thinkgrowled.com/
• Environment – TrolMaster: https://www.trolmaster.eu/
• Extraction – Spider Farmer & AeroFan
• Nutrition – Aptus Holland: https://aptus-holland.com/
• Substrate – PRO-MIX BX: https://www.pthorticulture.com/en-us/products/pro-mix-bx-mycorrhizae
• Storage – Grove Bags: https://grovebags.com/
⸻
💚 Remember: Grow slow, grow smart, and grow with love. The best is just ahead — and we’re here for every phase of the bloom.
We’ve got much more coming as we move through the grow cycles. Trust me, you won’t want to miss the next steps, let’s push the boundaries of indoor horticulture together!
As always, this is shared for educational purposes, aiming to spread understanding and appreciation for this plant. Let’s celebrate it responsibly and continue to learn and grow together.
With true love comes happiness. Always believe in yourself, and always do things expecting nothing and with an open heart. Be a giver, and the universe will give back in ways you could never imagine.
💚 Growers love to all 💚
Processing
Likes
21
Share


@Siriuz
Follow
Week 9
Here we go with the updates
We've been adding nutes twice a week
@1800ppm every 4/5 days
Day 70
She's been doing good
Growing like a monster!
Day 71
Very well
Day 72
More LST
Day 73
Schedule for 20/24hrs
Day 74
Time to feed them again
Floranova bloom plus water
I have been watering her lil every day early morning and before bed just sprinkle some for extra humidity but not much just to recreate some good environmental flow.
Day 75
SUPER growing and added more soil
Day 76
End of week 9
Doing very well growing fast and good