
Likes
Comments
Share


@drbill
Follow
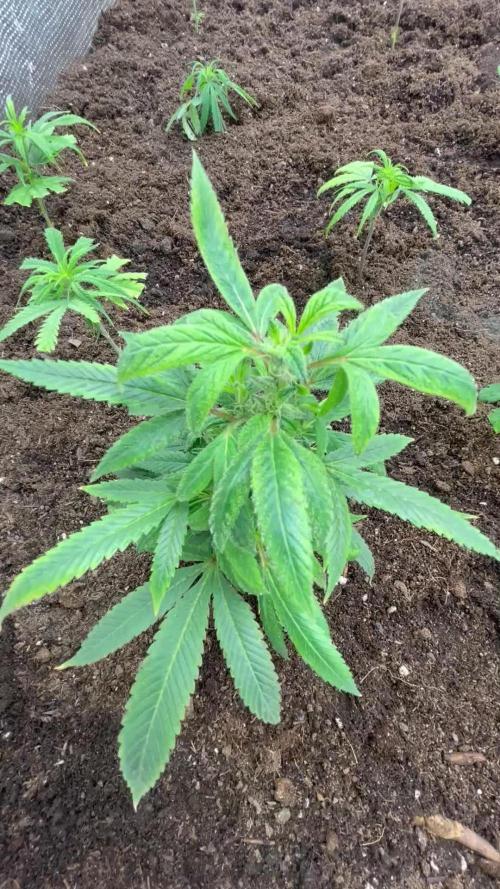
More mistakes made (I'm so worried I'm killing them), but trying to tone everything down to recover. I'm staying with 25% of nutes for now
Smell has increased. My whole basement has a very green "Plant" smell. It's less earthy now and more green.
First floor only smells on occasion... No carbon filter used yet...
Day 50 July 16 raised lights (saw a lot of light burn) and reduced power to 75%. fed 800ml water each (saw a bit of nutrient burn, slowing it down a bit)
Day 52 July 18 #2 1100ml to each 2.5ml calmag, 2.5ml micro, 1.25ml gro, 3.75ml
per gallon. pH meter issues 1L fed to each
Day 54 July 20 fed each 1l of water
Day 55 July 21 nut made 2.5ml calmag, 2.5ml micro, 1.25ml gro, 3.75ml bloom 6.36ph ppm 490 fed 1L each

Likes
42
Share


@Boos_Buds88
Follow
She's budding up nicely now, GrowCaps are doing their thing pretty well, no major issues with her :) sorry for lack of photos I've been so busy harvesting the other girls, i forgot to take any lol so her smell is changing from lemon fuel to a lemon sherbet smell, i can taste the rainbow already 🤤😍 i dont even care if she doesn't make it to harvest, i still can't wait to try her lol

Likes
16
Share


@Dunk_Junk
Follow
Well into flowering now.
She is definitely a more indica phenotype 😭
I must have lucked out first time round with such a Sativa phenotype 😍
I'd love to know more on this side. The likely phenotypes, and how and why they come about. Also what is the likelyhood/prevalence of each of the phenotypes.......
So many questions 😂
But anyway, she's looking absolutely fab. Flowers developing well so on she goes a few more weeks! 👌


Likes
69
Share


@ButtersStotch
Follow
2020-08-30 (Day 48)
Still trying to rectify the nitrogen deficiency but she’s still chugging along and starting to put off some flowers 🌺. Love the look of this girl, I put up a video too!

Likes
2
Share


@MaltaHerbman
Follow
Start of week 3 feeding
Plagron:
Alga grow 1ml per liter
Fish force 1 ml per liter
Power roots 0.50ml per liter
Calmag Pro 0.50 ml per liter
Siilic rock 0.50 ml per liter
450 to 550 ppm
Day 18 had keep same feeding but changed light to 18/6 as soon need to do first topping so plant need to rest.

Likes
19
Share


@Ferinky
Follow
En esta actualización se incluyen 2 semanas ya que por trabajo me fue imposible añadir la semana anterior.
El día 15 de Agosto recibió la segunda pulverización de Bacillus Thuringiensis para prevenir el ataque de las orugas.
Sigo alternando riego de agua un día con riego de Ascophillum Nodosum al día siguiente. He dejado de regar con Cannazym.

Likes
28
Share


@Felloffthegrid420
Follow
So it’s been hot and dry storm came throw didn’t seem bother any of the feed some blood meal and bone mean and the same stuff I use lee do it smell o so sweet can’t wait

Likes
23
Share


@Kakui
Follow
Primera ves cultivando una cepa de esta calidad, algo ansioso por obtener los mejores resultados posibles con estás genéticas.
Básicamente elegí la Grandpa's Stach R2 y la Grandpa's Cookies #6 S1 solo por sus tiempos de floración, espero que sean buenas tanto de sabor y resina, cómo también de producción.
G1, brotaron las semillas, solo 1 semilla brotó chueca, por lo que tuve que ayudarla con un alambre y va un poco atrasada en comparación del resto.
G3, primer riego con pH 6.1 y EC 0.6, y micorrizas Great White.
G5, creciendo bien.
G11, riegos cada 2 o 3 días, a punto de pasar a etapa vegetativa.

Likes
58
Share


@AsNoriu
Follow
Day 15 since seed touched soil.
Ducks are very very very slow to develop. Maybe slowest strain i ever grew. Most look nitrogen overfed , dont want to grow at all ...
Will be forced to leave them for one more week at home. Other strain goes out this friday .
Autumn not far ... Not a big hope with this one ;)))
Day 19. They went out !!! Hope summer is long ....
Happy Growing !!!
Likes
3
Share

@carlitoshaze44
Follow
nuestra pequeña vuelve a la vegetación!
acompañada de sus hermanas amnesia Haze selección

Likes
5
Share


@AustinRon
Follow
TH 1Q2025 - Week 11 - Flower 8
(ON Haze X Original Haze) X Northern Lights #2
“Todd’s Haze”
Objective
- 8 Female Plants, Topped ONCE @ Flip, 12” when topped
- Modified Sea of Green
Seeds Wet: 1139PM, 28.2.2025
Germinated: 2.3.2025
Flip: 21.3.2025
Harvest: 77 Days, DATE: 6.6.2025
_________________________________________
__
Fri May 16, 2025
TH 1Q25 57:F:8:1
Harvest Dehu
- [x] Amount: [ 1.5, gal]
- [x] EC: [ 2.9, mS/cm]
Refresh Reservoir
- [x] Primer A&B: [ 36, ml]
- [x] SLF-100: [ 15, ml]
- [x] Amount: [ 3, gal]
- [x] EC: [ 1.8, mS/cm]
Runoff
Amount: [ 2, gal]
EC: [ 1.9, mS/cm]
__
Sat May 17, 2025
TH 1Q25 58:F:8:2
- [ ] Install Line Supports for TALLS!!!
We REALLY need to clean up the foliage, especially lowers.
Defoliation
- [ ] GO SLOW
- [x] Remove Fans w/ Petioles up to Center Bar of tent.
- [x] Selectively Defol above
Note: Last time we defoliated, we thereafter had a flush of new green. (Week 5) May be correlated with CalPHOS (Applied same time) or Not. Point is, GO SLOW.
Runoff:
- [ 0.25, gal] # Leaving Irrigation Parameters overnight. Will gauge amount being taken up SUNDAY
__
Sun May 18, 2025
TH 1Q25 59:F:8:3
The Veg is almost overwhelming. I’m continuing this grow with some encouragement from GrowCast, but:
1. Pistils have integrity, the bracts are completely loosened, but larfing on uppers apparent.
2. IF This plant finishes, they’ll largely be TRIM MONSTERS.
3. I could grow my clones today - without having clones to take -
*** Frustration***
Harvest Dehu
- [x] AMOUNT: [ 2.5, gal]
Refresh Reservoir
- [x] Amount: [ 2, gal]
- [x] Primer A&B: [ 12, ml, gal]
- [x] SLF-100: [ 5, ml, gal]
- [x] EC: [ 1.8, mS/cm]
Runoff
- [x] Amount: [ , gal]
- [x] Installed Lateral Supports for Leaning TALLS
__
Mon May 19, 2025
TH 1Q25 60:F:8:4
We’re using more water than Dehu is providing . . .
Refill with pH’d FILTERED TAP
__
Tue May 20, 2025
TH 1Q25 61:F:8:5
__
Wed May 21, 2025
TH 1Q25 62:F:8:6
__
Thu May 22, 2025
TH 1Q25 63:F:8:7

Likes
1
Share

@KurtThePlantGuru
Follow
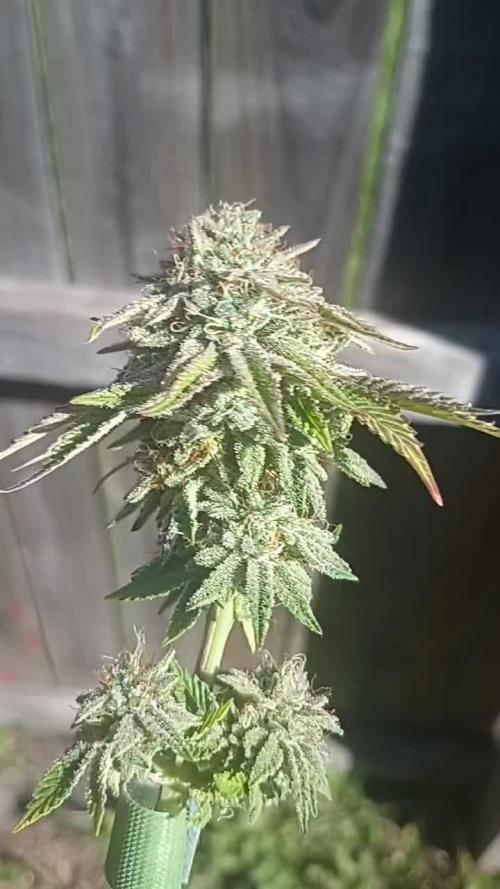
One of my best grows to date, super happy with how it came out... A Gorilla Glue heavy strain with a background notes of Oreoz. Deep Chocolate Diesel. I'm in love with it. Gonna make sum tasty tasty rosin.
Would be 10/10 if it didn't herm
Likes
41
Share

@AsNoriu
Follow
Day 78 from seed touching soil. #1 was eaten by bud rot, really heavy, buds all in dirt, she was very low, overstreched from lack of light and water, so went all to bin. Two plants were worthless, last hope on late one . #2 is still going, shows preflowers, big plant.
Happy Growing !!!

Processing
Likes
15
Share


@Venabr96
Follow
Entrando na terceira semana de floraçao. Planta otima com tons violetas e com otimos galhos.
Como sao de floraçao rapida pulei algumas semanas na tabela de rega na biobizz( sem2 e sem4 ) e esta reagindo otimamente.
Dia 19 floraçao : planta muito volumosa com lindos ramos e frutos com desenvolvimento muito rapido.
Otima para o LST com bastante flexibilidade e rapido crescimento.

Likes
9
Share


@Siriuz
Follow
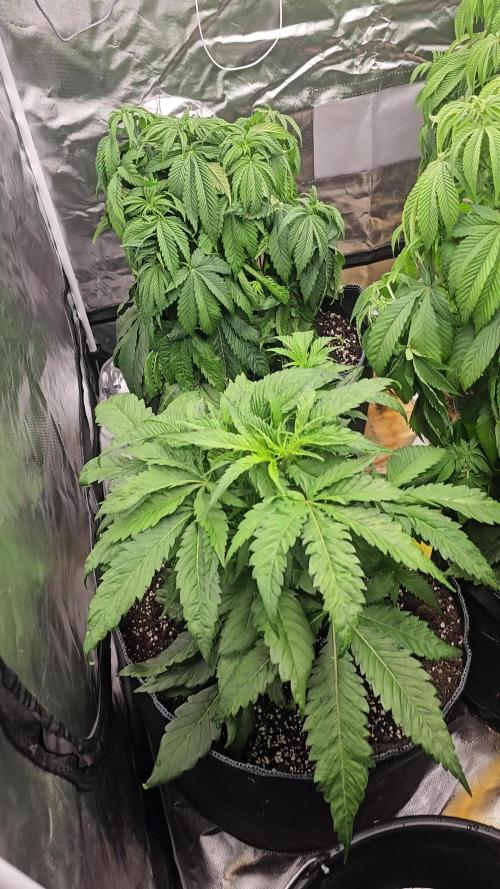
Ok guys so she was bushy again and so we did defoliation again.
You can see the difference and then after that started flowering even more
Plus the fact we are increasing the amount of molasses added to the soil plus the floranova bloom nutes.
They are very thirsty girls, taking around 1.5-2lts per 48 hrs
So almost like a 1 liter per 24 hrs
Very good SoG to make them feel even more comfortable
Going to change schedule from 24/0 to 19/5 and see if they evolve!
Thinking about adding some humus to the soil as well, other than that they have been under good conditions
Temp is steady at day time around 24C top and night time is 18-19C minimum
RH around 45-60%
Mostly 45% control environment with AC
Cant wait to see big colas coming soon!
Have fun enjoy the videos!

Likes
Comments
Share


@BeginnerSG
Follow
Have been leaving the seedling alone... I set up a baby monitor in the grow tent so I can look at the temperature and humidity from my phone app without opening the tent all the time
Likes
Comments
Share
@AsNoriu
Follow
Day 42. Huge disaster !!!! i stucked at my house on the lake for 7 days, normally i water them every 4-5. This girl got biggest damage, her leaves folded like stairs on the pot. leaves were brittle and dry as paper. Lost a lot of foliage. If i would need to recomend most forgiiving strain - thats the one, girl coped with all the shit i gave her ...
Happy Growing !!!


Likes
16
Share


@BudXs
Follow
There's a port on a western bay
And it serves a hundred ships a day
Lonely sailors pass the time away
And talk about their homes
And there's a girl in this harbor town
And she works layin' whiskey down
They say, @PeakyPlanters, fetch another round
She serves them whiskey and wine
Likes
12
Share


@Shinobi
Follow
Máme tu dosť silné búrky so silným vetrom.rastlina 1 dostala zabrať.jeden konár spadnutý na zemi,ale nebol zlomený.použil som pletivo ako podporu.stále vyzerajú ok.dnes posledné kŕmenie .držte im palce.mier
