
Likes
Comments
Share


@DogDoctorOfficial
Follow
Hey fellow green thumbs! 🌿💚 The day has finally come—our Auto Northern Dragon Fuel from Super Sativa Seed Club has been harvested! After an exciting journey, we’re thrilled to share the details of this incredible plant’s final stage. Let’s dive into the harvest report!
🌟 Harvest Details:
Day 75: Harvest Day
• Harvest Date: Day 75
• Harvest Method: Our beautiful Auto Northern Dragon Fuel was harvested yesterday. After weeks of careful nurturing, the time was right to bring in this amazing plant. 🌿🌼
• Preparation: Before hanging, we meticulously cleaned the plant, removing all leaves without trichomes to ensure a smooth drying process and to enhance the quality of the final product. 🌿✂️
Current Drying Process:
• Method: The entire plant is now hanging upside down to dry. This method helps maintain moisture levels within the buds, allowing for a slower and more even drying process. 🌿🔄
• Environment:
• Temperature: 18-22°C (65-72°F)
• Humidity: 50-60%
Maintaining these conditions is crucial for achieving a perfect dry and preserving the plant’s aromatic and flavorful profile. 🌡️💧
🌟 Plant and Bud Characteristics:
Auto Northern Dragon Fuel:
• Bud Structure: Dense and sticky, with an impressive trichome coverage. The buds are beautifully formed, showcasing the robust genetics of this strain.
• Aroma: Even in the drying phase, the rich and potent aroma is unmistakable. Expect a delightful scent that hints at the powerful experience to come.
• Trichomes: A thick layer of trichomes covers the buds, promising a potent final product with a great flavor profile. 🌿✨
🌟 Care Tips:
• Drying Process: Patience is key. Allowing the plant to dry slowly will enhance the final quality, preserving both flavor and potency. Ensure good airflow around the hanging plant to prevent mold and mildew. 🌬️💧
• Trimming: Once the drying process is complete (typically 10-14 days), it will be time to trim the buds. This is where we’ll shape the final product and get it ready for curing. ✂️🌿
• Curing: After trimming, curing the buds in jars for at least 2-4 weeks will further enhance the flavor and smoothness. This final step is essential for achieving the best possible smoking experience. 🍁
🌟 Genetics Spotlight:
Auto Northern Dragon Fuel:
• Characteristics: Known for its robust structure and dense buds, this strain has shown remarkable resilience and impressive bud development throughout the grow. The final product promises to be potent and flavorful, thanks to the thick trichome coverage and rich aroma.
• Harvest Expectations: High-quality buds with a strong aroma and potent effects. The slow drying process will ensure the best possible preservation of cannabinoids and terpenes.
🌍🌿 Fun Fact:
Did you know? 🌿✨ Drying the entire plant slowly helps retain more terpenes, which are responsible for the plant’s aroma and flavor. This method also helps preserve the potency and quality of the buds, resulting in a smoother and more enjoyable experience.
For all the in-depth action and detailed explanations, head over to my YouTube channel! 🎥✨ I’m sharing all the tips, tricks, and step-by-step guides to help you get the best results from your grow. This week’s harvest has been particularly exciting, and there’s so much more to explore and learn together!
👉 Join me on YouTube Link in my profile 👈
🌟 Conclusion:
Harvesting Auto Northern Dragon Fuel at Day 75 has been a rewarding experience. With the plant now drying, we’re eagerly awaiting the final product. Stay tuned for updates on the drying, trimming, and curing process, and get ready for a high-quality harvest!
Happy growing, and see you next time! 🌿💚✨
#SuperSativaSeedClub #HarvestReport #NorthernDragonFuel #PlantMagic #GardeningJoy #NatureLovers #PlantPower #InspireGrow #YouTubeJourney

Likes
5
Share


@0xcrlt
Follow
The germinated seed was directly placed in the final 11-liter pot with BioBizz LightMix soil

Likes
8
Share


@Salgeezi
Follow
From the looks of it. I am in early stages of root rot. Plant is not growing as fast as it was at all. It can be a few things. Light penetration into the bucket. My water temps are around 70f. So I think that's okay. I had some extra mylar from a grow I did years ago. Cut pieces to go over the kids hopefully that helps.
I took out all additives besides CalMag. They were fouling the rez as usual. Dropping the Ph as usual. I think it's also the cause of the root rot. I have sprayed soaked with h202 and have added it to the reservoir after a cleaning and a water change. Looks a bit better.
I'm located in Canada and I cannot find hydroguard anywhere. Which kinda sucks. Any alternatives would be great. Thanks
Processing
Likes
2
Share


@BigHorn
Follow
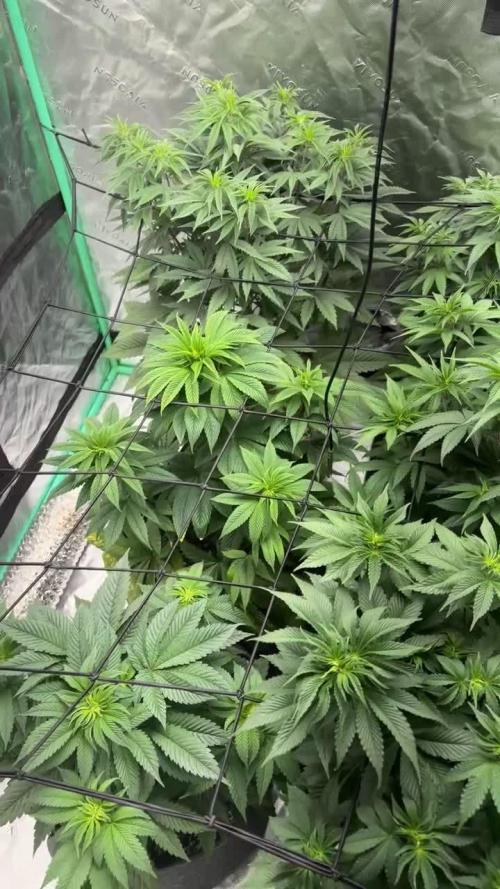
Week has gone very well. Growth has exploded will be trimming back some fan leaves this coming week to help the light reach the bottom stocks that have now come in. You can see the growth explode after I transplanted the plant.

Likes
28
Share


@J_diaz420
Follow
Comienza la floración de estas pequeñas!!
Cambiamos línea de fertilizantes gracias a b.a.c 👍👨🌾🏻🍀

Likes
10
Share


@KINGT88
Follow
Man it's been a while since I posted been having problems when it got cold trying to keep the temp right and all nutrients right..some bumpy roads but here they are!! Blackberry Moon Rocks.
If you have any questions or thoughts let me know been doing some lst training to try and get more out of them, really don't know what I'm doing lol. But hey practice makes perfect.

Likes
44
Share


@Zorachus
Follow
Finally, 25 weeks i believe...
Mold, mildew, bud rot, rain, humidity, crazy wind, frost.
Somehow these girls turned out just fine and I am so proud of the end result. I am late posting, everything is pretty much all cured up and ready to smoke. Just finished making some stocking-stuffer jars for friends and family for Christmas.
It was interesting to see the different phenotypes from each plant. One was named Average Girl, medium size, medium height. Then there was Big Bitch. She was the tallest and had the skinniest nugs. Next was Dolly.. She had the fattest cones of the 4.. a little shorter than Average Girl. And last was Runt... She was about 2 weeks behind her sisters and about a foot shorter, but she did not get any mold or mildew, and her buds were ginormous. I let her go an extra 2-3 weeks later than her sisters, bringing her into the garage every night at 7 pm, and then waking up at 7 am to put her outside.
By far, my favorite plant was Runty. She finished up so nice.
Overall smell is Kushy blueberry diesel cat piss with a hint of citrus.
Wouldn't grow this strain again just because it did not handle the weather well, and I like a kushier final product, on the taste and nose.
That being said, I am a very happy guy right now.
Over and out.

Likes
11
Share


@Bread_n_Buds
Follow
Our Green Crack has started to flower, the main lining has given it a really nice look, it is beautiful to look at with a series of brunches and small buds that go up at a great pace. It hasn't remained very small as I thought, it is going up.
The plant is an exemplary one with a medium internodal distance, I managed to work it quite well.
We are still using soil, feeding and all the recommended additives from Plagron 100% organic. We have moved on to the flowering start schedule that keeps the same Power Roots additives - Sugar Royal, Pure Zym and adds the flowering stimulant dear in my house for obvious reasons of Biscotti. Of course the basic fertilizer is now Alga Bloom.
The Green Sensation when the flowers are already a bit swollen, do not start immediately. The Power Buds must immediately stimulate the start and development of the buds.
---- Decide on the right soil and calculate your fertilizer schedule based on the soil on the official website.
-- www.plagron.com
Try a seed of this strain that drives us crazy..
---- https://www.zamnesia.io/en/10677-zamnesia-seeds-green-crack-f1-automatic.html
Zamnesia Description // Forget what you think you know about cannabis. Green Crack F1 Automatic by Zamnesia Seeds is here to shake up the entire industry. Using F1 genetics, growing cannabis has never been easier. These plants offer uniform and abundant yields. Get ready to harvest high-quality buds, full of flavor and amazing effects.
All the best that mother nature has to offer is at ---- www.zamnesia.com

Likes
57
Share


@SmokieMcPot
Follow
2 Girls 1 Cup week 7 is it? How time is flying by.
Day 42- still eating like pigs, so I'm bumping up the formula and doing 50/50 tap/RO for now on. Bubbled of course. Spots of calcium deficiency on GC here and there for the last week and I have seen a few spots on WG also. Still used 5mL calmag per gal as max dose to hopefully keep spotting from spreading. Raised my bucket to 374ppm prior to nutes. Decent defol tonight and I got a net back out to hold these down and spread em out as much as possible. One branch on WG has taken over as the main I guess and it's hard as f. Only place it's going is up lol.. 22in from the light as of RN, getting 37.2 DLI. Going to work up to 40 this week and see how they like it. GC really needs to hurry up. Can't let WG get too amber and can't leave dead rotting roots in the system right? Crossing my fingers GC hurries TF up in the end, or it may get cut early. RES change around 6pm tonight, modified week 2 bloom GHE medium. Breakdown as follows:
2gal water/calmag - 374ppm
Hydroguard - 5mL
Micro - 12.6mL
Grow - 12mL
Bloom - 15mL
RES totals after PH corrections - 1453 @ 5.71.
Plants 14in ^
Lights 22in ^
DLI 37.2
===========================================================================================
Day 43- McGuiver'd some external RES together tonight. Waterfarm site tube is now extended into a return line to the external RES. Small cat drinking fountain pump in the base of the external with a 1/4in fitting plastic welded on the 3/8 outlet of it. This thing trickles, just like I wanted. 1/4in line runs to my old fill port on the front of the waterfarm. Constant circulation from one res to the other. Waterfarm started life as a 2gal RES system. Roots fill it up and take up precious space. Roots were even coming out of the site tube lol. When I pump it out for a change lately, Im barely getting a gallon... side res and waterfarm combined now hold a little over 4gal now with the root mass filling a large portion of the farm. Ill actually measure one of these times. If I raise the farm up more, I can hold more in the side RES. 4 or so should cut it, they don't have much longer right? Filled with same formulation as last fill, just 4 or so gal instead of 2. Mixed 5, left with 1? in the bucket when I hit fill line. This may help conserve some water once I finally get their EC dialed in. Not only do I play my plants music throughout their day, I even sing to them from time to time.. Hopefully I don't lose any watchers with my horrible singing in the vid tonight 🤣🤣
===========================================================================================
Day 44- Why didn't I start this experiment off with an external RES? Damn the stability of more volume is a definite PLUS! Haven't had to adjust PH or top off 2 or more times a day since. Been letting the level drop and watching numbers while keeping PH in check. I think I've finally found a stable EC too. For now anyway. Water level drops, EC drops slightly, ph rises slightly. Taking almost 24hrs to swing from 5.61 up to 6.12 instead of 8-12hr. Been thinking about cutting back GC and just keeping it alive so dead roots don't disrupt WG but let WG finish as best it can. GC is THAT far behind from the looks of it. Trimmed em both up late in their day yesterday. Open it up a bit so the lowers on WG can bulk up too. Adding to the list of things I should have done differently and will share at the very end.
===========================================================================================
Day 45- ditched the net AGAIN tonight. No leak, shit was just annoying being in my way. Also been thinking ALLOT about my choices in life... latest is why did I plant two diff strains in the same pot and how can I make the best of it? They don't grow at the same rate or eat the same. WG is a PIG! Thought long and hard and have made the decision to cut back GC some to give WG her room to bloom. WG didn't stretch much and GC is still going. Keep supercropping it to keep it out of the fan and same distance from the light as WG. I have to keep both alive till the end, unless I throw in the towel on GC at WG harvest and chop em both. Really don't want to waste the experiment, so I may get creative at the end. Only have the one tent and was planning on drying in it since I've got the closet its in dialed in. Really don't want to make a cardboard dry box...
===========================================================================================
Day 46- Going to wean these girls off the N next RES change. GC is starting to stretch more, and still refusing to make the transition. maybe less N will do the trick?? kick up the bloom a bit as well. WG is ready for it for sure. GC may have an issue with it, but she'll survive. gave em both a defol before lights out today. heavier on GC than WG since WG isnt bushing up as fast as she used to. the light frosting is getting more populated also. side RES is working out beautifully!
===========================================================================================
Day 47- little prune on GC today to keep it out of WG's way. Plucked a few here and there off WG to keep it opened up. Colas everywhere! Going to be one short dense plant that's for sure. If GC gets to a finish, it's going to be a bunch of popcorn from the looks of it. Time will tell.
===========================================================================================
Day 48- light prune on GC to keep it out of the way, since its decided to be like 3wk behind WG. maybe tonights RES change will punt it in gear, and itll start exploding in flowers... yeah, i smoked before typing this so the pipe dreams are real on this one.. dialing back the calmag plus (since it has N in it) to 4mL a gallon. dialing back the N in the modified formulation from GHE week 3 "mid bloom" medium feed. formulation as follows:
Tap/Zero Water - 2.5gal/2.5gal
81ppm
calmag plus - 20mL
^ to 307ppm
Micro - 26.5mL
Grow - 26.5mL
Bloom - 41mL
RES totals after PH corrections - 1148ppm @ 5.63.
Measured the total volume needed to fill both the waterfarms RES and the external RES and it came to 18.4L. i scooped nearly every drop out of the side RES, but didnt even tilt the waterfarm. so there was prob a quarter to a half gal left in the farm. safe to say roughly 19L capacity. a HUGE increase from a measly 8L from factory. thats before roots fill the RES too, leaving you with NOTHING for water/nutes. so ill have to measure once again when the system is empty and see the true total volume without fillers. tis the end of week 7 i suppose. i will update the timelapse tomorrow afternoon to wrap up the week. i have a 3 week day 27-47 vid on YT if you're actually reading this and want to see the up to date clip.
https://www.youtube.com/watch?v=YKtqPxKeMNM
*edit* looks like GC is finally starting to hit the transition harder closer to end of the day today looking at vid..
===========================================================================================
As always, thanks for stopping by and checking out my current grow experiment. If it's your first time, check out previous weeks for their daily updates, pics, timelapse, blah blah blah.. you still reading this shit?? 🤣
Likes
Comments
Share


@JardineiroBr
Follow
Os fertilizantes tenho usado alternadamente em intervalos de 3 a 4 dias entre as regas . Pois tive que recolher as plantas para a estufa.
Quebrei as ponteiras para não alongar muito a planta pois tenho limites de altura da iluminação e quero ver se ela fica mais cheia de botões no caule .
Likes
24
Share


@Basementganja
Follow
Week6 of bloom, feeding Cal-mag+Floranova Bloom, both at 1tsp/gal. Each plant receives a glug or two from a 1gallon mixture. Runoff is removed.
New Clones of different phenos have entered the arena!
Happy growing!

Likes
5
Share


@Ensign420
Follow
Greetings fellow growers 🖖 and welcome to my first grow ever. This adventure actually started several months ago when I decided to stop buying flower from dispensaries and just grow my own bud. How hard can it be!?
This is actually my second seed of this strain. The first bean sadly died due to over watering (sorry girl, RIP). I was literally watering the cube to the point where water was dripping from the bottom, then heavily sprayed the humidity dome and tray with the vents completely closed. Everyday. Multiple times. I never let the dome or try dry out. So after about 8 days of not sprouting, there was a funky smell of rot. So that was that.
Later I learned that rockwool retains a lot of water and can easily drown seeds. So a wet/dry cycle is best for rockwool germination.
So even after hours of researching and digging through forums and tutorial videos, I was still under prepared for this journey. Did not consider how delicate the germination phase is. Oh well. Lesson learned. Reset and try again!
I hope everyone is safe and stoned during this corona crisis. Just like everyone else in the world, I want this pandemic to be over with. But in the meantime, let's grow some weed! 🖖
[START OF WEEK 01]
Day 01 - Monday - 08/03/20 - Total Days: 001
-----------------------------------
- [0830]: Light Schedule: 24Hrs/0
--- Soaked cube in 5.5 PH water for 10 min. Did not shake water out.
--- NO NUTES! Only PH'd down to control the PH levels.
--- Did not use the default hole (way too deep).
--- Flipped cube upside down and made a shallow hole for the seed (less than 0.25" deep).
--- Placed seed in and pinched hole close. No additional water added.
--- Sprayed the tray and dome with straight water (5.5 PH).
--- Vents are cracked opened a for ventilation (about 1/4 opened each).
--- Distance between the light and tray was 53"
--- AC was set to 80 °F
--- Exhaust fan was set to 86 °F
--- Room average temp was at 85 °F
--- Dome humidity was at 85-99% when sprayed.
--- Allowing to completely dry before respraying.
- [2200]: Dome and tray were completely dry! Sprayed only tray and dome with more water.
Day 02 - Tuesday - 08/04/20 - Total Days: 002
-----------------------------------
- [0845]: Sprayed dome and tray in the morning. Everything was dry.
--- Hoping for the best!
- [2130]: Everything was dry again, so sprayed dome and tray at night along with a light spray on the cube.
Day 03 - Wednesday - 08/05/20 - Total Days: 003
-----------------------------------
- [0830]: Everything was dry again. Resprayed dome and tray. Slightly sprayed cube.
- [2125]: Hooo damn!! She popped! Am little stub is visible! Resprayed dome and tray again.
--- Still going 24/0 for lights.
- [+0033]: Just checked up on her and I swear she grew a bit taller! Getting excited!
Day 04 - Thursday - 08/06/20 - Total Days: 004
-----------------------------------
- [0845]: Wow! Went from a little stub to fully sprouted overnight! Everything was pretty dry again so resprayed dome and tray.
- [2200]: Tap root is visible! Over 1" long too! Just resprayed dome and tray again.
-- Going to prep for hydroton transplant tomorrow!
Day 05 - Friday - 08/07/20 - Total Days: 005
-----------------------------------
- [0930]: She keeps growing!
-- Added a bit of CalMag to the spray bottle (8 drops to 650ml of distilled water). Resprayed dome and tray. Water was at a 5.4 PH with 141 PPM.
- [1045]: Prepped the bubble bucket with 4.5gal of water. Water is high enough to reach about 0.25" above the bottom of the net pot.
--- Added 3 drops of Superthrive
--- Added 3.5ml of CaliMagic
--- Added 2ml Hydroguard
--- Then PH'd down to 5.6
--- Solution Strengh: 120 PPM
--- Water chiller is set to 20 °C
- [1100]: Transplant time!
--- Filled the net basket 1/3 with hydroton. When placed in the bucket, air bubbles are not visible, but are slightly below the surface (slight digging will reveal the water/bubbles below).
--- Removed plastic on rockwool cube and placed in basket, then filled around and covered with hydroton. Making sure to block any light from passing through the net pot and into the nutrient solution.
--- Covered with a half-bottle dome sprayed with the CalMag water from earlier.
--- Hoping for the best!
- [1300]: Raised Bucket 5" higher. Now light distance is 48" to top of bucket.
- [1820]: Lowered tent exhaust temp to 76 °F
--- Lowered AC to 75 °F
--- Raised bucket even higher so light distance is 30" to top of bucket.
- [2300]: Looking good!
--- Sprayed dome and surrounding hydroton with more CalMag water.
--- Attached timer to light! So new 18 Hrs On/6 Hrs Off light schedule.
--- Lights On: [1600] (4pm)
--- Lights Off: [+1000] (10am the next day)
--- Decided to go with lights on during the evening/night and off during the later mornings/afternoon (the hottest part of the day) to see if temps can be controlled better.
--- Please survive girl!
Day 06 - Saturday - 08/08/20 - Total Days: 006
-----------------------------------
- [0800]: Everything was dry. Resprayed hydroton and dome.
- [2000]: Here first night cycle seemed to go well! Get'n taller!
--- Dry again. Removed the dome.
--- PH went up to 6.5 so PH'd down to 5.7
--- Ran the top feed drip ring for a bout a minute to wet the hydroton and rockwool with the nutient solution.
---Too scared to leave the top feed on 24hrs (I don't want over water her and cause dampening-off). Will let dry before re-watering.
- [2100]: After closer inspection, I think she's looking a bit yellow.
--- Decided to add a bit of grow nutes to the bubbler solution.
--- Added 2ml of Sensi Grow A
--- Added 2ml of Sensi Grow B
--- Solution strength after adding more nutes: 176 PPM
--- PH went up to 6
--- I hope that the extra chelating properties of the 'PH Perfect' solution is enough of a buffer for proper nutrient uptake.
Day 07 - Sunday - 08/09/20 - Total Days: 007
-----------------------------------
- [0800]: Water dropped a bit (mostly due to evaporation) so solution strength was at 190.
--- Checked PH again. Was still at 6, so PH'd down to 5.4
--- Ran the top feed for a minute to wet the hydroton a bit.
- [0915]: Since she's looking perky but still a bit yellow. So decided to up the nutrient concentration even more before lights out.
--- Added 2ml more of Sensi Grow A
--- Added 2ml more of Sensi Grow B
--- Solution strength after adding more nutes: 199 PPM
--- PH went up to 5.8
- [1700]: Checked nutrients.
--- PH: 5.9
--- Solution strength: 202 PPM
--- Added 4ml of Voodoo Juice
--- Added 4ml of B-52
--- PH after adding more nutes: 5.9
--- Solution strength after adding more nutes: 238 PPM
- [2130]: Decided to make a new foliar spray to address the continued yellowing.
--- Started with 500ml of distilled water.
--- Added 3 drops of CaliMagic
--- Added 3 drops of Sensi Grow A
--- Added 3 drops of Sensi Grow B
--- Added 3 drops of B-52
--- Added 1 drop of Superthrive
--- Solution strength: 164 PPM
--- PH was at 5.9 and did not adjust.
--- Gave her one spray.
--- Also sprayed the surrounding hydroton.
[END OF WEEK 01]


Likes
53
Share


@Hempy_The_Kid
Follow
08/10/22 watered with Recharge.
Welcome to motel 6
More ladybug porno. Now have yellow ladybugs
8/14/22 this plant is a magnet for ladybugs 🐞


Likes
10
Share


@GracelessGardens
Follow
Plant really took off over the last week. I had flushed the soil and been doing water schedule by weight instead of by visual/topsoil moisture. Leaves are almost double the size from this time last week. Moved the light back down a few inches.
Update: started some lite lst, mostly just moving big leaves out of the way for smaller branches

Likes
10
Share


@PolezGardn
Follow
week four flower everything looks fine so far :D
I water them with 1.5l every 48h
the light I use was set to 100% and it hangs 80cm away from the tops
Likes
1
Share

@TTerpz
Follow
Start of week 6
7/25/25
Fed with nutrients: 7/25/25
Fed with nutrients 7/30/25


Likes
6
Share


@Le_Pti
Follow
Now That at least 50% of pistils turned orange and that the smell and taste seem present i will start the flush and start gathering next week and try to get it done for Christmas... Cant wait to see the cured result! Big thanks to fastbuds for this beautifull strain! I had hard time finding the strain for my region as most of site where out of stock but it definitely worth it! Next update next week ;)