
Likes
Comments
Share


Likes
14
Share


@PlantGod
Follow
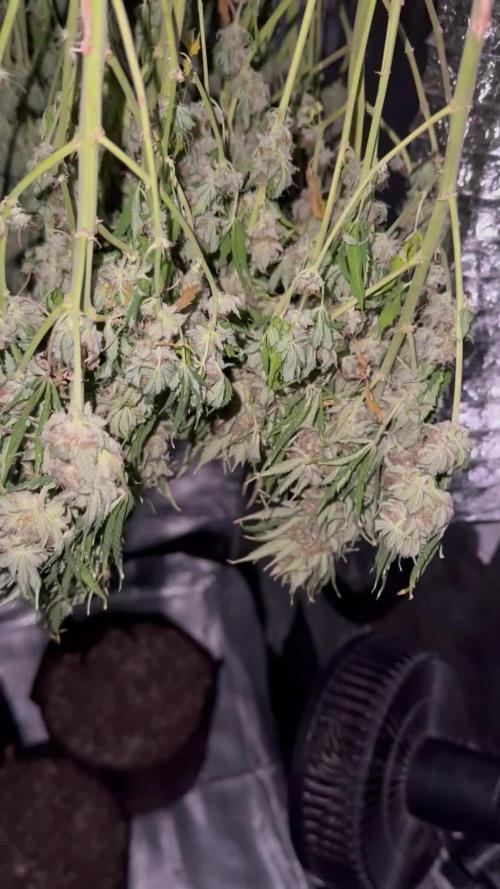
Royal Gorilla took 63 to harvest from 12/12 switch
Very Sticky while trimming
The buds I hung last night totalled 223 grams
The trimmings totalled 35 grams
I will update next week when things are dry and going into mason jars


Likes
12
Share


@Kloud9gardenz
Follow
Space is limited and I'm struggling with the time to keep up with these plants since things are back to normal on my parts of town. Just gonna keep about eye on em at keep defoliating. Plants flipped after 1 month veg
Likes
170
Share


@Green_Man_420
Follow
Evening fellow growers hope you all had a great weekend. Massive shout to James @RQS for supplying the beans for my current grow.
⚠️ I add photos as the week progress so please stop by and check out the progress.
Day 29 the start of week 5, we have started to flower so I will add some flower nutrients this week. Really happy with how these 2 lady’s are progressing. Very bushy low riders. Let’s see what this week brings.
Day 31, watered today, upped the amount in water too 1 ltr as these girls are growing. Also added bloom into the mix. I will take some current photos either later today or tomorrow. ✌️
Day 32, just leaving these ladies to it. Low riders 👊🏻✌️
Day 35, the end of the first weeks flower. The front one is nice and short with an even canopy the back on I topped and haven’t really done much else with as didn’t want to stress her anymore. She is loving life. Watered with plain water last night will most probs give another grow feed then onto the bloom. Been rather cold the last few days so hopefully they will be ok. ✌️
Once again thank you all for stopping by and showing the love. ✌️
Likes
6
Share


@GermanBoy69
Follow
The plant grows. I have now added an oxygen pump to the water tank. Let's see what effect that has. You can see the progress every day. I've also bought some phosphoric acid to keep the PH down (hopefully).
My water tank is very large, about 75 litres. I also have a few holes in the lid, so a lot of rainwater gets into the tank through this and also through the openings in the pots. Never had to top up the water yet lol.
At the end of the fourth week I'm happy with the growth, especially as it's my first plant.
--------------------------
Die Pflanze wächst. Ich habe mittlerweile einen Sauerstoffpumpe in den Wassertank gegeben. Mal sehen wie sich das auswirkt. Man sieht den Fortschritt jeden Tag. Ich habe außerdem Phosphorsäure gekauft, um den PH-Wert endllich stabil unten zu halten (hoffentlich).
Mein Wassertank ist sehr groß, ca. 75 Liter. Außerdem habe ich ein paar Löcher im Deckel, so dass dadurch und auch durch die Öffnungen in den Töpfen viel Regenwasser in den Tank gelangt. Musste noch nie Wasser nachfüllen lol.
Am Ende von der vierten Woche bin ich zufrieden mit dem Wachstum, vor allem da es meine erste Pflanze ist.

Likes
11
Share


@HerrnBubatz88
Follow
Last week; we’re about to finish! Will update you soon. Keep an eye on the harvest posts.


Likes
4
Share


@Drtomb
Follow
Started the final week of nutrients. Then ill be switching to flawless finish and pure water the last week.
The blue gelato big cola is finally starting to stack up. It has only one more week of nutrients, so hopefully it stacks quick.. Then a 1week flawless finish and a week of straight 100ppm water.
Likes
8
Share


@Ctbest2023
Follow
Week went good girls are drinking like crazy and growing broke a cola on one week and half ago she hasnt grown much since but its about healed now but she should catch up now


Likes
9
Share


@Herbsmanington
Follow
Kings Juice and CBD compassion are developing a nice odour. The Kuchi Diesel is developing a nice diesel scent with a shrubbery type branching, buds all over. The milky dreams is growing some popcorn buds full of trichomes. Jack Lemonade is nice long buds full of trichomes. The moweeto has a particular indica aspect in the leaves grows like a hemp plant and has nice bud development. Gorilla CBD is developing like a shrub, with bud sites all over.


Likes
41
Share


@Mother
Follow
Hey everybody! Kaiydaan, Kaiydan, Kaiydaan. I have no idea what's going on with this gal, she isn't doing to much of anything. Unlike, Freeman who's just flourishing, showing all shades of pinks and purples and swell calyxes. Anyone got any advice on Kaiydaan?
I'm watering pH'd tap water. I tried to indicate that in "Nutrients", but the Diary made a Frown Face at 0 nutrients.
Aug. 26, 2021, Thursday. I watered Kaiydaan and Freeman.
Aug. 27, 2021, Friday. Freeman is doing well no issues. Kaiydaan, I just don't know. Her calyxes are not swelling, they're growing in and what seems to be dying off a bit. Her leaves are dead, dry, brittle and yellow. I don't know she is a complete nightmare compared to "Freeman"
Maybe I'm reading to much into it and Kaiydaan is going through a natural fade. Any ideas?
Aug. 29, 2021, Sunday. Nothing new to report.
Aug. 30, 2021, Monday. Nothing to report.

Likes
22
Share


@herbalistssword
Follow
To think people were telling me to chop her off because she looked deformed when she was young! glad I didn't listen to them as she turned out a beautiful plant!
100g of really nice dark purple bud.
Really great strain, grew well without much care and produced really intresting looking buds.


Likes
20
Share


@StunFlower
Follow
She's doing very well. Gave her a little clean up today - removed some undergrowth that won't make to the top. Keeping her diet pretty much the same other than an increase in Cal-Mag this week - the other plant in my tent was showing signs of deficiency so I thought they'd both get a little boost since I've been treading lightly. She did a bit of stretching this week - grew about 5" taller! Looking forward to see some fattening of the buds! 👊
-----------
Day 65: PPM 668; PH 5.8. I think her drink is bit on strong side with PPMs increasing a bit since the rez change. Topped her off today with 3/4 gallon of filtered water to dilute things a bit. Sitting at 574 PPM; PH 6.2. Buds are starting to stack nicely and fatten.
Day 66: PPM 553; PH 6.2. Let her be. Seems to be happier now that I've watered down her drink a little. Frost is starting to form around some of the buds and she's getting more fragrant.
Day 67: PPM 584; PH 5.2. Gave her 3/4 gallon filtered water with light dose of nutes. She's now running at 553 PPM; PH 6.0.
Day 68: PPM 563; PH 6.0. Let her be.
Day 69: PPM 532; PH 5.8. Gave her 3/4 gallon filtered water/feed. Now at PPM 542; PH 6.2.
Day 70: PPM 532; PH 5.1. Discovered my PH meter is toast and has been reading much higher than it should. Got a new meter and hopefully back on track. Thank goodness this plant is resilient. Gave her some PH up and sitting at 6.1.


Likes
15
Share


Likes
3
Share

@HUUDUUH
Follow
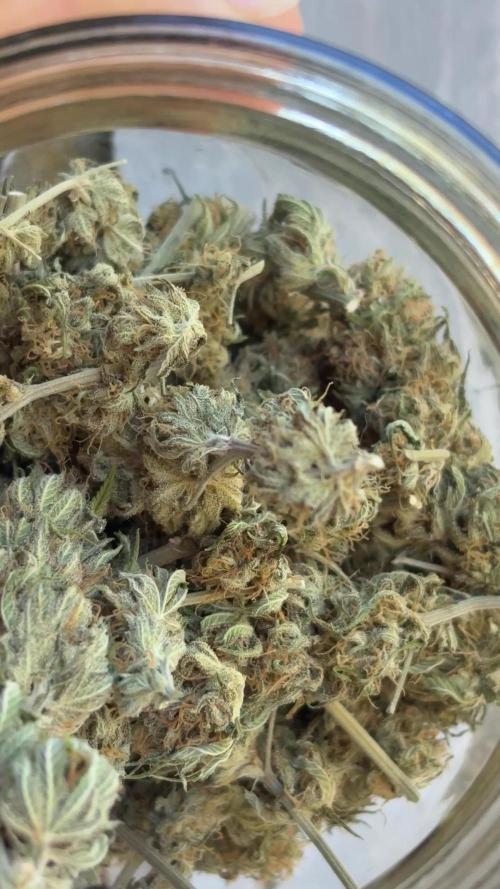
Well.. done!
45 grams of dry flowers after trim.
Im glad and proud. That was a long way, my first oficial controled grow. Cool.
It was 14 days of dry, l have cured it, it smells so good , but that flavor they say.. not yet. The first hit is nice tho. No cof cof, the smoke is so smooth and the effects.. Its not my favorite thing, but at morning works fine.
Not the best seeds bank, but was worthy.
Likes
28
Share


@fraankiiee
Follow
Las Cream Caramel siguen floreciendo a buen ritmo, pero las California Kush no acaban de empezar a florecer.
Le he puesto una maya y le he podado un poco los bajos a ver si eso ayuda. Los platos de las macetas están llenos de raíces, lo que me indica que tienen buena salud.
Para ser autoflorecientes las veo un poco tardías.


Likes
18
Share


@CANNASIM
Follow
I have been away for a week, had setup a drip system that watered every other day.
Noticed a strong yellowing, lost a bit track of the feeding since i was away for 8 days, and have used a mile concentration of nutes, no recharge.
I decided to live it be as is and start flushing, in two days, today will be the last feeding, and will be done with overdrive an the base.
On top of that I have ordered a floraflex round matrix, a bubbler from them.
Likes
21
Share


@cadur
Follow
It's going very well, nice even canopy and she's filled my 70x70cm tent.
On the cusp of the flowering stage, going to go very easy on the nutrients this time. Will start at 1/8 photo period recommended level and ramp up to 1/2.