The Grow Awards 2026 🏆 


Likes
Comments
Share
@Waveform
Follow
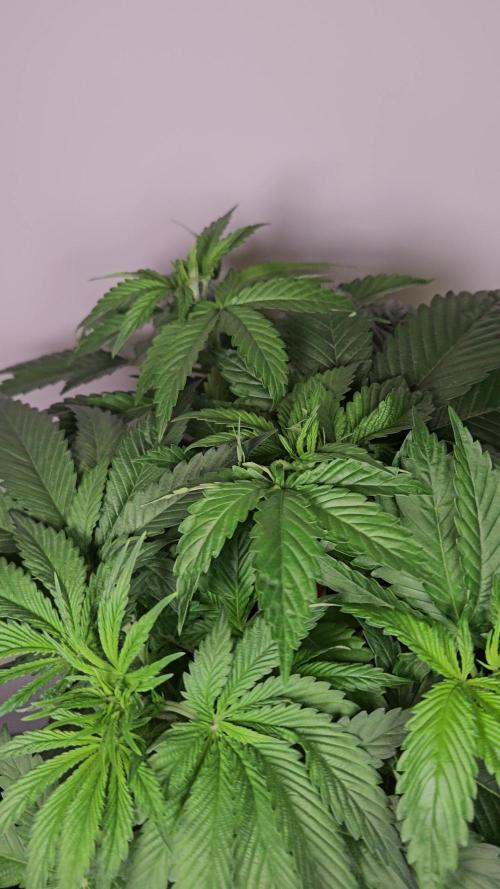
After another weekend spent away from home, on day 26 both Opiums present at 30 cm height, having grown big and bushy. Their thirst increased, I will water them when their next day starts. And do some more LST. Not too long until I can install the scrogging net. I am really impressed by their progress. They developed a lot of branching side branches and look really healthy and bushy. In contrast to what I wrote before, I think I can stay a few days longer with the current 80% 18/6 lighting scheme. Leaf positions do not show signs of light hunger, so no reason to change.
Watered them with 1.5 l each on their 27th morning, this time adding some flower fertilisers too. Compensated their relief with some more LST. I can see in timelapse video they are tmelselves compensating this stress easily; it’s amazing to see how fast they turn their heads. You’ll see soon too.
For reference: Pot diameter is approx. 25 cm. So lady #1 spreads about this much, lady #2 is even about 10 cm more. Guess they’ll make a very dense scrog surface, but first let’s have them have their stretch.
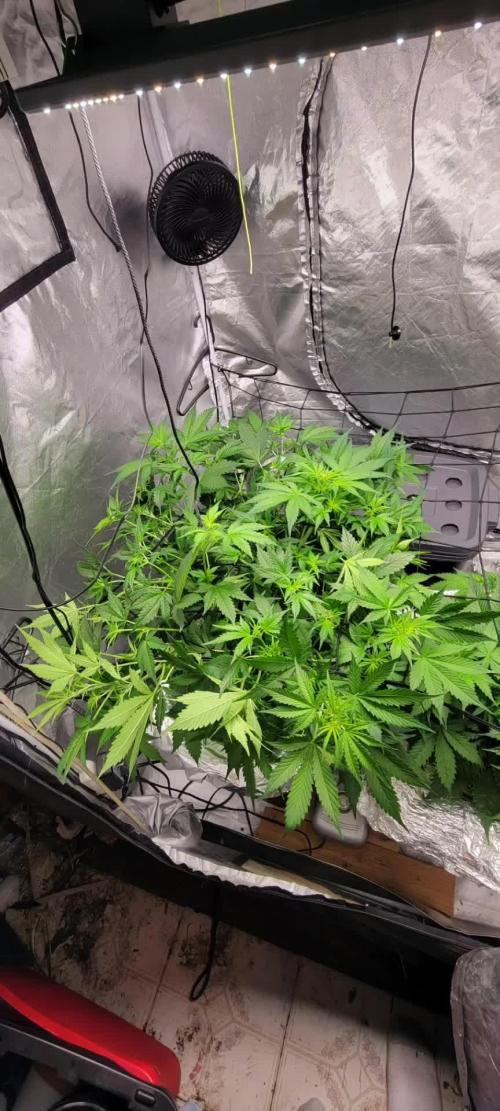
Day 28 evening revealed ladies are getting thirstier. The holey pots might be helpful in root development, but they are not when it comes to keeping the tent clean. Because of their structure, water runs out in respectable quantities each time they are fed, which takes a long time to evaporate and adds to air humidity of course. Which on the other hand is currently quite ok. Outside air temperatures are around 30 °C the last days, so a bit more humidity helps to keep the VPD in range. Which is quite ok as I still cannot complain about their growth – around 2–3 cm each day currently.
Grow video for day 28 (sorry about the interferences! Due to the control hard- & software being offline I cannot silence the blower(s) when a photo is taken anymore) shows steady growth and very vivid movements again. Dropping of their leaves around their evening is possibly due to me watering them again as soil was surprisingly dry already.
On their day 29 evening, it’s clear to see how much they are stretching: They really gained 5 cm since yesterday! Lights are close to 30 cm, so I think I’ll reposition things a bit when their next week starts. Attached video shows the day’s progress.
They say you cannot scrog an Automatic but seeing the development speed and bushiness I decided to give it a try nonetheless. I guess the buds can profit from being a bit more apart from each other if I handle to fiddle them through the holes in time.
I rearranged the lights to be at about 45 cm apart from the tops and set the lights to 100% at a 16/8 lighting scheme, waking them up one hour later than before and sending them to sleep one hour earlier.
Last day of this week, day 30, shows that growth speed has even increased. Lady 1 crosses the scrog net already which is positioned at 46 cm above soil. Gave them slightly enhanced water again, 2 l each.

Likes
11
Share
@ChameleonsCannabis
Follow
They both got dried out and showed different symptoms. I have just started a new job and havnt been able to be on top of them as much but the Alaskan Diesel is more angry with me I think showing brown spots on allbher leaves the SkyStomperSquanch looks to be fine now not gaining more yellow just turning purple towards end of flowering

Likes
2
Share
@valiotoro
Follow
Hello everyone😎
Week 9 of flower for the Kerosene Krash auto from Dutch Passion⛽️
Plain water💧
Second round for the top buds

Processing
Likes
15
Share
@Dico29
Follow
Buds are getting bigger, still raining and very humid, but smells too.

Likes
5
Share
@hfwbr420
Follow
First week after light switch is done. Plants are growing very nice.
Tips for improvement are allways welcome! :)
Likes
26
Share
@GuerillaGorilla
Follow
21 september
She is really close.
Weather forecast is pretty good the last part of this week. She has 3 or 4 more sunny days to go.
After that she will be harvested in steps. Big first, bottom second. Probably couple of days in between. Same process for all my plants. MAROC was also harvested like this during the past week.
It was a tense few weeks with all the rain we had. I had to cut out some buds to keep mould from taking over but i managed to keep the damage under control.
Biggest surprise was that fungi now grow underneath the plant as well, not just in the buds😅
Lovely sight to see!!


Likes
9
Share
@Tobecobe
Follow
04/09 - Started minor defoliation. Shes getting too bushy and blocking bud sites and causing moisture spots. Will remove a couple of leaves every other day for the next week.
05/09 - Full res change. Realised I mucked up the ratio. Went 35ml Micro, 25ml grow, (Shouldve been the other way around, so added an extra 10ml grow), 15ml Bloom and 15ml Silica. EC 1.4, PH 5.7. Will keep an eye on her and add some additional grow if she does alright.
06/09 - Minor defoliation. Removed about 12 leaves total so far. LST to spread the canopy a little more. PH stable at 5.8, EC at 1.4, Water level dropping. Seems to be stretching and pistils have begun to form! Responding well to the uptick in nutes from the res change.
07/09 - Leaf tucking, LST and took a leaf or two. Shes getting her stretch on for sure. PH stable at 5.8, EC stable at 1.4. Water level still dropping.
09/09 - After much deliberation, I ended up going for a fairly heavy defoliation session and am now going to leave her the hell alone until at least mid flower. I removed a large chunk of shaded leaves and bud sites and effectively ended up lollipopping her. I also removed all the old LST, and added a couple to pull leaves out of the way. The canopy remains largely unchanged, but shes much more airy now, and Im seeing far fewer damp spots where leaf perspiration has occured. Now to see if I can keep my hands off for a few weeks!
Likes
25
Share
@Dingle_Dangle
Follow
[First time on this diary? => Read "GERMINATION" tab to understand what I'm doing ]
27/11/2021 - Day 84 - First day of the 13th week.
Last update.
Critical situation.
Mold and WPM everywhere, chopping her today.


Likes
10
Share
@heeelion
Follow
Well sliding into another week, I'm checking the trichomes and waiting for them to go milky, not sure if i can just check leaves for that. That's what i have been doing. I've been told i'm waiting for a portion of at least half of the hairs to go an orange/bronze color.
Weird blotches become more prominent on leaves that its visible (they are just in some leaves) less than half id say around 15 - 20% and less than half of those seem pretty bad. I would like to know the cause if its nutrient lockout or a disease etc. Or perhaps its normal for late stage flowering i do not know

Likes
12
Share
@D33jW
Follow
Day 27
I will switch the light to 12/12 so we will start flowering tomorrow.
All is going well she growing very nice and no issues so far.
We are work on large strong stems 💪
VPD is setup on 1.1 now.
Watering 500ml everyday.

Likes
39
Share
@CURATI_DA_SOLO
Follow
E passata la prima settimana e sono rimasto veramente sorpreso!
Non ho mai visto una crescita così veloce è vigorosa in una autofiorente, come da regola una buona genetica alla base è tutto!
Queste sono genetiche autofiorenti Veramente di alta qualità, di un altro livello!
Adesso parliamo degli sviluppi e cambiamenti....
Una crescita esplosiva in ognuna di loro specialmente nella Strawberry milk and Qookies Remix che sembra essere la più alta e spessa tra tutte (per adesso), tutte stanno veramente molto bene anche perché ho preparato una tabella di nutrizione veramente molto ricca e completa, sto utilizzando tutta la linea connoiseur più tutti gli additivi e stimolatori di advanced nutrients e come sempre, devo dire che il loro lavoro si vede! Potete già vedere in soli 7 giorni una crescita esplosiva (sul substrato) di trichoderma, micelio, e batteri (si vede quando il substrato sembra umido ma in realtà è asciutto), questi sono piccoli segnali che mi fanno capire che nelle loro bottiglie ci sta un vero e proprio ecosistema!
Non sto seguendo la loro tabella e neanche i loro ml, ho preparato un alimentazione in base alla mia esperienza e conoscenza, per ora è tutto alla grande ed è fantastico perché penso che le autofiorenti devono avere una germinazione perfetta per poter dare tutta la loro vigorosità nel seguito...
Dopo questa partenza, night owl è entrato nel mio cuore perché non è solo una di loro ad essere più veloce e vigorosa ma sono tutte è 4 quindi parliamo che ogni incrocio che fa questo ragazzo deve essere un grande successo 😍!....
Io vi vorrei invitare a tutti a seguire la sua pagina personale Instagram così da poter vedere tutti i suoi crossing , perché sono uno più bello dell'altro!
Autopot ancora non l'ho avviato ma ho acceso le pompe ad aria con AIRDOME in ogni vaso in modo che possano avere un po' di ossigeno in più le radici.
Per adesso ho avviato il progetto con una lampada Mars hydro ts1000 solo perché ha un buon spettro tendente al bianco ed infatti si e rivelata un successo per la germinazione, ma tra altri 7 giorni cambierò la lampada ed installerò la lampada per il quale ho avviato questo progetto, sto parlando della fantastica EAGLE SERIES E520 di growers republic il quale sono diventato un loro tester è volevo prendermi due parole per ringraziarti tantissimo per il loro supporto e sostegno, sono delle persone fantastiche sempre pronte ad aiutare ed ascoltare il coltivatore (non tutti sono così, tipo con Mars hydro tutto questo lo puoi solo sognare...con loro ho avuto veramente una brutta esperienza infatti utilizzo le loro lampade solo per germinare i semi. Fanno led buoni per il prezzo che offrono ma onestamente il servizio clienti fa veramente piangere!) .
Growers republic è una azienda che ascolta il coltivatore e ha un approccio diretto con te ed è veramente molto attenta ad ogni minimo tuo particolare, e volevo consigliare a tutti voi di andare sul loro sito a vedere i loro prodotti perché fanno veramente paura!
Lampade led di prima qualità a partire dal design innovativo che si presenta abbastanza massiccio (non come il resto delle aziende che produce led plastificati), lo spettro fa veramente rabbrividire perché ha un IR potenziato è si vede tantissimo! È stata anche progettata per avere la temperatura sotto controllo è non supera i 35c di calore! Sprigiona ben più di 1400 umol/j essendo così una delle lampade più potenti che ho mai provato
Potete trovare i led growers republic qui:
https://growers-republic.com/
Quindi ricapitolando:
Midnight Marathon F4
91 Grapes
Strawberry milk and Qookies Remix
Hervey Wellbanger
Queste sono le genetiche che sto coltivando in questo progetto con
Night owl .....
Spero che possa interessare a qualcuno di voi e spero tanto che sia stato di aiuto per qualcuno !
Grazie mille a tutti gli sponsor:
Growers republic
Autopot
Night owl
Advanced Nutrients
E un grande grazie a tutti il pubblico di growdiaries che è passato di qui lasciando un like per il supporto! Grazie infinite a tutti voi 🤙🏼🤙🏼🤙🏼❤️
Likes
11
Share
@Aircoholic
Follow
Harvest came a little earlier than I wished for, about 3-5 days to be precise, but she had spider mites that just spread over lots of leafs - I had to harvest to safe her in the end (sounds so much more dramatic, than it actually was).

Likes
252
Share
@Tropicannibis_Todd
Follow
💩Alrighty then Growmies We Are Back At it 💩
Well folks we just finished up the last run and so we are back to do it all over again 😁
So what do you say we have some fun 👈And what we got here folks is a Strawberry Blast 🍓 🍓 🍓 🍓
Strawberry 🍓 Gorilla , Strawberry 🍓 Banana 🍌 and there new release 🍓 Ztrawberriez 🍓 from FastBuds
And we also got Strawberry 🍓 Cola from Exotic Seeds
👉 I had ruff time keeping the Humidity up so 8 had to boil water in conjunction with my Humidifier more work but it worked out 😮
So it's been a great week so far 👌 👉 So as you can 2 pots have 2 plants well one will be chopped , it's a survival of the fitest 👈
FC4800 from MarsHydro Lights being readjusted and chart updated .........👍I've added a RU45 to the mix 👍
www.marshydro.ca
👉I used NutriNPK for nutrients for my grows and welcome anyone to give them a try .👈
👉 www.nutrinpk.com 👈
NutriNPK Cal MAG 14-0-14
NutriNPK Grow 28-14-14
NutriNPK Bloom 8-20-30
NutriNPK Bloom Booster 0-52-34
I GOT MULTIPLE DIARIES ON THE GO 😱 please check them out 😎
👉THANKS FOR TAKING THE TIME TO GO OVER MY DIARIES 👈


Likes
4
Share
@Phatlad187
Follow
Week 10,
first day of flower set both light up now runing a total of 730 wats, for now will turn both light up over time and will add a extra co2 bag temps at 30°c but i keep cheeking leaf temp and that between 24°c and 26°c so hopefull they do good
@growerchoice
@SHOGUN COCO A 4ml/L
160ml
@SHOGUN COCO B 4ml/L.
160ml
@SHOGUN ACTIVE BOOST 2ml/L.
40ml
@SHOGUN CAL MAG 1ml/L
20ml
@SHOGUN ZENZYM 2.5ml/L.
100ml

Likes
20
Share
@amazingautoflowers
Follow
March 3rd, 2019. The plants are 28 days old today. Growing well. They are well in early flower now. Began LST and did just a small amount of defoliating. They had Azos mixed with Mykos on day 26, will probably feed tomorrow depending on moisture, if not the next day for sure. They just look great.
March 8th, 2019 - 33 days old. Was a big grow week. Both plants doing great. They had a full feeding Tuesday and today they got a good solid flushing. They are starting to smell pretty good. If you look closely at the cola shot, you can just see Trichomes starting to form. Lord knows what they will look like in 4 weeks. About 16 to 17 inches tall, really heavy branches, leaves look great, nice beautiful green.
Likes
28
Share
@cheetah844
Follow
Nice broad growth, it trains itself very nicely after some topping. I'll have to transplant & start LST very soon.
I topped every bud site on every plant, both indoors & outdoors.

Likes
9
Share
@SkunkyDog420
Follow
Hallo zusammen 🤙. Sie wird heute geerntet.
Der Geruch ist Fantastisch 🤙☺️
Likes
Comments
Share
@Stonerandgrower
Follow
It was a great grow from June 29th to being harvested October 10th I got 25 ounces dry