
Likes
Comments
Share


@BettaMushroom420
Follow
The Olympia Auto has just entered flowering. The plant has remained quite small, likely due to the intense cold stress (temperatures below 10ºC) it experienced—similar to other autos I'm cultivating this season. Despite its size, I'm impressed by how much it’s stretching in this phase; it just keeps growing. The aroma is still weak but gradually increasing each day.
Health: The plant looks healthy and beautiful. It’s a shame that only one plant emerged from the seed pack, but even though I haven’t harvested yet, I’m eager to grow this strain again!
Ambient Conditions: This week started off hot (with a minimum of 23ºC and a maximum of 30ºC), but a cold front has now brought temperatures back down (with a minimum of 11ºC and a maximum of 20ºC). Humidity remains quite low, around 30-35%.
Training: I haven’t done any training or defoliation on this plant.
Fertilization: I applied Ekosil (silica + potassium), another dose of bokashi, and a dose of nitrogen, with one more nitrogen application planned for the end of this week.
Pest Control: I'm continuing with Beauveria treatments, and I no longer have issues with the fungus gnats that had appeared earlier.
Watering: I’ve been watering the plant very minimally, as the substrate has been staying moist on its own.
Looking Forward: From this point on, there’s not much left to do except watch the flowering progress.

Likes
4
Share


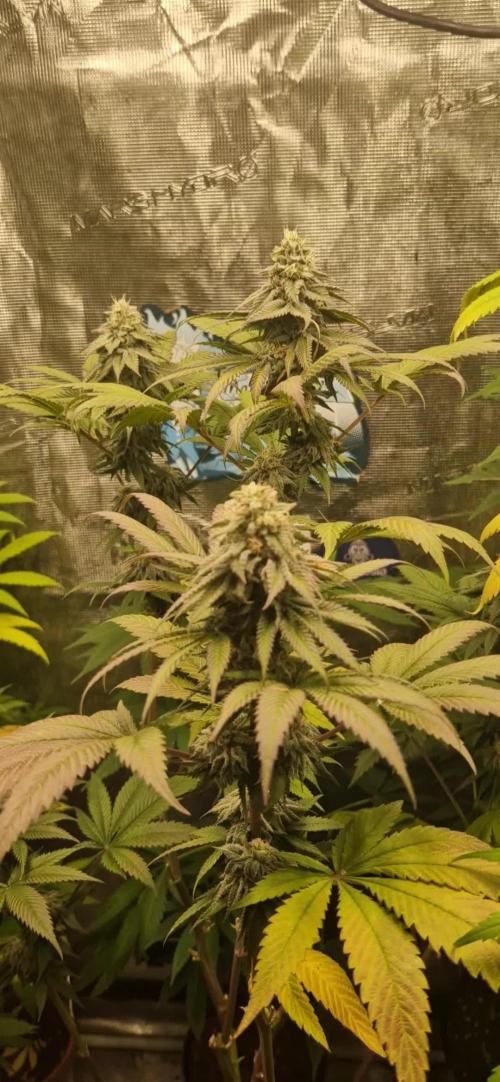
@DeepRootsGrowTrees
Follow
CHERRY 🍒 COLA BY FASTBUDS
Week #7 Overall
Week #2 Flower
This week has continued a trend of hot weather with no relief for the plants as it's having some effect on the leaves with burning. Stay Growing!!
Fast Buds CHERRY 🍒 COLA

Likes
11
Share


@Mr_Motalovah
Follow
Ladies are looking and smelling amazing, truly zenzational!
You can notice the different phenos that came out.
One is pure zkittlez while the other three in bud structure are sweet zenzation (zkittlez x grape ape) in those three two of them smell like grape juice.
Hope that turns out like some fine red wine taste when cured.
Dropped the amount of water a bit and also nutrients.
From next week onward only water.


Likes
50
Share


@MissRachel
Follow
Transplanted into 15 gallon smartpots and got them on pallets. They are starting to preflower!

Likes
6
Share


@Rinna
Follow
The girls are stretching nicely and looking healthy as can be. I added the second trellis for extra support when the buds will be ripening in late flower. There’s already some early ice, on the fan leaves too, so that’s a good start! Some pheno’s seem a little quicker with creating flowers, but since these are f1 seeds it’s not so crazy that there’s some difference. It looks like I’ve got either 3 or 4 quite different pheno’s, which is exiting. I’ll do a big defolation on day 21 of 12/12 so you’ll see that in the next weekly update 👌🏻


Likes
15
Share


@Dunk_Junk
Follow
She grew 12cm in height this week and a whole lot bushier!!!
Day 42 - I trimmed off about 6 large fan leaves to get light to the lower bud sites.
This is her last week of 20/4 veg lighting.

Likes
125
Share


@Sour_D
Follow
My Alien was not a tall girl. but she didn't care. She did her own thing her own way. Looks like her way might have been a pretty good way, my scissors were gunked up almost immediately 😃 And I must say that she was an easy one to trim, took care of it myself in less than an hour. I'm looking forward to this one, smells kinda spicy almost 👽
SMOKE REVIEW
This is some tasty stony stuff! The yield was small, hey that happens, but the important part is this is some very nice smoke! Smoothest I've had in quite some time, even with minimal cure time. Good stuff 😎

Likes
7
Share


@NCgrower252
Follow
The plants are growing nicely! They were all flushed with plain pH balanced water on Friday and will be fed nutrients listed above on: 5/31


Likes
1
Share


@kauilmayel1996
Follow
Está increíble
Fascinado con esta planta
Está enorme no cabe en el armario
Tiene un olor dulce como a chicle
Increíble planta para el hidro
Toma agua como loca...

Likes
88
Share


@Fergie
Follow
hey guys so another week has passed all beasting along got a few high temp days coming and still a week or so for air con unit . But girls seem be loving the heats even when getting up to 30degree . Done a little deflowation clean up the under , ordered some epsom salts and mollasses a few days ago to assist in flower , still only r/o water and calmax then ph seem to be way forward and my soil mix is defo doing wonders . Til next week family 😉😀

Likes
4
Share


@Ctsbestsmoke
Follow
They just kept stacking and stacking. I’m just loving the growth and seeing how beautiful they are coming! Can’t wait till these are done and I can start my fastbud autos!!!!!

Likes
20
Share


@Canadian
Follow
This girl has grown very nice very easy nutrient hungry but deliver us a lot of flowers will be updating later on with Weight taste and high thank you for reading have a happy grow continuing with the update this girl smokes like a dream very pleasant smoke I’m very glad I have her in my garden when it comes to the quality of the flower it’s very exquisite and it smells almost like Tangerine is quite remarkable high it’s strong and I will classify it as a nightstand for sure Quite enjoyable smoke
Likes
112
Share


@Tazard
Follow
Still planning to take them out this Saturday. I will begin flushing this Wednesday.
10/18 added flush water. Added short video of my flower tent and some root photography
Likes
7
Share


@Philippovic
Follow
Diese Woche hat sich einiges getan, die Blueberry hatte kurzzeitig starken Kalzium,Mangel der aber gut behoben werden konnte mit Canna Mono Kalzium und zusätzlich Bittersalz.
Sie ist ein richtiges Monster geworden ❤️❤️❤️
Das Bewässerungssystem arbeitet hervorragend und funktioniert auch zusätzlich sehr gut, um gewisse Mängel auszugleichen, wie zum Beispiel den Kalzium Mangel.
Likes
3
Share

@Olduffybastard88
Follow
Forgot to add a week and look how much these girls have started packing on weight a few starting to turn purple and hopefully not long up till there chopped used xpertnuiterns for the flower and it made a massive difference

Likes
3
Share


@Takeaims
Follow
Defo going keep going with f1 I have more still growing and there the biggest plants I've had thanks zameizia you guys are amazing
Likes
38
Share


@Green_Mountains
Follow
Another solid week of growth!! The two big plants nearly doubled their height and both had a lot of undergrowth this week! I plan on trying my hand at LST tomorrow. I added more soil into the pots yesterday. I still feel it is too low but I don't want to shock the plants too badly. I watered after lifting the plants up some and adding the soil. I plan on feeding them tomorrow night.
The first white pistils have sprouted and there is a distinct aroma of marijuana in the air!! I hope they hold off another week before really start to flower. It's amazing how fast a month can go by!
I may not keep the little plant past this week. We'll see if she makes it that far...
Here's to another week of healthy growing!! Peace!
Likes
12
Share


@MicroHidroGrow
Follow
Esta por empezar el engorde final. Ya las flores estan casi formadas. La altura está al límite total. Uno o dos centímetros más y estaría en problemas de verdad. El engorde de muchas flores ya es notorio, pero creo que el uso de un bioestimulante que no es de primera línea, ha reducido el potencial de las plantas. De todos modos hasta no tener el resultado final no puedo afirmar nada.
La solución de esta semana fue cargada con más pk booster para ver cómo funciona la linea de greenhouse en esta etapa. Suelo usar pk 13/15 de canna. Pero esta vez puse el que tenía. Seguiré actualizando.
Día 31. Se nota mucho el engorde. Las hojas muestran pequeños signos de sobre fertilización, pero nada grave que no haya visto antes. Me suele pasar en esta semana en todos los cultivos en hidroponia. Pero las veces que ko me pasó, no tuve el engorde deseado. Por eso manejo mediciones de PPM superiores 1000. Se empieza a ver cuáles van a ser los cogollos más grandes, pero sigo con incertidumbre sobre cuanto más van a engordar. Estoy bastante conforme al momento. Hoy tuve contacto con plantas macho, pero me cambié toda la ropa antes de acercarme al indoor y le lavé. Además no sé si sumará, pero me rocío en alcohol cada vez que entro a casa, así que espero no tener problemas. Ya voy a ir preparando los esquejes para la próxima siembra. Quizá no logre sacar 10 de las madres que tengo. Pero quizá ponga menos y los haga crecer más tiempo y con bastante LST. Pero será en otro protecto. Por ahora espero que siga el engorde.
Día 33. Ya el engorde es un hecho. Por el momento estoy bastante satisfecho. La solución se concentró demasiado así que tuve que agregar agua. Pero más allá de algunos signos de sobre fertilización mínimos y pasajeros en las hojas, la plantas se muestran saludables y firmes. Todavía sigo buscando la posibilidad de agregar overdrive la semana que viene. Todo está por verse. Ya puedo asegurar que va a haber una séptima semana de floración, sino debería empezar el lavado en 2 días, cosa que a la vista, sería muy apresurado. Así que seguiré esperando a ver las flores con los pistilos más secos. Entre tanto los tricomas ya están formados, pero recién van a empezar la maduración en unos días. No saco foto porque el celular no hace buen foco con la lupa, pero ya intentaré mas adelante.
Día 35. Cierra la semana con una buena idea de lo que van a ser los cogollos. Según el calendario de la planta, debería empezar el lavado esta semana, ya que sería la última. Pero por la madurez de los tricomas, todavía le faltan entre 10 días y 2 semanas más. Así que se viene otra semana de sobrecarga de PK y voy a aumentar la dosis para aprovechar a medir el nivel de tolerancia de la planta a altos niveles producto. Al ser hidroponia y trabajar con el ambiente bastante controlado, confío en que voy a poder aplicar correctivos a tiempo, si empiezo a notar defasajes bruscos.
