
Processing
Likes
Comments
Share


@Cogollo_eu
Follow
**Encontrarás la traducción a español al final de la descripción**
If you like this week, please hit a like, it costs you nothing! 👊. Thanks in advance 😉!
From/Desde: 19/08/19 || To/Hasta: 25/08/19
From day/Desde día: 28 || To day/Hasta día: 34
-----IMAGES & VIDEOS-----
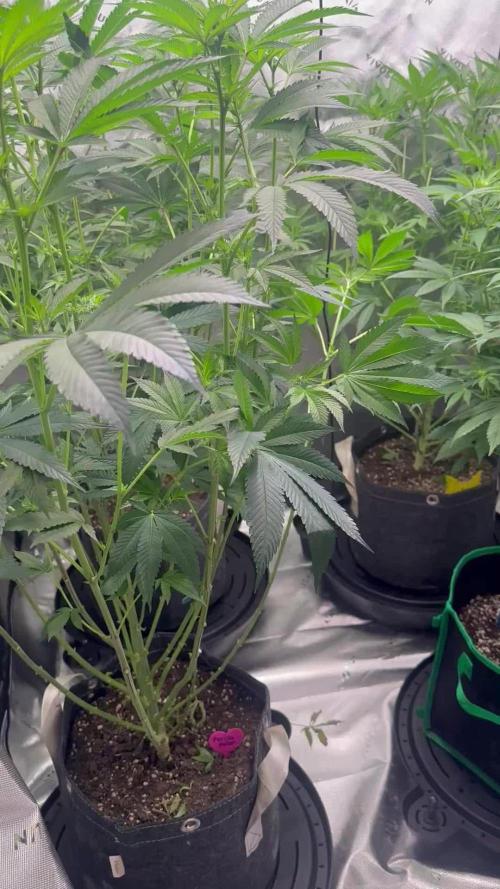
P5 - I'm loving this photo, is the first complete cool photo of the AK i've taken. With the structure, the fixing rods with the same length as the diameter of the AirPot, and those beauty rubbered green cables 😍.
P8 - I'm feeling that those branches looks too weak, and slim for what's coming. From next week i will use Rinho Skin to see if it can help them to get fat in upcoming weeks and before flora time. I'm also minding to create some branch supports with the 3d printer that will be placed on the LST structure, I need to twist my mind a bit with it.
-----WEEK SUMMARY-----
Another super heat week. While at home i'm at 34~36º in the street things are worse :(. Also humidity fluctuate from 50~65º.
At last I removed those ugly & dangerous cables from the branches and used a rubber covered one. For now i only need to fix her in 4 points, 1 per each main branch, as you can see, at about 13 cm of the main branch. Later i will fix her with another 2 points per branch, one in the border of the pot from inside, and the last one also in the pot's border but outside.
This week i removed the first horizontal internode on each main branch, and also removed the branch that grows vertically down from the second internode leaving in place the one that grows totally up.
At the end of the week i will fix the SCROG mesh, but it's not going to be permanent until later, or maybe not at all due to dark photography, as if i place the mesh i will not be able to move the plant (i need to think about it). For now, I just need it 3 or 4 days to test it as i never placed this 60x60 mesh before, and also i had to cut the central rods for the mesh.
About Alice K. she's growing beauty and healthy, some week ago i found a little white spider that i killed, @time (week 7) I didn't noticed any insect signs more. Also remark that she's standing well those temperatures and some days of very low humidity some hours 35% inside the tent. And also the equitative distribution she's developing.
As i said on previous week, i will kill those clones at mid week as i'm going to plant 4 more seeds in a week, and all is going to be too much work 😞to compatibilize it well with my job.
-----WATERING CALENDAR-----
23/08/19 (Day 32) - 3,000 ml with all week nutrients @ 1.1 E.C. PH5.8
*****ESPAÑOL*****
Por favor, si te gusta esta semana dale un like, no te cuesta nada 👊. ¡Gracias por adelantado 😉!
-----IMÁGENES & VÍDEOS-----
P5 - Me encanta esta foto, es la primera foto completa guay que hago de la AK. Con la estructura, las barras de aluminio de la medida del tiesto y esos cables cubiertos de goma verde, me empieza a encantar el aspecto de la planta 😍
P8 - Tengo la impresión de que las ramas son demasiado endebles y finas para lo que está por venir. A partir de la semana que viene, usaré Rinho Skin para ver si las puedo ayudar con el engorde antes de que llegue el tiempo de floración. También estoy pensando en crear unos soportes para las ramas con al impresora 3D que irían enganchados a la estructura para LST, necesito darle unas cuantas vueltas a esto último.
-----SUMARIO SEMANAL-----
Otra semana super calurosa. Mientras que en casa estoy entre los 34~36º en las calles la cosa es mucho peor. También la humedad está un poco loca ya que a diario me fluctua en casa del 50~65º.
Al final he quitado esos cables feos y peligrosos de las ramas y he usado un cable con goma en condiciones. Por el momento sólo he tenido que atar la planta a 4 puntos, 1 en cada rama que he dejado, como se puede ver a unos 13 cm del tallo principal. Más adelante usaré otros dos puntos de fijado en el borde del tiesto, uno de ellos en la parte interior y otro por fuera del tiesto.
Esta semana he quitado el primer nodo de cada rama y también la rama que crece hacia abajo del segundo nodo, dejando la rama que crece totalmente hacia arriba.
Al final de la semana colocaré la malla de SCROG, pero no va a ser de manera permanente, por lo menos hasta más adelante. Voy a empezar a hacer fotografías de fondo oscuro, y el tener la red me va a imposibilitar la tarea ya que debo sacar la planta del armario para las sesiones (necesito pensar en ello). De momento la quiero montar 3 o 4 días para probarla ya que nunca la había montado antes y también tenía que cortar las barras horizontales para la malla.
Sobre Alice K. está creciendo super bonita y sana, hace un par de semanas encontré y maté una arañita blanca (Requiescat In Pace), a día de hoy (semana 7) no he visto más signos de insectos. También debo remarcar lo equitativamente que está creciendo y lo bien que soporta las altas temperaturas y la escasa humedad, hay alguna vez que he mirado el higrómetro y estaba al 35% dentro del armario.
Como dije en la semana anterior, mataré los clones a media semana, voy a plantar otras 4 semillas la semana que viene y va a ser demasiado curro 😞para compatibilizarlo con mi trabajo.
-----CALENDARIO DE RIEGO-----
23/08/19 (Day 32) - 3.000 ml con todos los nutrientes semanales @ 1.1 E.C. PH5.8

Likes
44
Share


@RakonGrow
Follow
Note :
+ jegliches Zubehör wird in der GermniationsWoche aufgelistet . Zeitraffer Videos folgen immer nachträglich.
+ videos werden so geschnitten das nur ein geschlossenes Zelt erscheint , ergo Fehlen paar reale Minuten (ca 1 Std) .
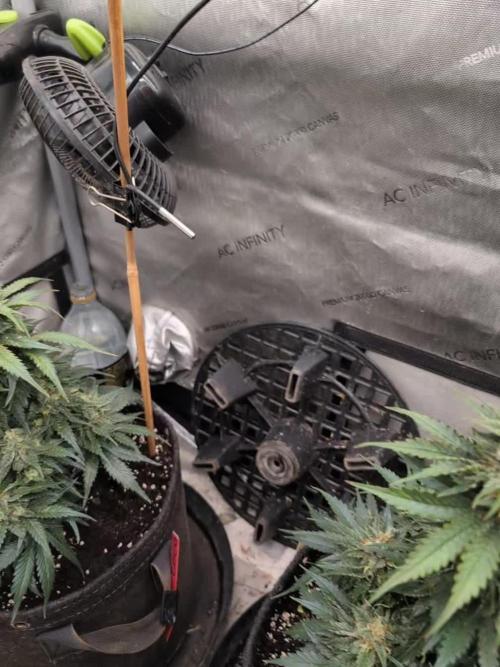
+ + leider ist die Halterung defekt und die Videos etwas schief . Vielleicht mach ich mich irgendwann mal daran und korrigiere das. Sorry
Day 43:
+ Höhe : 64cm
Es wächst und wächst :))
Day 44:
+ Höhe : 65cm
+ 2 Liter Flaschenwasser , kein Dünger .
+ + PH 6.5
+ Drain : PH 7.0
Höhe ist bei 63cm , das ist 3 cm mehr als die Vorgabe ausweisst :))
Day 45:
+ 66cm höhe.
+ 2 Liter Flaschenwasser
+ + Dünger für Blühte
+ + + Canna Terrar Flores (Achtung wirkt wie PH-)
+ + + Canna Boost
+ + + Cannazym
+ + + Greenhouse Feeding BioEnhancer als PH+
Jetzt säuft sie wie wilde , keine 24h und die 2Liter sind komplett wech . Mehr geht aber nicht in den Topf , ergo muss ich mir langsam mal überlegen ob ich Tropfbewässerung nutze .
Und es treten duch das nur Wasser extreme "Calzium" Probleme auf . Hihi , aber so hab ich mal das ganze auf Startsequenze gesetzt . Ich arbeite also noch daran diese Mischung aus BioBizz Light und Urgesteinmehl nach Schätzung zu meistern :)) Den Fakt ist , da ist viel zu viel Urgesteinmehl drinne , was auch die Vegiphase schon gezeigt hat.
Day 46:
+ 1.5 Liter Flaschenwasser
+ + Dünger für Blühte
+ + + Canna Terrar Flores (Achtung wirkt wie PH-)
+ + + Canna Boost
+ + + Cannazym
+ + + Greenhouse Feeding BioEnhancer als PH+
Day 47:
Draussen zu heiss , drinnen zu feucht ... Ja genau was ich nicht brauch lol ...
GoPro aus der Halterung gefallen :))
Day 48:
+ Höhe : 68cm
+ 2 Liter Flaschenwasser
+ + Dünger für Blühte
+ + + Canna Terrar Flores (Achtung wirkt wie PH-)
+ + + Canna Boost
+ + + Cannazym
+ + + Greenhouse Feeding BioEnhancer als PH+
Draussen zu heiss , drinnen naja ... Der Entfeuchter arbeitet weil ich sonst hier Tropenstimmung bekomme :)) Ein wenig Entlaubung .
Day 49:
+ Höhe : 68cm
+ 2 Liter Flaschenwasser
+ + Dünger für Blühte
+ + + Canna Terrar Flores (Achtung wirkt wie PH-)
+ + + Canna Boost
+ + + Cannazym
+ + + Greenhouse Feeding BioEnhancer als PH+
+ + + PH 5.8
+ + Drain PH 6.5
Läuft bei der Lady , sie trinkt , liebt das Licht (auch wenn die Spitze etwas zuviel bekommt , sie betet halt etwas ) , Mangelerscheinungen sind echt gering . Hat die heissen Tage (27° im Zelt bei 60%-57% ) hat sie super überstanden . Ich werde immer besser im Gießen . 75% von oben , 25% lass ich von unten aufsaugen .

Likes
8
Share


@sunshinegroww
Follow
It looks like this one is mutant I don’t know the other seed i popped looks the same
Likes
34
Share


@SalocinSpecial
Follow
D68 (28/01/2021): First official day of week 6 in bloom and first official day (second in reality) of pre harvest flush. The smell is strong when I open the tent! It does not take long for the whole room to smell dank and even outside the room.
- temp: 24-25C light ON ; 20-22C light OFF
- no water
- RH: 49-52% light ON ; 49-50% light OFF
D69 (29/01/2021): I did a first proper flush today by running approximately 2.5 gallons of water trough the medium. There is still a lot of nutrients in the medium. I might do the exact same flush tomorrow. The PH of the run off is high (around PH7-7.1). This is an other reason to flush again tomorrow. I also reduced the light ON schedule by two hours. So now 18h hours ON and 6 hours OFF. I will continue reducing the ON period until they are ready for a complete dark period. I also try to reduce the air temperature.
- temp: 24-25C light ON ; 19-20C light OFF
- water: PH6.4, 135PPM, 2.5 gallons each
- run off: PH7 and 680PPM for Glue Gelato ; PH7.1 and 560PPM for Banana Kush
- RH: 47% light ON ; 48-53% light OFF
D70 (30/01/2021): I did a second flush since I was not satisfied with run off PPM of yesterday. Today, the run off PPM is under 300 which is what I wanted. The run off PH is still high with 7.1. Banana Kush is ripening with the pistils slowly turning brown. Glue Gelato look sooooo yummy and I can't wait to harvest it. There is a small color change in some leaves but I'm expecting more in the next days.
- temp: 23-24C light ON ; 19C light OFF
- water: PH6.4, 125PPM, 2.5 gallons each
- run off: PH7.1 and 260PPM for Glue Gelato ; PH7.1 and 250PPM for Banana Kush
- RH: 46% light ON ; 46-48% light OFF
D71 (31/01/2021): Glue Gelato is changing color. I'm checking trichomes everyday on both girls and no amber yet.
- temp: 23-24C light ON ; 19C light OFF
- no water
- RH: 45% light ON ; 49-50% light OFF
D72 (01/02/2021): Well well well...the clock is ticking for those girls. Glue Gelato is now having a couple of amber trichomes. Banana Kush don't have any. Overall Banana Kush has less trichomes and fluffier buds. This girls is not ready yet but I will need to chop her down at the same time has the Glue Gelato because my drying space is the tent I'm growing in. I will try to push the Banana Kush to ripen faster by lifting up the lamp at 16 inches from top bud and by reducing of 2 hours the day period for a 16 hours light ON and 8 hours light OFF. But at least all Banana Kush trichomes looks milky.
- temp: 23-24C light ON ; 18-19C light OFF
- water: PH6.2, 123PPM, less then a gallon each
- run off: PH7.4 and 200PPM for Glue Gelato ; PH7.4 and 287PPM for Banana Kush
- RH: 45% light ON ; 40-45% light OFF
D73 (02/02/2021): I gave water probably for the last time today. Trichomes on Glue Gelato are starting to amber on top buds. Not a lot of amber but you can see that all the trichomes are starting to degrade by curling down slowly. Trichomes on Banana Kush are not amber at all but they all look milky. Glue Gelato is ready to harvest but Banana Kush need more time. It's tough to make a decision to chop or not since they are not at the same stage of growth. I want to place them in a complete 48 hours of darkness before harvest. 1h less light today for a 15h light ON and 9h light OFF. The lamps are now at 20 inches.
- temp: 23-24C light ON ; 18-19C light OFF
- water: less then a gallon each
- RH: 45% light ON ; 40-45% light OFF
D74 (03/02/2021): Glue Gelato is ready for 48h of darkness. I will take her out of the tent and place her in an other room without light. I will try to maintain a proper environment in this room and if it smells to strong or if the condition are not good I will replace her in the tent and both will start the 48h darkness. The idea is to give Banana Kush 2 more days to ripe and swoll more. After 48h, I will chop Glue Gelato and place her in the tent to start drying. Banana Kush will then start her 48h darkness. I don't know if this strategy is good but I will monitor everything closely and react if something is wrong.
- temp: 22-23C light ON ; 19C light OFF
- no water
- RH: 47% light ON ; 43-45% light OFF


Likes
51
Share


@eldruida_lamota
Follow
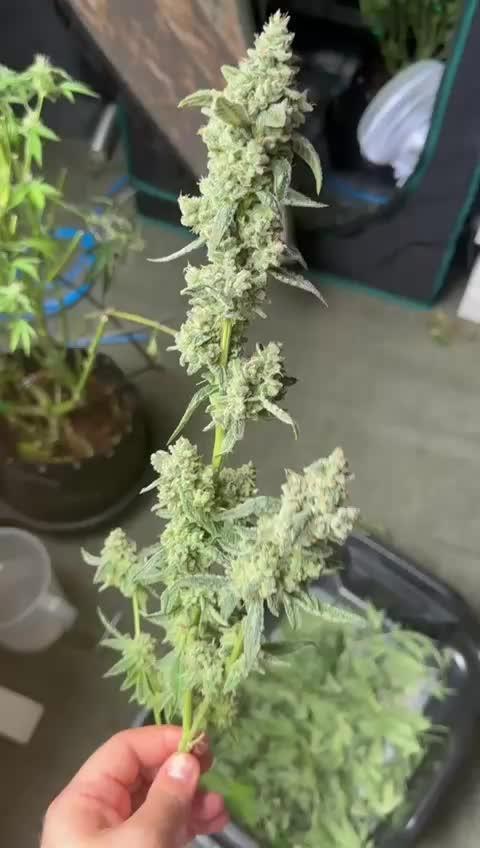
Bueno resumiendo cookies gelato es una variedad híbrida muy fácil de cultivar pero ojo, cuidado con los últimos riegos si no queréis perder cosecha por moho. Lo demás de 10 pegada heavy sabor increíble, cogollos duros como rocas y bañados de una gran capa de polen.
El ambiente del secado se mantuvo en 23 grados de media y la humedad estuvo por debajo de los 45% en todo momento.
Poco más la verdad estuve encantado de poder cultivar una genética tan potente .
Un saludazo que paséis un final de año increíble y por supuesto buenos humazooos💨💨💨.


Likes
77
Share


@BipolarHellas
Follow
Hello there,
🇬🇷
so the previous week was good with slow but steady growth...the girls were fed with Bio Grow from GHF and some of the Enhancer...they are under a 50W Led,safe and sound,until transplant when they will be moved outdoors...
WEEK 3 : "RUN IF YOU CAN"
☠️Day 15...they are forming the 5th set of leaves...strange thing,when I get them out of their cupboard they tend to stretch their leaves upwards...when I put them back they are back to normal...I think it has to do with humidity...thinking of transplanting soon as I can see the roots on 2 of the 3...I started preparing the pots,I put Bio Grow from GHF and the babies will be transplanted there in a few days...just waiting for the weather to be stable as they will go outdoors...
☠️Day 16...💧watering time for my babies...they seem to be very well...awaiting for that transplant...today I was thinking about what to do with the girls in terms of training...what I have decided is that I will perform different techniques for each one of them...one will be left to grow naturally like a Christmas tree...the second will be topped and the third will be LSTed...it is a good chance to compare the final weight of each technique...what stresses me a bit is that these girls will go outdoors during the day and under low wattage Leds during the night...I am used to using an HPS lighting and I don't know if the sun here from my spot will be enough...moreover summer is coming...here in Greece the temps will go above 35° C in July...I guess I have work to do and solutions to find...
☠️Day 17...💧📥transplant is here...the girls were put in their final homes, pots of 15 L,and were watered with plain water...I used "Coco Humus" which is coco coir fiber mixed with 20 % manure and organic matter...Its ph is 6,0 - 6,8...I also added Bio Grow, 45 gr for 15 L substrate, and the same quantity of Bio Bloom, both from Green House Feeding... I was a bit confused if I should place the Bio Bloom now,but I decided to do so as these are their final containers...they are 100% organic so I am not worried about any kind of burn...
they are now inside under low wattage Leds so that they will slowly get used to their new environment...I may give them some sun in the afternoon...their roots had reached the bottoms of the solo cups,so it was a good time for transplanting...hope they will take it good...I don't like calling them with numbers so I will give them names...We have Angie,Michelle and Lucy...Girls say hello to everyone...
☠️Day 18...its cloudy outside...the girls will stay inside under their low lighted shelter...maybe I will take them outside for a couple of hours just to get some fresh air...transplant was OK for them,no signs of shock or something...they are a bit small but from now on they will have the mighty Sun with them outside...I hope they will boost...Run if you can babies...
💀💀💀...today they survived a massive attack from my son...he probably wanted his toys back from the pots...🤣🤣🤣Anyway,Michelle is a bit hurt on her stem..not something very serious but I have to keep an eye on her...
☠️Day 19...💧summer is here...with temps at 32°C the girls are outside sunbathing...🌞I uploaded a short video showing them off...
I watered each one with 500 ml of pure water (ph 6,9)...
☠️Day 20...it's too hot down here...the girls are enjoying the sun but I have a feeling I will have a problem with the temps outside...it's too early too be that hot...32-35 °C...
☠️Day 21....💧last day of the week...the girls are doing fine...I would like them a bit bigger but I think they will catch up...Today I used 6,0 ph water for the first time...usually I don't adjust it,straight from the tap...after a lot of research I decided to give them water at this ph as it is better for coco.I hope the will like it..
So,I hope u enjoyed this week like I did...see u next week..stay tuned...


Likes
8
Share


@Eauderay
Follow
Old Dinafem free seeds I got from attitude 5 years ago...
6 critical/cheese
All sprouted but one.
2 growing fast and big
1 medium/small
2 very small ( wanted to discard those at first because they were the weakest and slowest one to grow but I could not kill them!!!
And so kept them squeezed on the side in a small pot just to see.
Planted the two biggest one completely laying on their side in the final pots before flowering because they were way too big for my little set up!
I tried not to make too much lower stem in the medium, but I think I should have bent early in veg instead of what i did...
One of the plant did not like it very much, but the other could not care less...Roots were poking out the top layer of pot, roots were truly rioting!

Likes
6
Share


@Eldorado_ed
Follow
Absolutely over the moon with my first attempt really interesting and fun think I have myself a new hobby and grateful for the help from you guys on here ✌️🏻

Likes
6
Share


@Spliffi
Follow
Week 5 12/10/2022
BLAST OFF!!
It's party time. What a difference!!
This BioBizz is doing a great job. The leaves just started growing louder. I see a spot here and there but nothing to worry about yet.
🌱🌱🌱🌱🌱🌱🌱🌱🌱🌱🌱🌱🌱🌱🌱
"I don't smoke weed to escape reality, I smoke weed to enjoy reality even more."
Unknown
🌱🌱🌱🌱🌱🌱🌱🌱🌱🌱🌱🌱🌱🌱🌱
Thanks for reading!!
Likes
12
Share

@Vince_Van_Grogh
Follow
🌿😎.
Day 50 01 Mar, Tues PM ♥️💛💚
Each got 2700 mL
1 CalMag, 0.5 Grow Big
1 Tiger Bloom, 1.5 Big Bloom
Day 53 05 Mar, Thurs AM♥️💛💚
Each got 2700 mL
Only put in Recharge.
Day 59 07 Mar, Sat PM♥️💛💚
Each got 280 mL
1.5 CalMag, 0.5 Grow Big
1.5 Tiger Bloom, 1.2 Big Bloom
Trying to water every 1.5 days at peak flower.
Everything is steady, heavy indica plants.
Buds look like they might get phhhaaaat!

Likes
3
Share

@Dsant
Follow
Harvested these two ladies on D75. I'm over satisfied with the result, unfortunately didn't weight the dry result but the smoke from these two are amazing. Been daily smoking it for the past 2~ months and I still got a good chunk left.
#1 Came out with a skunky and a slightly chemical taste and smell. Super nice and strong smoke, you feel your eyes getting heavy after a couple puffs. Nice chunky nugs, big yielder even under only 150W. Super satisfied with the result.
#2 Was surprising, garlic smell all over the place. During the drying process I felt a slight wild garlic smell, but after drying it became even more potent and smelly. Upon breaking these nugs the room gets filled with a potent wild garlic smell, which translates to a fresh potent smoke. One of my favourites so far, unfortunately my tent is too small to comfortably accommodate two plants and this one wasn't a particularly big yielder.
Overall I'm VERY satisfied with my first Mephisto grow, amazing genetics, super resistant (had a couple weeks of very hot days, to which they handled amazingly). A success grow for me for sure. Next I'll try a photo strain, thanks for reading! :)
Likes
1
Share

Likes
32
Share


@Hambone
Follow
10/16
So the girls are doing well. They have been watered twice now and #2 is a bit smaller. They are absolutely exploding veg wise and raising the light was necessary as #2 was much to short, will be updating with transplant soon!
10/18
Ok so transplant happened today. They were growing so quick we needed to move them as soon as they were water ready! They got transplanted into 5g fabric style pots. Did 2/3 Fox Farms "ocean forest" and 1/3 perlite mix. Used same nute mix for watering on the transplant, will change that up soon. See pics and video for more info!
10/22
There seems to be a nitrogen lockout. I'm guessing it was the unneeded cal mag add. Learned our lesson! Upped our grow big and giving the first water in big pots. Other than that they are growing amazing!
Likes
Comments
Share


@BeggarsBelief
Follow
After some research I decided to go for Advanced Nutrients for all amendments. Starting slow and building towards flower, then adding some Bud Candy. These plants really took off lol, shit got out of hand and I let them run a little, I'm definitely a habitual defoliator, I cant stop clipping when I really should just let them be, anyway I moved the tent out of the Closet space as its a friendlier time of year so they don't need the extra protection, kinda why I let them go, Season 1 needed to be smaller in height as they would have suffered outside the tent. Still topped and administered some LST, tried some clips out, but they were far too small and ended up snapping a stem. Would like to give them a go again but will research a bit more next time and not just go for Amazon crap. So far in terms of holding things down I really like the early pegs in the soil approach. I also tried some trellis netting this time, definitely like it and will be more prepared next time. Had to bail for an Easter break so a buddy came through and watered in nuets for me. SKOG was noticeably more Sativa-esque, thinner, stretchier. Runtz with the fatter leaves.
Likes
Comments
Share


@AlbStoned
Follow
Die Letzten paar Tage sind gekommen. Ich habe auf beiden Pflanzen braune Trichome, und warte nun das Verhältnis 30/70 ab. Der Geruch ist echt der Hammer! Beide Pflanzen geben eine sehr süßliche Note ab. Die Mango Cream x Cinderella wird momentan noch die letzten Blätter los, und besteht fast nur noch aus Buds.
Likes
72
Share


@Roberts
Follow
Auto Maxi Gom is growing good. She got her first lst today. She is under the Medic Grow Mini Sun-2, in Xpert Nutrients. The feed chart might be a bit strong for autoflowers. I think I got it better figured out now. Everything is looking really good. Thank you Xpert Nutrients, Medic Grow, and Seeds Mafia. 🤜🏻🤛🏻🌱🌱🌱
Thank you grow diaries community for the 👇likes👇, follows, comments, and subscriptions on my YouTube channel👇. ❄️🌱🍻
Happy Growing 🌱🌱🌱
https://youtube.com/channel/UCAhN7yRzWLpcaRHhMIQ7X4g
Likes
4
Share


@Growyourownathome2x2
Follow
Gorilla breath or OGKZ DAY 43 of 12/12 I mixed up my gorilla breath seeds with the ogkz so I’m not sure what I’m growing 🤣


