Recommended
Likes
Comments
Share
@nonick123
Follow
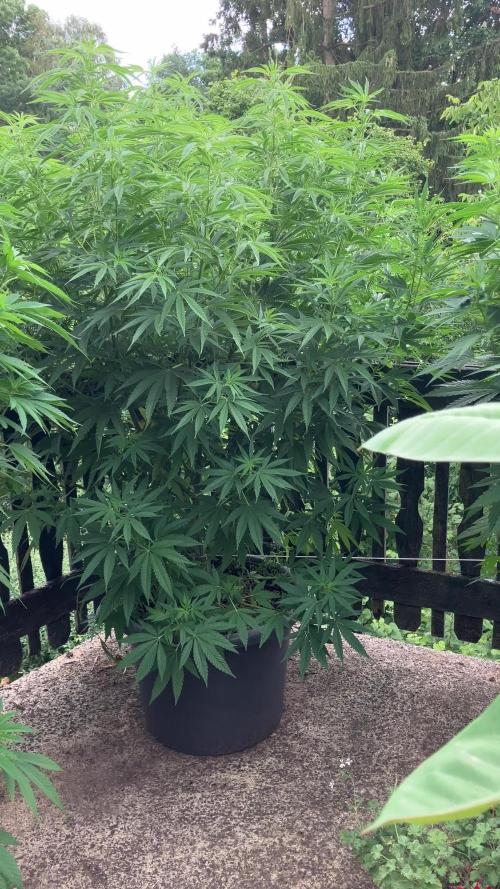
Día 80 (19/08) Riego 1 Litro H2O pH 6,55 Día 81 (20/08) Riego 250 ml H2O pH 6,55 Día 82 (21/08) Riego 500 ml H2O pH 6,55 Día 83 (22/08) 💥Comienza la floración! 💥 No riego. Día nublado y de bajas temperaturas Día 84 (23/08) Riego 500 ml H2O pH 6,55 Día 85 (24/08) No riego. Día nublado y de bajas temperaturas Día 86 (25/08) Riego con 1 Litro de Té Floración de Lurpe Solutions. Preparación: 24 horas con bomba de aire (oxigenación) con ingredientes: Healthy Harvest 8 ml/L + Insect Frass 16 ml/L + Hummus Lombriz 8 ml/L + Melaza 1 ml/L + Kelp Hidrolizado 0,25 g/L 💦Nutrients by Lurpe Solutions - www.lurpenaturalsolutions.com 🌱Substrate PRO-MIX HP BACILLUS + MYCORRHIZAE - www.pthorticulture.com/en/products/pro-mix-hp-biostimulant-plus-mycorrhizae
Likes
6
Share
Jardineros una semana más dándole al lío! Ya queda poco para cortar Todas las plantas tienen su limpieza de raíz y están listas para que las pongamos a secar
Likes
142
Share
Hi everyone 🤗. Everything is going great 👍. There are no defects or anything unusual :-). Today the Blue Cheese Pheno 1 became the first time rinsed, and now only gets 0.4 Ec water for the next 10 days ca :-). Everyone else needs a while. otherwise there is not much to report this week. I wish you all a nice week, stay healthy 🙏🏻 and let it grow 🌱
Likes
5
Share
Se deja de fertilizar con nutrientes , solamente se riega con agua para empesar el proceso de lavado de raiz / It stops fertilizing with nutrients, only watered with water to start the root washing process
Likes
13
Share
Had to leave for quick trip away from home for 4 days she was left alone unfortunately had to leave her under eave of garage too Incase it was gonna pour rain so she didn’t get as much sun as we would have liked. Was happy to see more bud and crystal growth. But unfortunate to find some powder mildew and leaf miners on a good handful of leaves. I ended up just cutting those bad leaves off hoping the pm and leaf miners will stop spreading! She was just watered this morning and looking pretty healthy to me.. thinking 2 - 3 more weeks ..
Likes
4
Share
Uma planta estava muito travada e pela minha experiência não vale a pena o custo da manutenção dessas plantinhas é chato mas preciso do espaço e do tempo para cultivar plantas que deem resultado. Coloquei um gancho leve em cada planta hoje para ver se aumenta a área verde.
Likes
17
Share
Langsam bilden beide Terpene. Für mich sind Terpene der wichtigste Punkt bei Cannabis. Der Geschmack bzw. Terpene haben großen Einfluss auf die Wirkung, deshalb bin ich sehr auf das Terpenenprofil gespannt und ob ein Phenotyp vielleicht ein Keeper wird. Das ist nicht mein erster Run, aber die Vorfreude ist genauso groß wie beim ersten Mal. Ich denke ich konnte die Sorte Melonade Runtz (fem) bis hier hin schon ganz gut repräsentieren 💚🍀
Likes
13
Share
Final day of veg flipping the flower today I’m excited to see how these tests go I have lots of hope for the ones and I may only create s1’s
Likes
99
Share
@DevilsBud
Follow
Anesia blackberry moonrock and imperium X will be put in the 100X100X180 with the TS-1000 so they can veg some more the black berry moonrock is looking very short stocky and bushy lest how she developed try the week Happy growings visit www.marshydro.eu for your best gear and use the PROMO CODE: DEVILSBUD 27/10/21 Transplant the black berry moonrock in 11L fabric pots added 5gram Easy Roots - Mycorrhiza Mix to soil Some info about the Marshydro FC-4800 Superb Quality LED Chips: The whole light is composed of 1206 pcs Samsung lm301b and Osram 660nm chips. More than two times as many LEDs are used to drive the grow lights at low currents and to avoid overdrive. Quality is guaranteed and efficiency is up to 2.8 μmol/j. Even PAR Distribution and High PPFD Output: The multi-light bar design and the densely distributed light chips enable the LED grow lights to achieve the optimum PPFD required for plant growth over the entire effective coverage area. Specifically Designed Spectrum: To ensure even plant growth, blue and red light are enhanced on the basis of a full spectrum combination. Not only does this accelerate plant growth, but it also improves the yield and quality of the plants at the same time. Dimming Daisy Chain Function: The dimming function saves on electricity costs and enables brightness from 10% to 100% for the different stages of plant growth. A single master light can connect up to 30 lights in a daisy-chain system. Business LED Grow Light: The light's wavy heat sink dissipates heat quickly and the IP65 waterproof allows the light to operate in humid conditions. 180° collapsible feature for easier installation. All these features provide favorable assistance for commercial cultivation. And some tent info ●【Lock All Light Insid】MARS HYDRO Grow Tent Interior is made of diamond mylar. Non-toxic to the environment, no harm to plants. High-quality 1680D canvas being double stitched, (ALL OTHERS BRAND grow tent is 601D canvas) which is tear-proof for perfect light locking, No light leaks or rips at all. ●【Durability Grow Tent】Stable Metal corner adapters and poles are the trustful supporters of the tent. No rusting nor paint-falling. Quick easy tool-free installation. Carries strong heavy-duty SBS zippers, double layer lining to create a light-proof seal. ●【Easy Observation of your Plants】Special peeks window made by double layers of cloths. Observe the growing conditions of your plants without opening the tent and avoid disturbing plants. The peek window also serves to dissipate heat and ventilate air. ●【Removable Tray Keep Clean】The package includes a removable waterproof floor tray to hold soil and fallen leaves. The tray can be taken out easily to wash. Removable and water-proof makes cleaning easy. ●【Good Ventilation&Fast Assembly】 Circular double-sleeved vent holes with adjustable nylon strap for air circulation by exhaust fan, ducting, carbon filter, or reflector. Better allows proper light, heat, and airflow. Quick tool-free installation. Reinforced by a sturdy metal frame to ensure security and stability, supports up to 140lb. Perfectly safeguard your plants to thrive even in winter
Likes
4
Share
@GreenNimf
Follow
The girls had a accidental temperature drop to 15.3 degrees... was my fault. For the all the rest it's all going 👌
Likes
33
Share
@Grower0
Follow
Thank you to everyone for following this journey! The results were nuts. Honestly, I would've been happy with 40g dry as this is my first grow. I DEFINITELY did not expect this outcome which is insane. This gives me so much confidence in my future grows and appreciation for the companies whose products I used. So, now to the point - Dry weight - Top class buds - 176g, smaller buds - 32g, larf/leaves/scissor hash - 26g. To sum up - 208g of product you can smoke and 26g that'll go to edibles. First grow, 2x2 tent, 100w light, three-part fertilizer and cal mag - that's insane, especially because I was expecting nothing more than 60g and like I mentioned, I would've been happy with 40g. I even thought my scale was broken or something went wrong, I still can't believe I pulled 208g of bud. It took 117 days from seed to smoke - that's disregarding the cure. Seed to flower in 42 days. Flower to harvest in 61 days. 14 days drying. Thank you to FastBuds, I've sent them an email about the grow with some questions and got a speedy reply with some pointers towards the end of the flower. Also, I don't have anything to compare this grow with but I had 0 issues with pests which I was really happy about. I didn't have to spray anything on the plants, didn't have a single bug inside the tent. They mention on the website that NL is a very resilient strain so that might've been because of this specific strain. Spiderfarmer light did amazing too - 208g of bud from 100w light!. General Hydroponics did way better than I expected - there's so many companies with multiple bottles of nutrients that expect you to spend ridiculous amounts of money on their products while I got crazy results with just 3 basic bottles. Cal and Mag by Canna worked with no complaints. Takeaways - seems like the runoff pH doesn't matter in coco - I could be wrong but I struggled with coco pH from the very beginning. Regardless, the outcome speaks for itself. Maybe the harvest would've been even better with an optimal pH but in this particular grow, I don't think it mattered much. Before starting this grow I've done A LOT of research and it looks like it most definitely paid off! I was panicking at first because of the slow growth. The plant also had some leaf deformities and the color wasn't as green as I've expected it to be. It was stressful at first, I think especially because I was constantly comparing my grow to someone else's. This specific LST method where I kept rotating the main stem clockwise every day or two paid off as well. The canopy was relatively even and new tops grew crazy fast. The only thing left to do is to cure the bud. I had two 1.5L containers ready for cure/storing since I didn't expect to pull much but had to go acquire a few more "big boys" to fit all the product in, which is a good problem to have. I don't think that I'll be updating the cure here but the plan is to burp 2x/day for 15-30min each time for the first week and 1x/day for 15-30min the second week. After the first couple of weeks I won't be timing the burps. As of now, I've placed boveda 62% packs inside the containers to maintain a RH of at least 58% in the jars. About the Northern Lights strain - the smell hasn't fully returned yet post trim, but it smells like sweet fruits with a hint of black pepper. You can still smell a bit of pine/grass but I think that'll be gone after the cure. Buds are covered with trichomes, they shine like diamonds when you take a better look. Also, the buds look a little airy but are still really dense when pressed. The smoke - It's a tasty, relaxing high. I get why people describe it as night time smoke but for me personally, it grounds me a bit and I can enjoy it anytime. Also, it burns white ash :)) P.S. This is a lengthy diary but I hope that people can learn some stuff from my notes shall they read them! Thanks to everyone that followed the journey, showed support or just browsed through. Happy Growing everyone!
Likes
109
Share
Hi everyone :-) . I am really looking forward to this diary for the Green House Cup 🏆. This is just the intro :-) I will start the grow in the next 1-2 weeks 👍🌱 I wish all participants, but also spectators a lot of fun :-) Let it grow my friends 😎👍💪🏻🌱🏆
Likes
11
Share
Que pasa familia, vamos con la primera semana de crecimiento de estas Gorilla cookies Auto de FastBuds. Tiene muy buenas reseñas y pues me animé a colocar 4 plantas. Las cuatro semillas una vez germinadas son plantadas directamente en macetas de 7 litros y salieron las 4, 100% de éxito en el ratio. La tierra que utilizamos que está en la publicación anterior es plagron all mix, aparte alimentamos nuestras plantas con Agrobeta. Por supuesto el oh se mide en cada riego y se mantiene en 6.2, regando cada 24 horas e intentando mantener la humedad un poco alta al principio. De uno de los ejemplares la cague un poco, como siempre que no falte, al quitar la piel de la cáscara de la semilla? Pues arranque los cotiledones sin querer, pero salir saldrá adelante. Mars hydro: Code discount: EL420 https://www.mars-hydro.com/ Agrobeta: https://www.agrobeta.com/agrobetatiendaonline/36-abonos-canamo Hasta aquí todo, Buenos humos 💨💨💨
Likes
209
Share
@BioBuds
Follow
It was a week with a lot of activity. First of all, she had her first full week of flowering and did a bit of a stretch. Also I switched her to the left side of the tent, to space the plants more evenly. We are getting to a canopy, although one of her roommates probably is male and will be removed. More about this when I update my Xtrakushh Diary. Also had time to fit the scrognet. It fits way better than last grow, much tighter. We had some problems with the lighting. I probably hit my timer with one of my sausage fingers, making my lights turn on in the middle of the night, thank god I found it out in time. They maybe had an hour or two of light for one night. Still something she really doesn't need with this strains tendency to hermie under stress. She still looks happy. Did some gentle leaf tucking, some LST under the net, and a little defoliation. The branches might be short but they are very sturdy and should be able to carry large and heavy buds. And we had won the @Sweet_Seeds Halloween give-away and got to choose three of their legendary strains: Tropicanna Poison, Red Hot Cookies and Runtz XXL auto!! Thanks guys!!! We shall see where it leads... Thank you for checking in again and don't forget the Black Friday Superdeals on https://www.mars-hydro.com!! See you at other diaries or next week! Hug Bud and Sunshine
Likes
10
Share
Started ponytailing both Banana’s to get light to her lower buds for 6 hours at a time. Did more LST to the branches and main stem removed a few leaves and tucking what can be tucked. The bananas appear to both be in pre flower and they are all handling LST very well.
Likes
5
Share
@Ensign420
Follow
Greetings fellow growers 🖖 and welcome to my first grow ever. This adventure actually started several months ago when I decided to stop buying flower from dispensaries and just grow my own bud. How hard can it be!? This is actually my second seed of this strain. The first bean sadly died due to over watering (sorry girl, RIP). I was literally watering the cube to the point where water was dripping from the bottom, then heavily sprayed the humidity dome and tray with the vents completely closed. Everyday. Multiple times. I never let the dome or try dry out. So after about 8 days of not sprouting, there was a funky smell of rot. So that was that. Later I learned that rockwool retains a lot of water and can easily drown seeds. So a wet/dry cycle is best for rockwool germination. So even after hours of researching and digging through forums and tutorial videos, I was still under prepared for this journey. Did not consider how delicate the germination phase is. Oh well. Lesson learned. Reset and try again! I hope everyone is safe and stoned during this corona crisis. Just like everyone else in the world, I want this pandemic to be over with. But in the meantime, let's grow some weed! 🖖 [START OF WEEK 01] Day 01 - Monday - 08/03/20 - Total Days: 001 ----------------------------------- - [0830]: Light Schedule: 24Hrs/0 --- Soaked cube in 5.5 PH water for 10 min. Did not shake water out. --- NO NUTES! Only PH'd down to control the PH levels. --- Did not use the default hole (way too deep). --- Flipped cube upside down and made a shallow hole for the seed (less than 0.25" deep). --- Placed seed in and pinched hole close. No additional water added. --- Sprayed the tray and dome with straight water (5.5 PH). --- Vents are cracked opened a for ventilation (about 1/4 opened each). --- Distance between the light and tray was 53" --- AC was set to 80 °F --- Exhaust fan was set to 86 °F --- Room average temp was at 85 °F --- Dome humidity was at 85-99% when sprayed. --- Allowing to completely dry before respraying. - [2200]: Dome and tray were completely dry! Sprayed only tray and dome with more water. Day 02 - Tuesday - 08/04/20 - Total Days: 002 ----------------------------------- - [0845]: Sprayed dome and tray in the morning. Everything was dry. --- Hoping for the best! - [2130]: Everything was dry again, so sprayed dome and tray at night along with a light spray on the cube. Day 03 - Wednesday - 08/05/20 - Total Days: 003 ----------------------------------- - [0830]: Everything was dry again. Resprayed dome and tray. Slightly sprayed cube. - [2125]: Hooo damn!! She popped! Am little stub is visible! Resprayed dome and tray again. --- Still going 24/0 for lights. - [+0033]: Just checked up on her and I swear she grew a bit taller! Getting excited! Day 04 - Thursday - 08/06/20 - Total Days: 004 ----------------------------------- - [0845]: Wow! Went from a little stub to fully sprouted overnight! Everything was pretty dry again so resprayed dome and tray. - [2200]: Tap root is visible! Over 1" long too! Just resprayed dome and tray again. -- Going to prep for hydroton transplant tomorrow! Day 05 - Friday - 08/07/20 - Total Days: 005 ----------------------------------- - [0930]: She keeps growing! -- Added a bit of CalMag to the spray bottle (8 drops to 650ml of distilled water). Resprayed dome and tray. Water was at a 5.4 PH with 141 PPM. - [1045]: Prepped the bubble bucket with 4.5gal of water. Water is high enough to reach about 0.25" above the bottom of the net pot. --- Added 3 drops of Superthrive --- Added 3.5ml of CaliMagic --- Added 2ml Hydroguard --- Then PH'd down to 5.6 --- Solution Strengh: 120 PPM --- Water chiller is set to 20 °C - [1100]: Transplant time! --- Filled the net basket 1/3 with hydroton. When placed in the bucket, air bubbles are not visible, but are slightly below the surface (slight digging will reveal the water/bubbles below). --- Removed plastic on rockwool cube and placed in basket, then filled around and covered with hydroton. Making sure to block any light from passing through the net pot and into the nutrient solution. --- Covered with a half-bottle dome sprayed with the CalMag water from earlier. --- Hoping for the best! - [1300]: Raised Bucket 5" higher. Now light distance is 48" to top of bucket. - [1820]: Lowered tent exhaust temp to 76 °F --- Lowered AC to 75 °F --- Raised bucket even higher so light distance is 30" to top of bucket. - [2300]: Looking good! --- Sprayed dome and surrounding hydroton with more CalMag water. --- Attached timer to light! So new 18 Hrs On/6 Hrs Off light schedule. --- Lights On: [1600] (4pm) --- Lights Off: [+1000] (10am the next day) --- Decided to go with lights on during the evening/night and off during the later mornings/afternoon (the hottest part of the day) to see if temps can be controlled better. --- Please survive girl! Day 06 - Saturday - 08/08/20 - Total Days: 006 ----------------------------------- - [0800]: Everything was dry. Resprayed hydroton and dome. - [2000]: Here first night cycle seemed to go well! Get'n taller! --- Dry again. Removed the dome. --- PH went up to 6.5 so PH'd down to 5.7 --- Ran the top feed drip ring for a bout a minute to wet the hydroton and rockwool with the nutient solution. ---Too scared to leave the top feed on 24hrs (I don't want over water her and cause dampening-off). Will let dry before re-watering. - [2100]: After closer inspection, I think she's looking a bit yellow. --- Decided to add a bit of grow nutes to the bubbler solution. --- Added 2ml of Sensi Grow A --- Added 2ml of Sensi Grow B --- Solution strength after adding more nutes: 176 PPM --- PH went up to 6 --- I hope that the extra chelating properties of the 'PH Perfect' solution is enough of a buffer for proper nutrient uptake. Day 07 - Sunday - 08/09/20 - Total Days: 007 ----------------------------------- - [0800]: Water dropped a bit (mostly due to evaporation) so solution strength was at 190. --- Checked PH again. Was still at 6, so PH'd down to 5.4 --- Ran the top feed for a minute to wet the hydroton a bit. - [0915]: Since she's looking perky but still a bit yellow. So decided to up the nutrient concentration even more before lights out. --- Added 2ml more of Sensi Grow A --- Added 2ml more of Sensi Grow B --- Solution strength after adding more nutes: 199 PPM --- PH went up to 5.8 - [1700]: Checked nutrients. --- PH: 5.9 --- Solution strength: 202 PPM --- Added 4ml of Voodoo Juice --- Added 4ml of B-52 --- PH after adding more nutes: 5.9 --- Solution strength after adding more nutes: 238 PPM - [2130]: Decided to make a new foliar spray to address the continued yellowing. --- Started with 500ml of distilled water. --- Added 3 drops of CaliMagic --- Added 3 drops of Sensi Grow A --- Added 3 drops of Sensi Grow B --- Added 3 drops of B-52 --- Added 1 drop of Superthrive --- Solution strength: 164 PPM --- PH was at 5.9 and did not adjust. --- Gave her one spray. --- Also sprayed the surrounding hydroton. [END OF WEEK 01]
Likes
11
Share
@WeedM8
Follow
Looking pumpy very frosty closing weeks
Likes
24
Share
@Daweed83
Follow
Girls look super healthy ! can’t wait for them to grow bigger buds but overall they looking great to me ! 🙏