The Grow Awards 2026 🏆 


Likes
Comments
Share
@TheCannaProphet
Follow
~ FastBuds PAPAYA SHERBET Photoperiod~
Well here we go on another journey together through 'Canna-land' and this one's kinda special... forget that, it's VERY special because this is FastBuds newest surprise for the community, a FEMINIZED PHOTOPERIOD STRAIN!🤯
I was fortunate enough to score these seeds, of which only 1000 were available and can't wait to see what this strain can do! This Papaya Sherbet, according to FastBuds, is a hybrid with a 9-10 weeks flowering period. For a more detailed and accurate description of this strain the following from FastBuds says it best:
"Combining the massive stature of Papaya (Oni Selection) with the strength and resilience of one of our best keeper cuts (Sunset Sherbet), this strain develops into a big, expansive bush adorned with numerous bud sites that later transform into a generous harvest of medium-sized buds. Papaya Sherbet flowers deliver a signature flavor of premium cannabis with subtle citrus undertones that emerge upon inhaling. During growth, her aroma makes for a sweet yet pleasantly bitter fragrance, giving you an idea of what the smoke will taste like. Notably stress-resistant, Papaya Sherbet is a great choice for growers working in challenging environments. She is very forgiving and rebounds quickly from any adversity, allowing growers the freedom to experiment with confidence that she will take everything like a champion she is. This strain embodies resilience, flavor, and abundant yields in every grow cycle."
Sounds like an epic strain and I personally cannot wait for this lady to strut her stuff!😍
________________________________________________________________________________________________________________________________________________________________________________________________________________________________________________________________________________________________________________________
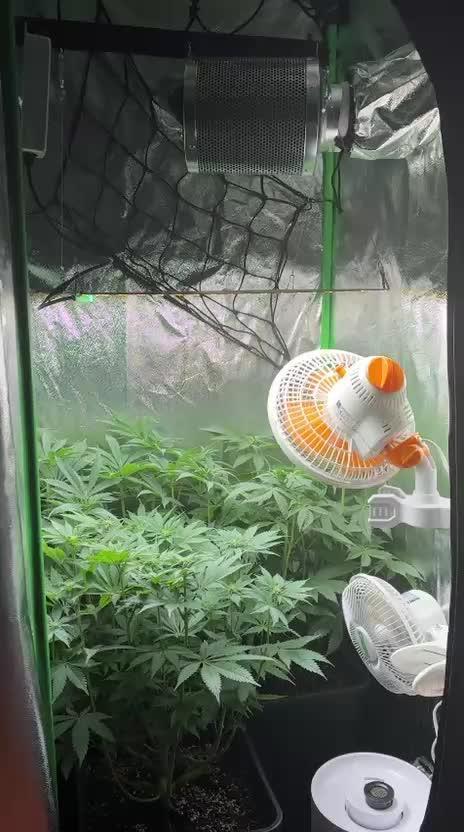
The Setup:
This is going to be an outdoor grow, but I have started the Papaya Sherbet photoperiod indoors as our weather is still a bit too chilly to put a newly sprouted seedling outside (nighttime temp's dipping regularly into the 40's℉).
The plan is simple... let her grow inside under a 19/5 light schedule until the nighttime temperatures are in the mid 50's℉, which shouldn't be long. After which, she'll be moved outside and transplanted into the soil which I have already setup and inoculated with beneficial microbes from BioTabs and slow release dry amendments from Gaia Green. Once she's established herself outside she'll be given periodic top dressings of Gaia Green 4-4-4 and 2-8-4 along with worm castings and Compost Tea's. Her grow area is approx. 5'x5' and I have posts and a trellis net set up already for when she gets bigger to aid in training her. Let the fun begin!🤪💚
________________________________________________________________________________________________________________________________________________________________________________________________________________________________________________________________________________________________________________________
Weekly Updates:
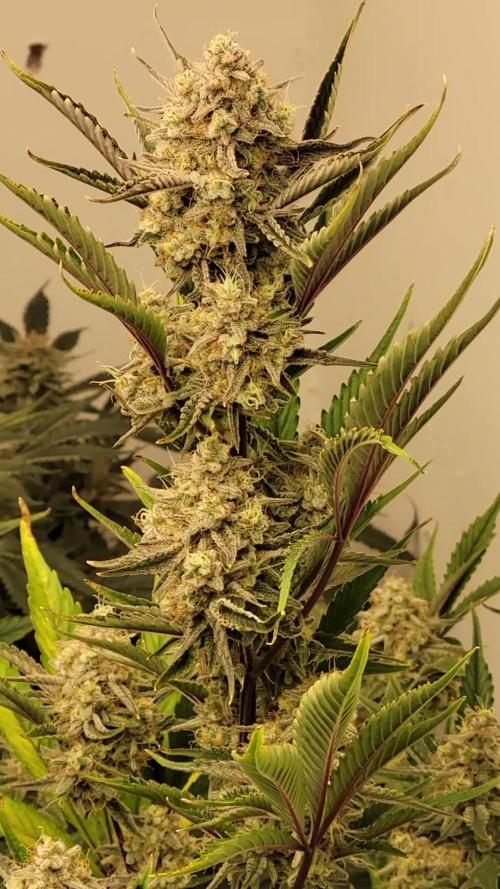
8/19- Week 2 of flower is here for the FastBuds Papaya Sherbet photoperiod and she is looking fantastic!
Our weather has finally cooled down and the daylight has dropped to just over 13 hours now.
8/21- My daily watering campaign continues with me giving the Papaya Sherbet 5-8 gallons of well water from the garden hose.
8/23- Luckily, with it's wide node spacing, there's not a lot to do with the Papaya Sherbet at this point except to keep her watered! She has not required any thinning out and has had only a few lower leaves turn yellow, which I promptly remove. Overall, this lady is a dream to grow, requiring little to no effort or maintenance!
8/25- There's the second week of flower on the books for the FastBuds Papaya Sherbet photoperiod and I have great expectations for how this fine looking lady is going to turn out, as she has exceeded all my expectations so far!
Thank you for checking out my diary, your positive comments and support make it all worthwhile! 💚Growers Love!💚😎🙏

Likes
21
Share
@MG2009
Follow
01/01/2022
Potting up and amending with
5-2-4 to give a little kick before mid flower
#6 is first girl to show herself, also got two different males and only difference is that one is lighter green and other darker green
(also dark green one seems to drink more than lighter green) 💚. Other than that structure is very similar I wonder which is a better breeding male? I guess I might pollinate and LABEL TWO BRANCHES ON each female one for each male. and find out.🙏🏻
01/06/2022
#3 showed today, reppoted and into flowering closet, along with#6,who showed earlier this week lights at 14-10 see how they respond to that schedule, which should help use up the 5-2-4 going into week 3 should help with her stretch. Which isn't really that much I believe maybe double her current height, which I will check at lights on.Week ,#3 if I think of it I'll give a good fungal dominant tea.
Likes
2
Share
@Alejangrow
Follow
Changed solution and they all look healthy.💉🌊
Even managed to get the runt into a bucket. 🌱
Gonna cut some lower growth into clones before the weeks end. ✂️😊


Likes
29
Share
@Ezzjaybruh
Follow
Day 23
Few spots of mildew. Adding Si supplement to hopefully help
Check out MEDICGROW website
https://medicgrow.com/
Really excited to see what it can do I’m flower. Love the Bloom button which increases red spectrum when wanted/needed…
Currently running at 40%
Official Website:
https://medicgrow.com/
Facebook:
https://www.facebook.com/medicgrowled
Twitter:
https://twitter.com/medicgrow
Instagram:
https://www.instagram.com/medicgrow420/
YouTube:
https://www.youtube.com/channel/UCNmiY4F9z94u-8eGj7R1CSQ
Growdiaries:
https://growdiaries.com/grower/medicgrowled
https://growdiaries.com/grow-lights/medic-grow


Likes
49
Share
@Bronhitis
Follow
This is first plant of 4, so total dry weight will be updated in about 2 weeks. I made a quick video about bud development, because i couldnt find it anywhere on the web.


Likes
4
Share
@CK-OrgGrow
Follow
Woche 7
Blüte Woche 3
Die Money Maker lässt sich mit der Umstellung viel zeit.
Die Wurzeln entwickeln sich auch weiterhin gut auch wenn sie nicht Weiß sind und im Eimer das Wasser auch mal knapp wird, Sie trinkt sehr viel.
In dieser Woche habe ich an der Money Maker wenig gemacht außer das ich die Dünger Komponenten auf die nächste Phase der Blüte geändert habe.
Voodoo, Tarantula, Piranha und Bud Ignitor habe ich abgesetzt und B-52 und Tasty Terpenes zum Dünge Schema aufgenommen.
Bei Fragen einfach die Frage stellen, genauso bei Verbesserungen und Tipps für mich.
Danke und viel spaß mit euren Pflanzen.

Likes
2
Share
@Hidden
Follow
:
Everything is going so well; the plants are huge and looking fresh. No problems on site, and the buds are starting to form. Just following the usual BioBizz schedule and watering when the soil feels dry to the touch. No defoliation or LST, just letting them grow big. RHC #2 and #3 turned out to be the tallest ones. Very proud of my second run.

Likes
14
Share
@danicrisan
Follow
Week 9 ongoing
Banana Kush 74 cm
Black Domina 54 cm
Cheese 51 cm
Blue Berry 58 cm
Finally stopped from going up, only 1-2 cm in the last week.
The smell is starting to get strong. The buds are looking better by day.
More photos at the end of the week.
Likes
14
Share
@eldruida_lamota
Follow
Venga familia que ya viene la cosecha de estas Tropical Zmoothie de Seedstockers, que ganas que tenia ya de darles machetazo.
No veas que pinta que tienen estas plantas.
Las flores aparte se ven bien resinosas.
a sido una genética con la que disfruté mucho cultivarla, es algo complicada cultivarla pero merece la pena si eres cultivador con experiencia no te será problema cosechar.
Agrobeta:
https://www.agrobeta.com/agrobetatiendaonline/36-abonos-canamo
Mars hydro:
Code discount: EL420
https://www.mars-hydro.com/
Hasta aquí es todo , espero que lo disfrutéis, buenos humos 💨💨.

Likes
47
Share
@terpproducer
Follow
👇 This week:
---
Watering 1l every day. Some phenos need more
PPFD at canopy height approximately 800-850 (Increase slowly), VPD ~1.2
Big defoliation, stretch coming to the end
Orange Creampop #2 HLVd test came negative
Next week: Lollipopping, compost tea, defoliation
---
Happy growing and thanks for checking out my report! I really appreciate you! 😁💪🙏

Likes
6
Share
@Nuwaubian89
Follow
So the vegging was dragging and there wasn't much new to report so I'm back with a flowering update lol. I'm about 2 weeks I'm flowering. I'll update the details later this week but just wanted to get pics up for now. I'll get some pics without the LED lights too

Likes
21
Share
@Sweetleaf420
Follow
Strain very resistant, although I had some problems with this, unfortunately having grown up in Outdoor the bad weather ripped away almost all the sunbathing, the plant weakened and had problems with aphids. Despite this she managed to complete the flowering cycle, harvested not abundant given all the problems mentioned above, but the buds she produced are quality with a scent of blueberry mixed with really strong fruit. Small but compact buds covered with resin 🤙
Likes
3
Share
@Green_Dream
Follow
The girl is looking good, though it could have been much larger by this time. I wish I gave it more light and more nuts in the previous weeks. Well, it will have to spend more time in veg. It got topped this week, at the 6th node, and I will do it once more before flipping them, so in total there will be 10 lower branches + 4 tops.
I also started misting with CalMag just in case.
Likes
3
Share
@4bpratt20
Follow
Another 7-14 days and theyll be getting chopped. So far couldnt be more impressed with how they turned out. Smell is absolutely amazing.

Likes
94
Share
@Ganja4Show
Follow
Update 12/8/2021
Keep on Rocking!😎
having a hard time getting the climate at a constant lvl. doing the best I can with the equipment I have🙌
Update 15/8/2021
from day 43 on i've started to add Calmag to each watering. but after a couple of day's it seems new leaves are still getting brown spots.
not really sure what to do.. The nutrient schedule I'm using 1/4 of what is recommended by the Bio-bizz schedule.
all plants are given the same amount.. 3 of them are showing some deficiency's and 1 plant is looking really healthy.
Update 18/8/2021
Hello Folks.. pffff deep breath My plants are really suffering.. only 1 is doing a really good job. the others really look sick. leaves starting to yellow cetting curly and crunchy..
I did pluck away most of the dead leaves but at this rate there is going to be nothing left 1 one week.
I have no real clue what's going on as it's looks it could be several things. it really feels i'm constantly running behind the facts.
I know this is my first grow and all and every decision I make will teach me a great deal for the future.
Today I ordered a digital PH/EC/PPM meter so I can actually see what exactly is going on and make decisions from there.
I am afraid the PH of 7 really blocked out the Nudes that have been given but I am not really sure so let's wait like 2 more days so i can start measuring stuff.
the past 2 days it only flushed the plants with water at an estimated guess of 6PH. but the crappy analogue PH meter that i put in the soil still tells me the the soil has a PH of nearly 7.
What I really don't understand is how 1 plant really doesn't show any symptoms while i gave every plant the exact same water/nutrients etc.
Well fingers crossed. what a hobby🙌💪

Processing
Likes
21
Share
@LittleBigTrees
Follow
Been feeding just water ready for the chop.
Some of them have all brown pistils and have pretty much stopped all together.
The kalimist indica pheno is still flowering so I'll let it go until it looks ripe 👍
Likes
9
Share
@Trinidad
Follow
7.07.25.day 46
No training qas done in last 2 weeks. Left to her own devices. I will lilipop today and LST. Also fresh reservoir change out.
12 07.25 Day 51. Reservoir change out.