The Grow Awards 2026 🏆
Likes
Comments
Share
@JBL007
Follow
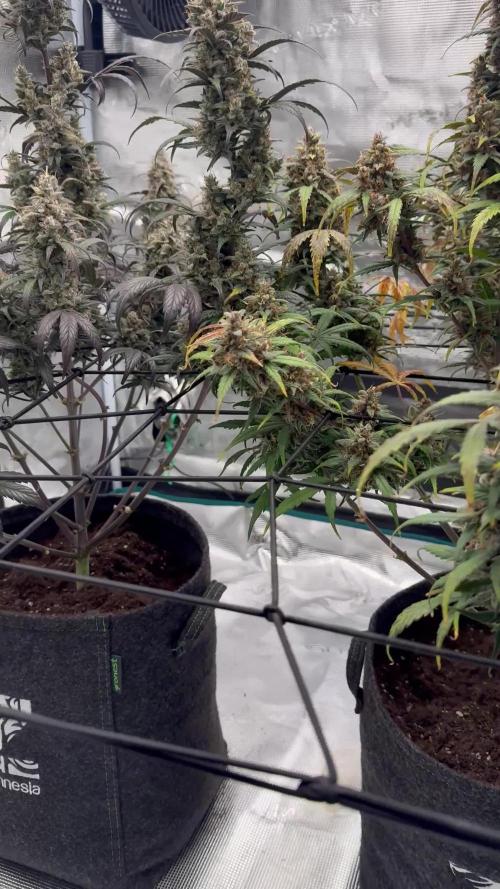
Všechno probíhá hladce, jediné co nedodržuji je vpd. Musím říct, že club41 je neskutečný... Osypany jako kdyby na něm byl půl roční prach a to máme teprve 5 týden a bez UV. Další kolo pojedu s UV doplnkem a opravdu mě zajímá jak to dopadne.
Likes
7
Share
@ToRuL88
Follow
Se me está complicando las cosas en esta semana quinta de floración, cogollos con lo que parece quemados, 3-4 plantas con manchas marrones en las hojas, creo que es falta de comida, subí a 2m/l calmag de biobizz, riego con 1.6 Ec. Solo queda aguantar 6 semanas más 😅
Likes
25
Share
10-25 Day 1 - FEM 9 is standing up today and ready to plant! DAY 1 - The coco is prewet. - Same feed: 1.75ml/gal cal mag 1.75ml/gal Coco A 1.75ml Coco B 270ppm @ 5.8ph. - I made a hole, poured about 50ml into the hole of the pre-made mix, same i used for the coco, and planted my puck. I then poured the other 50ml around her where i planted. 10-26 Day 2 - No water today, giving them a slight rest lol. - FEM 9 is sticking straight up today - Helped her out a bit and I finished pulling off her shell, but she fully opened by the end of the day 10-27 Day 3 - Same feed I made earlier this week, 270ppm @ 5.8 pH. Gave 100ml in ring around the plant. 10-28 Day 4 - Same feed, another 100ml today. - Still standing tall 10-29 Day 5 - Gave another 100ml in ring of same feed again - FEM 9 is the 2nd biggest in my new batch of babies! She came from the smallest seed too LOL. 10-30 Day 6 - 100ml, same feed 10-31 Day 7 - 100ml again. - Last day of her week 1 nutrients. Will make a new batch for tomorrow
Likes
16
Share
I defoliated the Plant for the first time and adjusted the LST to the growth of the plant. I found the first white pistils shooting out from the plant which shows me she is ready to go into flower. Until now i am very happy with the progress, still no issues :)
Likes
7
Share
Likes
11
Share
@Just_Jazz
Follow
This week, we will transplant the plants into large 19-liter pots and begin training LST immediately. Once they have recovered from the stress, we will proceed with fimming."
Likes
4
Share
@m0use
Follow
***Sponsored Grow*** = Medic || https://medicgrow.com || Grow = ***Sponsored Grow*** Ok big update this week, I finally edited the footage of the lights and got their unboxing photos processed, this took way longer then expected and should have been done on germination or week 1 entry but better late then never. You can really see how the lights shine in comparison to my older ones. The brightness of the leds is next level and I can use their V1 spectrum from seed to harvest. Its a great balance of red and blue in a full spectrum light. The medic grow mini sun 2 is a all purpose light that I can see myself getting lots of use out of in the future. Plus they fit in my tent just as snug as my last ones and that's a big thing for me, I don't like dim corners. I am using the lights at 80% dim level. this will be raised to 100% when they enter flower :D First time useing lights I can dim. they also have an onboard timer attached to them, I will be playing aorund with this to see if its something I want to use in the coming weeks, I all ready have all the external timers so I can see how this is a useful tool for anyone starting off without them. On top of all this I also transplanted my plants into their final pots. they went from a .7-.8L to a 2gal or 7.5L, all the root balls on the plants where perfect, nice white roots, maybe a bit compacted for the size and might explain why I am having some issues with them but healthy none the less. I think they will not start to grow a bit better and I will see less issues moving forward. I still have yet to get a new PH pen but I am blindly guessing the PH by adding 2 drops of phosphoric acid ph down per 1gal of feed solution. it seems to be working out just fine. Till next week. ***Sponsored Grow*** Official Website: https://medicgrow.com/ Facebook: https://www.facebook.com/medicgrowled Twitter: https://twitter.com/medicgrow Instagram: https://www.instagram.com/medicgrow420/ YouTube: https://www.youtube.com/channel/UCNmiY4F9z94u-8eGj7R1CSQ Growdiaries: https://growdiaries.com/grower/medicgrowled https://growdiaries.com/grow-lights/medic-grow
Likes
6
Share
Hola a todos!!!😃😃😃. Al fin llego el día tan esperado y odiado a la vez😅😅😅. El dia del corte, a esta strawberry gorilla auto se hizo el día n°84. Excelente planta, fácil cultivo, bastante productiva, con un aroma y olor intenso..ese olor cítrico es para destacar.
Likes
17
Share
Currently have my first Grow finishing up, two bag seeds was told they were Pink kush and death Bubba they are coming out looking as the strains are supposed to. Lights will be switched to 18/6 in a week or so
Likes
2
Share
This plant is growing well, I transplanted them this week into 3 gallon pots from 1 gallon pots. Structure on this plant is pretty nice and visually pleasing to the eye lol.
Likes
13
Share
Day 63 This plant now shows a much fuller canopy, with strong lateral growth and dense foliage. The training earlier in veg has clearly paid off — multiple tops are reaching upward, giving the structure a wide and balanced appearance. The node spacing is fairly tight, and the plant has developed into a bushy, healthy shape. Leaf color is a deep, rich green, a sign of good nutrient uptake. The canopy is vigorous and energetic, with new shoots continuing to push through. The posture of the leaves is upright and responsive, indicating that the plant is currently in a comfortable environment. No major signs of deficiencies are visible from this angle. At this stage, the plant looks ready to transition soon if the goal is flowering. The main considerations now are airflow and light penetration: the canopy is dense, so a light defoliation of older fan leaves could help improve circulation and ensure even bud development later on. Next steps will be to maintain a steady feeding schedule, monitor watering carefully, and prepare for the upcoming stretch once the light cycle is switched.
Likes
18
Share
@Sonic_Y
Follow
HARVEST!!!! HARVEST!!! 1. APRIL 1. APRIL 1. APRIL 1. APRIL 1. APRIL 1. APRIL 1. APRIL 1. APRIL 1. APRIL DAY 93 / Flower 54 Here we go. I beat the 1 kilo wet weight again, which is awesome. Will be 250-290 dried. YAY.... Buds are super frosty. Gluing my fingers up, that i almost can't split them anymore. Be careful!! :) That was a fun harvest on a historical day in my country...... I'm having the time of my life...uuuuhhhh music for harvest: Nexcyia - Endless Path of Memory Moor Mother - The Great Bailout Lolina - Unrecognisable Klaus Johann Grobe - Io tu il loro Klara Lewis & Yuki Tsujii - Salt Water Earth Flower - Earth Flower DJ Nigga Fox - Chá Preto Adrianne Lenker - Bright Future Tomato Flower - No Drying diary will be updated from time to time. I'm planning to cure at least 3-4 weeks before vaping it for the first time. Next Grow in line. Will start in about 1-2 weeks. One of my first yearly music festival in the hague starts on friday (rewire festival). I'm feeling so excited, actually. Spring/summer is coming as well..yayyyyy 23.04. About 2,5 weeks of curing done. I have about 234gramms dry until now. Vaped a bit and it's awesome. Pretty strong sativa effect throught the end. Feels like a energy drink. Perfect summer weed, instant energy, euphoria, creativity. Summer can come!!! :) uuuuhuhuhuhuh 28.04 New Pics. That strain is amazing. Pretty glad to have this strain for the summer. Will be the best summer of my life. :)
Likes
24
Share
Vegetation over end of week 8 I'm really happy with how these look I've ended up with 8 I'm happy to put into flower they are all different strains and range in size from 90cm to 120cm the strains are Barney's farm Wedding Cake Pink Kush Mimosa Evo Runtz Muffin Divine seeds Divine Indica Opium Anesia seeds Banana Kush Pink Starburst The feed I've used is great I really like this range and would recommend it to any grower and its all I will be using along with the Monkey Nutrients range these for me are the best European and UK Nutrients well worth anyone's money I will be defoliating and lollipopping them soon so I can get as much exposure as possible Also some of my cuttings have rooted so I can help my friend out I switched to Clonex rooting gel and have had some luck so I'm really happy (see pics) Thanks for the help along this journey and thanks always to my sponsors @HydroproWashington @anesiaseeds @Divineseeds @monkeynutrients See yous all next week with some better photos of each plant before and after some much needed defoliation Peace out
Likes
6
Share
Start of week 8. Week 7 went well as this girl slowed down her nutrient consumption, she did not need any extra feed during the week. Cleaned up a lot of small dead leaves that had tucked themselves up into bud sites. In this past with this strain, those small drying leaves have caused some bud rot and mold to develop. She smells incredible and is insanely sticky! My best grow of this strain ever! Will flush in 5-7 days, depending on trichomes.
Likes
25
Share
@Snaak
Follow
This week ill try to switch over to an English diary because the translation is absolutely crap and i might learn a thing or two about the English terms in growing, also because the American and Canadian researchers extended the growing knowlegde in an absolute insane tempo and i would probably get most of my information from them. I don't have a spelling-check on this pc, therefore i apologize in advance ;). I uploaded some photo's with crappy lighting (Next grow ill switch day-night rythm and should give me better opportunities for photo's, but we'll get to that in the future) but also i short video of some notes which i will elaborate below: Last week on saturday i turned off the carbon vent because i could not get the humidity level right and i was still waiting for my humidifier. I placed a big fan inside the tent for air circulation and besides that i installed a small vent-filling fan in in front for clean-airflow. Last weekend i closely watched what the humidity and temperature did and started playing with the setup. All the changes i made in the tent last week are: 06-02: - Shut down carbon vent - Added rotation fan inside - Added small front-fan for clean airflow 07-02: - Added humidifier (setting 55%) - Dropped HPS 600W about 15 cm's to 110 cm height 08-02: - Humidifier setting 60% 09-02: - Dropped HPS 600W about 20 cm's to 90 cm's height 10-02: - Front fan on 2 instead of 1 11-02: - No changes because all is stable 12-02: - Placed humidifier at the back instead of the side of plants - Dropped HPS 600W 15 cm's again to 75 cm's height - Moved the inside fan more to the top-back of the tent (more facing downwards) - Opened up a vent-hole in the top of the tent for a little warmth release From the moment i turned off my carbon vent last week the sprouts started flourishing, especially when i added the humidifier. All the changes, noting, and looking at them how they pose, reading blogs and learning have brought me to the point that i think i stabelized it. Allthough i am going to turn on the carbon vent sooner or later (i might do this tomorrow) i need to pay attention again because i'm predicting it will drain the humidifier in a higher speed and that means i have to refill approx. 15 liters in 2 days? The tank is 5.5 liter and at the moment i refill it every evening, so thats already 11 liters in 2 days. I'm really expecting it to increase significantly i ill keep my notebook ready. :p I'm also a bit worries it will be so warm in my tent because the outside temperature is pretty cold, and that might also be the reason the temperature doesen't go above 28 degrees anymore. Okay enough about the tent setup changes. Lets talk plants. After the transplant last week to their end-pot these auto's started to grow immediately and i think they did really well this week. Since the humidifier got added to the tent, every morning the plants praise their "Hallelujah" pose which is really pleasing to watch... **Last weeks's first time watering in the big pots:** 06-02 around 09.00: - 750ml around the side - 750ml around the middle area - 750ml with nutrients spreaded around the pots All is equally divided through 4 plants. This week's watering and nutrients: 08-02 around 16.00: - 750 ml around the pot - 750 ml with nutrients 11-02 around 10.00: - 500ml around - 500ml around - 500ml with nutrients 12-02: - Sprayed Vita Race first time 4ml in 750 ml and sprayed about 15% of it on the leaves, no drups, mostly nebula. The vita race really made the leaves shine, also within 1,5 hours all moist was took in or evaporated, Today probably again around 1600 ill water them again but ill hold the next vita race for tomorrow or something. as long as the plants shine the same i don't know if it's neccasary? Okay, last but not least.... This week on wednesday i kinda mis-read some shit on internet and topped 3 of my 4 plants. I think it went okay, because they don't seem to stressed about it. They still flourish and hallelujah on! Still i'm pretty worried because i made the cut right next to the nodes which isen't the best thing (learning phase :p)...... The reason i topped 3 outta 4 because i wanted to see if i diden't stress the smallest one, he would out-grow the others, but that does absolutely not seem to be the case. Also i think it's a great way to learn by not stressing one plant to see the differences, i want this first grow not to be about end results but more about learning and developing my own personal experience and point of view. Oh PS, i also drilled all the holes to prepare for LST, but i think they were kinda to small on 10-02 when i drilled it. I'm going to watch the recovery from the topped plants closely coming week and maybe start with LST. Stay tuned while this noob messes around with Auto Critical Orange Punch of Dutch Passion.
Likes
11
Share
Flowers starting to get frosty ,stankin and take shape !
Likes
6
Share
Questa runtz continua a crescere a dismisura 💪😉👍 Ci metterà più tempo per arrivare a maturazione
Likes
4
Share
first topping for lollipoping. spray seaweed a few.
Likes
410
Share
This grow with the TSW2000, FC4800 and 8x8 Grow Tent has come to an end🤘🤘. I'm so happy with the results mars hydro has done👍. Best lights you can get in my opinion and TONS of other people agree with me on this too👍. I always say mars hydro gets em frosty and their lights DID get em nice and frosty and the buds are so tasty and smell awesome🤘. I trimmed up 6 plants so far. Got 9 more to go. And it seems like I get a 1liter Mason jar per plant and is about 2 ounces per plant. Some are a bit more than 2. Not a huge haul per plant but I'm still very happy with it because the quality is amazing. I will never want to use anything but MARS HYDRO. Extremely satisfied with the entire grow with mars. The weed quality is very good and controlling the heat was simple because they don't get that hot. The lights were very easy to setup and so was the tent. I STONGLY recommend any products from Mars Hydro. You will not be disappointed 👍 Thanks for following my grow and good luck to all my friends and remember to have fun with your grows🤘🤘 rock n roll a joint everyone🤘🥁🎸 FOR EVERYTHING MARS HYDRO VISIT: www.mars-hydro.com PROMO CODE: rocknroll VISIT THE ALIEXPRESS STORE: @marshydro_aliexpress2 Instagram: @marshydropenny https://youtube.com/channel/UChU5ZWwNi-DvnO3oWVU3ceA Thanks for taking the time to read and check out my shit🤜🤛 GET THE MAX FROM MARS👍: Welcome one of  the newest members of the Mars Hydro family🤜🤛🤘. The Mars Hydro FC 4800 480W LED Grow Light can accommodate up to a 4' x 4' area for flowering. It has OVER 2000 LED chips consisting of the best selling Samsung LM301B diodes which has a Luminous Efficacy of: 220 lm/W 0.2 W, 3 V mid power, Osram 660nm Diodes, Infrared light and UV LIGHT👍. It boasts the incredible efficiency of 2.8 µmol/J, maximum 2.5gram yield per watt with 30% higher Average PPFD. This High-intensity spectrum is beneficial for plants at all stages - from veg to bloom, and creates Big dense Buds👍. achieve 50% higher yields & quality compared with the old lights! Only consumes 480W for 4x4ft personal grows, and 3x3ft for commerical grow. It comes with a dimmer and daisy chain function with a  maximum of up to 15 lights, the master light controls the rest👍. Wide 6-bar design offers even & wide canopy coverage and can maximizes your grow space. slim 180° FOLDABLE DESIGN... YES I SAID FOLDABLE🤘🤣 , making it compact and easy to install, it's IP65 WATERPROOF and will give you no worries while growing in a humid environment and makes it a flexible high performance commercial grow light for enormous  SUPER FROSTY yields.😛😛😛. MARS GETS EM FROSTY BOYS👍 AWESOME HEAT DISSIPATION: The Low energy consumption FC4800 growing light has 6 passive-cooled bars and an aluminum heat-sink a removable driver  you can upgrade later or have it outside your tent. with zero noise  you can save up to 50% in your electricity bill compared to HID's or HPS lights! It also has a removable driver so you can upgrade it in the future or have it outside your grow space for better heat control in your growroom👍 UPGRADED FULL SPECTRUM: Yield Max Spectrum with enhanced red (Top-Bin Samsung 3000k-5000knm, Osram 660nm Deep Red), speed up blooming & fruiting, perfectly suited for full-cycle growing. The FC4800 LED grow lamp was born for Big Buds, perfect for commercial, grow tent, grow room, hydroponics, and all soil grows.👍 THE BEST SAMSUNG DIODES: THE FC4800 has Top Bin genuine Samsung Osram Diodes, combined with remarkable 2.8 µmol/J Efficacy, 30% higher Average PPFD, 50% less energy consumption, to maximize your yields. They give you a TRUSTED 3 years warranty 100% Satisfactory guaranteed!!! The MARS HYDRO 8x8 Grow Tent interior is made of a unique diamond design mylar which is highly reflective. (Other companies mylar and reflective rate is as low as 50%, and it won't provide efficient light. They use thick 1680D oxford canvas, and being double stitched, it is tear proof and perfect for locking in the light. Their grow tent keeps 100% of the light inside the tent and helps your plants absorb more light. EXTRA-THICK material means No light leaks or rips at all.👍 Strong Stable metal corner adapters and poles are the trustful supporters of the tent. It's very sturdy, neither rusting or paint flaking off. quick and easy tool-free setup. They use heavy-duty metal zippers, with double layer black lining, by far the best on the market which creates a light-proof seal. The Easy observation windows are made by double layers of cloth. Observe the growing conditions of your plants without opening the tent and avoid disturbing your plants. The observation windows also serves to dissipate heat and ventilate the air. The tent includes 2 removable waterproof floor trays to hold soil and water. The removable tray can be taken out to wash easily. They guarantee the grow tents are easy to install even if you've never done something like this before. Clear Instructions and no tools needed! They also offer 30-day unconditional refunds for quality problems. Just contact their friendly 24 hours customer service 👍
Likes
38
Share
@Aedaone
Follow
We had a good bit of strong wind and rain at he beginning of this week. One of the plants was blown sideways. This week has been hotter but he plants seem to be loving it. I was a little surprised that I had to start feeding these. I'm thinking the nutes were leached out by rain. I found out my ph wasn't as much of an issue as I first suspected. The problem was lack of iron. I added an organic iron supplement and it cleared up the yellowing. It also ph'd my nutrient solution to 6. The tops I took and attempted to clone didn't clone. It was a fun experiment though. Overall a great week. I expect to see some pistils next week.