
Likes
Comments
Share


@StewartBloom
Follow
Okay so I'm trying something new, since I've gone away from a switch to water for the last week flush I harvested the tops and best smalls and packed the cannatrol full. I'm giving the under growth a bit more time to rippen before I harvest that for the the freezer. If this turns out to be a bad idea I'll not do it again in the future. The last long video is what's left in the tent right now. Let me know if any of you have experience doing this.
Updated with a bunch of pictured of dried and cured. Ended up with 186g of beautiful flower. 72g of untrimmed smalls I'll make into RSO, I have a lot of back and nerve pain and RSO hands down the only thing that brings me actual relive, I'm late to the party on this one but I set a side part of the grow for it now.
I let the under canopy and shorter tops go another 10 days feed at half strength and I'm glad I did, it ripened up nicely and definitely got a lot of color. I forgot to get pictures of that harvest but I will when I pull it from the freezer to wash. My test jar of this washed at 4+% (the last picture). Last update will be results of that wash.
Last update on this one, I added a couple hash/rosin pics at the end. She washed from plant to rosin at 4.03% the terps are musky skunk, sweet pastries, and fresh Linen. I'd definitely grow this one again.
Likes
21
Share


@NG420
Follow
Fattys are growing and seem to be thirstier.Used foliar spray to help the leaves and also started tucking. When the plant was topped pistils were seen for first time.

Likes
42
Share


@Brown832
Follow
Seems to be running smoothly.
I started to take some fan leaves of to get more light into the bud sites before I switch to flowering.
I noticed tonight that there are very small white dots on the leaves, mainly around the bud sires but also on the fan leaves, I have attached some pictures to see if anyone knows what it might be.
They have been switched to 12/12 last night
I thought it was trichomes but too early?

Processing
Likes
4
Share


@Serenityjane420
Follow
More defoliation and training although her stretch is pretty much complete now. Buds are starting to stack and thicken. Continuing with 2 gal water every 4 days with 1tbsp molasses every other watering.


Likes
17
Share


@BudMunchies
Follow
10/21: Harvest Day!
I did a wet trim today and chopped her down. She will now dry in the same tent at about 60-62% RH.
I was originally disappointed that i ended up with a runt. But she grew into a unique and cute plant. I dont think i could grow another plant that is almost entirely flower and just 3 large colas without having to work pretty hard in the training and flower timing. And so i am kind of glad that it worked out the way it did. I mean just look at her, she is photogenic as hell.
The highest point in height was about 9 inches. The whole plant after trimming and being cut down weighed in at 6.02oz. Id guess that there is nearly an oz of dried bud here.
I feel fortunate to not have dealt with any bud rot considering how this grew. I am not out of the weeds yet as that could still occur during the dry.
Overall i am happy with this grow. It was fast as hell and resulted in a really cute little plant.
10/29: dried after 8 days. 1.16oz. I put it in a jar with a humidity pack and will cure. Might try a smoke from it in a couple weeks.
It smells super fruity with hints of earth and skunk.

Likes
5
Share


@CannaIGrow
Follow
This plant seems to have grown much denser and better than my first plant. I just got the ac infinity ventilation setup with controller 69 for my 2x2, still trying to learn, hopefully grow #3 goes even better. Stay tuned
Likes
6
Share


@Yeyup
Follow
1/12 start of week 2 she’s getting bigger every time I open the tent 😂 didn’t need to water today we’ll check again later.
2/12 didn’t do much just a light water
3/12 Doomday 😂 my temperature and humidity monitor came and I realised my poor plant was in the desert and thanks to the community I also realised I’m growing in a massive fire hazard I purchased a new light and temperature has dropped thank god and thanks to everyone who answered my question. We’ll see how we get on with this CFL light
3/12 I also fed her this morning 1l of water with 2.5ml of Canna vega
4/12 nothing to be done
5/12 same as day before I think she’s looking good tho

Likes
5
Share

@RealGrowDiary
Follow
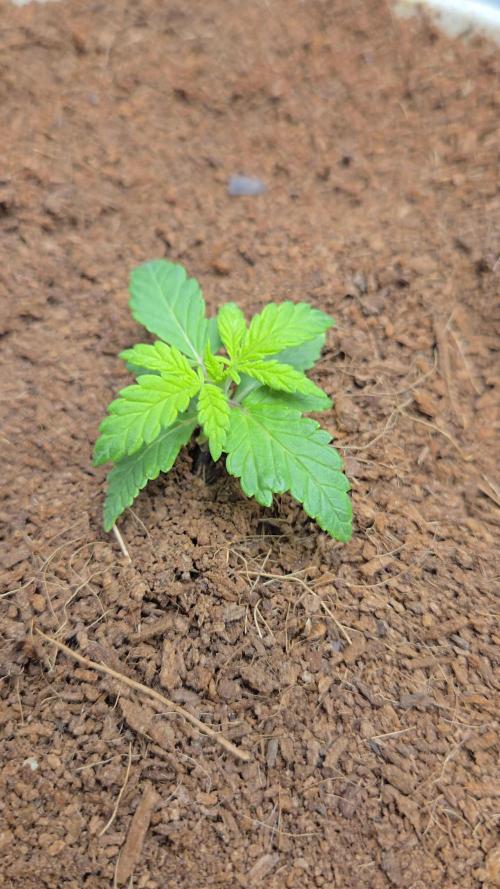
Week 2
In the second week, the plant begins to adjust to its environment, but its growth remains noticeably stunted. New leaf sets emerge slowly and stay significantly smaller than expected, despite maintaining a healthy green color. The stem shows little thickening, suggesting limited root development below the surface. Compared to the other plants, its reduced size is especially apparent. The plant remains upright but appears compact and dwarfed, with leaves growing closely together. Overall, it conveys a sense of stability, yet with severely restricted growth rather than visible expansion.
No water given so far!
Likes
14
Share


@b_deal
Follow
This week was amazing guys. I literally watched the buds getting fat day by day. I am still feeding with a similar program and adding Aptus Regulator once per week to boost silica and some other minerals like molybdenum and boron. I'm flowering my plants in a hot environment with CO2 boost. PPFD is high to support these settings and thankfully my the pots aren't getting hot. No fungus gnats or any other pests, no root rot and bad smell. Everything is perfectly neat and buds are exploding. My expectations from this harvest is really high and I'll keep adding CO2 for another week.
Some fellow growers asked for CO2 and PPFD measurements. I am sharing these information on this week's pictures. I got my CO2 meter fixed and I tested the CO2 PPM in different places of the canopy. Typical value for this grow tent with this CO2 setup is around 1100-1350. Temperature is fluctuating between 28-31 and the average PPFD on the bud sites is 1100 micro moles.
I'm sharing CO2 measurements right under the fan, where you expect it to show the lowest value. Then I'll also share the CO2 PPM value coming out from the air pipe, which is normally attached to the grill of the fan. Direct output is now around 5500PPM and in the first two days, the meter shows 10000PPM which is the max value that it can reads. This bucket yeast CO2 reactor lasts for four days and I'm refreshing the mixture twice a week. This is huge CO2 with a fairly low cost compared to propane burners or CO2 tubes.
Edit: I refreshed the CO2 bucket today and got you guys a video of the direct output. The system is outputting more than 10000PPM of CO2 and the meter can't measure it for the first two days. This CO2 method is a killer one for tent grows. Very low cost for very high CO2 concentrations.
Hope these information helps. Happy growing 💪


Likes
37
Share


@Cheeba_Inu
Follow
As of day 36, the Blue Dream'Matic is turning into a monster. She's the largest autoflower I've grown at her age, despite sharing my 6sqft tent with another plant.
As the growth has been so healthy and the transitioning to flowering nutrients has been smooth, my main concern is how much stretch is going to occur in this early flowering stage. The new nodes that are budding are getting tighter so I'm optimistic about the quality and yield come harvest time.
Thanks for reading! 🔵💤🍊
Note: Cannazym is used once every couple weeks at the full dose, but not in every watering due to the use of h202 which would render the enzymes ineffective. The Cannazym is mixed in its own solution along with other nutrients on an as needed basis.
Likes
27
Share


@Ganjagrandaddy
Follow
Hi Growmies
Happy new year 2024 and a prosperous green one for all.
Here we are at week 5 of flowering and they are really setting themselves up nicely for some nice chunky buds.
There is a very sweet smell coming from them now , nice and candy sweet. Their spread is quite wide and there are a lot of flowering sites to develop too. #1 is still out there in front as most productive and with the larger buds so far #2 is half her size but her buds are starting to show they will cover the whole stems. #3 has smaller flowers at tje moment but I expect that to even out over the coming weeks. I am still using the dehumidifier to keep that moisture down as the cold dark period gets quite damp amd I think these buds will be nice and chubby so a perfect place to hide mould if not managed properly. There is plenty of air movement beneath the canopy so this should also help keep them dryer.
I hope everyone had a great Christmas and that you are recovering well. lol. Until next week. Be well.
Sorry no pics due to rubbish app update. Every update destroys the platform for weeks as they try to address all the issues they open up every "update" .

Likes
Comments
Share


@Mnterpteam
Follow
She stretched a little bit more in the last week, everything very healthy.

Processing
Likes
42
Share


@Teamdirtbag3
Follow
Done..... 19 plants
Tangerine Skunk I love this pheno 🤩
🍊🔥🍊🔥🍊🔥🍊🔥🍊🔥🍊🔥🍊🔥
😈
Likes
5
Share


@Burneracct
Follow
Was out of town all week and came back to find the CBD Star in my space bucket not looking good. It looks like a phosphorus deficiency but not entirely sure. Yellow leaves with brown/black spots and dark red/purple stems. I flushed it with 2 gallons 6.5 pH water, re-fertilized, put it out in the sun and defoliated. I defoliated pretty heavily since many of the fan leaves were yellowed and blocking light from the lower bud sites. The center was also getting pretty dense so I carefully removed some of the leaves to help with airflow.
Despite the stress, It seems to have bounced back reasonably well. There’s probably irreparable damage given the level of yellowing but the buds continue to grow and thicken.
Cheese has absolutely exploded and looks great. It probably doubled in height last week with many bud sites on the 5 main stalks. Excited to see how it turns out.

Likes
2
Share


@bbs42
Follow
Starting to get some real buds now. Color in leaves changed within 3days. Had me super nervous I screwed up the plant. Thought I was dealing with a ph issue because of how early the leaves changed colors. Green spots on leaves are from me not turing down the light fast enough.

Likes
38
Share


@FrulaFrulaki
Follow
Nothing special this week. I added another light, now there's a light for every plant. From the photos you can see that they're not growing equaly so I'm treating them seperatly from now on. Otherwise 2 are floweing and the third will begin flowering probably this week as it's already showing signs.

Likes
Comments
Share


@Elguacho420
Follow
Buenas a tod@s... Otra semanita más de flora para estás hermosas niñas... Creciendo un poquitito más, super bien, super fuertes... Ya faltan pocas semanas y la verdad q lo las veo nada mal, absorben muy bien los nutrientes, aumentado el riego a 1lt x planta, no tienen ningún signo malo de nada, todo perfecto, eh tenido que hacer un poco de defoliación ya q habia muchísimas hojas grandes, se nota la buena circulación de aire, la penetración de luz en las partes bajas ( que aunque algunos no les den importancia o digan que esas zonas le quitan fuerzas a la planta, a mí me gusta dejar que crezca todo tal cual, sin problema.) son cogollos pequeños, pero los aceptamos igual, claro q sí... Buenos humos y buena semana para tod@s a seguir trabajando... 🤗👍🏻🙏🏻
💀😎🇦🇷

Likes
10
Share


@Gejlord
Follow
Starting a new episode of the experiment, 16 flowers 4x4 models. Half organic using florian organic fertilizers. And the other half classically anorganic using canna nutrients.
Likes
9
Share


@Krautbauern
Follow
The ladies are doing very well. They will soon start to bulk. We are very happy to be able to test the resinator from the rock nutrients, plus elan by crazyhillsnutrients and some calmag. we did a little bit of defoliation as well

Processing
Likes
58
Share


@Joah420
Follow
Another week done, flowering really starting to kick in the little flower spots from last week have bulked up massively. Everything seems to be going all fine and im enjoying watching them grow daily! Fingers crossed all goes well from here to the finish line!
Never been so excited to trim & smoke my own.
Have a great weekend everyone 🙏
