
Likes
Comments
Share


@420DeepGrow
Follow
Gracias al equipo de Divine Seeds, Marshydro y XpertNutrients sin ellos esto no seria posible.
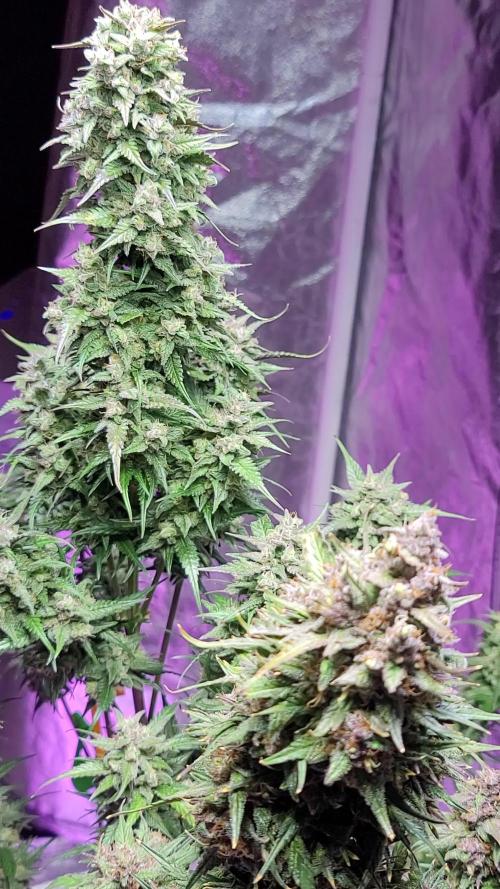
💐🍁Fractal:
La semilla de marihuana Fractal es una cepa especialmente psicodélica que Semillas Divinas desarrolló para experiencias esotéricas y místicas, meditación y creatividad. La potente y vívida Skunk#1 fue cruzada con una pegajosa Afghani Indica, y el resultado es ahora conocido como Fractal. Este exótico híbrido es resinoso, picante y productivo. La mejor opción para el cultivo comercial: un compromiso entre mayores rendimientos y maduración rápida.
En interiores se espera una altura de 1,70 m, en exteriores las plantas crecen hasta 2 m. Fractal se adapta a todo tipo de entorno de cultivo: cajas de cultivo, instalaciones hidropónicas o aeropónicas, plantaciones exteriores, balcones, terrazas e invernaderos. Para un mejor rendimiento se recomienda entrenar a las plantas de Fractal para ampliar su estructura y limitar su crecimiento vertical. Usar ScroG o SoG, LST, FIM o topping.
Fractal tiene una inmunidad inherente al moho y a las plagas de insectos, pero como sus colas son gruesas, proteja sus plantas del aire viciado. También durante las semanas de lluvia su plantación puede necesitar ser cubierta. Listo para la cosecha al aire libre en octubre. Grandes y densos cogollos.
Los cogollos de marihuana de la variedad Fractral huelen a hachís y algo a tierra, desprenden cedro y notas afrutadas al romperse. Mida su porción con cuidado: su potencia está por encima de la media. Con Fractal experimentas un apedreamiento general que te hace sentarte o frena tu movimiento. Perfecto para pasar una noche junto a una hoguera. Es mejor consumirlo por la noche.
🚀🌻 Consigue aquí tus semillas:
https://divineseeds.net/es/fractal-fem/
💡FC6500: Eficiencia líder en el mercado: la lámpara de cultivo LED FC-E6500, que ostenta un estatus líder en el mercado, es una solución rentable con un PPE de 2,8 µmol/J y un rendimiento máximo de 2,5 g/vatio. Ofrece un PPF alto de 2026 umol/S y es adecuada para una cobertura de vegetación de 1,50 m x 1,50 m y una cobertura de flores de 1,20 m x 1,20 m.
Iluminación versátil y uniforme.
https://marshydro.eu/products/mars-hydro-fc-e-6500-730w-commercial-led-grow-light/?gad_source=1&gclid=Cj0KCQjw1qO0BhDwARIsANfnkv9IIrYSbmJqz8PqpJOIyWwJfp5bc3SGJgUV68USLQ4tjmXDYwoBuAsaAue3EALw_wcB
🚥 MarsHydro ADLITE UV/IR/RED:
Para lograr un crecimiento óptimo de las plantas y maximizar los rendimientos es un arte simple que depende en gran medida de las condiciones ambientales adecuadas. Reconociendo las limitaciones de la iluminación natural y las soluciones de iluminación tradicionales para satisfacer estas necesidades únicas, lanzamos ADLITE. Estas luces especiales UV, IR y roja están diseñadas para llenar áreas del espectro, proporcionando las altas longitudes de onda que las plantas necesitan para un crecimiento y desarrollo óptimos.
Consigue aqui tu Adlite:
https://marshydro.eu/collections/adlite-supplemental-lights/
🏠 : Marshydro 1.50 x 1.50 x 1.80, carpa 100% estanca con ventanas laterales para llegar a todos los lugares durante el grow
https://marshydro.eu/products/diy-150x150x200cm-grow-tent-kit
🌬️💨 Marshydro 6inch + filtro carbon para evitar olores indeseables.
https://marshydro.eu/products/ifresh-smart-6inch-filter-kits/
🍣🍦🌴 Xpert Nutrients es una empresa especializada en la producción y comercialización de fertilizantes líquidos y tierras, que garantizan excelentes cosechas y un crecimiento activo para sus plantas durante todas las fases de cultivo.
Consigue aqui tus Nutrientes:
https://xpertnutrients.com/es/shop/
📆 Semana 5:
Una vez terminada la fase de estiramiento dedican todo su esfuerzo a crear nuevos pistilos y resina, es hora de engordar estos futuros cogollos.
La carpa esta totalmente cubierta gracias al FC-6500 y los Adlite de Marshydro, se nota la floración mas avanzada que otras veces y con una mayor densidad.
Continuo con las dosis de nutrientes recomendadas por XpertNutrients.

Likes
13
Share


@Prozak
Follow
the strain is really strong ,
low temperatures resist , 3 weeks around 12/16º graus and steell growing wel
nice new colos between week 4/6 in flowering.
really good strain to manipulate! 5 stars * * * * *

Likes
62
Share


@Herbz_Unkraut
Follow
Lowered the lights & will set 24h light on monday
Most of the roots show on the bottom of the pots


Likes
102
Share


@Hashy
Follow
Light settings
12/12 on at 9.00am off 9.00pm
Light power= 62% 150w
Radiator settings
LIghts on
Turn on if temp drops below 23.5c
Turn off if temp goes above 23.5c
Lights off
Turn on if temp drops below 19c
Turn off if temp goes above 19c
Dehumidifier settings
LIghts on
Turn off if humidity drops below 60%
Turn on if humidity goes above 60%
LIghts off
Turn off if humidity drops below 62%
Turn on if humidity goes above 62%
Extractor settings
temperature 24c with 1c steps
Humidity 58% with 2% steps
Max speed 8
Min speed 3
VPD aim 0.7-1.1
Wednesday 22/2/23 Day 29
7.30pm
#3 Dli=24.1
Thursday 23/2/23 Day 30
10.00am
Feed for 3hrs
5L used.
1.6L each
Need to try a different pump.
Friday 24/2/23 Day 31
8.00pm
Everything looks fine.
10.00pm
Extractor settings
temperature 24c with 1c steps
Humidity 55% with 2% steps
Max speed 9
Min speed 3
Saturday 25/2/23 Day 32
7.00pm
#3 Height= 27CM Dist= 42CM DLI= 25
Sunday 26/2/23 Day 33
1.15am
Feed for 1hrs different pump.
Different pump is better.
10L Ec=1.59 Ph=6.3/6.3
2L left
2.6L each roughly.
#3 run 0.35L Ec=2.15 Ph=5.9
4.00pm
Radiator settings
LIghts on
Turn on if temp drops below 23.0c
Turn off if temp goes above 23.0c
Lights off
Turn on if temp drops below 19c
Turn off if temp goes above 19c
Monday 27/2/23 Day 34
7.30pm
#3 defoliate some lower stuff.
Tuesday 28/2/23 Day 35
#3 Height= 31CM Dist= 40CM DLI= 25.5
The 1st week of flower has flown by. I'm quite happy with how things have gone with the grow so far. The environmental system seems to be keeping conditions a lot closer then I could manage using guess work and timers, probably the best investment I have made for growing.
#3 Gorilla Cookies FF has recovered completely from the accident last week, considering the top was only hanging on by a few fibres the job I did with the tape has held her together quite well. She has been spread out under the net this week to keep her height in check. She has been defoliated during the week and her lowers that won't see the light have been removed. She started showing pistils at the end of the week.
Power used for week
Light
(1.85+1.79+1.79+1.78+1.75+1.75+1.75)=12.46Kw
Extractor
(0.16+0.12+0.14+0.15+0.14+0.17+0.18)=1.06Kw
Fans
(0.39+0.39+0.41+0.4+0.39+0.39+0.40)=2.77Kw
Dehumidifier
(1.26+0.62+0.73+0.04+0.11+0.55+1.61)=4.92Kw
Radiator
(1.59+2.70+2.28+3.6+2.86+3.15+3.23)=19.41Kw
Water pump.
(0.0+0.01+0.0+0.0+0.01+0.0+0.0)=0.02Kw
Total for the week=40.64Kw
Back in a week.
Thanks for stopping by.

Likes
16
Share


@TooQuiikk
Follow
Let me start by saying, I'M SO GLAD I DIDN'T CHOP! THESE BABIES ARE GAINING SOME SERIOUS BULK!
I can not wait to see them finish out, It's really testing my patience, but I notice more bulk every single day!
It's about time to get the chop, they are maturing really quick and I love it. The smells are absolutely insane!!!


Likes
7
Share


@Thckaos
Follow
08-05-21 Se cambia la solución y se realiza un lavado de raíces. Para bajar la conductividad de las raíces de 1.52 a 0.2 ms para que la solución nueva sea más efectiva. La solución tiene 2.4 ms y 6 PH. Se añade una pastilla de CO2.
09-05-21 PH 6.1 Conductividad 2.25 ms
10-05-21 PH 6.1 Conductividad 2.00 ms
11-05-21 PH 6.0 Conductividad 2.04 ms
12-05-21 Se corrige el PH 5.4 a PH 5.9 Conductividad 2.35 ms. Se rellena con agua del grifo ya que el nivel es bajo. Conductividad 1.18 ms
13-05-21 Se corrige el PH 5.8 a PH 6.00 Conductividad 1.19 ms
14-05-21 Se corrige el PH 5.4 a PH 6.00 Conductividad 1.33 ms


Likes
30
Share


@BigDaddyK
Follow
Had a lovely smoke all week , weighted in at 149 g of super frosty buds ( I’ve smoked at least 10g )

Processing
Likes
8
Share


@saintetiennegrows
Follow
Most likely the last week for Zkittlez Auto. Really enjoyed growing this strain. I’ve been flushing for a bit now and I think she’ll be really good by the end. Gas, Candy, berry, and skunk terpene profile. Covered in greasy trichomes and stacking buds on all angles.
Likes
4
Share


@IamCy
Follow
Here we go into flower. If what they say is true, we're in for a nice color show.
Processing
Likes
46
Share


@PureMedicin
Follow
Nice growth and bud developtment. Hps still doing its thing while im sitting back and relaxing. Got to keep an hawk eye on watering. I feed full strenght going over to full canna so they were transplanted into soil. Clones doing good but the Lemon skunk clone dont feel to good. Lets see what the week will bring.


Likes
39
Share


@J_diaz420
Follow
Se hace defoliación extrema 5 días antes del corte para intentar hacer madurar la planta de forma mas pareja.✌️👨🌾🏻
Likes
36
Share


@SolitudeCorners
Follow
Can't wait to blazeeee
Feeding💪
10/17 Water30L+Cleanse80ml+calmag@190ppm
Ph6.3
Ebb 10.42/11.32/12.26/13
Clone 11.35/12.21/13.05/14
Average runoff ec1.5
Keeper 300ml per pot
10/18 Water26L+Flawless90ml+calmag@300ppm
Ph6.3
Ebb 11.38/12.24/13.17
Average runoff ec1.2 ph6.5
Clone 12.38/13.56/15.20/16.10
Average runoff ec1.5 ppm750
10/19 Water26L+Cleanse80ml+calmag@200ppm
Ph6.3
Ebb 11.12/11.48/12.24
Average runoff ec1.4
Clone 11.50/12.12/12.37/13.37/14.40
Average runoff ec1.3 ph6.6
10/20 Water30L+Cleanse30ml+Calmag@190ppm
Ph6.4
Ebb11.42/12.22/13.20/14
Clone 12.40/13.20/14.20/14.45/15.15
Average runoff 1.2ec ph6.4-6.7
10/22 last light day
10/23 2 Pm Cut and hang
Plan 21day at 23temp 55rh
Likes
25
Share

@Unkraut
Follow
This strain is just incredible, perfect indica high with a sativa sidenote
It grows strong and is quite resistent to mold. All plants were done after about 60 days of flowering.
First time i used a tumble trimmer and it works perfectly.
I didn't check PH or EC at all

Likes
29
Share

@For2itous
Follow
Flushing and cutting out some leaves. Smaller plant will probably be cut down in a few days & wil let taller go a couple extra. Love the smell on these girls definitely will run again. Goodluck everyone and happy growing 🌴
Likes
10
Share


@Fonzo412
Follow
So far this week has been Good but not Great . My blue dream plant didn’t make it.😢) So now i am going to focus on my other 2 ladies.
This week is the official start of my <Vegetative stage> Now I will be dropping the lights to 14” and giving them both nutrients. Also I’m watering both plants with about 300-500ml of water for each.
Strawberry banana plant 🌱 has been coming along but and Power plant 🌱 the growth has overall been amazing 🤩 .
Follow me on my journey…. Let’s gooo!!!

Likes
18
Share


@MrDainAndToeniAsiaCrew
Follow
6plants So good & one genetic error or I don’t know how
But I care

Likes
76
Share


@MagnoliaFrost
Follow
SETUP:
-MIGRO 100
-Grow space 60X60X160 (Mammoth PRO 60).
-Grow medium is Gold Label Special Mix Gold edition Premium, Airpot (10l).
_____________________________
29th August - Day 6 (Day 8 Beer Cup) - Gave them 50ml of 💧each. The Beer Cup one is looking like she needed more water.
_____________________________
1st September - Day 9 (Day 11 Beer Cup that's been transplanted) - I need to support both cause the tip over if not :(
_____________________________
6th September - Day 14 (Day 16 "Beer Cup") - Gave Final Pot 100ml of 💧. Nothing for "Beer Cup". Increased the LED from 1/5 of strength to 2/5 of strength.
Processing
Likes
7
Share


@Kindbudz
Follow
We are still weeks out before I switch these ladies to flower because all of my flower rooms are to full capacity. The clones from the mother moonwalked kush have all taken root. My black aeroponic cloner is a week ahead of my white EZcloner. Everything is going well so far. They started showing their first signs of deficiencies this week so I increased the feeding. Nothing else to report.
