The Grow Awards 2026 🏆 


Likes
17
Share
@leliantu
Follow
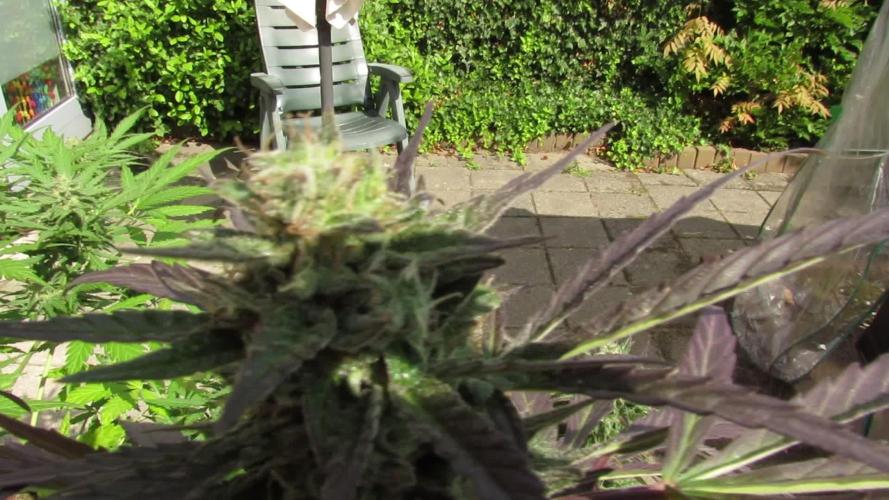
4 semana de floración. Se están formando las flores en las puntas y a lo largo de los brazos, empece a aplicar abono de floración pero en bajas dosis, conforme la planta vaya creciendo y necesite mas nutrientes voy a ir subiendo la dosis, quiero evitar a toda costa la sobre fertilización que ha sido mi principal problema y obstáculo en cultivos anteriores. De momento las plantas crecen muy bien. Esta semana voy a aplicar un preventivo para hongos foliares y bichos chupadores (trips, cuanto los odio!). Disculpen la calidad de las fotos, mi cámara no es muy buena.

Likes
61
Share
@Captensmokey
Follow
All nutrition comes to an end. They are now rinsed for a few more weeks. Just a little longer and then they can be harvested. The pineapple poison and lava freeze have beautiful colors. 😁


Processing
Likes
24
Share
@The_Projexx
Follow
This week I'm going to be adding Rhino skin until I decide its no longer needed . I've also boosted Piranha to 1ml/l . Im not sure what the PPM is yet as I havent fed them . As soon as I do feed them the PPM on my diary will change . We are entering week 2 and they are going strong . Already working on a second node I figure by the end of this week they will be looking at starting their 3rd .
A big thank you to everyone who stops in to check out the diary . Stay tuned lots more to come !!!
Happy Growing!
-V.G
Day#8 Pushing really hard for their second nodes now , going to be looking to get them stalks beefy start some LST soon.
Day#9 we got ourselves the first tri leafs growing slowly but surely !
Day#10 They're pushing for the next node !! Growing along smoothly
Day#11 The leaves are small but they got tri-leaves now and they are almost ready to expand !
Day#12 Watered 1/4 cup each 355 ppm PH 6.04 everything going well and they are growing along .
Day#13 Responding well to watering, growing along nicely
Day#14 Pushing their next node now things are coming along !
Week Report : They are growing well , things have picked up for them for sure I find the rate of growth a little slower then the other part of my current diaries but they are still going . Nothing but love for these little plants :)

Likes
7
Share
@vertex8
Follow
Start of week 4 and the washing machine looking great, got the scrogg net laid down and will be just tucking branches back under the net.
After digging out the Jaffa plants which were not growing at all we realised that they came in soil not coco, after cleaning off the soil and treating with super thrive and great white, giving them a new mix of Coco and some food at 1.0ec they begin to show signs of life 🙌
Hopefully they catch-up with the washing machine.
Not seeing any major signs of deficiency or toxicity atm

Likes
42
Share
@xs8
Follow
Week 5 starts with recover from the previous FIMing.
I'm surprised 😍
------
Day 30:
Found a better way to LST, the branches are growing much faster now :D
Day 34:
Sex clearly visible 😁 (female)

Likes
14
Share
@Naujas
Follow
79 days!!!!! and the harvest is already harvested :) The whole growth until week 6 went very well, then the girl got a little worse, (I think it's my mistake, which I described in previous weeks), but besides all that she managed to ripen perfectly, matured stiff flowers, full of shiny sticky trichomes with a very, very sweet aroma ;) 210 gr of wet buds, I also collected a lot of sugar leaves from which I will make bubble hash :) I can't wait to taste it :) this is my first trip with Sweetseeds Looking at the flowers I understand that I will definitely repeat it :) I will leave more feedback after the smoke review:) good luck to everyone.


Likes
9
Share
@HUMO_Cultiva
Follow
We start week 3 of bloom!! Goofiez 2 amor compound genetics it’s the champions!!

Likes
13
Share
@HashCakes
Follow
Gently dropped in a scrog with the biggest squares I could find to prop up or tie off heavy branches on #2. Used it to spread out #1 a bit but this late in the game tried to avoid as much pulling and bending as possible.
#1 finally picking up some weight. This one has more of a spear formation. Guessing about 4-5 weeks left. Super frosty and smelly though.
#2 just a tank. Nothing but dense golf balls. My goal was 8oz per plant and feel pretty confident this might be closer to 10ish. I'm guessing about 21ish days. Planning on deploying Winter Frost a week from today.
Topping of with 80% strength solution kept EC level between changes..
So tough to do these things justice in pics and videos.

Likes
2
Share
@dauntless
Follow
Strain is Lemon Pie x Gorilla Cookies Auto R2
Grow started on July 8th, 2022
I dropped these directly into another pot with some plants that I was pretty sure were not awesome. I was right and these germinated quickly and are growing well.
Out of four, the two I kept were the best ones, so I named them 1 and 2
Direct to soil, same feed as my Green Gelato Auto grow, Flora Nova Bloom with all the good Gaia Green nutes and worm castings and myco in the soil already.
Crimson Clover is cover/companion
July 23, 2022
Day 15
My impression of these two autos so far: super fast growing, topped on day 15, 1st week of veg. I was NOT going to top them, but they are so fast, I need to buy some time, since the other plants are filling out now. I don't think she will slow down by much.
Processing
Likes
1
Share
@clstr8
Follow
Pretty easy week all around for all my plants. Bud sites are getting bigger and actually getting a little frosty. Gonna be exciting to watch the next few weeks.

Likes
8
Share
@SpaceGorilla_01
Follow
Them issues with the haze xl really upset me wate of tome effort and money so im not impressed with 1st impressions of sweetseeds im sorry but we have to be honest im this community would you not agree but on the plus all my fastbuds 100% success
Likes
75
Share
@Hologram
Follow
Baphomet is enjoying the autumn sun RN..😎👍
Luckily the weather is mild and sunny (but windy!) today
and the temp still gets above 20C now and then..😸 (dayllighthours are mayb 12h..)
She looks demonically delicious! 😋
Next update is gonna b a harvest..before autumn rears its ugly head..👺
(when its dry enough to vape a bit, so i can make a 'smokereport' at the same time😘)
happy growing 4 all✊
***KISS! Growingtechnique: KeepItSimple, Stupid!

Likes
92
Share
@DogDoctorOfficial
Follow
🌸 Week 3 Flower – Growing Strong, Tall, and Vibrant! 🌱
Hey Grow Fam! It’s already Week 3 in flower, and I’m thrilled to bring you this update because these plants are doing phenomenally well! Some are stretching up so tall that I might have to get creative in the coming weeks! Fruit production is well underway, and it’s absolutely amazing to watch the canopy fill out as these girls reach their potential.
Aptus Holland Pack Unboxing & New Additions
This week kicked off with a big arrival: the Aptus Holland nutrient pack! 🙌 I couldn’t wait to share the unboxing with you all; there’s a video up where I go through all the goodies, so check it out if you haven’t yet! Between the photos and videos, you’ll be able to see just how well these nutrients are already feeding these green beauties. Having a blast sharing more content lately—I’m in the zone with editing and creating, so get ready for even more shares!
🌡️ Environmental Control and Fine-Tuning the Reservoir pH
Temps this week have been holding around 27.2°C with RH at 65.2% and CO2 at 800 ppm, creating a VPD of 1.26 for ideal flower development. The lighting intensity is at 833 PPFD, and the solution in the reservoir is fine-tuned to a pH of 6.22, EC of 475, with a temp of 21.8°C.
Let’s talk pH in the reservoir: it’s a dynamic process, and I’m constantly adjusting it to keep everything at the right level. The pH tends to rise throughout the week, and each day, I work it back down, fine-tuning it to keep those plants happy and balanced. Managing pH is truly a hands-on job, and it’s worth every moment. I love staying on top of it for optimal nutrient uptake—it’s all about consistent effort and keeping that perfect range dialed in.
Leaf Maintenance & Selective Defoliation
These leaves are HUGE and gorgeous, creating a lush canopy that’s nearly too perfect! I’ve been taking a few leaves here and there, focusing on leaves that may be blocking light from reaching lower parts of the plant. Selective defoliation at this stage is key because it opens up airflow and allows light to penetrate deep, boosting energy distribution across the whole plant.
Big, healthy leaves mean we’re getting excellent photosynthesis, but a gentle, strategic defoliation can guide that energy toward those developing buds. Leaf removal is all about balance, giving the plant space to breathe and thrive while still maximizing growth in flower!
🌐 TrolMaster + App – Real-Time Precision
Huge shoutout to the TrolMaster system and the app—keeping everything in sync and at peak performance is honestly effortless with this ecosystem. The app provides a full overview of each environmental parameter, allowing me to make real-time adjustments as needed and track trends over time. The precision here is unbeatable, giving me complete control over temps, humidity, CO2, and VPD, ensuring my girls are in a controlled paradise 24/7.
What I love most is how the app records everything automatically, so I always know exactly where things stand without having to keep separate records. If you haven’t tried TrolMaster yet, it’s a total game-changer for any grow setup!
💥 Shoutouts & Gratitude
Massive shoutout to TrolMaster and Aptus Holland for powering this grow with tech and nutrition that’s second to none. And, of course, gratitude to Pro-Mix for the superb growing medium and to the seed banks behind the genetics. We’re running strong thanks to each of you.
And to the whole community—thank you, everyone, from new friends to seasoned followers, lovers to haters. Your energy, whatever form it comes in, is all part of this journey, and I’m so grateful for it all. Special shoutout this week to my brother Daggadna—head over to IG and give him a follow! And if you’re loving the journey, remember to like, comment, and subscribe—it really helps the channel grow and reach others who may also dig this content!
Discount Codes so you can save big on your next check out 💚💚💚
Kannabia - DOGDOCTOR 30% off
SeedsmanSeeds - DOGDOCTOR 10% off
CannaKan- DOGDOCTOR 15% off
terpyz.eu - DOCTOR 15% off
The Neutralizer - PORKIT5-DOG 15% off
As always thank you all for stopping by, for the love and for it all , this journey of mine wold just not be the same without you guys, the love and support is very much appreciated and i fell honored and so joyful with you all in my life 🙏
With true love comes happiness 💚🙏 Always believe in your self and always do things expecting nothing and with an open heart , be a giver and the universe will give back to you in ways you could not even imagine so 💚
Friendly reminder all you see here is pure research and for educational purposes only
Growers Love to you all 💚💚💚


Likes
91
Share
@MrCOCO
Follow
The whole week without any problems ... I change the dosage of supplements again and let the ladies keep swelling ...🍃🍃🍃 The girls are very sticky and are just starting to smell stronger... 💪🍃🍃🍃

Likes
9
Share
@Krissci
Follow
Day 2 - LST and topping if possible before transition to flower.
Slow for separate branches to grow
Likes
228
Share
@yan420
Follow
This two were part of another diary and got moved out due to space reasons at VW8 and moved back indoors at VW20
https://growdiaries.com/diaries/218151-auto-god-s-glue-grow-journal-by-yan402
13.09.25 VW21 Both are looking good and are developing tighter nodes than when they were outside, I'm going to have to keep cutting them back every once and a while I also applied nematodes against thrips and fungus gnats.
20.09.25 VW22 some spots and some yellow leafs, I think it's a root problem, probably root bound, but both seem healthy and are getting thicker so maybe just top up with Coco coir and give a slight different nutrient schedule less Tri Part Bloom could do the trick MAYBE lol.
27.09.25 VW23 Topped up the pots with extra coco coir and trimmed the side roots a bit, both plants were root bound 📹
03.10.25 VW23 did a HST/LST session 📹
12.10.25 VW25 Done a major HST session to try and keep them in line with the Sunset Sherbet GF I have going in the same tent, rest in the video 📹
17.10.25 VW25 ffj/fpj/fish 30 → 60 ml
19.10.25 VW26 it just became a one plant diary, keeping #5, #6 gets it's own diary for testing nutrients.
20.10.25 VW26(?) Feed tweak: added 3 g Calcium Nitrate/ 30 L (≈ 15 ppm N + 10 ppm Ca)
24.10.25 VW26 did a defoliation and trimming session 📹
25.10.25 VW26 I'll be repoting tomorrow, 26.10.25 VW27 rest in the video📹
27.10.25 VW27 Epsom Salt 0 → 2.5, Calcium Nitrate 3 → 9 g
01.11.25 VW28 CalMag 60 → 30ml, TriPartBloom 20 → 30ml, Magnesium 2.5 → 3.5g
04.11.25 VW28 no more yellowing between the veins and no new spots, the changes to the schedule worked, rest in the video 📸
09.11.25 VW29 Did what I'm hoping is a last cleanup 🎥
12.11.25 VW13 Did another cleanup in the tent 🎥, also switched to the FERMAKOR PK Micro schedule, (10.11.25) added Phosphoric acid as a pH down in preparation for flowering
14.11.25 FW1 FERMAKOR PK Micros 40 → 50 ml
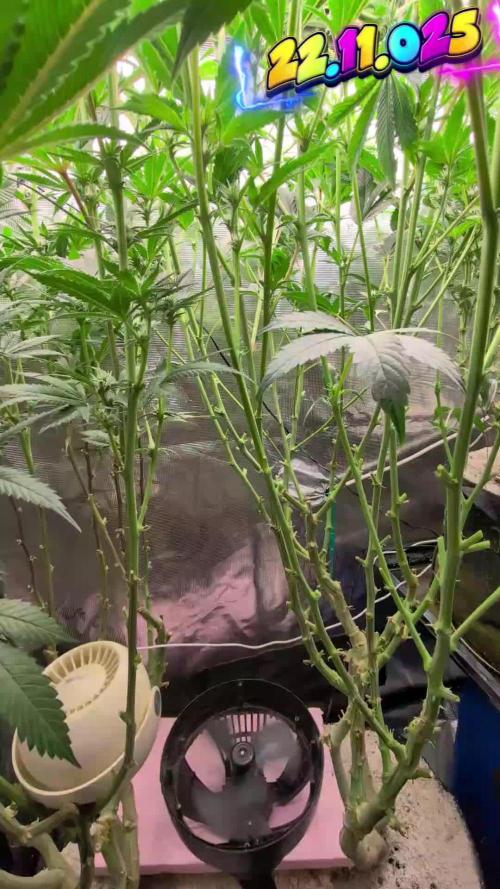
22.11.25 FW2 Calcium Nitrate 40 g → 35 g
🌱💦🌱💦🌱💦🌱💦🌱💦🌱
Day to day tasks & actions 🌿
🌱💦🌱💦🌱💦🌱💦🌱💦🌱
22.11.25 FW1 – Fed 5l of #1 → 2l runoff
23.11.25 FW2 – Fed 5l of #1 → 2l runoff
(*RUNOFF reused for indoor house plants)
🍶💧🍶💧🍶💧🍶💧🍶
💧 Nutrients in 30 L #1 Veg — FERMAKOR
🍶💧🍶💧🍶💧🍶💧🍶
💧 Calcium Nitrate (Calcinit / Nitcal):
45 g → 40 g → 35 g
= 1.33 g/L → 207 ppm N + 253 ppm Ca
= 1.17 g/L → 183 ppm N + 224 ppm Ca (current)
💧 PK Concentrate (FERMAKOR Base):
30 ml → 40 ml → 50 ml
= 1.00 → 1.33 → 1.66 ml/L
→ balanced 1:1 P:K + light micros (from extract)
💧 Home-made FFJ/FPJ (Fish + Veg):
30 ml
= 1.00 ml/L
Epsom Salt (MgSO₄·7H₂O):
8 g
= 0.27 g/L → 26 ppm Mg + 35 ppm S
💧 Fetrilon Combi 1 (Micros):
0.5 g
= 0.017 g/L
→ Fe 0.7 ppm • Mn 0.7 ppm • Zn 0.3 ppm • Cu 0.3 ppm • B 0.1 ppm • Mo 0.02 ppm
Phosphoric Acid (pH down) + Citric Acid (chelation):
→ First set pH with phosphoric acid
→ Add a little citric only if extra chelation is needed
💧 Target pH: 5.8 – 6.0 (drop test yellow-green)
📦 TOTAL Inputs:
60 ml → 70 ml → 80 ml / 48.5 g per 30 L
= 2.00 → 2.33 → 2.66 ml/L + 1.62 g/L (current)
⚙️✂️⚙️✂️⚙️✂️⚙️✂️⚙️
✂️ Tools & equipment ✂️
⚙️✂️⚙️✂️⚙️✂️⚙️✂️⚙️
✂️ 2× MarsHydro SP3000
⚙️ MarsHydro 150mm ACF Ventilator
✂️ Trotec dehumidifier (big unit)
⚙️ Mini no-name dehumidifier
✂️ Kebab skewers (LST – stainless)
⚙️ Wire + roast skewers (LST assist)
✂️ Scissors (HST)
⚙️ Vacuum (for spills & cleanup)
✂️⚙️✂️⚙️✂️⚙️⚙️✂️⚙️✂️⚙️✂️⚙️
🍒🍭🍬🌈🍒🍭🍬🌈🍒🍭🍬🌈🍒
🦄Fantasy Feast ( Seeds)🦄
🌈🍒🍭🍬🌈🍒🍭🍬🌈🍒🍭🍬🌈🍒
Species: Hybrid (Regular)
Genetics: The mother is Unicorn Whip by Dirty Bird Genetics. The father is Charcuterie by Cannarado Genetics.
Effect: Unknown Mixed effect body and head high
Flavor: Some phenos are Skunky gassy fruity, some are fruity sour citrus with a chemical touch and a touch of skunk
Flowering: Estimated 8–10 weeks
Resistance: Strong — Testing phase done
YouTube Link: https://youtube.com/-m8h?si=A7x4Zlr2kj-_ga31
Likes
293
Share
@Ju_Bps
Follow
Hello growmies 👩🌾👨🌾🌲🌲,
👋 Girls keep maturation, End is very close, Harvest in few days 💜🌲✂️🏁🏁
Flush Started
💧 Give water each 2/3 day
2l Water + Flash Cleaner (3 ml/l)
2l Water + Flash Cleaner (3 ml/l)
PH @6
💡Mars Hydro - FC 3000
50% 13 cm
Mars Hydro Fan kit
Setting 9
Have a good week and see you next week 👋
Thanks community for follow, likes, comments, always a pleasure 👩🌾👨🌾❤️🌲
Mars Hydro - Smart FC3000 300W Samsung LM301B LED Grow Light💡💡
https://www.mars-hydro.com/fc-3000-samsung-lm301b-led-grow-light
Mars Hydro - 6 Inch Inline Fan And Carbon Filter Combo With Thermostat Controller 💨💨
https://www.mars-hydro.com/6-inch-inline-duct-fan-and-carbon-filter-combo-with-thermostat-controller
Fast Buds - Gorilla Cookies FF🌲🌲
https://2fast4buds.com/us/seeds/gorilla-cookies-fast-flowering