
Likes
Comments
Share


@Mrbudgrower88
Follow
The ladies are going into flower now in the main room and the second room is half up and running with four sick French macarons and 29 cuttings of all the strains


Processing
Likes
2
Share


@Little
Follow
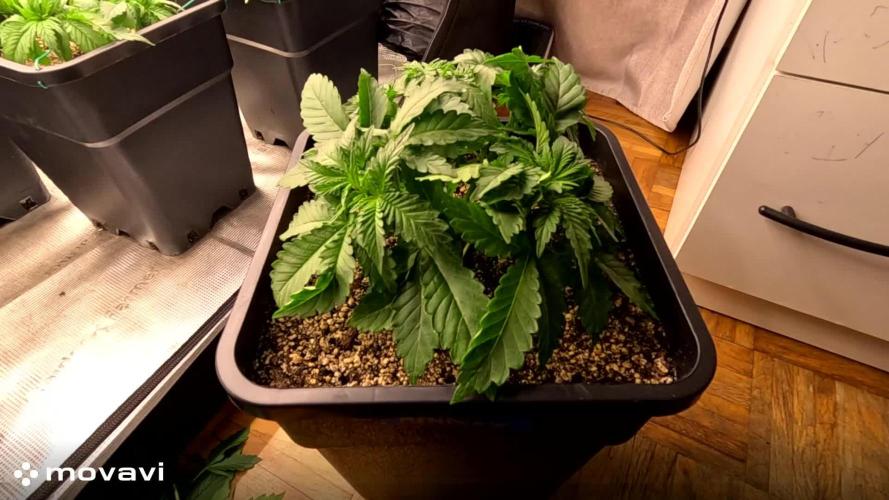
Semana 3 de crecimiento y parece que todo va un poco mejor. Las plantas tenían demasiada luz porque los leds estaban a muy poca distancia,.
Creo que una de las plantas se llegó a quemar,¿Alguien lo puede confirmar? es la primera vez que lo veo. Aunque parece que poco a poco se va recuperando. Desde que las trasplanté sólo he regado un par de veces.
Ahora he aumentado la distancia de la luz y espero que crezcan más fuertes. A partir de ahora empezaré con Top Veg.
Por cierto! La AK que tenía el caparazón de la semilla pegado, ahí sigue. Y creo que es la que mejor va!
Saludos y buenos humos!
Likes
39
Share


@Hazecat_420
Follow
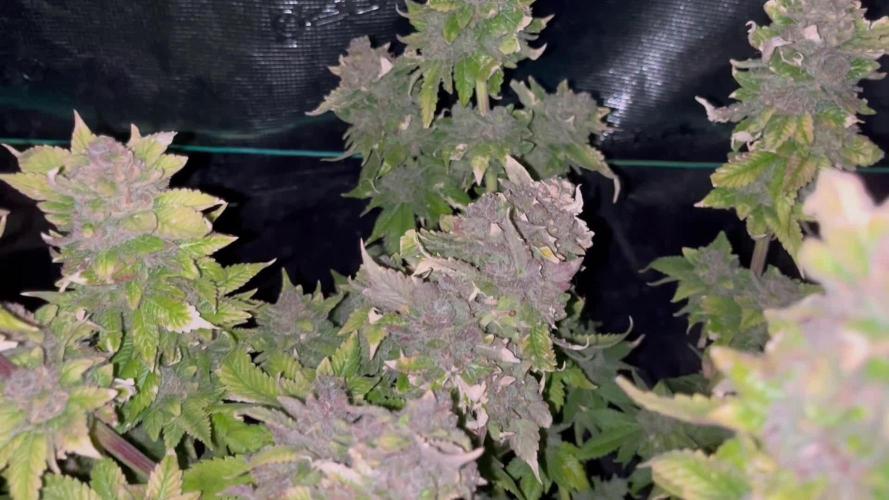
Se comienzan a ver los tonos morados/rojizos de esta cepa tan hermosa de Sweet Seeds, vamos en la segunda semana de floración y todo bien hasta el momento, van más lentas de lo normal en la floración pero debe ser debido a las bajas temperaturas, aún así sus colores ya se notan en estas 3 nenas. Seguimos ...

Likes
26
Share


@TheCannaProphet
Follow
😎Week 3
8/2- Here we go into week three and I'm looking to see some explosive growth happening in the tent soon!😃 The girls are all running 2 1/2" to 4" in height with the Seedsman Gelato OG's and FastBuds Purple Lemonade currently kicking all the others butts!💪 Gave a good watering this morning 2hrs after lights on with non-chlorinated water ph'd to 6.4. I plan on maintaining that watering schedule from here on out. I refilled the humidifier with non-chlorinated water ph'd to 6.5. Love the new setup with the two HLG quantum boards, 4 plants per light, and currently running at 400w per light. I'm looking forward to some record yields with this new setup using these 650R's! Temp's/RH/VPD are where they need to be at this point with daytime temp's maxing @ 83 Deg F/ nighttime @ 68 Deg F, RH @ 55%, VPD @ 9.0😀
8/3- Started compost tea last night, ingredients were; 5g de-clorinated 7.0ph water & 5tbsp unsulfured molasses, 4 cups worm castings, 1 cup alfalfa meal, 1 cup kelp meal, 2tbsp bat guano, 1 scoop Great White mycorrhiza and 3tbsp Neptunes Harvest seaweed extract which were added after the air was turned on and the 'bag' was in the bucket.
I fimmed the FastBuds Purple Lemonade #2 and Seedsman Gelato OG #1, LST'd the FastBuds Crystal Meth #1 & #2, and the Seedsman Zkittles #1. Whilst doing all that I noticed my old friends the fungus gnats so I immediately placed sticky traps in all pots....little bastards! I went online and ordered Nematoads who will have a field day with the gnats!
The girls all got watered in from the top and bottom with de-chlorinated straight water ph'd to 6.6 @ 76deg 225ppm, lights still @ 36" above the soil and running @ 400w each.😎
8/4- Gave the girls compost tea for breakfast. The tea had brewed for 38hrs., had 854ppm and ph'd @ 7.1...PERFECT! I split 4g of the tea between the eight ladies @ 1/2 gallon each. I also topped the FastBuds Crystal Meth #2 and Seedsman Gelato OG #2 and checked and adjusted LST on all. Temp's, RH, and VPD all on point with the girls are showing it!
8/5- Soil felt moist so skipping water today and will feed early AM. All the ladies have taken on a deeper shade of green and are really starting to take off since receiving the compost tea yesterday and they'll be going crazy by the end of this week going into week four. The FastBuds Crystal Meth #1 & #2 are both showing early flowering signs already and are starting to get some purple coloration in new growth which looks natural, not a deficiency. I topped the FastBuds Purple Lemonade #1 and Seedsman Zkittles #1 and checked/adjusted LST on all.
8/6- Gave a good watering this morning with 4g of de-chlorinated water ph'd to 6.8, went through, and tucked leaves on all the girls to keep exposing lower bud sites to the light so that we have a nice even canopy for flower! All the girls have either been topped, fimmed or LST'd at this point and all I'll be doing from here on out is tucking leaves and possibly some very minor defoliation if needed,
8/7- All the girls look very happy this morning and are starting to get ready for that stretch at the beginning of flower. The FastBuds Crystal Meth's are the shortest, along with the Seedsman Zkittles #1 and the CM's are already showing pistils but I'm not declaring that they're in 'flower' quite yet.
8/8- Gave all the ladies a good water in this morning with .5g each of de-chlorinated water ph'd to 6.9 @ 76deg. Went over all the girls and tucked shade leaves to expose bud sites, removed a couple of the ones that couldn't be tucked, and were blocking numerous bud sites. I also continued with LST on all bending branches outward to expose them to more of that HLG 650R goodness!


Likes
7
Share


@Gardens_of_Of
Follow
Both completed flowering in 60 days, reaching around 15-20 % Amber in Trichomes. One thing to notice was the trichome structure. First time seeing such long trichomes and so crowded.
GreenHouse feeded one only received wated in the last 2 weeks. She has produced much more than the Advanced Nutrient feeded one due to several reasons like my mistakes, pot sizes, different phenos etc.
Both produced amazingly smelling frosty buds. Visually, both are top notch for me.
* GreenHouse feeded one developed some fox tails in the last week.

Likes
5
Share


@Ewok923
Follow
So with the hydro I am running into it getting way to tall and some of the top kolas are burning the living soil and super soil are doing great solid buds on them and growing daily i missed a week because i was out of town but here we are really week 4 into flower after transitioning. Enjoy Looking crazy so far

Processing
Likes
7
Share


Processing
Likes
38
Share


@Silverback_Guerilla
Follow
8/24:
No deficiencies, no pestilence, no major issues with heat or humidity....just SO MUCH EASIER than trying to grow outdoors in summertime...😁
8/25:
Was gonna feed today, but they aren't dry enough yet. Keeping it cooler in the closet has it's drawbacks...
I'll do a foliar feeding with Microlife Maximum Blooms tonight and probably feed them tomorrow.
8/26:
I fed them 8 gallons in total today, so that's a little under a half-gallon each. Hopefully they'll dry out a little quicker so I can get back to my normal routine.
8/27:
Rotated the edge plants
8/28:
Ogled them a bit...
8/29:
I sprayed them at "dusk" with Microlife Maximum Blooms and did a little rearranging after removing the 3 autos from the closet. Now, each of the 15 plants has a little over 1 sq ft to itself...

Likes
2
Share


@Archimedes
Follow
Had to attach some more wires and weights as anker against the wind. Buds swelling nicely and densely covered in Trichomes.
On day 42 of flowering I took the smallest branch from the bottom of the weaker of the 2 plants, dried the bud for 5 days and dropped it on the Purpl Pro.
Came back with 15% THC. It had perfect moisture so i gave it a smoke and it was a smooth smoke already.
Given the fact this was a very "bad" flower sample, and that another week of flowering with good sunhours has passed im expecting something along 18-21% THC on the good Material, wich is pretty neat for a metropole area balcony grow in 6L pots.
Will post purpl pro results of both plants once dried, cant wait!
Had to protect the Plants against some sudden Rainfalls, kept sitting there until it stopped raining - but see for yourself


Likes
132
Share


@rhodes68
Follow
12/27 Week 7 and looks like flower is here... yeah ... yeah thats it.
VERY gradual transition into flower but Im calling it and switching to bloom nuets beginning about 750ppm and go up from there.
Will continue to hit with Fish Sh!t weekly until we start getting serious buds.
12/28 Up nuets to same level are rest of tent.
12/31 The GC has surpassed the Fastberry in height and had to raise the lights an inch.
1/2 Tara has turned into a beast pics tomorrow
Early Flower so last Kangaroots drench 10ml/gal added to feed and done to 35% runoff
Likes
45
Share


@AbroCadabro
Follow
I found out that I have to go out of town when I had planned on harvesting. So I did it a few days early. This plant has been a blast to grow. I was a little worried at first because she just wouldn't put on any inches. The plant only reached about 12 inches in 2 months. However, after the that she grew like crazy. It could have been due to my inexperience. I guess we will have to see on the next grow. I still have 5 more seeds of this plant. She flowered in about 9 weeks. Big fat dense colas. The next time around I need to pay better attention to the little scrubby side shoots. There were a lot of them. I ended up with about 60 grams of larf because of it. I should have done a better job of defoliating before flower and I should have kept her colas clear of the dense foliage. Having said that, she turned out a ton of bud!
Wet weight count:
Clone 1 - 179g
Clone 2 - 163g
Mother - 586g
Total - 994g
I will come back next week and update this with some more pictures and final dry weight.000

Likes
21
Share

@Rangaku
Follow
Gonna flush her in a few days , she’s a monster of beautiful buds , sneaky little taste of her already and it’s such a good smoke . Good times ahead

Likes
7
Share

@AumShanti
Follow
ॐ
WEMBLEY x MENDOCINO - Pyramid Seeds
11L pots, 720W led, Remo Nutrients
"Bedroom setup"
These are free seeds which i got as reward...
1 of 5 made it...
3rd week of vegetation from 9.3.2026. to 15.3.2026.
This week i did topping, defoliation, and wireing hehe
and notices that from one branch spot 3 branches coming out (mutant branch)... :)
As days goin im just spreading her and pulling wires every day.
Shes healthy and took topping with no issue.
Take care and much love :)
ॐ
Likes
Comments
Share


@EBPbyEVD
Follow
Hey everyone! 🌱✨ I’m continuing my work with CRFH4-F2. I’ve selected 10+ top plants that showed the best results at germination. Right now, they’re finishing up root development, and soon we’ll see some serious growth! 🚀🌿
Likes
31
Share


@DudeGrowsWeed
Follow
Fed Recharge for the first time this week, also fed Espoma Organic Bloom. Did some defoliation too. She seems happy and healthy overall, but I see what I believe is LED light burn on some of the sugar leaves on the upper most buds. I jacked up the LED light as high as I can without completely reorganizing all plants, lights, etc. Even completely reorganizing the tent, I'd only be able to gain 2-3 inches of height so not sure if its worth it. Now that I harvested the Blue Mammoth I have a little room to try some LST-style bending and try to get the plant farther away from the light that way. We'll see what happens during the week.
Likes
3
Share


@YOZYY
Follow
Was really easy grew very fast and was easy to train I could have did a better job but that was on me got a little lazy but it was mostly taking care of itself.
Likes
53
Share


@Hempy_The_Kid
Follow
08/10/22 watered with Recharge.
Welcome to motel 6
More ladybug porno. Now have yellow ladybugs
8/14/22 this plant is a magnet for ladybugs 🐞
