


Processing
Likes
7
Share


@frogDUDE
Follow
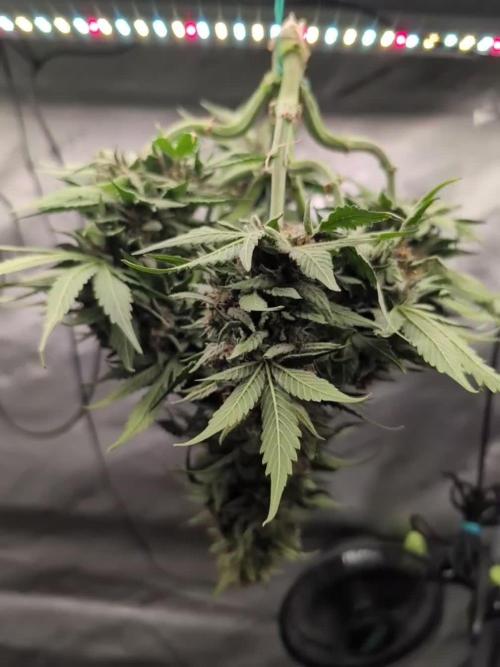
Growing Fast! Smells like fresh Fig newtons - loads of frost covering everything. Buds are Significantly Thicker than Barney’s Mimosa EVO, both were started from seed on the same day.
My Whole backyard smells like Peyote Cookies The garden smells Amazing!!!!!
Happy Growing

Likes
14
Share

@Vince_Van_Grogh
Follow
Traveling mid next week for an extended period so I decided to harvest early. Did not have the best grow season but will bounce back on the next one.
Gonna try and grow giants next time because this harvest is not going to be enough to sustain me medically for more than two to three months.
Will add a smoke report once cured! 🌿😎


Processing
Likes
14
Share


@Mr_Og_GreenThumb
Follow
Week 12, Day 83 from seed and 3rd day of flower.....The 5 day of this week officially marked the start of the flowering season!! So I flushed both of these bad boys with ph'd water for two days and then today I switched them to 12/12. I gave them their first dose of bloom nutrients and then lollipoped them as you can see, pixs . Grateful no issues to report for the past 3 weeks have been trouble-free!! I'm going to leave the MH bulb in for an additional 2 weeks to prevent any stretching before switching to the HPS. But so far they are still loving their environment. I'm also in the process of keeping clones of fat banana and hulkberry while i try this new strain of Peanut Butter Tree.


Likes
10
Share


@asstonmartian
Follow
We enter the second full week of flower. I went and got some nutes to start adding in sparingly to the watering sessions. Mild mix from Foxfarms of their Tiger Bloom formula. I didn't catch that the large plant's leaves were curling pretty tellingly so I didn't realize I was about to overload the nutes for that plant when I should have been flushing for a week. I had supercropped this large plant as it was 6" taller than the others but it bounced back so quickly. Five colas snapped and turned 90 degrees, bounced back in a day or two. It did allow the others to catch up a bit.
I find that the one potential male I removed was 100 a male as it now had well developed pollen sacs. I had this plant outside alonside the other two potential herm/males. I put the two questionable ones on the roof and chopped the male down.
Likes
6
Share


@Naujas
Follow
shit, the snail got to her, even though I try to protect myself from them with special pellets, out of the 4 girls she chose the biggest one :( ... it's a pity, I let her grow further. she doesn't touch the other girls, this one is probably the tastiest :).


Likes
8
Share


@DrBud420
Follow
29.06.
Dos Si Dos 33# 1# Day 65#
Dos Si Dos 33# 2# Day 65#
And what can be said about the champion... these two plants felt the least
this, I think this strain would survive a nuclear war lol
29.06.
The plants have finally started growing again, some have almost completely recovered, some are still recovering, and some are in critical condition.
The plants stopped growing for almost a week, maybe even that long, during those days they literally made no progress, the situation only worsened to the extent that I was sure that all but one plant would wither...
There were storms yesterday and the day before yesterday, and that's why I'm late with the update because I couldn't take a picture of them, the gusts of wind were really strong.
Watering is now more frequent and abundant, now I water them every 3rd or 4th day, everything depends on the temperature on those days, whether there is wind, how much moisture there is, etc.
The last time they were watered was before the storm and they are already thirsty today as you can see in the pictures, it will be a day and I will water them in the morning.
Today I removed their leaves again and now I can freely say that they have twice as few leaves as they should, so when it's time for defoliation, I probably won't do it at all, or at least not a lot.
The day before yesterday it was the end of the ninth week for the plants, now they are already in the tenth, but in order not to miss the ninth week, I will write it in the ninth and I will write the next update 2 days earlier, more precisely, on time.
The day before yesterday it also rained, there was a downpour for about 40 minutes, but the spray that I sprayed on the plants failed to absorb, it simply stuck to the leaf, it is greasy, you can see that in the pictures, the leaves are shining. I think the biggest problem was caused by the fact that it sticks to the leaf and when the sun is strong, the leaf simply burns.
In general, do not use the product from the last picture, it can easily kill the plants.
Most of the plants have almost recovered and are getting better, however, the rain can't stop that shit and I also tried to wash it, but it's not worth it, so there is a high probability that the problem will return when the temperatures rise again and the UV is almost extreme and that could be a problem... the temperatures have normalized again to 30 during the day, but in 4-5 days they are announcing again around 36-7..
I will copy the problem that befell the plants from the previous two diaries of other strains from a few days ago in order not to explain everything again, so whoever is interested should read it in more detail.
25.06.
the condition is medium sad... the plants have not progressed at all, why?
Well, because I'm a moron who doesn't think...
Basically, what happened.. I sprayed the plants with an organic preparation against thrips and similar pests and if there was no need for it because this is growing outside and absolutely these little things can't do anything for them except something miserable to slow down their growth, but nothing terrible... and now, I didn't even want it to slow them down miserably, so I ordered a product called "SMC Spidermite Control" I sprayed the plants overnight, the next day when I came to the site, I had something to see... which is the worst I sprayed all the plants, instead of checking on one and only then spraying the others...autos I wanted to spray all the same, luckily I only sprayed 5 of them, as if God himself told me "wait until tomorrow to see how the plants will react" and continue...I come to the site and I have something to see...all the plants, but all, some more, some less, but the leaves were massacred blue, black, purple, there were all colors, everything was there, but the least healthy leaves, as if I had sprayed them with the biggest poison, I think that even in that case they would have passed better... was it the product itself or the sun that was strong during the day (I sprayed them at night and the nights were around 18 C in the coldest part of the night, so they had time to dry, it's not that they couldn't dry, but it all stuck to sheets, it was all shining, I think they could see how bright it was from the plane, but literally... I removed almost 50% of the leaf mass from some plants, from some smaller ones... the tips that were supposed to grow and be ready for a new topping just started, so they had stopped completely for a couple of days literally... the situation is now as you can see in the pictures, there are a few leaves that appeared after spraying with that product, and it is still appearing, but very little, just, just, and this there was no point in leaving the leaves that I plucked because they were completely destroyed, I have never seen them in my life...
The site I bought it on said that the preparation was organic and completely safe, nowhere did it say that it can literally kill the plants, not even on the preparation itself... I am very sad about this, I have been spraying them with clean water every morning before sunrise since it appeared and the tops have slowly started to grow, this crap is appearing less and less, and I have no more leaves where should I remove it, I would just kill the plants... I hope they will recover (except for one plant that is in a critical condition and the automatics that were sprayed are also in a very critical condition, they are young and will hardly survive this) but if not, I have another white runtz that is not in the diary, it is a little more than 3 weeks old, so I will transplant it into 200 liters of soil, so at least something will come out... I feel very sorry for the plants, I already have enough money invested, and this is also my therapy, cultivation heals me…
I'm very angry with the people who sold it to me, and they didn't warn me about such a thing, if it's not written on the bottle itself and on the website, and I've been buying from them for years and they know what I'm growing... the product is not cheap, I paid money for something that will kill my plants, fuck... I mean, fuck money, I feel sorry for the plants, but you understand what I'm saying... I'm also angry at those who put the product on the market in the first place, and I would say all kinds of things I did it, but it's better to keep quiet... and mostly I'm angry with myself because I believed what it says and didn't check the product, like the biggest amateur...
But what's here is now, let's move on...
Today is the 57th day of the plant's life, yesterday was the end of the eighth week.
Watering is now more frequent, every 3-4 days, it depends, the heat is already high, today it was at least 40 C in the shade, the forecast says 35.
Since the last update, the plants were fed once and for the first time after transplanting, this morning most of them were fed for the second time, the next watering or two will be with clean water.
Stay High and Keep Growing!!!
Growers, please avoid this crap, the product is called " SMC Spidermite Control"
This crap seems to have been imported from Ukraine,from chernobyl directly, not from UK lol
Only Positive Vibes
Stay High and Keep Growing!!!

Likes
85
Share


@Tropicannibis_Todd
Follow
💩Holy Crap💩
That was so much fun , it's full on winter where I am and it kept me busy , and come on there's nothing like growing your own stuff. I had a blast as it's been at least over 10 years since my last indoor grow , and it was fun , I had used all of my old techniques and equipment and it worked out just fine , so I was glad I had a ruff idea of what to expect......
Final thoughts
Gonna be honest about that grow , it should me just how far Genetics have come, 10 plus years ago before I stopped growing indoors , all we had was like lowrider auto and greenomatic auto and maybe few others but they were horrible...... but this auto produced quite well as expected it should with the size of my medium and my soil base and very little nutrients, which is what I had hoped for from the start , cause I didn't really know where to start in terms of Genetics as I have been out the game for awhile but I'm super glad with the results and some gratitude needs to be sent to CanukSeeds , they came through as it always starts and ends with elite Genetics👌 ...........
I can't wait to start my next grow diary, so keep an eye out , there's gonna be more to come , I'm going to try some really interesting cultivars........
PS. Can anyone tell me this , back in the day like 2003-4-5-6 wasn't growdiaries.com just a private forum cause if memory serves me , I was among those lucky enough to find a community that did complete grow logs, fourm style, which is where I found my growmie and Mentor Franco Loga from Greenhouse seeds , RIP BUDDY 😃
CANT WAIT TO START MY NEXT GROW
👉I HAVE CREATED A PLACE FOR GROWMIES TO VISIT , SHOW OFF THERE GROWS , AND JUST HANG OUT .....👈
👉ALL YOU NEED IS TO JOIN THE GROWDIARIES DISCORD SERVER !!!!!!!!!!!👈
LINK IS 👉
https://discord.gg/zQmTHkbejs


Likes
17
Share


@420DeepGrow
Follow
Gracias al equipo de Kannabia Seed, Marshydro, XpertNutrients y Trolmaster sin ellos esto no sería posible.
💐🍁 Moby Dick 🐋:
Criada a partir de dos parentales icónicos, como es el cruce de White Widow y una Haze pura G13, este choque de titanes provoca un híbrido que golpea a las puertas de las sativas más fuertes disponibles en el mercado.
Estamos ante una criatura impresionante en todos los sentidos, con ejemplares que florecen en solo 9-10 semanas en interior y arrojan un peso en lonja de 550 gr./m²
Al igual que su padre Haze, nuestra Moby Dick ofrece agradables notas cítricas, pero con efluvios de vainilla y eucalipto, una mezcla de aromas que genera una combinación intrigante, que puede llenar cualquier habitación con una fragancia inolvidable.
El sabor es muy parecido a su olor, con toques de limón agrio que harán que tu lengua cosquillee al inhalar, convirtiéndose lentamente en un humo dulce y terroso, con pinceladas de madera e incienso que se adhieren al interior de la boca al exhalar.
💡TS-3000 + TS-1000: se usaran dos de las lámparas de la serie TS de Marshydro, para cubrir todas las necesidades de las plantas durante el ciclo de cultivo, uso las dos lámparas en floracion para llegar a toda la carpa de 1.50 x 1.50 x 1.80.
https://marshydro.eu/products/mars-hydro-ts-3000-led-grow-light/
🏠 : Marshydro 1.50 x 1.50 x 1.80, carpa 100% estanca con ventanas laterales para llegar a todos los lugares durante el grow
https://marshydro.eu/products/diy-150x150x200cm-grow-tent-kit
🌬️💨 Marshydro 6inch + filtro carbon para evitar olores indeseables.
https://marshydro.eu/products/ifresh-smart-6inch-filter-kits/
💻 Trolmaster Tent-X TCS-1 como controlador de luz, optimiza tu cultivo con la última tecnología del mercado, desde donde puedes controlar todos los parametros.
https://www.trolmaster.com/Products/Details/TCS-1
🍣🍦🌴 Xpert Nutrients es una empresa especializada en la producción y comercialización de fertilizantes líquidos y tierras, que garantizan excelentes cosechas y un crecimiento activo para sus plantas durante todas las fases de cultivo.
Consigue aqui tus Nutrientes:
https://xpertnutrients.com/es/shop/
📆 Semana 1:
Ha sido una buena semana, ella ha dado otro gran cambio en su lugar definitivo 😎.
La carpa está ocupada al 75% y comienza una floracion explosiva gracias a @Marshydro y @Xpertnutrients y @Trolmaster con esta gran genética 💪.
A partir de ahora se riega manualmente con las dosis recomendadas por el fabricante.

Likes
5
Share


@cr0baron
Follow
Really good sativa, was supposed to be 'fast-flowering' but was not, however it grew to the largest plant of the 4. Would grow this one again. Unfortunately the main cola ended up rotting due to high humidity which was a great shame.

Likes
7
Share


@uktuk
Follow
not much to report this week, plants are looking very healthy and happy. Struggling to keep them away from the light. stems at the base of the plants are looking beefy. So far this has been the healthiest and most vigorous looking grow I've had (aside from letting them get a little out of hand in size)

Likes
13
Share


@SgtDoofy
Follow
Feb 22
This guy really is FAST. I guess FastBuds was right. I'll need to attach a timelapse to show just how fast it's taken off.


Likes
9
Share


@Headies
Follow
So I had a little less nutrient last week then i needed. Def a calcium deficiency. I think it's clearing up but this plant has spot all over it. I changed the water, gave it the right amount of nutrients and a little exra hydrated lime for calcium. Hydro is hard. I hoping It's not sick. I hope It doesn't get the other plants sick. Just a few weeks left.
Likes
5
Share


@XaXaXa
Follow
Girls getting bigger, color looks good, everything on point at this time
Feeding every 2-3 days with 1.2-1.3EC
380PPFD - 25DLI
Nothing much to say, I’m just happy that I managed problems I had
