
Likes
Comments
Share


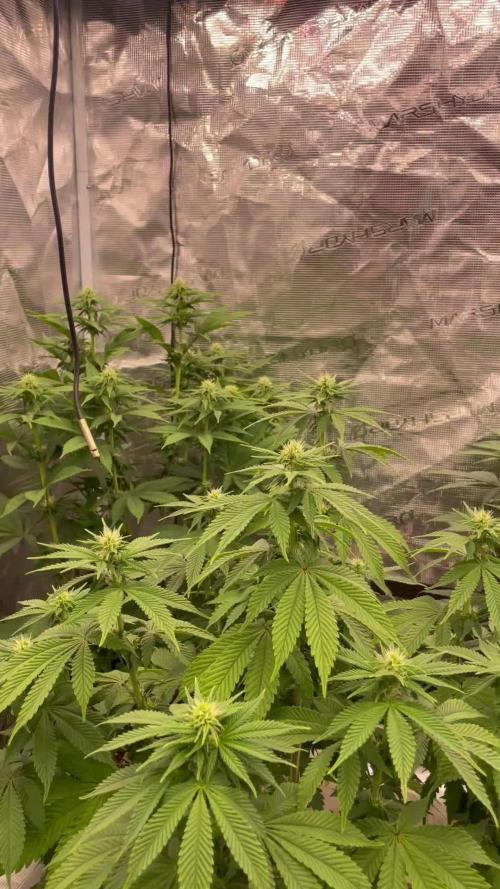
@GODAXE
Follow
2024.09.12 D64
Its been two busy week,
as i trim the 1 pond mother, get aknowledge that my wife use my grow sniper two pruned is badly infested rose bush, since 2 week and never proper clean it whith alcool.😱😱😱😷
in result a massive PM & mithe contamination in my grow tent... 😱😭😷😭
all plant have been shoot with H2O2 at 0.5% and set ouside for 2 day, wich turn to be rainy as f***, until i clean and serilized everything, twice and run the hepa filter .😷😰
the plant look ok, lightly over wartered, but no more pest or PM sign as they return in the tent..
3 days later PM hardly bonce back, no choice to use more agressive treatment so they all have been shoot with saffer's defender 3 in 1.
after 3 shoot in 24h and another tent desinfection we should have get rid of it 🙏
8 day laters everything look fine👍, all damage leaf have been removed, i also prune some unrelevant lower and inner grow

Likes
14
Share


@artems
Follow
Pre flowering going to the end. Plant looks good and healthy.
UPD: Just find out this interesting mutation on 2 cols! Check it out! 2 heads for the same price!😂

Likes
18
Share


@BlackForestGrower
Follow
Week 9 we are nearing the end. This week the gelato will be flushed and completely defoliated
buds are dense af


Likes
3
Share


@LittleBigTrees
Follow
Defoliated and in its flowering pot, switched to 12/12 on day 35 she's stretching out nice.
Will start feeding from week 7.

Likes
23
Share


@adam_pawloski87
Follow
This week went very well! One will be getting cut an hung to dry while the rest finish up with one more week of flush ! These ladies are smelling so lovely I hope you all enjoy! Stay tuned for next week! Cheers 😤💨💨💨💨💨

Processing
Likes
23
Share


@eldruida_lamota
Follow
Que Pasa familia,Tenemos cambios , 12/12 empieza lo bueno(floración), empieza a oler el cuarto a un aroma especial 😉, os voy a dejar muchos vídeos para que no tengáis ninguna queja.
•primer problema y único , es la temperatura. (Max30 min28 con Luz).
Llevaba varios días comiéndome la cabeza , de mientras tengo medio abierto las compuertas del indoor.
Todo lo demás funciona, se las ve Sanas, veremos las próximas semanas.

Likes
147
Share

@Growingdaddyo
Follow
Heute Abend wird die Gute zerlegt und ihrer eigentlichen Bestimmung zugeführt.
Erntedankfest
Updates folgen...
21.06. Direkt an der Lady den Grobtrimm gestartet, ist für mich so angenehmer..
Gleich wird sie geerntet und aufgehängt.
Die Luftfeuchtigkeit ist momentan recht hoch, der Luftentfeuchter läuft..
Hab die Triebe getrimmt und einzeln ins Zelt gehängt, Funzel aus, Abluft volles Rohr und Venti an...jetzt heißt es warten?
Aber der Duft der beim Trimmen entstand, erinnert an diese gelben Lutschbonbons, super lecker👌
Likes
14
Share


@BushDoctor740
Follow
The Papaya Cookies are smelling great and developing nicely.I gave one last dose of recharge today and just going to give plain water until they finish.Some are developing faster than others so I won’t harvest all at the same time.The buds are getting really dense and full of trichomes.Around half of the pistols are turning bright orange giving this buds an awesome look.Ill update some pictures later on this week as they getter closer to the finish line.
Day 64 removed the bamboo scrog and decorated for the fast buds Halloween contest.These girls smell so amazing and the buds are super dense loaded with trichomes.I will be harvesting one of the plants in a few days I’ll let her dry out and sit her in the dark for a day or two in another tent.Most of the trichomes are all now cloudy 🔥🍪.
Likes
18
Share


@TheBulldozerSicily
Follow
Settimana 14
Mercoledi 21/12/2022
Per livello acqua bassa aggiungo 25 lt demineralizzata con 45 ml Flaschclean.
Sabato 24/12/2022 raccogliamo.. buona vigilia di natale!

Likes
2
Share


@DrJekyll_MrKush
Follow
Week 4 – Things Are Looking Good
Starting off Week 4 with a little experiment – decided to try a SCROG on one of the 7 autos, just to see how she takes it. So far, so good – she’s bouncing back nicely. These F1s are really something!
The rest of the girls are doing well under LST, spreading out slowly and steadily. Everyone looks healthy, and growth has been pretty consistent all around.
All in all, a smooth week so far. The tent’s looking better every day – curious to see how things develop from here.

Likes
35
Share


@Paulolo03
Follow
DAY 27, most of the plants are flowering, LST works so well. I'm worried because some of them seems to have advance, I don't think the buds should be that big for their age, maybe the heat stress made them flowering faster ?
Moreover, some plants have their lower leaves turning yellow, I don't know what it is, give them nutrients once every 2 watering and I'm being very light with the amount of nutrients.
Ordered 2 cooltubes, one for each light, it will help to cool down the room, gotta pick them up at the store and use them today.
DAY 33, I followed your advices guys and added a bit of each nutrients for their deficiencies, don't know exactly if it was Ca, Mg or N deficiency but I can tell how better they are ! Water pH between 6,2 and 6,5 with 3acid down, hygro 55%.
Because of the lower hygro for flowering stage, temp is going higher, I'll try my best to take care of them because another heat wave is coming... Thinking about reducing the light time to 12/12
Likes
14
Share


@NorthernChemist
Follow
June 17: The garden area had just under 3 inches (75mm) of rain in the past week which was really needed. Temps have been mid teens to low 20s deg C. The wind has been relentless and the plants continue to take a beating. Overall pleased with the growth but some concern, because preflowers are showing, they may be stunted and flowering early (due to environmental stress).
Likes
8
Share


@Fuzzel
Follow
Put the plants in a environment (-> tent) where I could control temp. and humidity better. Plants #2 and #3 moved from their 200ml pots into 8L fabrics on day 25. Could have waited a few days with that, since barely any roots where visible. Applied some Dynomyco and water with very low amount of Hesi TNT to all plants on day 25.
At about this point my excitement grew, since growth was finally accelerating and a little smell proofed that this was at least the right kind of plant. Slowly introduced the GCxSolo at about 35cm distance on day 19 and increased its output from 25-100% over 2 weeks.
Likes
Comments
Share


Likes
321
Share


@Tropicannibis_Todd
Follow
🤔🤔🤔🤔🤔 HAPPY GROWING 🤔🤔🤔🤔🤔
(👉Bonus Video Showcases Everything I Have Going on in TropiCannibis HQ 👈)
We are now 63 Days into flowering and everything is going great 👍 👈 We are now playing the waiting game👌 Mini Me is getting chopped 😀
Just waiting on the tricomes to amber up a bit 👈
👍 decided to showcase the Mini BigBand , was a extra seed that germed so I kept it as a Mini Me 😊 She's killing it 👈
Except for some watering no nutrients have been added 😋 Flush Completed
👉Soil Medium Provided by ProMix.ca
👉Nutrients Provided by Agrogardens
👉Lighting Provided by MarsHydro.ca
I would like to thank the many growmies for support throughout the years 🙏 So Let's Do This 👊👊👊 Happy Growing

Likes
25
Share


@KivzBudz
Follow
In the end I’m very happy how this first Grow went. Tomorrow I’m gonna finish the other half and update some pictures. Curing begins now, can’t wait to smell and taste the full cured terpens! 😋🌱


Likes
112
Share


@Dunk_Junk
Follow
She actually grew ANOTHER 31cm this week!
She is totally out of headroom now, her top cola will be above the lights in a couple of days 😂
Fastbuds do say it can reach 1.4M... 😁
She is also looking quite bushy, I'm guessing this is a result of the earlier FIMing/topping on multiple sites. This may also have lengthened her veg time, but that's ok. I like to grow monsters 😁 😜
Nothing else to the report as I'm just letting her do her own thing.
For nutrients I'm using 15g of 20-20-20 mixed with 10L of water. Also added 4ml/L of both Cannazym and Terpinator. This brings it to around 1600ppm including ~300ppm for my clean water.
Timelapse Sequence:
*** Pineapple Express ***
Blue Dream
Auto Jack (Not in shot)
*** Pineapple Express ***
CBD Compassion
Likes
85
Share


@Grey_Wolf
Follow
Hi Everyone I hope you all had a wonderful Christmas I know I did 😀 The Peyote Wifi growing in my Super soil mix is getting fairly big now and still has a long way to go.
Where I'm based at the moment the days won't be short enough to induce flowering until February!! That means atleast another 6 or 7 weeks of veg still to go then 10 weeks of flowering. 😲 I have ordered the Blooming supplement from Dr Greenthumbs that is reccomended for Heavy flowering plants like cannabis.
Although the super soil should still have plenty of available nutrients by the time flowering starts it's reccomended that you add the blooming supplement which gives a
rapid boost of P & K to the girls right when they need them. However I wont be needing the booster for awhile yet so in the meantime I'll make up a brew consisting
of fresh worm castings from my worm farm and Black strap mollasses. This will bubble for 3 days and then be fed to my plants along with 1 scoop of Great white Mycorrhizal
powder per plant. Remember if you treat your soil as a living organism then it will remain in top condition and pass on it's health to your growing crop.
Thankyou For looking in on this weeks update please leave a like and I will be back next Year 😄 👊

Likes
8
Share


@GarciasGarden
Follow
All in all this was an amazing harvest I usually have around 8-10 plants and harvest anywhere from 24-36 ozs per harvest with the 8 plants I had this harvest including the biscotti mintz and cookies USA I ended up with 898g total dry weight with all top quality flower. I’ve learned some things with all my previous runs when it comes to dialing in my quality and yield and definitely watching for those herms because I like to push my plants to the max when it comes to training !
GMO PUnch -Greenpoint
I’m giving this a total score of 7-10!
Biscotti Mintz- Barney’s farm
Total score 10-10
Cookies USA score
7-10
