


Likes
5
Share


@Selness
Follow
Cal Mag da fat crystal foi adicionado 2g/L
Açucar Refinado foi adicionado 0,5g/gal
Essa semana algumas das plantas demonstram uma deficiencia de CalMag.
Vou estar adicionando 1x por semana por mais 2 semanas, e parar 2 semanas antes de colher
Mas tudo ta indo bem até agora, o Fungus Gnast que tava no ambiente foi controlado. As plantas estão com um crescimento otimo, e completam 60 dias de vida entre os dias 14/01 e 18/01, acredito que mais 4 semanas e estará pronto para colher!


Likes
5
Share


Likes
16
Share


@Cannabis_carlitos
Follow
Scrog netting is becoming a challenge, I am trying to fill bottom right corner but the plant continues to grow in all directions.
The areas that are filled keep growing, I have stopped topping and keep tucking.
I have put 4 clones in the corner because I do not want to wait anymore as my 2x4 will get too big during the flower cycle of this tent.
Turned off light and will keep off for 48 hours, officially starting the flip into flower cycle. Plants look good, no issues so this is the perfect time for me.
Wish me luck, I hear this strain loves to really stretch.
Fed nutes at 50%, they just got off a lockout so taking it easy, they'll tell me when to up the feed.

Likes
50
Share


@ThatoneAKguy
Follow
I’m a few days late with my entry because I was busy in the other tent finishing up with a project. The express is going along nicely. I duped the nutrients and ran a few days of florakleen to run a test and see if stripping the salts and removing the nutrient bond as advertised makes a difference. She has a big beautiful stall and all her branches are supported nicely.

Likes
10
Share

@Bdog7878
Follow
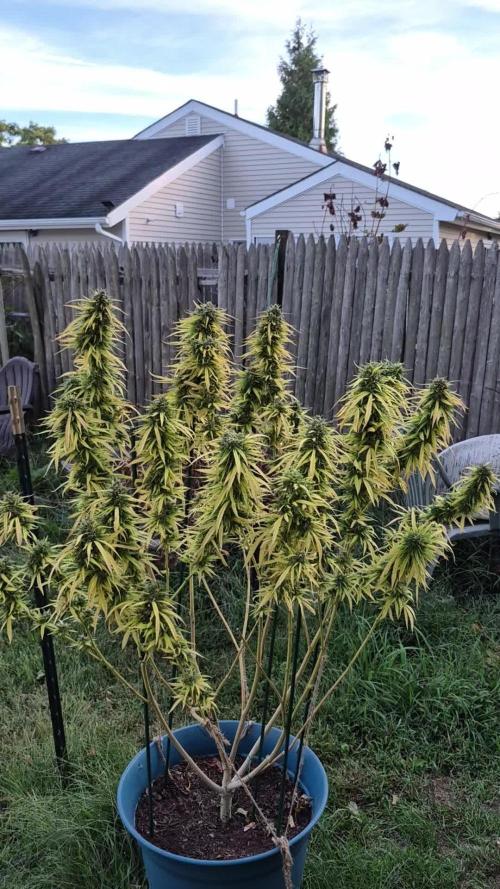
Everything is getting ready to be cropped any day now. I will be cropping the og kush tomorrow for sure its had a little bud rot and its getting pretty yellow. The tyson #1 is will harvesting on sat and tyson #2 Sunday or Monday. The humidity has dropped and its supposed to be sunny so im gonna let the Tysons ride a little they haven't had much bud rot at all. Wish I could have rode out the mop and bit longer but to much rot was happening had to harvest but it was ready enough. I harvested a bud of the og kush about 3 weeks ago it smokes really well for only 3 weeks its strong tastes good I couldn't be happier it was a great grow.


Processing
Likes
10
Share


@Barcelona_Farmers710
Follow
Buenas Farmers!
Otra semana más y pasaremos a Flora, esperando a ver si podemos obtener nuevo equipo de @todoGrowled para llevar el verano más llevadero... Después de recuperase de las Plagas empieza coger buen color esto.🍁
Likes
21
Share


@ArtisticGrown
Follow
Okay sooooo big big sighhhh! I’ve been dreading making this post so I’m sorry I’m behind 2 weeks. I had to go outta town for 8 days. I had everything set up for my brother to take care of the plants. It was a really hot week the week I was gone and these plants were taking a beating and started to get burnt from the heat! One plant died and I’m super sad about it. But we living and learning out here! I have tried to trim the dead leaves without taking too many fan leaves off so I don’t shock em more. All last week was surviving giving the plants a little over a gallon of water a day! Doing some of the nutrients every day but not all. I like to run water in Between the nutrients. But with coco coir I’m not too sure if it’s needed. “Learning over here” so ya thankfully it’s been cooling down and I’ve learned some new tricks to cool the tent off! I got a air water cooler that’s blowing cold air into the tent and my 6” duct sucking out hot air. Things are looking better! One more week with nutritions then a week of flush and Harvest is what I’m thinking. Any suggestions thoughts or ideas for me! I’d appreciate it!
Likes
26
Share


@ledgrowers
Follow
one-two more week til chop. just started flushing. easy first grow. looks dank. smells dank. very anxious to smoke
Likes
23
Share


@Chi_K24
Follow
Hey folks, sorry for the late week update. Life happens haha. I finaly water the plants today with the usual 50mL of molassas to 5 gal of dechlorinated water. I topped the leading colas and defoliated the plant a little. Next update I will be top dressing with 2-3tbs of 70/30 4-4-4/2-8-4 gaia green mix. I will also be topping off of the soil levels. Plants are very bushy!
Likes
13
Share


@DaisyNabis
Follow
instale tutores y apique posas bajas con defoliación, hice cambio de comida a base de floración, ya mis bellas comienzan a formas sus flores


Likes
4
Share


@HowtoBubatz
Follow
This girl is growing like a sword – tall, slender, and cutting through the canopy with style 😅
She's stretched quite a bit, and down below she’s rocking four tiny side shoots that I’m honestly not sure what to think of yet.
But hey, I’m letting her do her thing.
Stretch seems to be slowing down now, and I'm starting to spot the very first trichomes glistening under the light, always an exciting moment!
Let’s see how she continues to shape up in the coming weeks. Staying hopeful!🌱💚

Likes
12
Share


@TeamQuality420
Follow
What a week !!! This was an absolute pleasure to grow , I don't deal with alot of sativa dominant grows, so having something get this much height on one week was pretty cool to see !!
This one is about 6 days from going into flower, she REALLY liked to be plucked !!!
Not very often do plants take so well from losing their large fan leaves like this one did !!

Likes
1
Share
@in_a_few_weeks
Follow
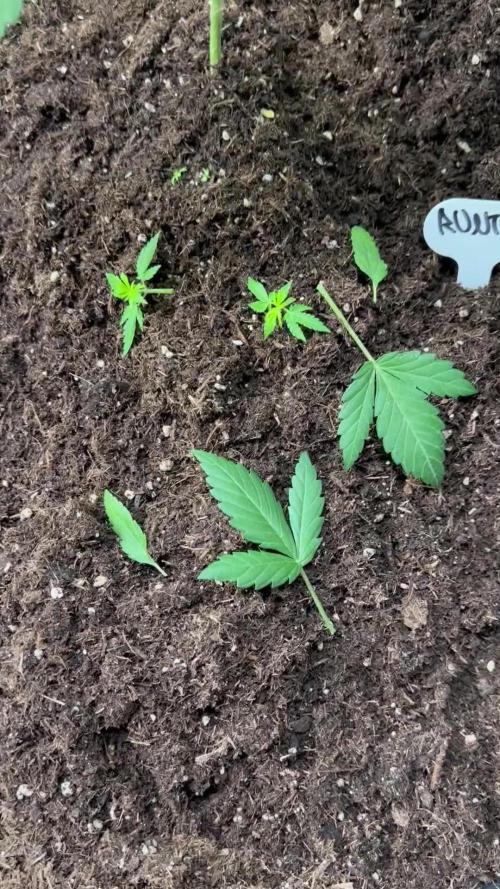
I seperated them now. The bigger one stays in the 90ltr Pot. The other got in a 13ltr pot. Later in 20ltr. Topping the small on in 1 or 2 weeks. Than LST and 12/12. Its a bit hot the next weeks. Have to look more after the plants.
Processing
Likes
2
Share


@BigHorn
Follow
This week had some growth but it has definitely slowed but the smell has gotten more potent. At the end of this week I will be harvesting this beauty. I will post weight and pics when I do. I will be flushing the plant the night before than harvesting the flower.
Likes
37
Share


@NewbieLearner
Follow
Gorilla Glue stands out from the other strains! Can see from early on that it has more trichomes and more frosty than the rest. The blue cheese and Phantom OG are looking super dense as well. No other problems and only great growing going down.


Likes
19
Share


@Book_of_Thoth
Follow
I've been away for a week, leaving my tent in the care of a friend. Coming back I was surprised to see how much bud growth has occurred, as you can see colas are really starting to stack up, and trichromes are already appearing.
AK48 seems to have some purple coloration creeping in on her buds which is really beautiful, just hard to capture as my led throws a purple hue on my photos in the first place. Today I spent two hours trimming leaves from the tent and have kept the airflow at a healthy level. Happy at how everything is looking, and at only three weeks into flowering she seems really promising. Stay tuned!
Likes
86
Share


@CANNASIM
Follow
------GENERAL COMMENT------
Nice and easy, liking to grow this girls, they are vigorous and i already can see white roots at the bottom of my 15l pots, so they rooted very well.
Training wise, just some FIMing in the two girls.
Had an issue with the humidifier forgot to turn off and almost burnt my LED, as the humidity raised to 99%, like growing underwater lol...
------GG.AK47 COMMENT------
This girl is exceeding my expectations, she just took off, seen massive growth, no problems at all, superb strain, she just like everything about life :).
