The Grow Awards 2026 🏆 


Likes
2
Share
@TheHazeMeister420
Follow
The video says enough. Week 3 of flowering. I put them in a dark place for 12 hours so the flowering begon earlier. I live in the Netherlands so the autumn is not nice for weed plants.


Likes
10
Share
@GloHoodlum
Follow
Slight nutrient burn on the super silver haze and the banana. I have backed them up in feed from 10ml per gallon back to 8, it seems to have done the trick the last couple days. Both banana and super silver haze are trucking along quite well I think otherwise. I have officially decided to start my flushing on the black domina x Scott's og, trichomes are about half milky half clear, not sure if I should be doing a full flush or continue feeding through week 7 and start flush on week 8 I'm not overly sure lol see how it goes anyway.
Cheers


Likes
30
Share
@Jamesg
Follow
Didn't stretch as much as she might have done which suits me. On target for plenty of
compact buds. Taking the Shogun coco nutrient range like a champ. Only issue I've had is having to defoliate more times than I'd like.

Likes
44
Share
@TragicTerps
Follow
Day 6 - Invested into a TDS Tester. Watering is at 10ppm as I filter it from the tap we are at 120ppm. No other updates.
Day 5 - lollipoping and defoliation done, readjusted tie downs and watered. Looking good a starting to develop the trichomes now.
Day 4 - left alone
Day 3 - watered the ladies top down.
Day 2 - left the plants alone
Day 1 - no real updates just a watering and that's it. Letting it go for 2 days with no disturbance and seeing what happens. The end of week 6 left us in a pretty good situation headed into week 7.

Likes
128
Share
@PapaNugs
Follow
After topping last week we've just been watching them grow. Bending down the branches to help them spread out. Over this next week I'll start my lst ties to help pull them down and out.

Likes
Comments
Share
@Krautis_IndoorFarm
Follow
Tag 38, Blütetag 12 🌸
Ich sag gar nichts mehr die Mädels übernehmen das Reden 😌
Heute nur pH angepasst und gegossen. Pure Pflege, kein Schnickschnack. 💧


Processing
Likes
10
Share
@Barcelona_Farmers710
Follow
Pasamos a segunda de flora a pesar del calor que hace empieza oler un poco y esto... enseguida ya llega nuevo equipo para ver si mejora un poco todo esto. Espero que os guste Farmers!🍁

Likes
28
Share
@PrairieFrostGrow
Follow
*
********* Week 11 - June 20 to 26, 2020 - Days 71 to 77 from germination ***********
*
It is the end of flush week and she went into darkness on Wednesday night, day 75, for two days. Saturday will be harvest day and start and the dry process👍
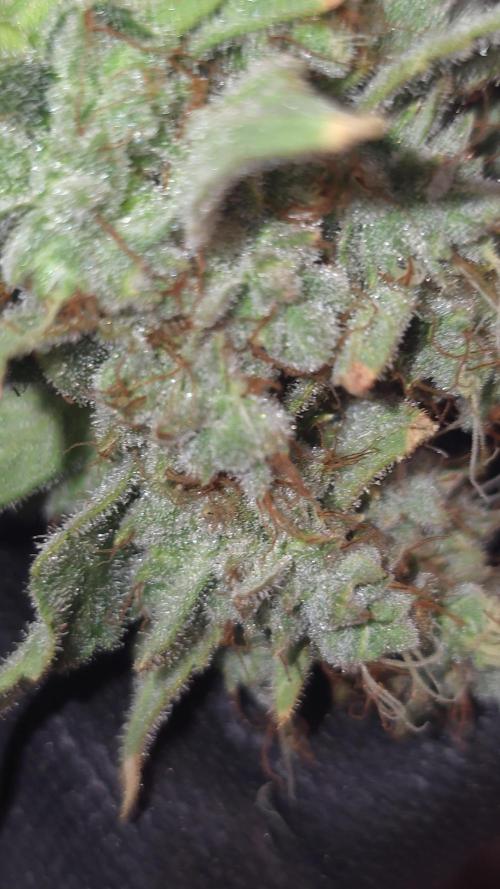
This week she continued to fill in and she also pushed out more frosty tricombs!! The fade happened this week more and she fed off of more of the nutrients within the plant.....perfect😃......would like a little more even but she was ready based on tricombs. Would like to have seen the lower leaves a little more yellow but its good.
I am feeling very strongly that the big part of the pH issues this run was a change in feed water. I have always used bottled RO water for all my grows, except outdoors, but this grow I switched to tap water. Dechlorinated the water with air stone and gave it 24 hours min before using. Wanted to save some money and tired of lugging bottles downstairs a couple of times a week☹️ This is worked out nicely and a lot more convenient. However, the city must be putting some crap in the water that is causing issues in my media and raises the pH after the watering. Out of the tap it is 8.4pH and 275ppm. Since ppm were not too bad in my opinion I moved forward without filtering the water.......oops🤬🤬🤬 Out of options on what is causing the issue, I switched back to RO water late last week........all the girls are happier!!!! F......missed the cause for weeks. Always learning from this plant and my own mistakes to get better every run😉👍
Also wanted to add a little more stress to girl to help push out some increased resin. I drilled a 5/16” hole into the main stem to cause her stress. I did this rather than trying to break a branch and will see it goes this run. Sterilized a new bit in Alcohol and went for it. They went into darkness about a couple of hours later. Excited to see what happens when she comes out to get chopped😃😃
Not really a lot more to add this week as it was mainly looking at the tricombs and her buds. The pH will impact the harvest but she has been fun to grow and very resilient to pest and bug issues as well as grower curve balls. As always.......nice job Sweet Seeds....... SWS56 is very solid and I look forward to running her again one day. Beautiful little girl and makes me smile😃😃😃
Little more detail......
June 20/20 - Day 71
- Rezin and Liquid Weight @ 2ml/L = 285ppm and 4.0pH
- 8L given to get a good flush....pH still running around 7.4
- Runoff in pots already were 7.9pH and 685ppm.
- after 8L water runoff was 7.4pH and 360ppm.
- she is 20” tall and 24” wide.
- a number of clear tricombs but more becoming cloudy.
June 21/20 - Day 72
- dry out day.
- buds are firming up......squeezed a couple🧐
June 22/20 - Day 73
- Rezin @ 1ml/L = 120ppm and pH the water to 2.7!!!!!!!!!
- Given 2L watering.
- No runoff water and I am good with that as I want the low pH water to stay in the medium.
- her frost levels are really coming out now.....was able to lower tent temps to 75 degrees and 51% humidity......its been raining a bit so damn humidity has been high.
June 23/20 - Day 74
- 2L plain water feed - 80ppm and pH to 2.4!!!!!!
- not excited about these crazy low pH numbers but doing what we can
- her tops are getting more pointy now and ripening nicely
- leaves continue to fade......she is close
- checking tricombs, I think we are done and tomorrow will be her last day so that I can take down on Saturday.
June 24/20 - Day 75
- 2L plain water feed - 80ppm and pH to 3.0
- Going into darkness tonight so this was her last bit of moisture.
- drilled a hole into the stem.....was going to do a couple of holes but not trying this method before I decided to leave it with one hole.
- into darkness tonight
So we finish up the week with her in the dark. Next update will be the harvest!!
Thanks very much for taking the time to review my diary!! Sorry for running behind often on this run.........everyone has had a busy life the last couple of months in the world and its been no different here...........a huge Kudos to all the Growmie‘s that are able to keep up with their diaries on daily basis on GrowDiaries.......its a commitment😃👍👍
Sweet Seeds girls are very solid genetics with great vigour and resilience.......this strain is no different........great job Sweet Seeds🙏
Likes
14
Share
@9LittleGrow
Follow
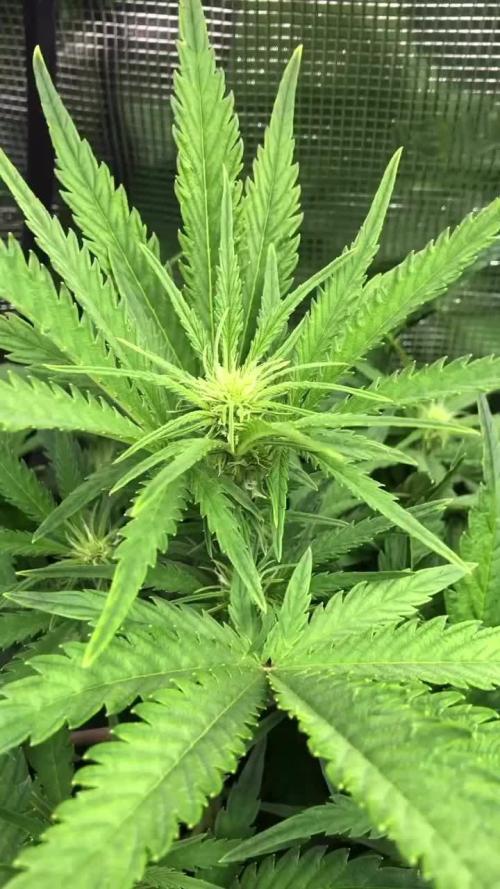
Here’s the beginning of flowering stage and the last day of first week I made defoliation to them and give them some training. I’m so glad to see those girls growing fast and more in this week 1 so I’m so excited and looking forwards to next week . can’t wait to see the beautiful flowers.


Likes
7
Share
@nedreynolds
Follow
It took two ... 2 full hours to repot all 7 plants. I used an entire bag of Fox Farm Ocean Forest.... also sprinkled Mycorrhizal on each root system.
The GG4 is really oing pretty good... I believe the tight node spacing means good things are in store. Super cropping continues.
I gotta flip the whole lot of 7 plants...who cares .. first grow mistakes... fun!

Likes
5
Share
@Tuki3
Follow
Seguimos el seguimiento de las pequeñas nenas! la verdad que es increible el tamaño que vienen agarrando, los olores que se están sintiendo, y lo compacto que están los cogollos!
WonderPie viene un poco más avanzada que la MacNZkittlez pero eso lo veremos, recien empezamos semana 7 y pretendo seguir hasta la 9na.
Saludoss!

Likes
13
Share
@Lfuego22
Follow
During this week I will did some fan leaf removal, at the end of the week I will do a full system flush
Flushing in 2 day when RO comes
Good week. Flushed and added full tilt to the system @ 3tsp a gallon total 15 tsp
Likes
21
Share
@hydroponicganja
Follow
I have to make 2 full batches of nutes to get through a week they are thirsty girls!
plants seem to be healthy almost week 7 cant wait :-)


Likes
35
Share
@Kingseeds
Follow
The selection of Green crack was one of my best cultivation experiences.she obvious points can be noted that having high trichomes and resistance to disease and stress can be mentioned.flushing 7 days and Bringing ppm below 300.harvest in 65 days and drying in 17 ° C and humidity 55% a and curing in 21 ° and humidity 60

Likes
285
Share
@Tropicannibis_Todd
Follow
👉Alrighty Then👈
So we are at DAY 49 of Flowering with the Sugar Larry 👈 And she's doing fantastic 👍
😀 decided to showcase pheno #2 , definitely has different traits then #1 very interesting 😀 thoe both are killing it 👈
Except for some slight watering , ive been doing some defolation as well as some LST manipulation to pull branches to the side 👌
👉I had to Top her during the middle of 4th week 👍 Happy Growing
👉Soil Provided by ProMix.ca
👉Nutrients Provided by Agrogardens
👉Lighting Provided by MarsHydro.ca
Thanks my friends for the great support over the years 🙏 Happy Growing
