
Likes
Comments
Share


@TommyBVRSA75
Follow
Como siempre y siempre en la mitad de ciclo de grow, os regalo un vídeo para que sigáis mi evolución.
Espero que lo artístico os guste...ha sido echo a pensar en vosotros.
Es un privilegio tener tantísimos amigos (más que seguidores tan solo)
4:20 Siempre y que el Dios Jah nos guarde siempre.
All you need is Love ( CANSerbero VIVE).
Besos y abrazo. Vuestro. Tommy


Likes
24
Share


@PrairieFrostGrow
Follow
*****Week 14 growth – March 6 to 12, 2021 – Week 5 flower ******
This girl keeps chugging along. Her resin rails are looking awesome. A little dark green maybe but not worried. Looking for some bud swelling to kick in!!
Bud Fusion being introduced this week. Into the last phase of feeding during flower now. Nitrogen is continued to be reduced as its late flower. Keeping up the feeding ppm this week as we are getting to the end. May be pushing them a little more than I should but finding out how they react for next run.
Still continuing to play with the light intensity and seeing how the girls react to my environment conditions when pushed harder. Could have backed off and stayed with 100, 300, 600, 900 PAR levels at the different stages but I have trying to go a little higher in the late stages and going over 1,000 PAR.
Little more detail…..
Mar 6/21, Day 29
- Dry out day
- Changed light cycle to 11/13 today to help with light intensity and reducing DLI.
- Light power reduced to 425 watts
Mar 7/21, Day 30
- Keeping up the feeding but reducing nitrogen.
- feeding with micro – 1.5, bloom – 2.5, ult B – 0.5, carbs – 1, B Storm – 2, S Storm – 2.5, Bud Fusion 0.15gr/l, Terp – 1.5, Jet Fuel – 0.5, Rezin 1
- 1150ppm and 6.0pH
- 2.5L
Mar 8/21, Day 31
- Watering with 2L feed from yesterday and 16L plain water
- Over shot the pH
- 400ppm and 5.9pH
Mar 9/21, Day 32
- Feeding again with Grow – 0.5, Micro – 1, Bloom – 1.5, Carbs – 1, Magnifical – 1
- Didn’t add many of the supplements
- 875ppm and 6.0pH
- 2.5L
Mar 10/21, Day 33
- Middle of the week and just giving some enzymes today
- Enzymes – 1.5ml
- 300ppm and 6.1pH
- 3L
Mar 11/21, Day 34
- Microbes again today
- Tap water with Jet Fuel – 1ml, Terpinator – 2ml, Nature’s Candy – 1.5ml, Rezin – 1ml, Ultimate B+ - 0.5ml, Recharge – 1tsp/gal
- 800ppm and 6.0pH
- 3L
Mar 12/21, Day 35
- Dry out day
- Been feed a couple of times this week so work with ¾ strength next week.
Likes
8
Share


@Timbo_Growz
Follow
Some beautiful colors coming through as we head into week 10! I removed the scrog net because I needed it for my other grow… had to tie a lot of buds up because they are so dense and heavy!
I’m only watering from now on until I don’t have much nutrients left in the excess water. You can already see how the plant gets rid of its chlorophyll as the leaves are getting darker and darker.

Likes
21
Share


@reirrac1
Follow
NCH x SB is starting to fade significantly and has stopped throwing out new pistils, trichomes are significantly cloudy and a few on the sugar leaves are beginning to turn amber. Debating whether I should pull her at full cloudy in a week or two or wait until I see more amber. Sour Kush is still fattening up and has a lot of white pistils yet to mature, trichomes are of course a mixture of clear/milky, no fade on this plant yet. Tangerine Dream is making great progress in flowering and bud sites have thickened up considerably, trimmed a majority of larfy bud sites on this plant since the discrepancy in the distance to the light was so large. Water pH 6.15, EC 0.4. Feed pH 6.15, EC 0.717.

Likes
66
Share


@Earthling37
Follow
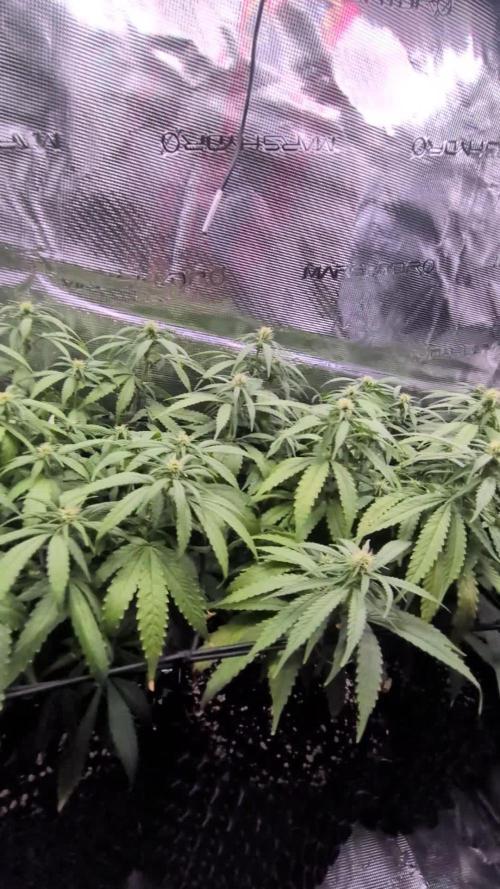
51 Days in flower have passed.
This week i got myself an upgrade, new light the FC-E3000 and a 120x60 grow tent so i can grow some bigger and better medicine.
I love the specs on the light, the price was right and so i have high expectations from looking at other peoples reviews of the light.
We will see if im able to hit the jackpot with this! 🤠
The girls are looking great!
Cheese left, Gorilla Girl right.
the pictures and videos are self explanatory, its looking awesome!!!
If you ever wondered where i stashed the Runtz and Bruce Banner; i took them out of the grow tent and just put them in the corner of my house without light only surviving off the light in the shadow from the sun, they have been neglected for a while but they still went on super strong, they started flowering 3 weeks ago so i had to put them into reveg so they look a little odd now but its all good.
it was either that or i would have to throw them in the trash, and im not gonna waste some nice strains like that.
Im impressed how they have survived with almost no light and water.
---1st time growing with FLO - Florian Living Organics.---
They claim that there is no need to pH when watering and that their living fertilizer is the only thing that i will need throughout the whole grow so i only need to mix with soil and just water with plain water.
If this stuff works then it can simplify my future grows ALOT!
Happy growing. 😎


Likes
7
Share


@Adam22
Follow
I am waiting to start some more seeds I already have them but another tent is needed and a couple of leds, good ones. It will take a few weeks to sort and as usual I have some inspections on the house I need to try and time carefully around 🤔 I did have 2 during this grow the first was in veg luckily they grew in a closet the second was week 3 flower (don't ask) The smell didn't stink out the room like the wedding cake did so I will try and cure this as long as possible to last this as close to next harvest as possible 😅 my cats didn't eat my plants this time so thats another bonus. Need to look into getting a proper air circulation for the new tent I used a fan the whole time my tent was wide open I want to have it sealed next time so I can fully zip it closed ffs lol defo would recommend this strain but I don't think they stock these anymore 😕 I got a coupe seeds from the first plant I was right the pic of the top bud a few weeks ago you can see the seed just about forming after the branch got broken off we will live and learn 😉
Likes
8
Share


@GarciasGarden
Follow
All in all this was an amazing harvest I usually have around 8-10 plants and harvest anywhere from 24-36 ozs per harvest with the 8 plants I had this harvest including the biscotti mintz and cookies USA I ended up with 898g total dry weight with all top quality flower. I’ve learned some things with all my previous runs when it comes to dialing in my quality and yield and definitely watching for those herms because I like to push my plants to the max when it comes to training !
GMO PUnch -Greenpoint
I’m giving this a total score of 7-10!
Biscotti Mintz- Barney’s farm
Total score 10-10
Cookies USA score
7-10


Likes
40
Share


@MrJones
Follow
47th Parallel Crowly's Comet
🔹⊱╮🔹╰⊰🔹 GROW Started 03.10.24 INFORMATION 🔹╰⊰´🔹⊱╮🔹
🌞Environment - Maintaining 80F and 65%Humidity
🌾Training - Nothing this week, just letting the seedlings veg out.
⚱️3-Gallon 📊6.2 PH
💧 Feeding - Using Horti Grow 8-11-21, Bloom 5-15-26, Late Bloom 0-24-26, Cal 12-0-0
🌞Medic Grow Smart 8 760 Watts
🕷️ IPM - CannControl from Mammoth and Mosquito Bits as needed
🔹⊱╮🔹╰⊰🔹 PLANT UPDATES 🔹╰⊰´🔹⊱╮🔹
📝 Notes - These ladies are just going nuts; they are stretching aggressively, and the vertical growth is outstanding. I want to defoliate these plants, but I need to be cautious and not stunt the stretch.
📝Fertigation injects fertilizers into an irrigation system to supply dissolved nutrients to crops.
🗓️04.27.24 Just feeding daily, sometimes twice; today, fed with Hort-Bloom @ 2.7 GRMS Per Gal and Horti-Cal @ 2.5 GRMS Per Gal.
🗓️04.28.24 Just feeding daily, sometimes twice; today, fed with Hort-Bloom @ 2.7 GRMS Per Gal and Horti-Cal @ 2.5 GRMS Per Gal.
🗓️04.29.24 Just feeding daily, sometimes twice; today, fed with Hort-Bloom @ 2.7 GRMS Per Gal and Horti-Cal @ 2.5 GRMS Per Gal.
🗓️04.30.24 Just feeding daily, sometimes twice; today, fed with Hort-Bloom @ 2.7 GRMS Per Gal and Horti-Cal @ 2.5 GRMS Per Gal.
🗓️05.01.24 Just feeding daily, sometimes twice; today, fed with Hort-Bloom @ 2.7 GRMS Per Gal and Horti-Cal @ 2.5 GRMS Per Gal.
🗓️05.02.24 Just feeding daily, sometimes twice; today, fed with Hort-Bloom @ 2.7 GRMS Per Gal and Horti-Cal @ 2.5 GRMS Per Gal.
🗓️05.03.24 Just feeding daily, sometimes twice; today, fed with Hort-Bloom @ 2.7 GRMS Per Gal and Horti-Cal @ 2.5 GRMS Per Gal.
╰⊰🔹╰⊰´🔹⊱╮🔹╰⊰🔹╰⊰🔹STRAIN INFORMATION🔹⊱╮🔹╰⊰🔹╰⊰🔹╰⊰🔹⊱╮
Crowley's Comet / https://www.47thgenetics.com/product-page/crowley-s-comet-10-fem-birdseeds
It's everyone's favorite piece of space rock, Crowley's Comet! The culmination of reversing our Matterhorn cut off Mr. Crowley to Intergalactic Runtz, and the results were out of this world (I had to do it). These ladies were slow to start, but once they hit their stride, they put any worries we had to rest. Compact, short-framed, and robust. They pack beautifully boulder-like flowers that reek of garlic and sickly sweet cotton candy. Dark green to a mosaic of purples, yellows, and silvers. Frost production is off the charts, the internode spacing is tight, and they certainly will impress in their last few weeks of flower. This is one of our favorite crosses in the new fem lineup. If you're looking for your hype fix, here you go.
Yield: Heavy to XL
Flower Time: 63 days
Feeding Schedule: Heavy
Likes
9
Share


@HUMO_Cultiva
Follow
We start week 3 of bloom!! Goofiez 2 amor compound genetics it’s the champions!!

Likes
3
Share


@SubliminalSociety
Follow
Did she stretch 2cm? I'm saying: yes!
Otherwise same old. Oh, just realising I didn't measure bud width. Man, it's depressing. So many leaves in the bud, it's going to be hell trimming these two sad colas. But she's doing her best, so I should do, too.
Chopping time is close.

Likes
2
Share


@fabialien
Follow
Semana sel 9 al 14 de septiembre 2024.
Vemos un desarollo bastante vigoroso en todas, esto también se puede adjudicar el hecho de la nutrición que han estádo llevando esta tanda se fem y regulares, la mandarine qué nació con apical va bastante bien.


Likes
21
Share

@reirrac1
Follow
Started out pretty slow, then blew up like crazy during preflower before running into deficiencies followed by nute burn. In the end I switched to organic nutes and she came out great! Big frosty purple buds consistently ping pong ball sized. Smells like straight skunky oranges. Although this took a really long time for an auto, I would grow this again!
Likes
7
Share

@therealgrowmie
Follow
Week 14 Update – Flower Week 3 🌸
The stretch is finally starting to slow down, and the canopy is settling into its final shape. The SCROG net has done its job, creating a much more even canopy with plenty of tops receiving direct light. Bud sites are stacking nicely across the tent, and white pistils are appearing everywhere as the plants shift their focus from vertical growth to flower production.
The plants are drinking heavily and showing strong vigor despite the warm conditions. Airflow remains a priority as the canopy thickens, helping keep humidity under control and reducing the risk of mold later in flower.
Overall, this week feels like the transition point where the garden stops stretching and starts building flowers.
📊 Current Stats
💧 Watering: 2L per plant every third day
🌡️ Temperature: 28°C
💦 Humidity: 65% RH
📈 VPD: ~1.39 kPa
💡 Light: ~800 PPFD
🕛 Light Schedule: 12/12
Looking ahead, the focus will be on maintaining a healthy canopy, good airflow, and consistent environmental conditions while the buds begin to bulk up over the coming weeks.


Likes
4
Share

@Relentless-Pressure
Follow
Ipm on fleek
3x Different Mites will prevent all Bad things wich the Summer brings sometimes!

Likes
3
Share


@Dabking
Follow
Chopped on day 76 from when it was planted into soil. It was always scraggly and would remind me of the gimp hand dude in scary movie 2. It pushed along. It's aesthetically pleasing and a smooth smoke but I won't be growing it again. Not a fan of the high or anything else. Will sit on the shelves in grove bags until smashed into concentrate. I ended up with roughly 42 grams dry weight.
