


Likes
Comments
Share

@DeepRootsGrowTrees
Follow
APRICOT GORILLA AUTO /
GANJA FARMER
HARVEST WEEK
This lady produces golf sized trichome covered buds that had a sweet aroma to her. She's a nice smooth smoke not heavy at all light notes with this lady.
Thank you for stopping by and taking a look it's much appreciated!!
THANK YOU GANJA FARMER!!
APRICOT GORILLA AUTO /
GANJA FARMER

Likes
13
Share


@SufalloBoldier
Follow
100% power now on the ts2000 @ 24inchs. Trying to follow this rough guide of DLI for autoflowers, stumbled across on it on a random forum, seems to have worked great so far;
AUTO FLOWER LED LIGHT INTENSITY
Recommended LED PPF/PAR Values / DLI Based on 20 hrs. of light.
Seedlings 150 - 200 umol / DLI 10.80 - 14.4 moles per day
Veg up to 9" 450 umol / DLI 32.40 moles per day
Early bloom 500 umol / DLI 36.00 moles per day
Mid bloom 650 umol / DLI 46.80 moles per day
Late bloom 750 umol / DLI 54.00 moles per day
Ripen 400 umol / DLI 28.80 moles per day
*** Use extreme caution going 700 umol or higher @ 20 hrs/day this could cause leaf burn***





Likes
11
Share


@BudBeezy
Follow
Welcome to week 14 of my grow diary. What can I say? The plant is growing like weed. It's getting bigger and bushier from week to week. I can't complain about the weather except that I have to water her so much every day😂
See you next week ✌️

Likes
5
Share


@CreoWeed
Follow
The total yield was 40.7 grams dried, and it took around 7 days before ending up in the jar. Plant is not very leafy so the trimming part doesn't take long time.
The taste is pretty soft at the beginning but the high is impressively strong and pretty mental.
That's all lads, thanks everyone that followed this journey and stay tuned stay high for the next diary!

Likes
6
Share


@Ciscohash
Follow
El germinado fue genial 100%.. de 43 semillas todas germinaron ..comienza el cultivo de estas orangecake auto de nemeseeds_bank..saludos a todos y wenos humos

Likes
52
Share


@MeaCulpa
Follow
Happy Easter.
According to my calculations, the final week is beginning.
Or the second to last. Let's see.
I defoliate everything that has turned yellow.
I think I read once that shortly before the end it is normal for the plants to draw all their nutrients from the leaves.
So everything looks good, I think.
Oh yes, I put my fan on the ceiling “McGyver-style”.
Functions.
Have fun looking for eggs.

Likes
11
Share


@Socal6pak
Follow
LOOKS GOOD. GROWING STEAD. ONE OF THE BEANS SPROUTED 1 WEEK BEHIND.
REMAINING 4 SIMILAR SIZES. NO MUTATED OR SHRIVELED FAN LEAVES. SINCE OUTDOORS. IM NOT GONNA TRAIN TOO MUCH THIS TIME. SINCE THE SUN WILL HIT IT FROM ALL DIRECTIONS. LET'S KEEP HANDS OFF AND SEE HOW IT GROWS.
Processing
Likes
25
Share


@Master_weeda
Follow
Bonjour à tous les padawans et les maîtres jedis
Pour cette semaine 4 au jour 23 ma plante fais 17 centimètres et son sixième noeud apparaît je décide donc de pratiquer un LST sur ma plante.
Pour ce j'utilise du fil de fer galvanisé que je plante directement dans le substrat en faisant attention de ne pas endommagé les racines car n'oublions pas que ce qui pousse dessus pousse aussi dessous.
Jour 17 je pulvérise du une solution composé d'une cuillère à café de savon noir mou dilué dans un litre d'eau en prévention d'éventuels nuisibles.
Je corrige mon LST suivant la pousse de ma plante ...
Pour ma par c'est la manière dont je procède mais petit rappel de la technique du LST:
Quand commencer à appliquer la technique LST
De nombreux cultivateurs commencent la manipulation dés que les plantes possèdent entre 3 et 6 nœuds ou une paire de feuilles. Durant cette première étape de la croissance, le tronc encore flexible est pliable sans risque qu’il ne se casse, même si au fur et à mesure du développement de la plante il sera de plus en plus difficile de le plier. Nous pouvons continuer à guider la croissance des branches durant toute la culture, même durant la floraison, ce qui pour cette étape représente un grand avantage face à la taille, qui n’est pas du tout recommandé une fois que la formation des têtes commence, cela stressera en effet la plante, ce qui aura pour effet de retarder la récolte.
Comment appliquer la technique de guidage LST
Si nous sommes prudents, la flexibilité naturelle des fibres du cannabis permet de plier leur tronc et branches avec une relative facilitée, même durant la floraison des plantes.
En utilisant une corde fine, nous pouvons accrocher la pointe de la plante à la base du pot par exemple ou à un tuteur que nous aurons planté dans le substrat. Nous plierons le tronc avec précaution et nous le fixerons avec la corde, à partir de là, nous pouvons augmenter progressivement la tension de la corde, chaque jour un peu plus, jusqu’à obtenir la position souhaitée. Soyez attentif à la réaction de la plante, essayez de ne pas appliquer trop de pression sur la corde et rappelez-vous que la flexibilité des branches peut varier d’une plante à l’autre.
Pour obtenir de meilleurs résultats, il suffit de suivre quelques règles simples. Pour commencer, nous devons choisir une corde fine mais pas trop pour ne pas blesser les troncs au fur et à mesure qu’ils grandissent et qu’ils deviennent plus gros.
Nous pouvons utiliser des crochets en plastique souple ou de n’importe quelle autre matière flexible pour éviter d’endommager les plantes. Spécialement en intérieur, utiliser des cordons en plastique de couleur (voir les diaries de @Silky) est très pratique pour voir facilement les accroches et faciliter le travail au milieu du réseau formés par les cordes, les tuteurs, les mailles ou les supports que nous aurons dans la culture. Bien entendu, en culture extérieure et surtout en guerilla nous ferons juste le contraire et nous utiliserons des matériaux de couleur qui n’attirent pas l’attention pour que notre jardin reste discret.
Pour stresser les plantes au minimum, la mieux est de réaliser ces manipulations le soir ou juste après que les lampes en intérieur s’éteignent, ce qui leur permettra de se remettre durant la nuit. Normalement, le jour suivant nous pourrons observer comme les pointes des branches que nous avons pliées se dressent de nouveau vers le haut à la recherche d’une source de lumière.
Je combine un pincage d'Apex au LST cela me permettra d'avoir une canopé plus homogène donc une meilleure pénétration lumineuse et par conséquent un meilleur rendement.
Que la force soit avec vous💪

Likes
47
Share


Likes
49
Share


@MadeInGermany
Follow
Hi everyone 🤗.
On 07/19/20 she was placed in the flower tent.
She gets a good growth spurt :-).
From the next watering there will be Canna Flores instead of Canna Vega.
I am very excited that this bush will develop in bloom Blüte.
In the next 3-7 days everything will be taken down that would later end up as popcorn buds 😅.
I hope you enjoy the update, stay healthy 🙏🏻 and let it grow 🌱😃
Strain : Sour Diesel
☝️🏼😍
Genetic:
Diesel x Northern Lights
👍
Vega Lights : 2 x Todogrow Led
Quantum Board 100 W
💡
Flower Lights : 2 x Todogrow Led
Cxb 3590 COB 3500 K 205 W
💡 ☝️
Soil : Canna Terra Professional +
☝️
Nutrients : Canna Terra Vega, Canna Terra Flores, Rizotonic, Cannazym, CANNA Boost, Pk 13/14,
Canna Cal/Mag, Canna Ph - Grow,
Canna Ph - Flores
☝️ 🌱
Water:
Osmosis water mixed with normal water (24 hours stale that the chlorine evaporates) to 0.2 EG. Add Cal / Mag to 0.4 Ec Ph with Organic Ph - to 6.0
💦 💧
Likes
3
Share
@Smev1337
Follow
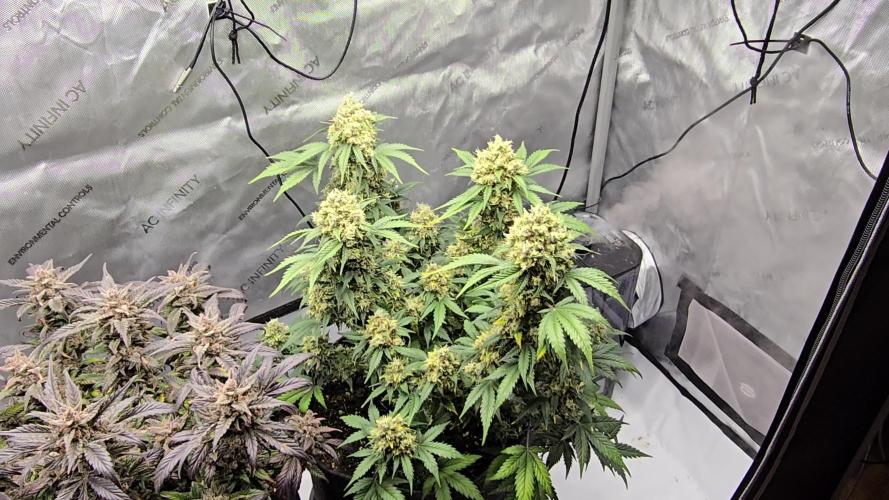
Hey all! this week is starting off good and stable, both plants are going good and healthy i also cut down the older plant for harvest already, she is drying now in the other grow tent so we will see how the trimming goes else we are rooting now for the younger plant which is now in a new grow tent! it moved into the tent with my Strawberry Gorilla RF3 that is also done soon! best days are coming to process these plants into juicy rosin 😇 happy growing all! 😎💚✌️
Likes
9
Share


@CrazyRussian
Follow
Beautiful, and productive week. They drink a lot of water, I give them 10 litres/4 days. They are truly enjoying the environment, hopefully we will have a large harvest.

Likes
58
Share


@AsNoriu
Follow
Day 74. One more victim of war against bud rot. Prevention needs sacrifices sometimes...
Day 78. Second was sacrificed for more space too ;)))
Day 84. First girl is Jared . Fantastic bud quality !!!
Day 88. I said fantastic quality about first one ??? ;))) That's till I touched second !!!
Purple phenotype is pure joy for eyes !!!
Happy Growing !!!
Likes
54
Share

@wolfvb
Follow
🌿 Mellow Jelly - Frost Factory & Full Recovery!? ❄️❤️?
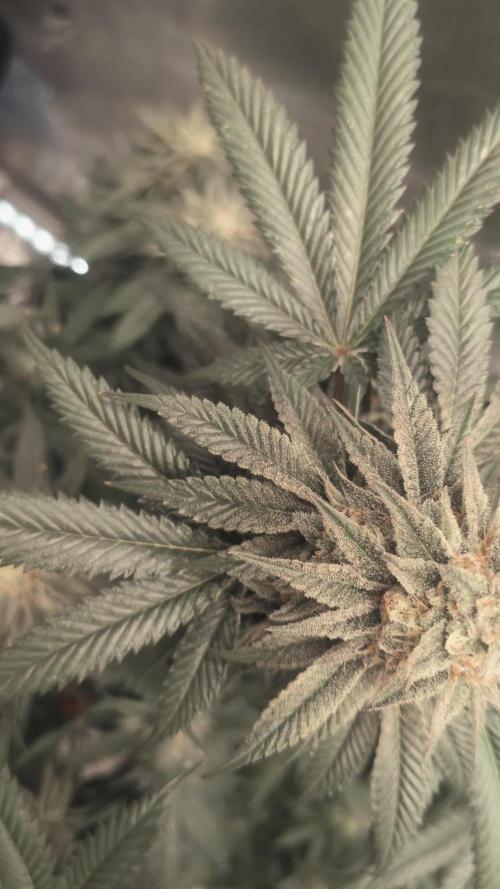
Let's go! Welcome to Week 16 for the Mellow Jelly. Hopefully, she is fully recovering from the thrips madness we had to deal with. Judging by how she is stacking up this week, I'd say she shook it off and is pushing hard to the finish line!
📈 The Details / Progress Report:
Bouncing Back: She took the defoliation and pest cleanup perfectly. While you can still spot a few old battle scars on the older fan leaves, the upper canopy is completely focused on flower production. The airflow is dialed in, and she is putting all her energy into those buds.
Extreme Frost: Just look at the macro shots! 🤯 The resin production is absolutely out of this world right now. The sugar leaves and calyxes are completely caked in a thick, sticky layer of white trichomes.
Swelling Up: The colas are getting incredibly dense and chunky. We are starting to see a lot of those pistils curl inward and turn a beautiful fiery orange, but she is still pushing some fresh white hairs, which means she is still packing on weight! 🔥
Canopy Structure: Opening her up last week really paid off. The light is penetrating down to all those mid-canopy bud sites perfectly, ensuring we get solid development from top to bottom.
💧 Next Steps:
We beat the bugs hopefully, so now we are officially in the coasting phase! The main goal right now is to keep the environment perfectly stable and start keeping a really close eye on those trichomes. We are getting into the final stages, so it is all about letting her swell up even more and waiting for that perfect harvest window.
She is an absolute beast! Let's keep it growing! 🌱💨


Likes
16
Share


@DrLaggis
Follow
Day 72: The Finale 🌿🌟
It’s finally time. My very first grow is coming to an end—at least the cultivation phase. The plant is now ready for harvest, and I can’t believe how incredible this journey has been. I never expected to enjoy the whole process so much—from nurturing the plants to watching them grow and evolve. I’m absolutely hooked and can’t wait to dive into the next steps: harvesting, drying, curing, and of course, starting a new grow soon with fresh ideas and experiments!
While it may not be the largest yield, the quality of the buds speaks for itself. The time, love, and care I’ve put into this grow is visible, and I’m pretty proud of the results. I’ll admit, I was a bit impatient at times (which I think every first-timer can relate to 😅), but the experience was priceless.
Here are a few interesting highlights from my trimming and harvest process:
1️⃣ Dark Phase Before Harvest
Two days before harvest, I put the plant in complete darkness to encourage resin production. I'm not sure if it really made a difference, but it was worth trying!
2️⃣ Wet Trim vs. Dry Trim
I decided to go for a wet trim because the buds were really dense, and I wanted to avoid any risk of mold. I’ve read that wet trimming can speed up drying and may slightly impact the quality, but this is part of the learning experience. Next time, I’ll try a dry trim for comparison!
3️⃣ Yield Update
Wet, the total came in at 179 grams from my plant. Trimming took around three hours, and it was actually a lot of fun, despite the time commitment.
4️⃣ Curing Plan
The buds are now hanging in the tent for about 8 days. Once dried, they’ll go into jars with Boveda Packs (62% humidity) for another 3 weeks of curing. I'll update the smoke report once they’re fully cured, but I’ve already had a sample of the same strain from a friend, and I can say it’s pretty amazing.
Final Thoughts on My Grow 🌱✨
As mentioned earlier, this grow has been an absolutely incredible experience, and it has definitely set me on a path to jump right into my next grow. There were ups and downs along the way, such as over-pruning, which I believe stressed the plants a bit. Additionally, I think they could have benefited from an extra week to mature. We also faced many temperature fluctuations this summer, which impacted the plants due to external weather conditions.
I'm really pleased with the quality of the buds. The quantity is okay—I can’t fully gauge it yet—but I’m sure there’s more potential to unlock. I've gained valuable experience in what worked well and what didn’t. Overall, the countless lessons learned during this grow far outweigh the few mistakes made. I'm incredibly proud of my first results!
As this long journey comes to an end, I want to thank everyone who followed along. I hope you enjoyed all the content. In that spirit, happy growing, and see you next time! 🌟
Likes
10
Share


@Bread_n_Buds
Follow
Going into flowering is always a special moment and we prepare to do it in the best way to make the plant understand that it is time to become a woman and speed up the start of the formation of buds.
We start with 24 hours of darkness this to give a strong break and sign of change to the plant that understands the change of time and prepares to go into flowering.
Our Slurricane was worked with a topping x16 buds that worked really well, we have well aligned branches, here nothing escapes upwards. The small growing bruches are perfectly aligned and it is another fantastic characteristic of plants with low internodal distance.
Another thing that gives the plant the signal of the start of flowering are the flowering stimulators we friends of Plagron use Power Buds.
The start of the flowering program includes the same additives as the vegetative phase Power Roots, Sugar Royal, Pure Zym and adds the flowering stimulant Power Buds. Now the basic fertilizer is Alga Bloom specific for flowering. The shape is very very beautiful as the structure of this plant, I definitely love plants with short internodal distance. Elegant, to see, to photograph, to grow.
Green Sensation will arrive as the hero of the end of flowering and at the same time it will be time to remove Power Roots and a week later the Pure Zym enzymes. It is recommended from the 4th week, if the plants flower fast I start at the 3rd depending on the size of the bud.
Try a seed of this strain that drives us crazy... It's a super News!
---- https://www.zamnesia.io/it/11177-zamnesia-seeds-slurricane.html
Zamnesia Description // Do you want to add a prestigious genetics to your grow room? Slurricane is a premium US strain created by In House Genetics and now available to growers thanks to the breeding processes implemented by Zamnesia. Born from the fusion of Purple Punch and Do-Si-Dos, Slurricane is 60% indica and incredibly vigorous. Whether grown indoors, outdoors or in a greenhouse, this strain can produce large quantities of dense and aromatic buds. Add Slurricane to your assortment and enjoy growing one of the most beloved hybrids in the United States.
All the best that mother nature can offer is on ---- www.zamnesia.com
Processing
Likes
9
Share


@AK1210
Follow
This lady is doing really nicely since I being moved from the tent. I made a massive error with my other grow by leaving her in the tent with the front cover closed as we had some shite weather and this made the humidity levels to high causing bud rot. I can't begin to explain how soul destroying it was finding that.
This lady is free from any mould and since I have just defoliated her there will be less chance of it happening. I'll be keeping my eyes peeled for any signs.
I think this one may have around two to three more weeks before harvest.

Processing
Likes
6
Share


@Mr_nugs_lover_David
Follow
She's looking gorgeous,I lsted the talles branches to get a more even canopy. Let's see how she turns out,I'm loving to grow this strains her performs well with lst and all types of training,she's being fed only using 100% organic and bio amendments by florians living organics and guanokalong and also my lactobacillus serum home made,it is being a pleasure to grow her.
