The Grow Awards 2026 🏆 


Likes
Comments
Share
@TheMightyHermit
Follow
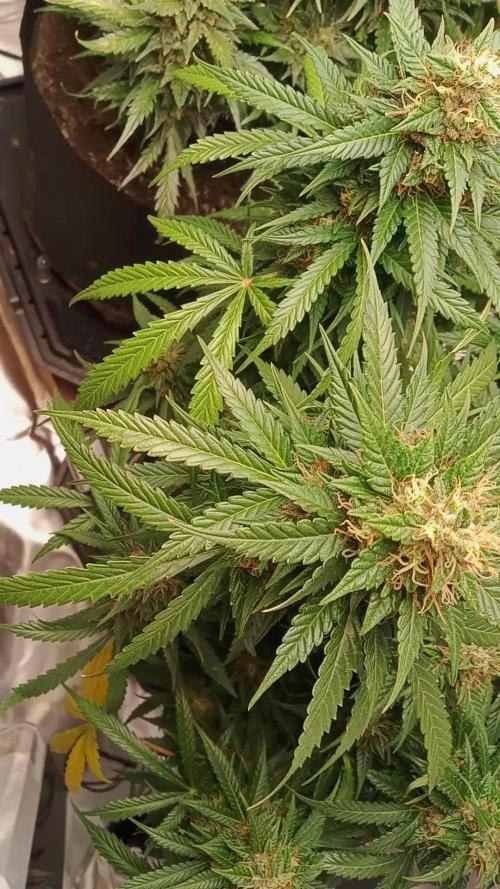
Honey Cream is almost ready (Aiming for 15% amber trichomes), another week or two and the first tops will come out. The smell is very pleasant, a bubble gum, sweet and almost ripe berry smells, very intoxicant !
Power flower is stacking nicely, but still with no smell, very frosty too.
Special queen #1 is also doing amazingly, specially being in a pot, 2.25m and stacking EVERYWHERE ! The smell reminds me of an amnesia haze, very pungent on the nose !
Old Lemongrass is doing a little bit worse, her leaves yellowed a lot, but hopefully it will get fixed by next week. Trichome production is considerably slower than all the other strains, but she is stacking for sure.
Smells of a very pleasant sweet lemon.

Likes
6
Share
@Bread_n_Buds
Follow
When talking about strains of recent times but already legendary and ready to enter the history of Cannabis, Permanent Marker is a name that cannot be missed. It is very famous and many have produced it, we will show you that it is worth growing the one produced by Zamnesia.
In reality, the beautiful seed pack alone would be worth the purchase but we do not stop at appearances and we will show you that that artistic marvel corresponds to a marvel of nature.
Remember that we are growing a plant worked with the techniques indicated and another left to grow without pruning to preserve its speed; in the previous/next diary you will find the other plant of the same variety.
In this diary we find worked with the Main lining. Being a plant with medium-low internodal distance it was not very easy to work with but especially in the second phase of the main lining (when these plants become a little bigger and you can work better) I am having a lot of fun. The plant is looking very good, I have done a lot of topping and I am sure that now that it is going into flowering we will see some beautiful things.
Slow down the use of nitrogen during this technique, you may not need everything that is recommended by the manufacturers. So, if the leaves become too dark or, worse, the tips of the leaves arch downwards and the leaf becomes "crunchy", it is time to lighten or stop the basic fertilizer.
Comparison is the salt of experience, so the plant in the other diary will be treated very differently, go and see it to compare.
We have started the Plagron fertilization program, we are in 100% organic configuration, the soil is recycled Promix + 1/3 fresh soil + 10% Perlite + RQS Mycorrhizae Mix (4 g in the mix, 1 g under the small fiber pot).
We fertilize with: 1 ml/l Power Roots - 1 ml/l Pure Zym - 1 ml/l Sugar Royal - 3 ml/l Alga Grow
We sprayed 3 ml/l Vita Race foliar fertilizer once a week.
https://plagron.com/it
We always have the excellent mycorrhizae from RQS flowing in the soil.
https://www.zamnesia.io/it/5778-mix-micorrize-easy-roots.html
Try this variety, it is a top strain of recent years very high level of thc ---- // https://www.zamnesia.io/it/12508-zamnesia-seeds-permanent-marker.html
Brief description of Zamnesia // Here is a good opportunity to enrich your genetic library with another award-winning variety: Permanent Marker was crowned Strain of the Year 2023 by Leafly, thanks to its intense aromas, high levels of THC and its physical vivacity. Originally created by JBeezy and Seed Junky Genetics, our team managed to secure a cutting of this modern top cultivar, so you can grow it comfortably at home, whether indoors, outdoors or in a greenhouse. Permanent Marker fits perfectly in any environment!
The whole world of growing and more is at Zamnesia: just take a look at the site and you will find "all the best that nature has to offer" in various shapes and colors.
-- // www.zamnesia.com

Likes
11
Share
@MrMoMoGroW
Follow
Everything Is okay 😁 the girls stay very Happy and micorrize change the games 😁 . I adding Black humus and Bat guano too improbe and protect the microbial live in the medium.
Stay tuned for updates✌️✌️✌️
Little update... My cat ruined a branche 🤬 and I cut... The bud weight 26 grams wet... Not bad for 5 week 😁
Likes
35
Share
@SmokingTiki
Follow
This week I defoliated the Honey Melon Haze and the O.G. Kush. It's the first time I try this.
The broken stem of the O.G. Kush seems to grow pretty well so far. Nice!
Humidity goes from 50-55% during the day to 80% after the night without dehumidifier (too noisy during the night). I poor 2l of tap water during each watering for the 26l pots and 1l for the 10l pot.
The two Mandarin Punch Auto grew a lot this week, the stretch has surely started! They are now even taller then the Honey Melon Haze and the O.G. Kush.
Plants heights at the end of the week:
Honey Melon Haze : 50cm
O.G. Kush : 44cm
Mandarin Punch #1 : 54cm
Mandarin Punch #2 : 52cm
Tomorrow, I will switch to 12h of light to start the stretch of the two photoperiod plants.


Likes
2
Share
@ProlificGrowth410
Follow
Day 100 from seed by far the healthiest most stacked plant in the tent, very dense nugs, strong citrus and berry smells kinda like blueberry lemonade, I'm very impressed to say the least.
Likes
12
Share
@Doggy
Follow
Apply a leaf irrigation with vita race, wait a couple of days and start on 12/12😋
Happy growth! 😁😁
Likes
41
Share
@TheBulldozerSicily
Follow
Crescono a vista d'occhio, aspetto lo sviluppo del 4/5 internodo per toppare e dopo mandare i fioritura
Venerdì 7 giugno 2024
Primo cambio acqua, Svuoto completamente la vasca
Ripartendo da 60 lt di acqua osmosi inversa ph 8 ec 147
Aggiungo i nutrienti ottenendo ec 772 ph 6.4
Giovedì 13 giugno 2024
Aggiungo 25 lt di demineralizzata e tutti i nutrienti come in descrizione


Likes
17
Share
@CanadianFillmore
Follow
Week 5 begins for Mandarin dreams and Divine storm. All four ladies look happy and healthy with minor deficiency signs. All four are bulking up and frosty as my windows (it's -21 °c)!
The Mars-Hydro TSW2000 is performing awesome, very happy with it. Thank you Kaoritracy for hooking me up!
Thanks for stopping by growfessors 👽🌳💚


Processing
Likes
14
Share
@AthanasGrow
Follow
So we are in the middle of week 10 and I feel pretty comfortable feeding them now, pretty much the same until next week when I give more Top Max. I've seen much more explosive growth on other diaries but I have to say I'm pretty proud so far for my first attempt. Staring at those fresh furry little balls of life is surreal, getting to this point is great, but it's far from over.
So I kept the same feeding this week, still adding the Great White with mycorrhizae (and like 40+ other microbes) once a week as it says per directions. The BioBizz products are easy to use and hold up well, so I'm feeling better about going with them even though I had some issues at the beginning (all my fault most likely). I can dial in the feeding mixture PPM now first try to where I want it, so far 700ppm of a gallon every 2 days has been working out. I feel like at the start I was over watering because people say water everyday in coco, well that seems to be for the coco bricks. I am using FoxFarm Bush Doctor Coco Loco (long ass title just for some coco coir) with additional perlite and it has a lot more holding capacity than just normal bricked coco coir. For checking on when it needs water I still use the method of digging into the topsoil an inch and weighing the pots by hand. Also I've noticed if they are pretty tired looking after lights on then I'll water. Like everyone said, consistent fertigation has been the hardest part as a beginner.
First week I'm posting a video, the fan can't oscillate so I turn it to the right, left, and keep it center as well as raise and lower it so there is decent airflow. I wouldn't say it's optimal but it works for now.
I've raised the lights about 3 inches just so the top colas don't get burnt, I've also found the sweet spot on the potentiometer (power knob) where I can get maximum power without raising the temperature above 77f, which it quickly goes above 80f if I exceed it.
I've done minor defoliation before each feeding (so like every 2 or 3 days), mostly just clearing the leaves from above while keeping the important sugar leaves and some fan leaves, even though most the large fan leaves have long died/turned. If you watch the first video I've posted you'll notice an injury on her, unfortunately I didn'
I feel like I've failed on the C99 X Blueberry Auto, in fact I took it out of the title. I definitely kept it in nutrient lock even after repeated flushings, it seems to have grown a little and even looks like it's accepted its new life as a stunted sideshow geek never thinking of being the in the spotlight under my grow tent. On the plus side, the two normal Desert Lemon photo's look great, even if one is starting to look leggy. They haven't shown their sexes but it looks like they soon will, because frankly I don't have enough room and would like the leggy one to be gone. The two other shortest plants looks nice and green, shortest being the Black Sugar photo that I did some minor LST with tent stakes - and the very beautiful Gelat.OG photo that is so symmetrical it makes me want to put her in the spotlight (aka position 1 which I give most room/light priority too).
Okay so that's it for this week folks, thanks for checking in and please comment or critique on my first grow! Any questions also welcome.
-AthanasGrow

Likes
31
Share


Likes
34
Share
@ertaverd
Follow
Este post es el de cosecha, pero voy a hacer el Harvest cuando tenga procesadas las fotos de cogollos secos y haya hecho una buena cata.
Estas dos mangos fueron preciosas de cultivar. Cogieron un tono azulado y algunos petalos se volvieron de un color rosa muy fuerte. No fue dificil de cultivar aunque la empezara en octubre, tuvo la visita de algunas orugas pero no causaron casi ningun daño.
-Empecé el cultivo en octubre, lo que hizo que mis plantas no llegaran a la altura deseada, no tubieron todo el sol que necesitavan y se espigaron. Les hice un corte FIM a una planta y apical a la otra, lo cual hizo que las puntas desarrollaran una forma curiosa.
This post is the harvest one, but I'm going to do the Harvest week when I have processed all the photos of dried buds and made a good tasting.
-These mangos are amazingly gorgeous. They took a bluish tone and some petals turned a very strong pink color. It was not difficult to grow considering that I planted it a little late, I only had the visit of some caterpillars. There are some pics of one of them.
-I started cultivation in October, which caused my plants not to reach the desired height, they did not have all the sun they needed and they sprouted. I made a FIM cut to one plant and apical to the other, which caused the tips to develop a curious shape.
Thanks to you all for the support!


Likes
11
Share
@Inceptionist
Follow
I mean actually using this tent for other grow, so might as well rate it.
It's quite durable and like the shape and color of it but I like this tent less with every grow.
Doesn't has the best placement of air vents and therefore steals quite a bit of space which is supposed to be for your plants because it develops too much negative pressure.
The three squared "windows" at the bottem aren't really usable because too much light will come through. It's just gonna make your tent a hermie tent.
Likes
12
Share
@Patregsj
Follow
So far so good, Smell is getting very intense at the moment. Started flushing today.
Really can't wait to hang these upside down 🙏😇 For now they are barely "hanging" in there, they are getting heavy AF haha. leaning on the sides...
Hang in there ladies!
Likes
19
Share
@MaxGrowCanada
Follow
First time grower, criticism will be well recieved😀
Two plant ebb and flow setup in a 3x3 as a test run
Top feeding until I can afford the rest of my setup🙄
Started seed in water balanced to 6.0
Sat. Feb. 29th
Tap roots within 12 hours, directly into pre soaked rockwool cubes.
Broke the surface march 3rd.
Began 1/4 strength micro, grow, bloom and stress relief
Using very hard water for the next couple days, roughly 450 PM out of the tap.
Ro system to be installed march 6th
Ro system now installed.
Start of week 1 will be Saturday the 7th of March.
Day 2:
Turned the light down to roughly 50%, instead of raising it, due to the fear of light burn. Will look into it soon.
Plants seem to have recovered after I decreased the light intensity.
Fan and filter purchased.
Alternating flush and feed cycles 12 hours apart to keep salt sats down.
Day 3:
Bumped light intensity back up to roughly 75% of the ts1000's capability or 700 "light units" from a cheapy 3way meter.
Adding as much co2 as I can through baking soda and dilute phosphoric acid.
Day 4:
Exhaust fan with climate control installed March 10th
Day 5:
Girls exploded now that I have my salt build up figured out .
Day 6:
Light back up to 100%
Day 7:little droopy on the one plant, gonna let them dry out a day
Setup should be complete for start of week 2.(actually sick right now and having trouble getting supplies)
Still need a flood table setup.

Processing
Likes
42
Share
@MadeInGermany
Follow
Hey everyone 🤗.
A lot has happened this week ☺️.
Not surprised that the plants look so extremely dark, is that because I sprayed them with neem oil as a preventive measure , because I discovered a very young trip on a plant.
This annoys me extremely, because the attachment room is very clean and neither shoes nor dirty clothes come in when you enter the room 😩.
But since I had the problem in most cases years ago, I am very confident that I will get the problem under control very quickly 😃.
Otherwise, everything is developing very well as usual 👌.
I wish you a lot of fun with the new update, stay healthy 🙏🏻 and let it grow 😃.
You can buy this Strain at :
https://sweetseeds.es/de/cream-caramel/
Type:
Cream Caramel
☝️🏼
Genetics:
Blue Black
x
Maple Leaf Indica
x
White Rhino
👍
Vega lamp:
2 x Todogrow Led
Quantum Board 100 W
💡
Bloom Lamp :
2 x Todogrow Led
Cxb 3590 COB 3500 K 205W
💡💡☝️🏼
Soil :
Canna Coco Professional +
☝️🏼
Fertilizer:
Green House Powder Feeding
☝️🏼🌱
Water:
Osmosis water mixed with normal water (24 hours stale that the chlorine evaporates) to 0.2 EC. Add Cal / Mag to 0.4 Ec Ph with Organic Ph - to 5.5 - 5.8 .