


Likes
18
Share


@Wahalan
Follow
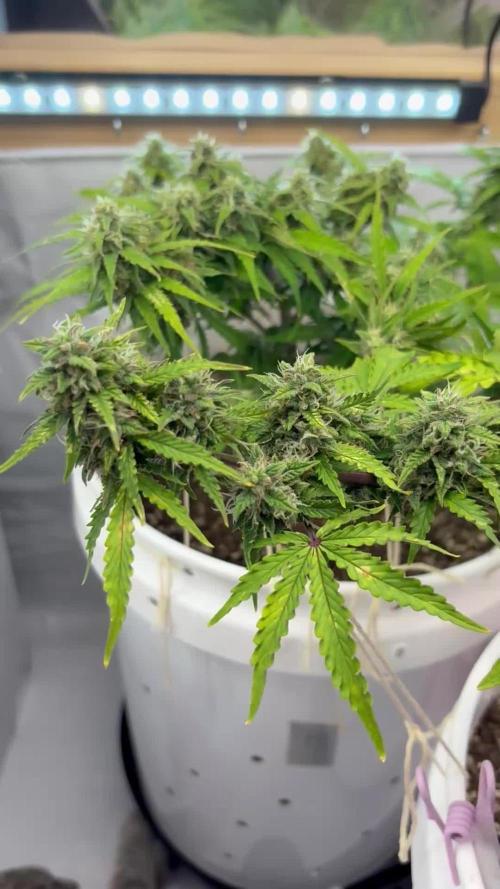
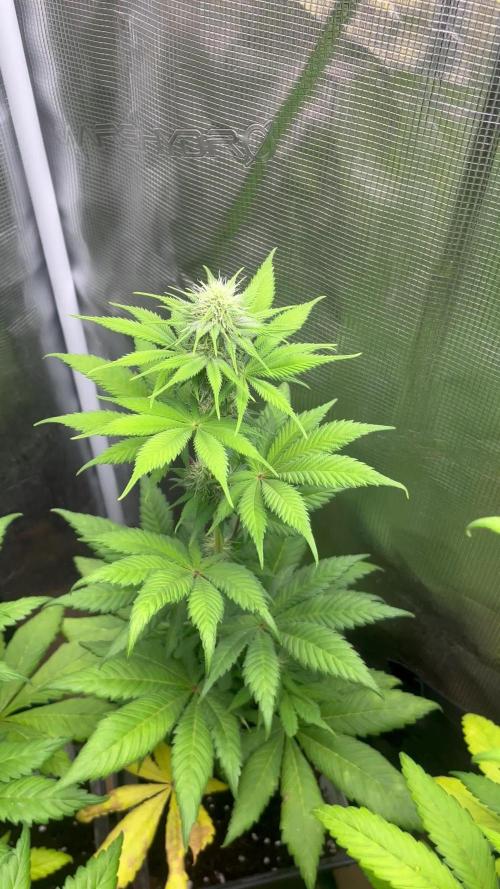
Valeurs sûre la gorilla blue
Couper a Flo +68
Je repasserai après séchage et curing


Likes
1
Share

@BossberryFarms
Follow
Welcome to Week 9!
December 14 - Took some pictures of Plant C since she is nearing harvest time! Definitely not ready yet, but will be flushing and keeping a close eye on her! Plant A & B are a little behind, and will post some pictures later this week! Hoping to harvest all by the end of December 😁
December 15 - Added photos from Plant A&B
December 17 - Keeping a close eye on them, not quite ready for harvest yet! Today is day 67 for these girls 🤣 Listed harvest time online is 70days so I’m guessing they will be ready next week!!!

Likes
7
Share

@Samsationalseeds
Follow
Week 3 most of the photos are in the plastic containers to grow in before being transferred outside

Likes
175
Share


@love_2_grow
Follow
Day 43 Flower (Day 85)
Today is the first day of week seven of flower, and this is supposed to be the last week of flower for this fast strain, but I doubt that either of the girls will be done this week.
That being said, it's pretty much a waiting game at this point since we're on the home stretch. The right girl should be done soon-ish, but the left girl will probably take a few more weeks.
I just got my second Corona vaccine shot a couple of days ago, and as soon as it is entirely up and running, I'm off on vacation. After 1.5 years of this pandemic crap, I'm SO ready to go traveling again.
To prepare for my travels, I installed a drip irrigation system in the left girl's tent. It's a simple system with a 10-liter water bag, some hose, and a few drip emitters, but once dialed in, it should be enough to provide the left girl with water for around a week.
The system was a piece of cake to install, and I wrapped the water bag with some white mylar to avoid the water getting heated and also to reflect the light better. It's a bit ghetto still, but I'll make it prettier once I see that the system works as intended. I installed the system now already to give me time to dial it in.
I'm hoping that the right girl will be done before I travel, but if she isn't, then I'll hook her up to the automated drip irrigation system that I use for our tomatoes.
Come hell or high water. I'm going on that vacation, dammit!
Lastly, I gave the right girl 3 liters of pH 6.5 water.
Day 44 Flower (Day 86)
I think those extra photons from the new light are starting to work their magic in the left tent, and the left girl is slowly starting to fatten up.
In the right tent, everything is just cruising along and I gave the right girl 3 liters of pH 6.6 water today.
Day 45 Flower (Day 87)
The drip irrigation system in the left tent is working out great so far. Only been a couple of days though but yeah, so far so good.
The right girl is packing on some weight into her buds and some of the thinner branches are starting to fall over. I've ordered some plant yoyos for support but they won't arrive until next week so I'll make do until then.
Lastly, I gave the right girl 3 liters of pH 6.3 water.
Day 46 Flower (Day 88)
Not much is happening on a day-by-day basis this late in flower.
I hope those plant yoyos get here asap as the right girl is struggling to keep some of her branches up under the weight of the buds. I want to go in and tuck some fan leaves in her canopy to allow better light penetration. Still, I can only tuck a couple without starting to knock over branches as other branches precariously support them.
(Note to self: use a second scrog next photo grow to give support after the stretch.)
I gave the right girl 3 liters of pH 6.5 water, and that was all for today.
Day 47 Flower (Day 89)
Woooo! The yoyos arrived today even though they weren't due until next week. It was a breeze to put up; attach the yoyo at the roof of the tent with a zip tie, pull down the hook and attach it to the branch, done.
I ended up using only three since the other branches are standing quite well once those three worst offenders are supported. A fourth branch could also use support, but the branch is way in the back, and I can't get to it without getting my arms and hands all covered in resin as just about everything in the tent is super sticky now.
The buds on the right girl are very resinous and have a strong smell. I should bring out the microscope soon and start to check the trichomes to see where she's at.
I also gave the right girl 3 liters of pH 6.6 water.
The left girl is just hanging out in her tent, doing her thing, and slowly fattening up.
The drip system is working great so far. After four days, the water bag is about half empty, so it looks promising that it will last a week. I've been monitoring the soil humidity, and it has slowly been dropping these four days, but the drop is so slow that it is next to negligible.
Day 48 Flower (Day 90)
Today, the left girl's soil humidity did a small drop, but it is still in a great range. I guess it is because as the water in the bag gets less, the water pressure is reduced, resulting in the water flowing more slowly out of the drip emitters. Not a huge deal, though, as it is now five days since the last time I hand-watered the left girl, so this irrigation system will work just fine when I go on vacation for a few days.
I filled up another 3 liters of pH 6.1 water in the bag, and I'll keep an eye on it to see if the soil humidity increases.
Speaking of watering, I treated myself today to a new, better pH pen. As a living soil grower, I don't use any nutes, so I thought I might as well make sure I have a quality pH pen to make sure the water is on point.
My old Dr. Meter pen has served me just fine, but this bluelab pen is a lot faster, and it has a backlit display which makes it easier to use in low light situations. A friend of mine recently started growing, so I'll gift my old pen to him as well as my old tiny, drying tent, and the ViparSpectra P600 light as I don't need that now when I have a much more powerful light for the small tent.
The right girl got 3 liters of pH 6.1 water as I haven't hooked up the automated drip irrigation system to her yet but will do that in the next few days as I suspect that she won't be finished either before vacation.
Lastly, I started to brew some compost tea to give the girls one final boost of microbes and nutrients. I used a similar recipe as previously: worm castings, rock dust, biochar, lime, bentonite, neem meal, kelp meal, and molasses. I upped the castings and neem, though and I'll leave this tea brewing for 24 hours and feed it to the girls tomorrow.
Day 49 Flower (Day 91)
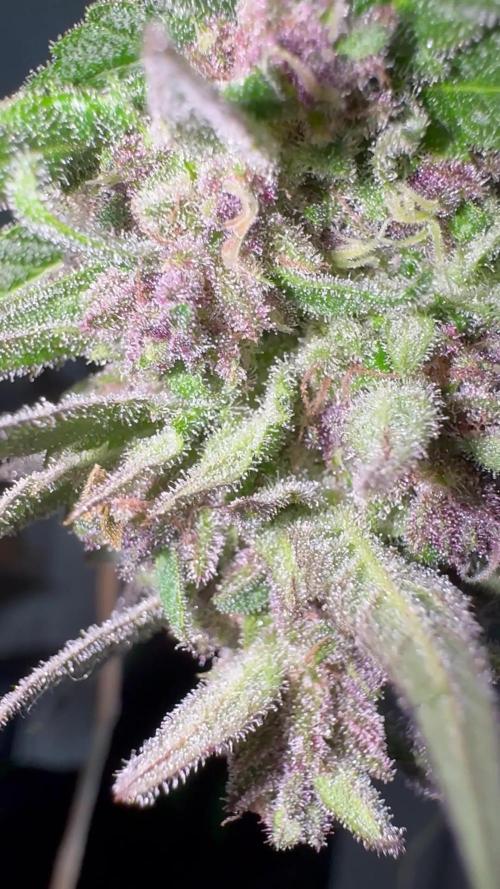
The last day of the seventh week of flower, and all is well in the tents. According to the breeder, this week is supposed to be the final week of flower, but none of my girls are near ready. I took out the microscope today and checked the trichomes on the right girl, and I would guess she has at least another week, if not two, to go as her trichomes are still clear. I might even end up running her longer as I'm looking for a decent amount of amber this harvest. This strain is supposed to be a heavy, almost narcotic Indica, and I'm aiming to make her as potent as possible. A "last-smoke-of-the-night" kind of smoke.
Lately, there has been a noticeable cannabis smell in my lung room, and last night I tracked down the cause. It turned out that there was a leak between the carbon filter and the fan, so the fan blew out partly unfiltered air. Nothing that some duct tape couldn't fix, and this morning the smell was gone.
The right girl is sticky af and has a strong smell. Initially, there's a strong citrus fragrance with hints of lime and grapefruit, but once those terps have started to evaporate, there's an underlying fragrance of pine.
The left girl has even longer to go, and it wouldn't surprise me if she takes another month.
We made some guacamole last night, but a couple of the avocados had gone bad, so I put them on my pots. My loss is my worms' gain.
All I did today was to feed the compost tea I started yesterday to the girls. Each one got 3 liters of unfiltered tea at pH 6.7.

Processing
Likes
24
Share


@MadeInGermany
Follow
Hey everyone 😃.
This week they have become more and more beautiful 🤗.
The smell that wafts through the room is very sweet and delicious 😍.
They absorb their food very well 👍😎.
This week you will get the full power of flower fertilizer again.
I now had to start supporting them so that the shoots would not bend 😃.
Have a nice week, stay healthy 🙏🏻, and let it grow
You can buy this Strain at :
www.Zamnesia.com
Type:
Runtz
☝️🏼
Genetics:
Zkittlez x Gelato
👍
Vega lamp: 2 x Todogrow Led
Quantum Board 100 W
💡
Bloom Lamp : 2 x Todogrow Led
Cxb 3590 COB 3500 K 205 W
💡💡☝️🏼
Soil : Canna Bio
☝️🏼
Nutrients : Canna Bio
☝️🏼🌱
Water: Osmosis water mixed with normal water (24 hours stale that the chlorine evaporates) to 0.2 EC. Add Cal / Mag to 0.4 Ec Ph with Organic Ph - to 6.0 - 6.3

Likes
1
Share


@Highgrade_Harvests
Follow
Watching this plant grow has been really fun and taught me a lot about taking care of a plant and what to watch out for. Can't wait to see what i can do on my next grow already!


Likes
39
Share


@Cannabeast40
Follow
Finally harvest time arrived 🤗
It’s been a great run, though I had to improve a lot along the way. But as usual there was a way to get things done and finished up😎
After a long heatwave I decided to chop the whole tent, just a bit before I actually wanted to. But I see amber trichomes and heavy buds, so I think it’s safe to chop now, so here we go. 🤩
Can’t wait to taste this after so long watching over it🤤
More details to come.

Likes
3
Share


@RezaM
Follow
Everything was going well in the first week, but unfortunately, a mistake caused stress in the plant. The distance between the lamp and the plant was too short. This week, I gave the plants a small amount of root growth stimulant
Likes
13
Share


@GrowGuy97
Follow
Overall happy with this solo cup grow, wish I could have got a little more but I ended with 6.3 grams dry weight, bud looks amazing. Post more of a update after I smoke it in a few days! Thanks for following & happy growing friends!

Likes
2
Share

@SidekickGrowie
Follow
Tag 73 :
- spülen mit 5 LiterRegenwasser
Tag 76 :
- spülen mit 5 Liter Regenwasser
Tag 77 :
- Bud abgebrochen beim schütteln
- Trichome gecheckt
Processing
Likes
6
Share


@ZhugeTsuki
Follow
5/28 Leaves are looking a lot better now that they have some room to spread themselves apart, no signs of furthering nutrient problems or overwatering issues.
5/29 Noticed what I'm pretty sure is a potassium deficiency. Freaked me out at first but the browning tips looks exactly like the picture I see online. It's not very widespread so I cut the effected leaves off, I'm hopeful it's residual effects of the insanely high ec. Regardless of the issues the plant is still growing really well and I was able to tie down a main branch around the entire pit almost except one area, but that ended up making it easier to water.
5/30 Potassium deficiency has spread a little but not much. Even though I watered till runoff yesterday (as I always try to do) the plant was dry and light today, so I watered her with nutrient solution at about 1.3 EC and runoff was about 2.2, little too high
6/1 Calcium toxicity. Shows as brown reddish spots and can present as potassium, manganese, iron etc deficiencies which is exactly what I've been seeing. There was quite a few leaves showing the blackish rust color so I cut them all and watered with nute solution at ~.72 EC. Will see if the problem continues to develop, however judging by the color of the growing shoots she is still growing quickly.
6/2 I found a couple of leaves that had evidence of damage but they were so hard to find I could very well have missed them the other days. I cut all effected leaves I could find off again, and will check tomorrow. Rearranged the plants a little to avoid this one from getting blasted by space heater. Untangled all growing shoots.
6/3 Found I think two or three effected leaves, mostly already effected leaves that I had just cut the currently effected blades off of the other days, and one leaf that looked too far damaged to be new damage but I will remain vigilant. Watered clean water, runoff ~1.75EC, almost where I want it.
Likes
17
Share


@Chevywood
Follow
So decided to chop them down this week.. I checked the trichomes and majority was cloudy with a hint of amber, and also gotten a few opinion from growers and they said it looks just about done .. once this drys I’ll be back with the weight
Likes
38
Share


@Cariboo_OG
Follow
Utopia Haze is a rare heavily sativa dominant hybrid (90% sativa/10% indica) strain created through back crossing Brazilian Sativa strains. This tasty little bud took home 1st Place for Best Sativa in the 2008 High Times’ Cannabis Cup and for good reason – with its potent 18-22% average THC level and long lasting cerebral effects, Utopia Haze is one powerhouse smoke. The Utopia Haze high comes on soon after you finish your first toke, hitting you with a strong cerebral lift that infuses you with a sense of hazy relaxation.
Type: Feminised/Photoperiod
Cultivation: Indoor/Outdoor
Flowering Time (days): 70-75
Indoor Yield (g): Up to 650
Feminised Outdoor Harvest Month: October
Feminised Outdoor Harvest Month Week: 3rd-4th week
Aroma: Citrus, Woody, Pungent, Mint
Effect: Cerebral Lift, Hazy Relaxation, Sleepy
Welcome Everyone to the Final Entry of my Utopia Haze Grow !
There is so much to discuss ! I have been extremely busy as of late trying to get this Harvest together, but i am happy to have it here for you now !
I Seriously under estimated the amount of time, help from others, and my own necessary skills to pull this off.. and i still kind of screwed it up lol !
But its worth noting i have never actually done this before and trying to document it during....was extremely hard.
It is next to impossible to work an iPhone with rubber gloves on !
First I want to discuss everything step by step so before you jump straight into the comments on how the end product is so small in "quantity"
Rest assured i am happy with its"quality"...and thats all that matters to me because Life is a journey not a destination! and i have learned so much from this grow that I couldn't be any happy even if i messed some things up :)
But at the very least I hope you read through this entry in its entirety with an open mind and focus more on the process, rather than just the outcome!
I ran out of Ice & i was only able to wash three times..(normally I've heard you should go sometimes 5-6 washes)
Preparation is Key & things will be much better next round :)
Photos 1-22
These are pretty self explanatory but for those of you just tuning in now.. this is what happens to a very happy plant when you don't have the necessary tools to monitor key components of growing cannabis.. Ph, as well as EC levels play a very key role in the outcome of your grow lol that being said I was just able to save this plant by purchasing both tools but that doesn't mean the plant didn't suffer because of the prior events.. This was a Huge reason behind me choosing to turn this harvest into what i would consider
"Solventless Hash Rosin" from "Ice water extracted Bubble hash".
Pictures 23
The idea here is the process of using "fresh Frozen Cannabis" this has been discussed many a time online on such sites as instagram and here on grow diaries as well.. I personally have Never tried the process so i decided to try it out and make a judgement for myself..
Video 24
The Cannabis has now been in the freezer for 72 hours making it very well frozen.. as you can tell i struggled getting it all into the 25u Screen Wash Bag. One thing of note i would do differently is i will de-stem my next batch as i also believe this played a part in the amount of plant matter that escaped through the sieves.
Photo/Video's 25-28
The idea here is "ice water Seiving" & especially with the bags that I am using here that are only have screen material on the bottom portion of the bag it is very important to have spaces in-between the screens to allow the water to pass directly through the screens into the bottom bucket with the least amount of resistance.. because the hash is so extremely temperature dependant if it gets warm on the side of the bag.. it will stick there and not make it to the bottom to become use able product..
29
You do not need to use as much Ice as i used here lol... the idea is to keep everything very cold..i certainly achieved that but at the sacrifice of using so much that i ended up grinding product and producing "contaminants" but in the end they are just plant matter that i would be smoking when i rolled up my joint either way so.. I'm not super disappointed..
But it should be noted that what you want to achieve here is a Layering effect where you have the wash bag between two small layers of ice while the "water current" washes the Trichomes away allowing them to be separated by the screens setup below :)
Before Starting the machine you should allow some time (i.e.;10-12minutes pre soak to allow the product to become saturated) before the first cycle.
By video 32 I have just ran out of ice lol..
Video 33-34
Here I have a tip for you.. to separate the screens that you sieve through.. cut 5 gallon buckets to stretch them across nice and tight.. it'll make scooping your Bubble that much easier ! i learned this from the many "Frenchy" videos I have watched :)
Picture 35
Here in lays the problem for most people.. drying your hash without loosing vast amounts of "Terpenes" whilst also stay ever vigilant against mold !
Thanks to all those videos I've watched on youtube.. id like to think this was one of my most successful parts of this process..
Things to Note; Terpenes start to seriously evaporate at temperatures 68F or 20C
you need to stay as cold as possible whilst bringing the Relative Humidity in the space down into the 40-30% to stay away from that nasty mold !
I used my cold storage room in the basement.. with a dehumidifier running to keep the space at 45% RH & staying at a constant 15c.
All while spreading the hash as thin as possible across parchment paper, on top of the white screens with a fan moving air across both sides of the paper.
Pictures 36-38
These are some macros i took in the middle of my drying session I fell in love with the colour.
Yes i know the black spots are plant material but they will get caught when i bag the hash & squish the oil out.
Thing to Note; at this stage it is important to ensure you 'micro plane" the hash down as fine as you can whilst staying weary of the temperature... any "chunks" will hold pockets of moisture.. that lead to potential problems..ie; mold ...
Picture/Video 39-41
Successfully planed bubble hash ready to be bagged and Squished !
Picture 42
Ive decided to follow Pedro.. from Pedros Grow Room and double bag to be on the safe side so i don't have any blow outs.
So thats One 25u bag inside one 160u bag ! :)
Pictures 43
This is almost 3 grams of the bubble hash from above, already melting in the bag.. this is where i ran into trouble again lol things started getting to warm in the house and i was only able to get one of the three squish's i did on video :( things started getting sticky.
Picture 44
This is basically just a photo of the equipment I'm using; 3x5 LowTemp Cage in the frame I built myself, with a 20Ton bottle jack.
Something to note here is this is an older Lowtemp model with only a single heating zone which is which i have it closed here heating Both sides of the press :)
As well as the importance of having adequate pressure on your plates.. my rig is very overkill for the size of hash bags..lol
Video 45
Here is the lovely press video.. its didn't quite work the way i wanted either lol my directional folding wasn't quite tight enough for a big "drip" :)
&the Press was set to 65°c
Photo's 46-50 are pretty self explanatory :) I had a blow out.. but still managed to pull an 80% return from the hash once squished...& yes it tasted amazing :)
Was it worth it in the end... that could be debated.. for some..i understand..its not your thing, but for those of us that are interested in making our own concentrates.. free from Solvents...
I wouldn't make it any other way :)
If even ONE of you reading this diary finds it helpful to reference for ANYTHING.....even if its "what not to do" ill consider it a success !
Thanks again for tagging along on this garden adventure.. its been one heck of a journey !
Much Love from B.C. Canada,
Until Next time,
Cariboo

Likes
25
Share


@pifflestikkz
Follow
Day 79
17/09/24 Tuesday
Feed today using de-chlorinated tap water pH 6.
Seeing good developments, buds forming nicely, divines are smaller denser structures but the buds are not lacking!
Damn I'm surprised by 2L pots.
Day 81
19/09/24 Thursday
De-chlorinated tap water pH 6 only today.
Day 83
21/09/24 Saturday
Another feed to push this week they seem to be handling it 💚. Fattening up on the buds now and pistils starting to mature

Likes
6
Share

@D33jW
Follow
BOX: 80x80 - lamp 250W
🌞 Temp: 27°C
💦 RH: 60%
💥 PPFD: 800+ µmol
🌬️ VPD: 1.3 1.4
⚡ EC: 1.1 - 1.3
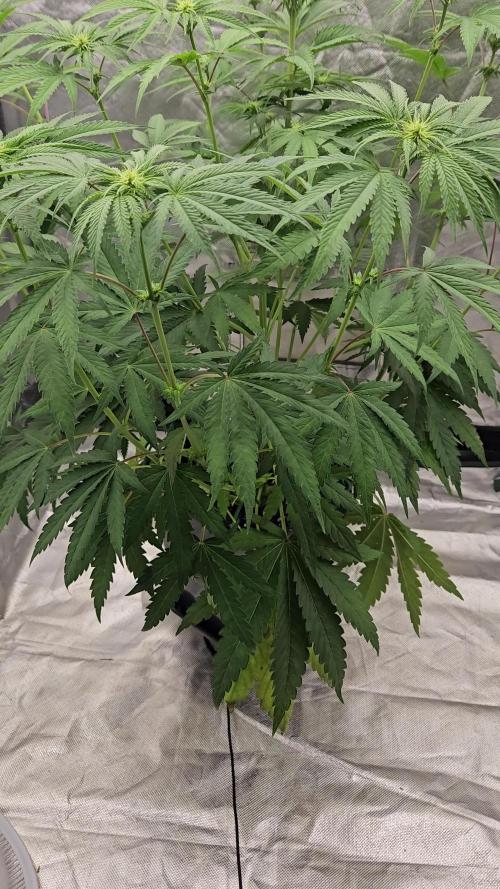
It’s been a good week:
-Plants moved into the bigger 80x80 box.
-Keeping stable climate conditions, which clearly shows in their growth.
-Watering split into two portions per 24h – they drink more evenly without stress.
-Adjusted LST to keep the canopy flat and ready for the upcoming stretch.
Plants are healthy and moving forward nicely 🚀
Likes
12
Share


@GarciasGarden
Follow
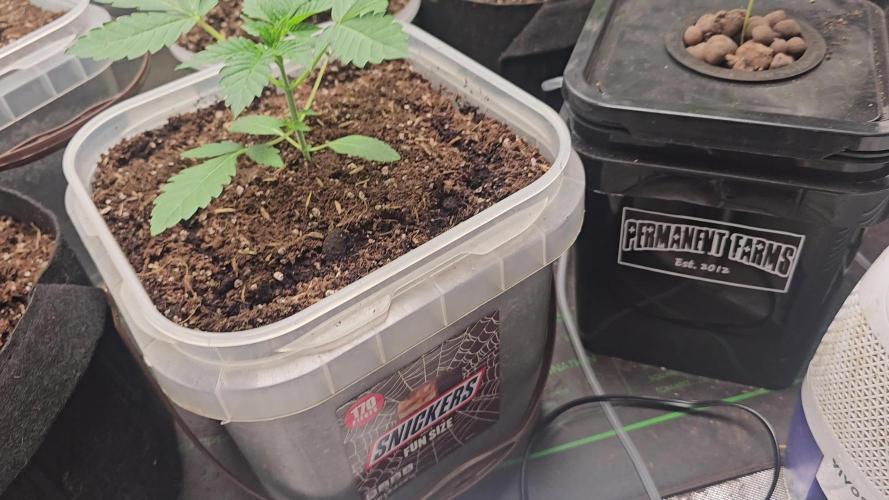
WEEK 2 DAY 14
Since last week the babies have taken off! They didn’t have much light until yesterday when I added another 100w led and since then I’ve seen a huge difference ! They are looking super healthy the roots said fuck the pot and grew right through it I’m actually super interested in seeing how these grow up..
The 3 clones that were separate last week are now moved into one single pot to further develop the experiment.
They are on the same feed as the mother with flora grow/micro/bloom and cal-mag .
And In the last picture you can see my ghettos man way of cloning .. going to see which 2 out of 4 are better rooted and I will move those to a pot in about a week or so.
If you guys have any questions or want to know where I got these exotic seeds message me!! Or comment below !

Likes
56
Share


@Wicked_Stix
Follow
We made it to the end of week 4 and I switched the light to 12/12 today. I brought in a sour sorbet from DNA that has been vegging for almost 7 weeks in another room. She never had a water change from day 1 and she has stayed pretty happy. I just topped off her reservoir about once a week and increased nutrients as needed. The twisted helix has showed some steady growth over the past week and is looking much better. Still behind the other plants but am looking forward to seeing how she flowers. Nutrients are pumping 24 hours a day and I added more light for a total of 1000 watts. I will be crushing stems to try to slow down stretch if anyone tries to get out of control.


Likes
2
Share

@eldruida_lamota
Follow
Que pasa familia, vamos con la tercera semana de floración de estas Kiwi x Papaya feminizadas de Mavericks .
Vamos al lío ,se trasplantaron en macetas de 7 litros definitivamente.
El ph se controla en 6.0 , la temperatura la tenemos entre 24/20 grados y la humedad ronda el 50%.
El ciclo de crecimiento puse 12h de luz, el foco está al 80% de potencia.
De momento van creciendo a buen ritmo y tienen un buen color.
Gracias a Agrobeta de nuevo por el kit para esta temporada, unos grandes 🙌.
- os dejo por aquí un CÓDIGO: Eldruida
Descuento para la tienda de MARS HYDRO.
https://www.mars-hydro.com
Hasta aquí todo, Buenos humos 💨💨💨

Processing
Likes
65
Share


@Dedon
Follow
Hi Everyone !
Everything is ok.
Plant are still healthy. specially the tank on the left, they drink 15L during this week and maybe less than 10L for the tank on the right
Guess which one has a nice root system ? 🙏😉
