


Likes
16
Share


@GYOweed
Follow
Pruned it. Needs more frequent water but looks green and healthy.
Smells like coriander not diesel or yucky yet heheh.
Likes
Comments
Share


@Geili_Seili_fireinfireout
Follow
Now its start of week 6 and i start the superlumen. 660w
Likes
1
Share


@PositiveEnergy
Follow
Week 4 looks good gorilla zkittlez it’s beginning to flowering I will amend the soil soon


Likes
4
Share


@Willy_Balls
Follow
All the ladies bounced back from the little stress at the transition. They are all charging.
On 9.11 I’ve increased the light from 600 to 660w. We will see tomorrow how they handle it.


Likes
21
Share


@Fullmeltalchemist
Follow
Alright I've updated this postmortem and cure just to give an idea of what I was up to during the dry and cure weeks. This grow was a ton of work and I'm very please with the results. I learned a ton about soil and environment control and really feel like I'm gaining confidence and coming into my own as a cultivator.
I've been playing a lot with ice water hash and rosin and have set some neat goals for the future like hunting ice water hash cultivars, going perpetual and expanding the amount of canopy I can work with by building a network of remote-operated satellite flower tents in friends' and family's abodes . I'm not sure I'll go through all this effort of documentation here again, but please follow along on my instagram, stay in touch and chill out with me sometime @Fullmeltalchemist.00
All in all, I was running 1000w of quantum board across three tents and pulled just over 1100 grams, which was a big goal of mine.
Thanks for all the advice and love growmies! And thanks growdiaries for the platform. It's been coo.


Likes
9
Share


@Sauce_XL
Follow
3.9.2024: Start of week 8. Day 50 from seed, 46 from sprout. Nothing doing today, plant is healthy and getting fatter by the day. Plucked a few leaves but thats it.
3.10.2024: Day 51. Fed 1/4 strength fox farm trio mixed w/ calmag into over a gal of 6.5ph water. Gave roughly 3 liters of the solution. Runoff ppm is finally under 1000. Might increase nutes to 1/2 strength moving forward. Bud development on the main cola is almost half the main stalk now. I'm no pro when it comes to taking pictures so its hard for me to get clear, detailed shots of the nugs.
3.11.2024: Day 52, 48 from sprout. Moving along nicely.
3.12.2024: Day 53. Fed 1/4 strength, roughly 96oz at 6.4ph. I broke the feed/water/feed schedule and fed twice in a row. Also did some lite defoliation on the bottom fan leaves that weren't getting light.
3.13.2024: Day 54 from seed. Plant is doing its thing.
3.14.2024: Day 55. Fed again at 1/4 strength, 96oz at 6.6ph. Runoff ppm was 880.
3.15.2024: Day 56 from seed, 52 from sprout.
Likes
14
Share


@MUSRIME_supreme
Follow
Всех приветствую.
Были политы водой с Мелассой
Спасибо холодной погоде за карликов... 💪


Likes
28
Share


@PEAKYPLANTERS
Follow
Happy New Year to all. welcome to this new week. everything is going smoothly. we are in the second week of vegetation. My girls are doing well and are in excellent health. I haven't done any techniques yet. stay connected to see their growth with me. For any question or curiosity please contact me as always. Hello everybody

Likes
4
Share


@Mr_nugs_lover_David
Follow
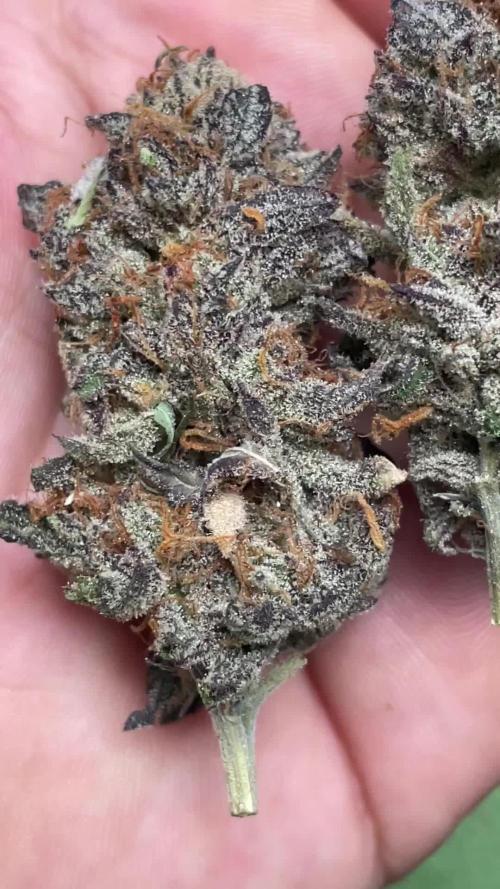
She looks very healthy and happy, she's fatting those flowers, she's very sticky, wonderful resin production and very very sweet aromas, just like her sisters, let's see how she turns out. I love her so far! 😍🤤❄️

Likes
42
Share


@rhodes68
Follow
12/28 Week 7
Wow well looking around there are a lot of plants not sure how we will reconcile space issues with so many of them recovering but glad to have the problem.
More than likely convert the veg tent but still damn
In Flower
Pussy Galore (FF7) is showing their classic stretch to the ceiling, working on it.
Octopussy(LSD) and Plenty (GC) doing very well look great really
In veg - big girl feed 24ml/g grow + occasional Kangaroots
Solitaire (CC) and Chew Mee (FF2) moving towards size to flower couple more inches needed to compete with the big girls.
Bambi (FF6) Right behind them by a few days
Dink(FF2) has now graduated to the big girls - great job #HisHope
In veg - little girl feed 10ml/g grow + kangaroots low dose
Tiffany Case - Gold Leaf
Thumper - FB FFT-8
Holly Goodhead - FB FFT-7
Mary Goodnight - ILGM Gold Leaf
Kissy Suzuki - Fast Buds Wedding Cheese Cake
Seedling - 2ml/L grow
Strawberry Pie will name on transplant should all go well
Typical Bond at the end of the first act everything looks ok but a mess
Issue is in two weeks will have 7 plants in flower another bunch can be ready in 3-4 weeks if I slow things down nuet wise.
Thing is the clones will be coming along in about 6 weeks with planned 8 plants ready for flower with prob a week or two remaining on the first three to flower.
MUHAHAHAHAHA I am happy. But I really hate fungus gnats
12/29
Chew Mee and Solitaire are in the Flowering tent made as nice with the Medicinals as I could, they were getting out of hand.
FF7 is just a stretchy girl, this was expected and did what we could with gentle bend and secure within a cage to keep things manageable.
Octopussy is a perfect lady, growing very well, no cage for her.
Plenty required a little discipline so she got a cage.
Three more plants headed this way within a week or two, FF2 FF6 Gold Leaf
12/30
Three FFT-7 clones have rooted very well.
Transplanted into solo cups to begin the contest for the coveted two F7 slots in the grow.
Other clones still no roots but its way early
12/31
Late night staff meeting on how to proceed.
Clones - ... are on their own in the small tent, will use the small tent and seedling station to bring them along but will veg in the small. Just do the best we can here should be fine.
No more clones will be taken that would only make the space issues worse.
Flowering tent... I can take two more plants but they will have to be flipped small-ish (13") and grow more vertical than wide so no topping on Dink and Bambi which will flower in this tent.
Medicinals... should have been flipped smaller I reckon, hard to get that right but they are large and healthy so keeping them smaller is easier than making them bigger. Not really higher than we wanted just not sure when the stretch will end and the stretch is always out and up. Pussy is the largest so far but Octo is catching up at least in height. Plenty doing great love how she is growing.
Solitaire and Chew Mee outstanding looking plants. Wish I had space for their clones.
Veg tent... Dink and Bambi moving toward departure in a few days
Rest of them flower here, will flip on the smallish side no real choice have to assume they will get larger than planned.
Just have to decide when, will put up the divider for the seedling area so they wont interfere with each other.
Thats it doing well


Likes
57
Share


@MadeInGermany
Follow
Hey everyone 🤗.
This week they both continued to develop very well.
I especially like Pheno 1 visually ☺️ although both phenotypes smell very good 👍.
Flowering day 28
Today the tent was cleaned, the humidifier refilled and both plants sprayed with Canna Cure :-).
Flowering day 29
Both were poured today with 1.2 L per pot 🙂.
Both were also checked for their health and pests 👍.
Everything looks great 🙏🏻.
Flowering day 30
Again the tent was cleaned and fresh osmosis water was filled into canisters.
Flowering day 31
Today 1.5 l per pot was poured so that some drainage comes out again. therefor two days are not poured 😋.
Flowering day 32
The tent was cleaned, the humidifier was filled, both plants were checked for vitality and the entire electronics were checked for functionality.
Flowering day 33
Today both were sprayed again with Canna Cure and checked.
Flowering day 34
We have reached the last day of this week and again 1.2 L were poured per pot and the tent was cleaned 👍.
I hope you have a lot of fun with the new update, and let it grow 🍀🙏🏻
You can buy this Strain at :
https://sweetseeds.es/de/red-mandarine-f1-fast-version/
Type:
Red Mandarine F1 Fast Version
☝️🏼
Genetics:
Red Poison Auto®️ (SWS39)
X
Tangie (California Orange x Hybrid Skunk)
👍
Vega lamp:
2 x Todogrow Led
Quantum Board 100 W
💡
Bloom Lamp :
2 x Todogrow Led
Cxb 3590 COB 3500 K 205W
💡💡☝️🏼
Soil :
Canna Coco Professional +
☝️🏼
Fertilizer:
Green House Powder Feeding
☝️🏼🌱
Water:
Osmosis water mixed with normal water (24 hours stale that the chlorine evaporates) to 0.2 EC. Add Cal / Mag to 0.4 Ec Ph with Organic Ph - to 5.5 - 5.8 .
Likes
28
Share


@ThatoneAKguy
Follow
There I was. Talking on another forum to what I consider to be a true aficionado and master green thumb. Explaining that I had a staggered set in my tent. He told me to ease into the beastie bloomz 0-50-30 with 1/8 tsp per gallon in my reservoir. Keep in mind I’m hydro NOT soil. The first watering I did so with these little ladies that are 46” tall. Somehow I was in a rush and not thinking clearly the second watering which was two days later and added a full tablespoon into 4 gallons and the plants were already being fed before I did the math in my head. Much to my surprise they BLEW UP. When I went back and test the PPM on my reservoir the following day it was at a staggering 3400ppm. I should have had zombies. I cleaned it and reset with 1500 ppm and have slowly been adding water and watching it creep again into higher numbers. 3 different strains and they are all stoked on these numbers. So you know what. I’m literally going to test the uncharted waters and see exactly how much they can take.
Like I always so, don’t do what I do. Do what your plants tell you to do.
Party on wayne!
Likes
9
Share


Likes
16
Share


@Rungood
Follow
Floraison +10 tout va bien ! Rajout d'un deuxième filet pour mieux guider les têtes vers la lumière

Likes
39
Share


@Alpengrower
Follow
PHENO#1: the more purple one, and the one with the strongest sweet grape smell, cutted on 43 day of flower.medium size structure
PHENO#2> grape smell mixed with some diesel, cat piss tones. indica structure and compact buds, more leafly than the other phenotypes.
PHENO3# diesel and woody smell , covered in resin, the white pheno. small structure, weak branches but shiny motherfucker

Processing
Likes
8
Share


@zZzfromspb
Follow
как видите малышкам все очень нравиться!пока подгиб сделал только парочкам девок остальные плотные и мне их страшно гнуть.
Likes
16
Share


@HowtoBubatz
Follow
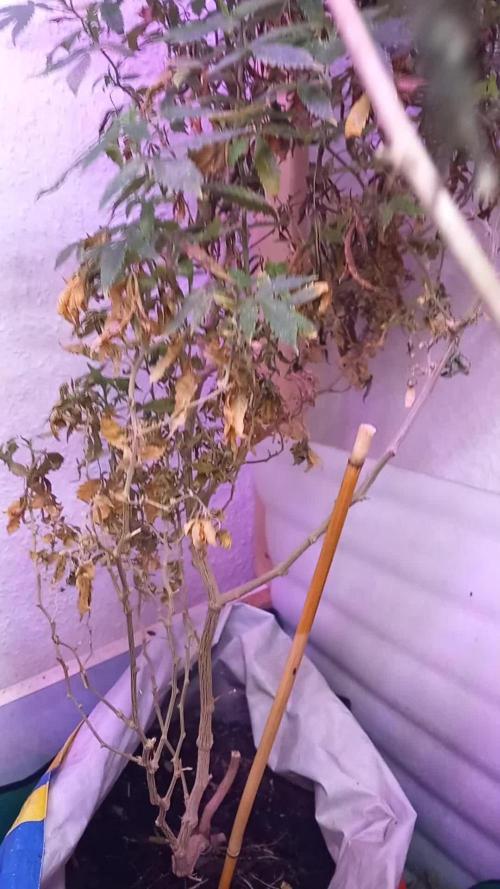
The cannabis plant is generally growing well and is progressing as expected during the flowering stage.
Despite the positive overall growth, brown spots have appeared on some of the leaves and I dont really know what it is.
While the appearance of brown spots is concerning, the overall health of the cannabis plant remains good. With careful monitoring and appropriate adjustments, the plant should continue to develop successfully.
It will be exciting to see how the plant progresses as it matures, even if its growth rate is somewhat slower than expected.
