
Likes
Comments
Share


Likes
3
Share


@Moon_garden
Follow
Skipping ahead a bit. This is almost 3 weeks since I flipped light to 12/12.
Slowly going to stop feeding Nitrogen nutes.
I start with
- FF tiger bloom (2 nitrogen)
- TPS cal-mag (4 nitrogen)
Then after around the 3 to 4 weeks mark, I'll stop all those and only use nutes that have little no nitrogen.
Took all the clips off and defoliated everything up to the top few nodes. Want all the energy to go to the very top.
She is growing great with a pretty decent stretch. Leaves are always praying to the light. My tiny MarsHydro 150watt is at 100%
Likes
54
Share


@Roberts
Follow
So Gorilla Cookies is doing okay. She got topped today. She is looking pretty healthy. I think the HPLVD I had been battling got to all my other plants again. This one should be clean due to its isolation. Plus I have always taken care of this one before anything else. So there should be no issue. I am running the G3000 light at 30 percent. Thank you Spider Farmer, and Pure Instinto Seeds. 🤜🏻🤛🏻🌱
Thank you grow diaries community for the 👇likes👇, follows, comments, and subscriptions on my YouTube channel👇. ❄️🌱🍻
Happy Growing 🌱🌱🌱
https://youtube.com/channel/UCAhN7yRzWLpcaRHhMIQ7X4g
Spider Farmer G300w: https://amzn.to/3S2zvsd
Spider Farmer 10X20 Heat Mat Kit - https://amz.fun/lsa0J
Spider Farmer Amazon Store: https://www.amazon.com/spiderfarmer
Spider Farmer Official Site: https://spider-farmer.com
Discount code: saveurcash (stackable)


Likes
20
Share


@Xabii
Follow
Did defoliation as usual and a little lollipoping.
Did 2 complete refills of the reservoir, ph stayed stable for 1 day after the exchange but then super unstable again.
Dropped the EC with the second refill to 1000 to see if it stays stable.
Ori is going good, already looking frosty, NL#2 is comming aswell, NL#1 not so much.

Likes
37
Share


@Organic_G
Follow
Haben zum Glück aufgehört zu strecken, seit Tag 10 auch die Under Cannopy dazu geschaltet…
Perfekter Strech, bin auf die Blüten gespannt 💪🏽


Likes
4
Share


@IamCy
Follow
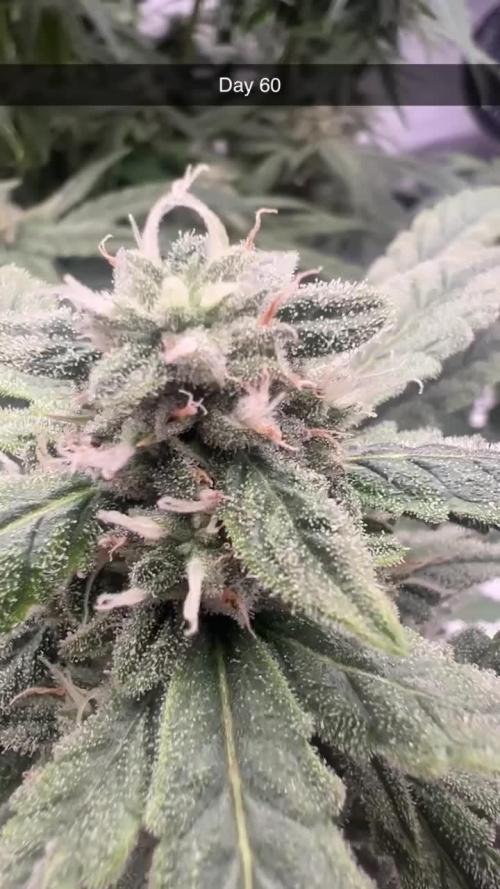
Here we go into flower. If what they say is true, we're in for a nice color show.


Likes
7
Share


@BushDoctor740
Follow
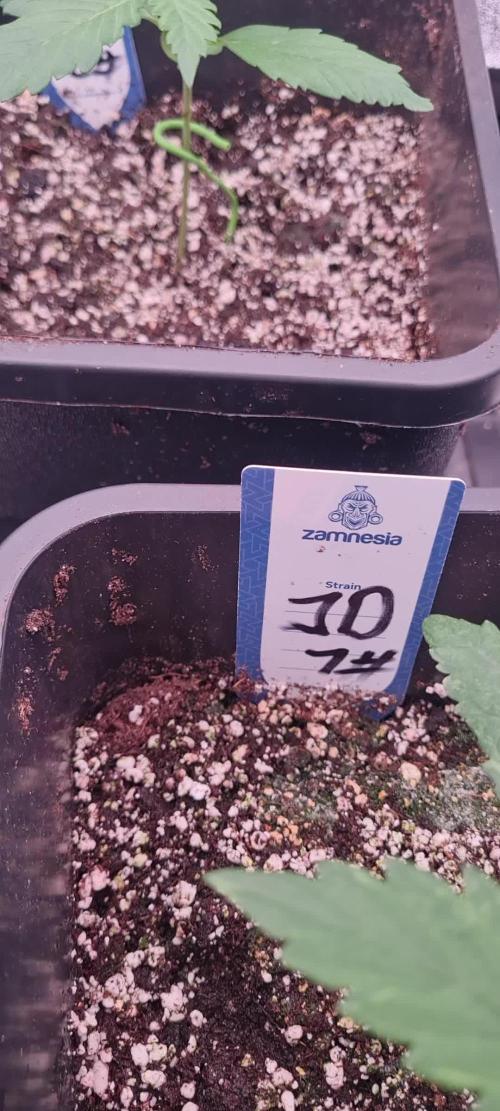
Well I have 6 little seedlings that sprouted looking happy and healthy.Going to give just plain water once the pots dry up a bit more.Ill add Gaia green 4,4,4 top dressing with a shot of recharge in a few days after these seedlings are stronger.Se7000 set at 30 percent power and is raised to the ceiling.I prefer to do this over lowering the lights and intensity and not being able to walk around and work in the ⛺️.Day 4 added a 1 inch layer of farm farm ocean forest and I’ll water plain ph tap water when the pots are dry.Also placed some pins and anchors to tie down branches for when the girls are ready for training :)
Likes
5
Share

@LeosLivingSoil
Follow
Ich hätte vielleicht ein paar der kleinen Knospen wegschneiden sollen, fand es nur super hübsch und dachte ich behalte die, aber jetzt muss ich fast jede Woche Blätter entfernen die sonst Licht für die anderen verdecken würden und das wenigstens etwas Luft reinkommt :D
Wenn die schimmelt wäre schon Arsch freue mich schon stark auf das verkosten :D
Achso und hebe den ab und an mal an und kippe eigentlich alle 2 Tage 4,5L Wasser drauf :o


Likes
151
Share


@BioBuds
Follow
Yesterday I discovered that, in order to change my timer, I didn't put the clock back onto it. Now they had 3 hours more light on the third day of flowering. Exactly the kind of oopsies this grow really doesn't need.
But it happened and all back on a normal schedule, but I hope the OHS en GG4 aren't affected by it too much... One accidental re-vegging is more than enough for a year.
Also, these sensitive strains can hermie on me for lesser reasons so from now on I'll be checking for male signs daily.
The XTraKush is performing as advertised, with enormous stretch, these plants can go 10 ft up according to the breeder. So I'm tying them down and managing this to fill out the space.
With all the stuff going on, this 'underdog' strain might even prove most resilient, when all is said and done.
They seem to respond really well to the SP-3000 light and If you are in the market for a new light, consider this option from Mars Hydro.
Thank you @MarsHydroLED for letting me try it, it is a dream of a light. I compared it to my old light again and PAR values are not even in the same ballpark.
Thank you for checking my diary and taking the time to read my adventures!
Hug Bud
Likes
56
Share


@Prilyfe13
Follow
May 3, 2024 Day 78
This week is what seems to be the last week before flushing and a light intensity drop. Both ladies look really nice and coming along swimmingly. More orange pistils, more amber trichomes. Not enough of either, but they are getting there. Probably the next week of nutrients and a week of flush.
Speaking of nutrients, I decided to cut the whole regimen in half. There's clearly nutrient burn and I can't seem to get rid of it. I also believe the plants aren't taking in as much water as they were before. The containers are holding more water and that tells me it has nowhere to go besides in the soil and the ants aren't keeping up. Nutrient lockout? Age of plants? They are an 8 week strain while we are starting week 11 today. I'm sure I'll find out. So I'm guessing about a week and a half left before harvest. I'm not sure if it will be 2 weeks or not, but I've been saying 2 weeks for over a week now. We are definitely close to comfortably call 2 weeks or earlier. Hopefully earlier.
Banana Purple Punch A is getting heavy. Branches are starting to lean and buds are covering buds from the weight. Apparently these branches aren't as strong as Banana Purple Punch B whose branches are stiff as boards. Very healthy though. Although, she did take a hit from the nutrient burn. Not much and definitely not as bad as the Tropicana Cookies did.
Banana Purple Punch B is a thing of beauty. She is small and compact, but her buds are fat and she smells amazing. Tons of trichomes and lots of bud throughout the plant. She'll definitely need a trimming before I harvest. I think I've decided to do a mostly wet trim and leaves just the sugar leaves on the plant. Anything with a stem I can reach will be cut off. Same with Banana Purple Punch A, but her buds to leaf ration is fantastic. I won't have to do much trimming on her. Banana Purple Punch B, on the other hand, will need a whole lot of trimming.
I've got this week's first set of trichome pics. One for each plant. Looks pretty good. A bunch of cloudy, a bunch of clear and some amber. Definitely not ready.
No watering today as I topped off the reservoirs with a half gallon of plain water. PHed at 6.2 which took a bit of PH down. Apparently my water is really low in acid.
The lighting will be staying the same for most of the week. As these ladies have only a couple of weeks left, I'll try to time the light intensity drop accordingly.
The environment is still messed up. SMH. The temp is still fine, but the humidity is still high. Now only 55%, but still too high. I'd prefer 40% now, but I'll take 50% somehow. It stopped raining and the weather is really nice, so I don't see why the humidity is still high. Last night the temp was averaging out at 67.9° with a low of 65° with the humidity still being high at 55.8%. At least it's staying the same.
Grow System Environment:
Temp: 73.2°
RH: 55.0%
VPD: 1.23 kPa
May 4, 2024
May the 4th be with you! Star Wars all the way!
Not a lot going on today. Both ladies got a full gallon of half dose nutrients. I think it's time. They have about a week and a half left to go. Maybe less. Hopefully less.
Banana Purple Punch A was rotated today. Her branches are so top heavy now that the whole plant jiggled when I moved it. Honestly, kinda funny to see. Her reservoir was almost empty. She's definitely still thirsty. With the half dose of nutes, I expect to start to see a fade.
At the end of the week I'll start the real flush with Flawless Finish. Only for the first watering though. Also, I don't top flush. All of the nutrient buildup on the top soil will just poison the plants. So I continue to run the reservoir. Afterall, that is the place where the nutrients get absorbed.
So Flawless Finish blocks some sort of beta things that prevent the plant from taking in nutrients. I've used it for the last 3 runs and I have no idea if it works or not. I very rarely get a good fade. Too many nutrients at the end? Maybe.
Banana Purple Punch B hasn't changed position at all. She fits perfectly in the tent where she is. She had a little bit more water than her sister, but still low enough to fill the reservoir with a whole gallon and not overdo it.
She also has about a week and a half left. Her buds are huge now. The very tops are the huge ones, but the lower buds are all dense. Should be decent popcorn for pressing.
Her leaves are a deep color of green. Not so deep to be a concern for toxicity. However, FastBuds says the leaves should turn light green at the end. We shall see. Also, I'm not seeing purple at all. Hence the half dose and flush next week.
The lighting of course is going to be dropped to 70% power in a few days. Then down to 60% at the start of next week and will be brought down to 50% for the final few days.
The environment is bad today. The humidity is back to 60%. I can still control the temp though. I think I need to drop it to 74° for the day and try to keep it at 65° at night. A tall order, but I think I can pull it off. I just wish I could get rid of this damned humidity. Not that I think anything will get ruined. I have 3 clip fans running at half power each, so airflow is fantastic. These also quite a bit of open space for Banana Purple Punch A. Not so much with Banana Purple Punch B. But she still has a decent amount of open space. Definitely enough to not get any issues. At least that's the theory.
Grow System Environment:
Temp: 74.0°
RH: 57.9%
VPD: 1.19 kPa
May 5, 2024
Trichome day!
I got a couple of decent trichome pics from each plant. They aren't perfect, but they are pretty good for what I can do.
No watering today obviously. That won't be for another day or 2.
Banana Purple Punch A looks great! Her colas are getting heavier and slightly fatter. I'd say I'm on point with when she will be done. I say another 10 days. Flush will start at the end of this week. That should leave me a good 5 to 6 days of flushing before harvest. She's also getting more and more orange pistils and some amber trichomes. I still see mostly clear and a good amount of cloudy. Definitely not ready yet.
Banana Purple Punch B also looks great! Her buds are just as fat as her sister plant. They aren't nearly as far along though. I'd give this one 2 weeks. But maybe the same 10 more days. They are different phenomes afterall.
Her branches are like SUPER stiff. No leaning, no anything except the jiggle when moved. Such a strong little one.
Neither plant is showing signs of fade yet. I expect it will start to show up in the next week. The buds are also still quite green. I'll also be expecting purple in the next week. We shall see.
Light power will be dropped at the end of the week I think. I was going to drop it tomorrow, but I think these two need a bit more time.
The environment is still messed up. It's mid spring now and it's just getting humid. I can expect to have a lot of humidity for the next 3 weeks. I will just have to do my best to fight it.
Currently, the temp is at 76° and the humidity is still at 60%. It just refuses to drop down. I had the humidity in my room all the way back down to 50% and it did absolutely nothing. I'll have to periodically open the tent until this humidity levels back out. No big deal, I'm always home.
I also keep trying to get the temp down at night. I can't seem to get it below 67°. I'd really like it at 65° and the day temp at 74°, but it doesn't seem to be working. The problem is I can't get the humidity down without cranking the heat. But if I crank the heat, the temp goes above 77° and gets dangerously close to messing up the trichomes.
Grow System Environment:
Temp: 73.1°
RH: 59.7%
VPD: 1.10 kPa
May 6, 2024
Not much going on today. No trichome pics, no watering, no light changes. The only thing I have to mess with is the humidity still. It should go down today. I have my room at 47%.
Banana Purple Punch A looks great! Super heavy colas and dense... Very dense buds. Solid. She has a few more orange pistils, but that's a good thing. She should be finishing up in about a week now.
Banana Purple Punch B is stunning. For a small plant, her structure is wonderful, bud are huge and solid. She is pretty bushy, so I will be very happy when I can trim all the foliage off before harvest. She should need about another 10 to 12 days.
The aroma coming off of these has changed since that last time I said something about it.
It's more pungent now and smells of sweet fruit and something heavy. I'm not getting much or any banana smell, but I'm a smoker, so my sniffer is a bit off. It's still strong enough for me to smell the essence of this strain. Unfortunately, I don't know anyone who doesn't smoke and will be willing to smell my weed. Lol
And the one person I know who would smell it smokes more than I do.
As before, the lights will stay the same for the rest of this week. Then I'll drop them down to a DLI of 36 mol/m²/d.
The environment is still kind of wonky with the temp being around 75° and the humidity being still high at 58%. But as I said earlier, I have my room back down to 48% humidity, so I should be able to get the tent down to 50% sometime this afternoon, and hopefully it will stay that way for at least another week.
Grow System Environment:
Temp: 73.8°
RH: 62.3%
VPD: 1.06 kPa
May 7, 2024
Watering day. Both ladies got a full gallon today. Other than that I took some pictures. I'm not bothering with trichomes for the next few days with these 2. They clearly aren't ready, so no point in checking clear trichomes. When I see more orange pistils, I'll start checking them.
Both ladies have super heavy buds. They are making the tops sway a bit when moved. So big, so dense, so heavy. I look forward to harvest.
The lighting is the same as always. It'll be dropped by the end of this week I think. I'm planning on dropping it down to 36 mol/m²/d for the last week of flower. It should work to bring out purple and to help tighten the buds up.
I'm also considering cutting the nutrients off at the end of this week and go for plain water. It's just about time for flushing as it is, so in 2 days, I'll do one last nutrient dose and that's it.
The environment is starting to readjust to a normal level, it's just taking a long time. Currently the temp is at 76° and the humidity is at 54%. Still high humidity, but better than 60%. My room has 42% humidity, so the humidity should eventually drop below 50%. I'll try to drop the temp as well. I'd like to see 74° for the rest of the grow.
I'm still having issues with night temp. I cannot get it to go down enough. It sat at 68° and 55% humidity.
Grow System Environment:
Temp: 73.6°
RH: 54.6%
VPD: 1.25 kPa
May 8, 2024
So I have been doing a bit of image research and have found that these two should start showing purple anyway now. At least that's what it looks like. These ones have super green buds. Nowhere near ready for harvest. Still another week and a half or so.
No water needed today. I will note that the reservoirs are still nearly full. Interesting.
Banana Purple Punch A looks great. Her buds are super fat and smell great. They are dense and when they are ready will be hard as rocks.
Her leaf to bud ratio is perfect. Not too many but no bare. I was more worried about her getting super bushy. Nothing of the sort. Very nice. I'll be trimming her down before harvest, but I'm not bothering with the sugar leaves until after drying. They will help give more of an even dry.
Banana Purple Punch B has caught up in bud size with her sister plant. Although, she has more leaves. Trimming will be a nightmare with this one. I plan to do it in 2 sessions. Once before harvest to clean out all of the stemmed leaves. Anything I can reach at the base of a leaf is gone. After drying, I'll complete the trimming session with basically a manicure and that's it.
The lights are staying as they are for a bit longer. I can't really tell if these two are actually done yet or not. I'll do a trichome check tomorrow and post pics.
The environment is a nightmare. It's still 60% humidity with the temp being a bit high at 77°. I'd rather it be at 74°, but the humidity gets higher that way. I'll just have to keep opening the tent as I have been for what seems to be the last week. Either way, I will not get mold. Not if I can help it. Now drying in such high humidity is a concern. Very little airflow. Hopefully I can keep the temp in the low 60's in there. I highly doubt it.
Grow System Environment:
Temp: 74.0°
RH: 57.6%
VPD: 1.19 kPa
May 9, 2024
Some noticable things today. First off, neither plant is taking in as much water as they were. A sign of either nutrient lockout or they don't need as much water because they are finishing up. Finishing up makes the most sense.
Banana Purple Punch A was rotated again today to keep the plant from growing mold and keep the lights hitting all the buds from every angle. She's definitely closer to being done than her sister plant is. I'd say about 5 days difference? Maybe slightly less. This is kind of a blessing and kind of a curse. I have 4 other plants in 3 gallon containers that need to go in the tent asap. If I can clear at least 2 of the 4 plants currently in the tent, including this one, I could fit all 4 plants in the tent with the last 2 plants. Then I can harvest those two separately kind of.
Banana Purple Punch B has huge buds now. Some are a little bigger than her sister. They seem to have the same amount of bud, just structured differently. This plant has the super compact structure with buds all up and down, but it's only like 19" where the other one is closer to 23" and has more space between buds.
But it's a larger plant, so there is the roughly the same amount of bud. At least that's what it looks like. I'm seeing no signs of fading yet. I'm guessing this is one of those strains that waits for the last week or so before showing color.
Although, other diaries I've seen show different. The weird thing is that the majority of the other plants I've seen all have purple buds. Mine are still bright green. But they are definitely not ready. So I'm guessing another week and a half.
Frankly, I have a lot of trouble timing harvests. I don't know what the plants do or are doing, for example, I've never had a plant finish up based on breeder specs. I've even had an autoflower go well over 15 weeks. Granted it was HUGE (understatement), but it still took over 15 weeks. But then I have strains that finish up in 12 weeks. But I couldn't tell if they were done or not. Disadvantages of not having the proper equipment. This time around I have a microscope, so I can get a really good idea of when to harvest.
As for trichome check, I was supposed to do it yesterday. Then I thought maybe today. But then I realized tomorrow is a new week, so I'll take my trichome pics tomorrow. Plus, they clearly aren't ready, so no point in checking yet.
The lighting as I said will stay the same for now. These 2 are showing no signs of needing it and are definitely not ready for it to drop. Not for another few days to a week anyway.
The environment is kind of calming down. I can keep the day temp down to 74°, but the humidity is still high at 55%. I'll be spending the day opening it up periodically... again. I did manage to get the average night temp down to 66°, so that's something. It messed up my Sour Diesel seedlings in my 2x2 though. The temp in there went all the way down to 62°. I really need to get them in this tent.
Grow System Environment:
Temp: 72.6°
RH: 58.7%
VPD: 1.11 kPa
Likes
9
Share


@Ryno1990
Follow
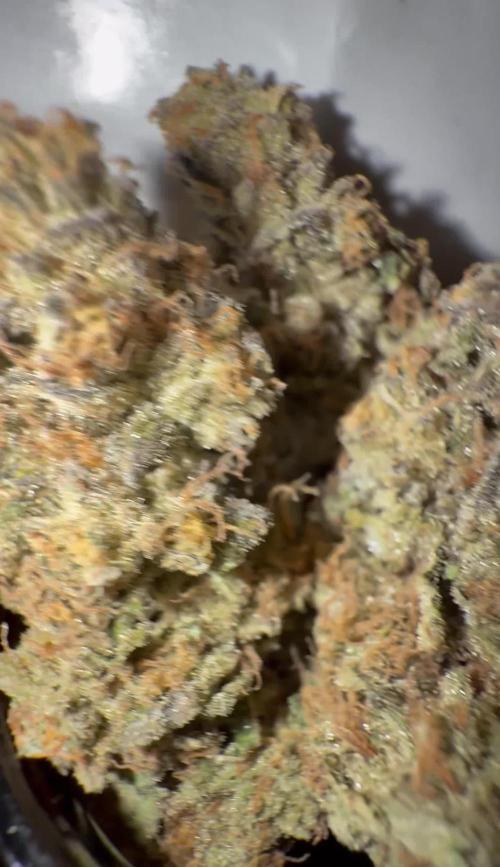
The strain came out amazing very purple an very dense didn't have a very strong smell but deff a nice one got 3 ounces after all said an done


Likes
142
Share


@MadeInGermany
Follow
Hey everyone 🤗.
This week was harvested properly 😍.
All of them are harvested, except for the two Tropicanna Banana (they will be on tomorrow).
All finished crop images follow little by little as soon as they have dried enough and have got their actual bud structure 😃.
I wish you much fun with the diary, stay healthy Ges and let it grow 🌱


Likes
29
Share


@TightNugs
Follow
Good progress since transition to flower with good stretch this week ,almost catching the ak x bd for height.
Just a small amount of lst with regular defoilation to keep lower sites clear.All good 🤞🍁
