
Likes
Comments
Share


@Mrs_Larimar
Follow
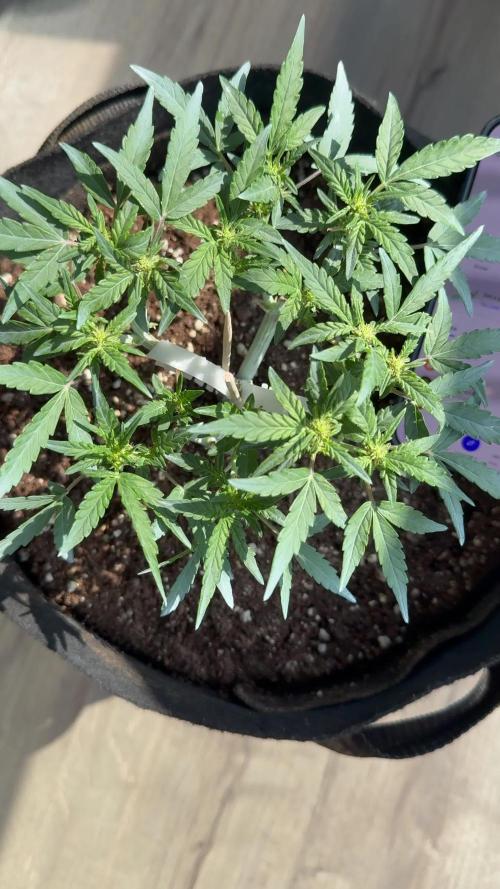
2024-10-18
The le Plants do a super job.
spreading the semen into the feale Flowers
absolutely extiting
BE a Breeder", is one of Doctor´s Choices Motto.
Regular Seeds Seeds germinate- A backcross from Chronic Ryder_
BREEDER INFO
LEGEND We’re so proud of our latest drop - Chronic Ryder regular - as it results from a hardworking breeding process. We used an original Chronic male plant from Serious Seeds and backcrossed it with our Chronic Ryder from Sasha The Joint Doctor’s private collection to receive the Chronic Fast F1 BX Regular. By crossing 2 Chronic Ryder F3 lines, L1 and L2 from the same parents, we have created a new hybrid line. Well, it seems like it should be an F4 hybrid, but it's incorrect to name so. This process is called interline breeding, which means the cross of 2 lines. This cross allowed us, over several generations, to get a fully automatic Chronic Ryder that predominates its parents by 25% in key characteristics. Chronic Ryder is also available in feminized variety. GROWING Chronic Ryder regular shows the best performance of parents’ heritage. It grows into a uniform and compact plant that rarely exceeds 1m in height. Thanks to its compact size it is better grown in small spaces, terraces, and balconies and is quite suitable for stealth growing. The plant forms a single huge central bud cola with few side branches. Fatty and frosty buds will be ready to harvest in 70-75 days from germination. You’ll be truly surprised how big and dense buds are - the nice and fruity smell adds extra pleasure. The short growing period and strong resistance are other strong points of the strain. Chronic Ryder regular would be a great choice for growing outdoors with short summers - you’ll get your guaranteed high-quality yield in any case. Be ready to harvest up to 500 g/m2 indoors and 50-100 g per plant outdoors. TASTE and EFFECT Chronic Ryder regular has a nice taste - fruity and citrus tones complement one another, giving an unforgettable aftertaste. The effect is mild and doesn’t hit you like a hammer - the perfect choice for novice smokers. It brings balanced high and stone effects. Thanks to it, Chronic Ryder is a good smoke that calms your body, giving a strong body relaxation for a long time. CHARACTERISTICS Autoflowering: Yes Type: Regular | Autoflowering Room: Indoor | Outdoor | Greenhouse Genotype: Hybrid Genetics: (Serious Seeds) Chronic BX Chronic Ryder Finish time: 70-75 days from seed Indoor: Productivity: 500 g/m2 Height: 60 - 80 cm Outdoor: Productivity: 50-100 g/plant Height: 60 - 80 cm THC: High Flavour: Citrus | fruity | apricot Effect: Balanced high and stone | daytime | giggly

Likes
16
Share


@EaRtH
Follow
29.12. - Plants are doing well. All of them have developed second pair of leaves. 🌿
30.12. - I could not believe my eyes when I looked into growbox this morning. The Apple Fritter seed that I thought was dead sprouted next to it's replacement 🌱 So I carefully transplanted the Green Gelato into the new pot, now I have 7 plants ❤️
4.1. - Just wow. First week of the veg went really well, plants gained on height, got thicker and developed first true leaves, so I'm starting with nutrients from next week 😎
29.12. - 4.1.2024

Processing
Likes
4
Share


Likes
10
Share


@TeesTrees
Follow
Day 43 - I have started LST as this plant i know won't grow much in height, im gonna use it to teach myself techniques/perfect a technique. I hope ive done a decent job of it. Excited to see what happens over next few days.
Day 44 - im very proud of my little plant. It looks so strong after the first day of LST. Definitely surprised with the results.
Day 45 - Plant seems to be adjusting just fine to LST i do keep checking it. There is a bit of leaves overcrowding to pne side. I will probably have to move if i can!
Day 46 - I'm thinking if i need to do more LST or just leave it now to grow.
Day 47 - the plant is really starting to woden out and stretch as well. I need to see when it will flower it looks like it might do soon.
Day 48 - The plant looks well. I believe she has started to flower so i really have to get my fan and filter asap.
Day 49 - She defo started flowing and i just bent ome stem to allow more space between each other ;But they looks really good. Also entering another competition can't win if you don't partake.


Likes
8
Share


@Cannabot
Follow
Was definitely a pleasure growing,amazing looking plant.Loved seeing the progress and seeing the purple really come through. had the true purple pheno so was very happy about that.In hindsight i shouldve cloned and made a mother etc with this pheno but yeah next time.Like i said earlier watch out for cannabis aphids and PM.Bud is currently in jars curing ,want to leave it for atleast a month before i start toking on it


Likes
5
Share


@UnCultivadorDeWeed
Follow
Luego de haber realizado una poda en el cual me excedí lograron a estirar y ocupar todo el espacio disponible, las ramas de las Big Bud tuve que abrirlas ya que su estructura es compacta, pero eso no quiere decir que no tenga esperanzas de sacar una buena cosecha.


Likes
5
Share


Processing
Likes
Comments
Share


Likes
26
Share


@OGbros
Follow
Ciao growers,
spero abbiate passato un buon natale. Al giorno 28 le piante stanno benone e l'odore inizia a farsi più intenso: aroma dolcissimo, sembra quasi di zucchero filato, incredibile. Ho aggiunto i soliti 10l d'acqua con il tripac floragrow 8ml, floramicro 1,6ml, florabloom 2,4ml. Qualche giorno fa ho comprato lo stimolatore di fioritura della GHE Pro Bloom (ex Biobloom) super concentrato. Questa è la prima volta che uso questo prodotto ma qua sul sito ne ho sentito parlare bene. Ne ho usato 2ml (0.2ml/l). Ho anche alzato la lampada di qualche centimetro (ora sta attorno ai 30cm dalle piante), poichè molte punte delle cime stavano diventando bianche. La lampada un po' più vicina ad alcune cime della glookies (<30cm) che si è allungata di più dell'altra ma mi sembra un peccato sacrificare tutto alzando la lampada per pochi rami più alti. Nel complesso devo dire cha stanno crescendo bene, già dalla scorsa settimana la differenza in grandezza delle cime è evidente. Sono contento.
Ci si sente tra qualche giorno o la prossima settimana, dipende se cambierà qualcosa😄
edit giorno 31: nulla di importante da segnalare, ho aggiunto alla soluzione 20l d'acqua con 0.8ml/l di floragrow, 1.5ml/l di floramicro, 2,4ml/l di florabloom, 0,1ml/l di biobloom e 0,5ml/l di cal mag (tutto dela GHE). Nell'ultima settimana hanno necessitato di più acqua rispetto alle settimane precedenti
edit giorno 34: ho eseguito una piccola defogliazione su entrambe le piante togliendo le foglie che coprivano i siti de fiori almeno superficialmente. A lavoro finito sembrava che avessi messo le mani in della colla talmente erano appiccicose. All'interno entrambe le piante seno una giungla, avrei dovuto pulirle un po' meglio durante la vegetativa (già la defogliazione al ventesimo giorno di fioritura era stata difficoltosa per l'eccessivo numero di rami che non mi permettevano di infilare le mani): moltissime foglie e fiori non ricevono luce purtroppo, mi servirà di lezione per il prossimo ciclo. Anche stavolta ho aggiunto alla soluzione 10 litri d'acqua con 0.8ml/l di floragrow, 1.5ml/l di floramicro, 2,4ml/l di florabloom, 0,1ml/l di biobloom. L'odore si fa veramente intenso


Likes
79
Share


@Salokin
Follow
Hello Growmies! 🌿👋
Welcome to Week 17 of our Epic Buzz journey! We're observing some noticeable progression in our plants, and we're nearly at the finish line with the next entry poised to be our final harvest week!
Here’s the breakdown for our Epic Buzz phenotypes:
Pheno #1 is thriving with its buds thickening up nicely, showcasing a frosty appearance that promises high-quality resin production.
Pheno #2 remains a bit smaller in comparison, yet it's catching up with an increase in bud density and trichome development.
Pheno #3 stands out with its robust growth and resin-packed buds that are slightly ahead in terms of maturity compared to its siblings.
As we approach the harvest, maintaining optimal environmental conditions—consistent humidity and temperature—is more crucial than ever to maximize their potential.
Stay tuned for our final week's update, and as always, stay lifted! 🚀🌱

Likes
101
Share


@WhiteEdge
Follow
28.04.2024
Continue into week 9
Clean nutrient tank for the last time...This is last week of flowering for almost all girls.
Electrical Conductivity (EC): 0.8 for this week..
Wedding Cheesecake: one girl finish this week, two others probably in middle of 10 week. Massive plants, tons of yelled. Creamy undertones, sticky buds. Love it!
They starve whole grow, didn't have possibility for separate line just for them. Love odor and bud structure.
Beautiful and high odor in the room!
Lighting Parameters: PAR Map: Maximum PPFD is 800, minimum PPFD is 550.
VPD: Ranges from -0.1-1.1
Daytime Temperature (DT): 23-24°C.
Nighttime Temperature (NT): 19-20°C.
Leaf Temperature: 21-22°C.
Light Distance: 45-55 cm from the plants.
CO2 Levels: 700+ ppm.
HLG Scorpion Diablo: Set at 60%, positioned at a 45-55 cm distance.
Girls drink less water, so for this week and till the end of flowering new misting timing's
Daytime: ON for 50 seconds, followed by 30 minutes OFF.
Nighttime: OFF for 50 seconds, followed by 45 minutes OFF.
Nutrient Tank (NT):
pH: Maintained between 5.80 and 6.00. Stable PH, small drifting up and downs
EC: 0.87
Temperature: 19-21°C
01.05.2024
Cruse mode , observing girls, looking trichomes under phone microscope. Still have to wait.
First and second Wedding Cheesecake are finishing this week. Third still need some time.. Almost all pistils still white, only clear with some milky trichomes
Lighting Parameters: PAR Map: Maximum PPFD is 800, minimum PPFD is 550.
VPD: Ranges from -0.1-1.1
Daytime Temperature (DT): 23-24°C.
Nighttime Temperature (NT): 19-20°C.
Leaf Temperature: 21-22°C.
Light Distance: 45-55 cm from the plants.
CO2 Levels: 700+ ppm.
HLG Scorpion Diablo: Set at 60%, positioned at a 45-55 cm distance.
Girls drink less water, so for this week and till the end of flowering new misting timing's
Daytime: ON for 50 seconds, followed by 30 minutes OFF.
Nighttime: OFF for 45 seconds, followed by 45 minutes OFF.
Nutrient Tank (NT):
pH: Maintained between 5.80 and 6.00. Stable PH, small drifting up and downs
EC: 0.89
Temperature: 19-21°C


