Likes
Comments
Share


@Legendaryseedthumb
Follow
Day 9: they are all looking super healthy and ready to explode! I’ll just veg these fast. Let them grow a node or two more then top them all and wait some days then switch to 12/12.
I’m having 9 plants in the same tent.


Likes
88
Share


@Wastent91
Follow
Ehiiiii ragazzii come va?? La settimana per queste due ragazze hibride F1 è davvero andata bene!! Merito soprattutto penso della intensità e qualità della nuova luce Mars hydro che posseggo e ringrazio vivamente di avermi dato questa possibilità di poter collaborare con loro e creare delle bellezze del genere che x me sono come pezzi di arte in evoluzione!? Non so se mi spiego! Per me sono la cosa più importante di tutta la mia intera vita! Chiaramente dopo la mia donna ,mia nonna e i miei gatti🐱🐱 apparte questo la genetica mostra una crescita uniforme dei due fenotipi Apollo nonostante la differenza di nutrienti... Vedremo nelle prossime settimane lo sviluppo delle cime come sarà , mi aspetto delle gran belle cime a giudicare dal verde bello intenso che hanno queste piante si vede che sono in ottima salute , e x ora x me preparare prima il terriccio e fare un soil living tra micorriza e nematodi mi pare l opzione migliore, a meno che nn compro tutta la linea Advanced Nutrients e allora nn avrò carenze nutritive! Se volete spedirmela boss di Advanced sono qua x testare se i vostri prodotti siano migliori delle tecniche che utilizzo io , preparando un terriccio organico, piuttosto che aggiungere troppi fertilizzanti minerali dopo.. a meno che ho tutta l ampia scelta di utilizzare tutti i prodotti specifici.. apparte questo ringrazio come al solito Mars Hydro e Royalqueenseeds che mi hanno dato fiducia x costruire tutte questo ! Buon 420 a tutti?! 😼💪🧙♂️🌱🌿🌲💨❤️❤️
Likes
6
Share


@Insane4twenty
Follow
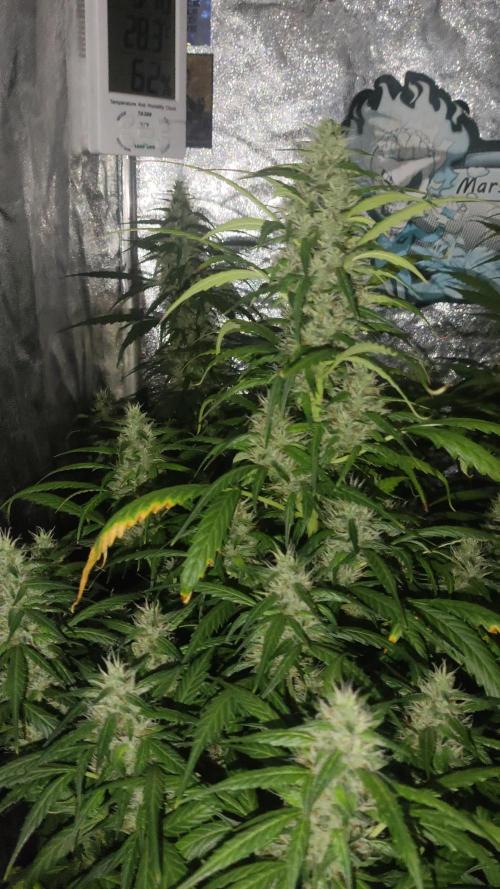
Since I can no longer get the humidity below 58% and the rust spots on some of the sugar leaves are getting bigger, I decided to harvest . Unfortunately I couldn't wait for the perfect time, so luckily I don't have any clear trichomes , about 75% cloudy ones and the rest amber. 67 Day's from Seed to Harvest
Processing
Likes
11
Share


@Alexanderbeno
Follow
Hello buddy, so far the buds have been completed, but latent. 📍One of the youngest ones is a little downtrodden and weak. Why?
thank you

Likes
7
Share


@Stickygreens420
Follow
3/28/2023 - Day 30 Flower: moving into mid flower and all the plants look good. Starting to put on some weight and stack up. Tricomes are really starting to develop and they are starting to smell. Switching to 11 hours on and 13 hours off today, but have the lights cranked up 100%. Not seeing any signs of deficiencies, so hopefully it will be smooth sailing from here.
3/30/2023 - Day 32 Flower: watered again today with 4 gallons. Added another sprouted seed tea, with Jay Plantspeaker Quillaja, Rootwise Bio-Phos and Bio-Catalyst, BuildASoil Big 6 and BuildABloom, Fermented Peach Extract, and coconut powder. Everything else is looking great. Flowers are stacking and adding more frost every day. Not too much of a smell yet, but the Grand Prix 2 is starting to smell like something special. Still too early to say exactly, but I'm excited to see how she develops.
4/1/2023 - Day 34 Flower: not much to report today. The plants look great. The only thing I noticed is it looks like the Grand Prix 3 is showing signs of some purple in some of the leaves. The stem still looks green, so I don't think this is related to any kind of deficiency. I think it's just some color starting to come through in mid flower. I'll try to add a picture above.
4/2/2023 - Day 35 Flower: watered 4 gallons of water, mixed with Jay Plantspeaker Quillaja, Coconut Powder, and Yah-Whey Thrive.
Likes
23
Share


@Canadian
Follow
The plant seems to be a growing very fast and very strong is like it is on steroids and have become very stinky in a good way. It looks like she has start to produce the first buds or at least the beginning of them looking forward to see how she will start to develop .
Day 44 I found myself adjusting the light up every day once they wake up because this plant is truly very strong vigorous and with a very large flowering stretch and with very thick branches so if you are growing this girl in a indoor setting be aware who the roommates are Genetically speaking . And make sure they actually will stretch as much as her so you don't have problems with light distribution in your tent.
thank you for reading I will continue to update have a happy grow.

Likes
18
Share


@Dunk_Junk
Follow
What the hell happened here???????????
A solid 50cm vertical growth this week!!!!!!!!!!
I thought the weird split this plant had a few weeks ago would be the talking point of this plant not her epic height!!
I have bent over her main cola now because of headroom issues.
First watering with 6-12-36 powder mixed at 1g/Litre

Likes
10
Share


@Colectivegrow
Follow
Nuestros cogollos ya empezaron a encogordar, esperamos que con los aditivos de flora nos vaya la raja ! aksjas


Likes
17
Share


@Eddjack
Follow
Iniziamo a caricare di zuccheri. Ha un Bell aspetto ma è molto lenta nella fioritura ...speriamo esploda presto ! Ho abbassato la potenza della lampada per evitare di bruciare le cime principali .aspettiamo e vediamo che succede
Processing
Likes
3
Share


@macrocefalo
Follow
As I am growing automatic plants arriving in the 5th week it goes into pre-flowering and I was thinking that my 140w led panel would not suit me in the 3 foot cover of the grow. So I invested in a new 240w panel that will provide me with excellent coverage. This week I added the koolbloom to meet the needs of the plant in this phase of transition to flowering. The first pre-flowers started to appear and the plants showed good vigor. Some brown spots on B2 show some magnesium deficiency, decreasing the watering interval and increasing the callMag a little.
Likes
5
Share


@Silverback_Guerilla
Follow
Off to a slow start...think it was too cold initially to get them to pop, but problem solved.

Processing
Likes
2
Share


@gogreen
Follow
Week four, doing tha same feeding schedule, still growing. This week o started spray water as weel as in the soil. Keep growing! Anxious to get my first harvest.


Likes
4
Share


@GrapevineGrower2
Follow
Week 5 veg - clones and Week 3 - Blueberry Cupcake (Humboldt Seed Co.) and French Macaron (TH Seeds) from seed. G-41, Frosty Gelato, and Frozay Gas topped with 2 clones each taken from cuttings to propagate placed in 2x2 clone/seedling tent with low LED lighting. Temps in low 80F w/60% ROH. Clone cuttings covered with sandwich bags used as humidity domes.
After taking cuttings transferred G-41, Frosty Gelato, and Frozay Gas to 3x3x6 AC Infinity tent under Mars-Hydro FC-E3000 set at 50 percent power (PPFD range for veg). Black Cherry Gas clone, Blueberry Cupcake, and French Macaron from seed remain in 2x4x5 AC Infinity under Spider Farmer SF-2000 with dimmer set at 50 percent power (PPFD range for veg).
Continued twice weekly IPM foliar treatment with Organishield as well as watering soil program (SP).


Likes
2
Share


@fabialien
Follow
Semana sel 2 de septiembre al 8 de septiembre 8 de septiembre, fotos del dia Jueves 5 de septiembre 2024.
Se regaron con Floralicius plus adicionado con Hidrol-pez + vitaminas.


Likes
37
Share


@Secretflower
Follow
Hello my friends,
...May 16, 2022....Day N°64..
My three Automatic Blueberry Cheese are fine. The buds smells strong.
I feed them with the complete stuff of the Green Buzz Liquids from Germany.
There are under a Viparspectra P4000 at 80% of power and at 40cm of the canopy.
www.barneysfarm.com
www.viparsprectra.com
www.gbliquids.com
15% discount code : secretflower
That's all for now.
Thank you very much for passing by.
Wish you the best with your green projects, peace.
See you soon 💨💨💨

Likes
5
Share


Likes
4
Share