


Likes
Comments
Share


@BalconyBoy
Follow
29.07.24 plant from left to right "Auto" Daquiri Lime 1, Zombie Kush, Cheese, Gelato#45, Lost Coast OG, "Auto" Daquiri Lime 2
at this point I contaced Dutch Passion to do a little Karen and get free Auto Seeds for next season to see if they behave like Autos. The plan for 2024 was to have some autos for a mid season harvest and then more room for the regular plants on the balcony. Unfortunately all three Daiquiri Lime turned out like Photos. The third one in my friends garden (in the ground) also finished end Oktober.





Likes
80
Share


@TheCannaProphet
Follow
~MERINGUE by DUTCH PASSION~
Well friends, here we go on another 'canna-venture' together!
The grow room has had a complete remodel and some upgrades done to it including brand spanking new 4x8 and 4x4 tents and a Trolmaster Hydro X controller along with a new Control Panel.
This strain by Dutch Passion is one of my all time favorite strains that I've cultivated previously with phenomenal results so I'm looking forward to seeing what this girl has to offer when she's grown to her full potential!
I'm going to things a bit different this time around. I have a brand spanking new AC Infinity 4x4 tent and was just given one of HLG's newest lights for 2022, The Blackbird! I've got this 600w monster hooked up to my Trolmaster Hydro X Controller so I've got full control over timing, dimming and Sunrise/Sunset. This beauty is going to annihilate the 4x4 for sure! 😎👍
I'm going to grow her all by herself and veg her for around 70-90 days after witch I'll install a trellis net in the tent and spread her out. Once she's recovered from her 'net training' I'll flip her to 12/12 and hang on! 🤪
It's ALWAYS been a blast for me growing strains from Dutch Passion because their genetics are extremely stable which allow me to just concentrate on the essentials: Light, Environment, Water, Nutrients and possibly a bit of LST... not complicated, just basics like keeping a constant temperature and RH in the tent at a level that gives a good VPD, watering when almost dry and maintaining proper light levels according to their stage of growth and they REWARD you with some of the most EPIC cultivars you've ever grown! 👍👍👍
____________________________________________________________________________________________________________________________________________________________________________________________________________________________________________________________________________________________________________________________________________________________________________________________________________________________________________________
~STRAIN INFORMATION**~
~Unique USA genetics~
~Very sweet aroma and fruity flavors~
~Compact buds with one of the highest THC levels~
~Quality of the flowers is top-notch with an amazing bag appeal~
Meringue has a very sweet aroma and fruity flavor
Meringue is a hybrid indica/sativa strain with a complex fruity aroma that leans to the tangy side of the spectrum but a bit sweeter. It smells like oranges, mango and honey with some earthy, sour hints. Her aroma profile is also very pungent.
Meringue is a connoisseur’s delight
Meringue is a high-quality strain. She might not be the biggest overall yielder but the level of quality is definitely a reason to keep growing her again and again. Expect solid yields of stunning looking buds. Although the flowers can be a bit smaller, they are rock-hard and thus will still put down some weight on the scale.
When handled well she will deliver you some of the most beautiful looking nuggets on the planet. The dark hues in the flowers and leaves makes the white layer of resin really pop out for an eye-catching bag appeal.
Meringue is grown by crossing Wedding Cake x Animal Cookies.
Wedding Cake, also known as Pink Cookies, is a USA cross of the famous Girl Scout Cookies and Cherry Pie. These 2 strains make for the intense sweet tangy taste of the variety. It is also noted for its extremely high THC content.
Animal Cookies is another popular USA variety which is a child of the legendary GSC line and Fire OG. She is a clone-only variety that flowers in about 9 week and grows very dense and compact buds that can show some dark coloration in the flowers. This strain has a sweet and sour aroma with a strong body-effect that will suit the more experienced smoker.
-The genetics used to create Meringue ensure the following characteristics-
~A sweet tangy aroma from the Wedding Cake
~The dense, compact and colored buds from the Animal Cookies
~High potency levels thanks to both the Wedding Cake and Animal Cookies genetics
Meringue is top-notch variety with a high cannabinoid profile and an intensely sweet, pungent aroma.
~Meringue Effects~
Meringue is a crossing of 2 popular hybrid USA strains. She leans a bit more to the Indica side which is shown in the shorter flowering time and bud structure. The effect of the variety is quite euphoric with a powerful sense of well being and relaxation. When you smoke more during a short period of time you will be rewarded with a deep body stone which could give a couch-lock experience.
Meringue feminized seeds vs Lemon Meringue strain
Any fans of the USA Lemon Meringue variety will love the Dutch Passion Meringue. Both varieties share a THC rich high and a connoisseur flavor profile. However feminized seeds of the Dutch Passion Meringue are thought to produce frostier plants and a superior vaping experience.
-The growth and flowering time of Meringue-
We recommend a veg period of about 4-6 weeks for these feminized seeds. Meringue can have a bit of a slow start while showing some stretch during the latter part of the grow period. On the other hand, she doesn’t stretch a lot during flowering, so she can be a bit challenging to understand. Meringue can have quite an unusual growth pattern with leaves that have elongated stems and which are pointed upwards with some distance to the main stem. This requires the use of certain growing techniques, like leaf tucking, to make sure she receives sufficient light from top to bottom.
Meringue stays fairly compact and within 3-4 weeks there is already a lot of resin on the flowers. After 6 weeks of flowering the buds start to show orange pistils, they seem to ripen quite fast. Luckily all plants show amazing resin production, making them very appealing to the eye.
The flowering time is about 8 weeks. In combination with the recommended veg phase, it will take around 12-14 weeks from cannabis seed to harvest.
The yield of the Meringue
Meringue produces XL harvests of top-notch quality cannabis; between 400 and 500 grams per m2 is possible. The buds are really frosty and dense.
Our expert advice:
Meringue is the perfect strain for professional home growers or licensed producers looking for a variety with the highest possible resin levels. Buds are literally coated in layers of resin. We would recommend to look out for the plants which show the most hybrid leaf and plant structure.
These are generally the biggest and best yielding phenotypes. Consider using a UV light during the last few weeks of flowering and notice how the trichome production goes into overdrive. If you’re looking for something truly unique with an amazing bag appeal then please look no further, Meringue is the strain you need!
~More info about Meringue
Meringue isn’t the most straightforward plant to grow so she can be a bit challenging to understand. The thing that stands out the most is the slightly unusual growth pattern, therefore more leaf picking is necessary, otherwise the lower buds will not receive enough light.
Because of the slightly larger internodal distance, buds don’t have the tendency to become really big, which could make her a bit more interesting for growers with higher humidity levels. There should be enough fresh air around these flowers though, because they become rock-hard.
Buds are covered in trichomes, lab results showed all phenotypes were close to and above 20% THC, suited for hardcore smokers.
** Credit to Dutch Passion
____________________________________________________________________________________________________________________________________________________________________________________________________________________________________________________________________________________________________________________________________________________________________________________________________________________________________________________
~THE SETUP~
~Initially seed was lightly scuffed, then soaked for 3 hours in 78℉ distilled water after which it was transferred to a moist paper towel laid out in a Jiffy Pellet plastic starter tray with lid. Underneath the tray was placed a Mars Hydro Heat Mat with Controller that was set to 78℉ where it stayed until a tap root emerged.
~Planted into Jiffy Peat Pellet that was hydrated with distilled water warmed to 78℉ with a 7.0 ph.
~Once roots emerged from the Jiffy Pellet she was transferred to a 1qt plastic pot. As she grows I'll be moving her into larger pots along the way up until she's in her 10g fabric pot.
~Grown in a 10g fabric pot filled with Mother Earth 70/30 Coco/Perlite medium and fed Dutch Pro nutrients throughout the entire grow with de-chlorinated water ph'd @ 6.2-6.8.
~19/5 light cycle for vegetation, then 12/12 to flower with supplemental UVA added during the last weeks of flower. Lights are controlled by a Trolmaster Hydro X controller set for a 15min Sunrise/Sunset simulation.
~ Supplemental co2 provided throughout vegetation and flower - monitored and controlled by an AutoPilot APC8200 co2 controller.
____________________________________________________________________________________________________________________________________________________________________________________________________________________________________________________________________________________________________________________________________________________________________________________________________________________________________________________
Weekly Updates:
12/1- I soaked the seed for 3 hours in 78℉ distilled water after which it was transferred to a moist paper towel laid out in a Jiffy Pellet plastic starter tray with lid. Underneath the tray was placed a Vivosun Heat Mat with Controller that was set to 78℉. After 30 hours she had not popped open yet so I soaked another seed for 3 hours and then into a paper towel and onto the heat mat it went.
12/3- This afternoon I checked and the seed had a root that was about 1/4 to 3/8" so at 5 pm I transferred it into a Jiffy Peat Pellet that was hydrated with distilled water warmed to 78℉ with a 7.0 ph using a tine off of a plastic fork as a 'mini trowel' to make a hole in the pellet and to gently cover the tap root, leaving only the seed head slightly exposed. This method accomplishes most of the initial work the seed has to do by eliminating having to orientate itself, push it's root down and head up. By the next morning she had her cotyledon leaves opened!
12/5- Well this is Day ONE for the Dutch Passion Meringue! I'll keep her in the covered/heated Jiffy tray until I see her roots beginning to emerge from the peat pellet, then I'll transfer her gently into her 2qt plastic starter pot to begin growing.
12/7- Today when I checked her, she had roots just starting to emerge from her pellet, so tomorrow I'll transfer her into her 'starter' pot.
😎💚 Thank you for checking out my passion in life! Please visit as often as you wish and I hope you enjoy this journey as much as I know I will! Grow Strong! 💪😎🤙

Likes
3
Share

@ChitownCannaChica
Follow
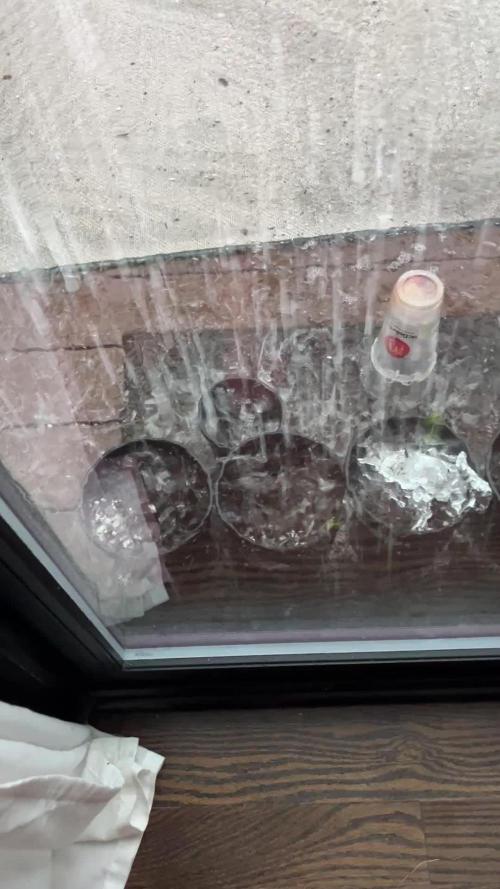
Watch the video. These are done. End of diary. I will start these strains again soon. Taking a vacation and will start again, but I got hit by Mother Nature. First the winds blew them over so I moved them closer to the house— the. The downpour started and washed these ladies out. End of plants end of diary🙈

Likes
13
Share


@FlavoursUk
Follow
So, eventful week.
Prior to putting my seeds into my system, my light and rdwc system was left on as I was dialling in the growing environment before placing the seeds as a final home. My only issue was I had a light leak BEFORE putting the foil top covers on the clay pebbles. Long story short, I got algae which ended up turning to root rot.
I spotted it very swiftly and did a res change adding beneficial bacteria to the system along with the base products of remo nutrients. A few days later new growth and recovery is taking place.
Day 16- Fully back on track, new roots shooting out into the water and the growth rate has picked up as it should.
Foliar feeding twice a day for a little boost until the root system establishes a bit more. Huge changes in just a day. Can't wait to see what a week's growth looks like.
Really loving the sunset/sunrise feature on the trolmaster, something I got to experience watching recently!
Watching by closely to make sure everything stays in track.
Stay tuned for the next one 😉

Likes
31
Share


@Wicked_Stix
Follow
The voodoo juice x platinum hermed this week so moved it to it's own tent. We have 6 plants remaining in the room. I cut out the maxigro this week. They are getting .5 tsp per gallon of maxibloom now. Seems to be keeping everyone happy. Not much to report other than that. Buds seem to be progressing pretty nice.


Likes
14
Share


@grower1212
Follow
Comenzando la semana 6
Usando full co2 para el engorde final.
Con el hit de calor en el que estamos, lo aprovecharé para preparar un input KNF, el FFJ de cherries, beetroot y damascos para entregarle el potasio que necesita para estas últimas semanas.

Likes
51
Share


@MadeInGermany
Follow
Flowering day 68
since clock change
to 12/12
Hey guys :-) .
It's so far, the lady is ripe and will be cut at the bottom end in the coming days and hung upside down in the drying tent :-) .
Next week there will be an extra update on how they are hanging.
Watering would be done twice this week with 1 l each (nutrients see table above)
Otherwise it was checked and everything was cleaned.
Have fun and stay healthy 💚🙏🏻
👇🏼👇🏼👇🏼👇🏼👇🏼👇🏼👇🏼👇🏼👇🏼👇🏼👇🏼👇🏼
You can buy this Nutrients at :
https://greenbuzzliquids.com/en/shop/
With the discount code: Made_in_Germany you get a discount of 15% on all products from an order value of 100 euros.
👇🏼👇🏼👇🏼👇🏼👇🏼👇🏼👇🏼👇🏼👇🏼👇🏼👇🏼👇🏼
You can buy this strain at :
Clearwater Seeds
Water 💧 💧💧
Osmosis water mixed with normal water (24 hours stale that the chlorine evaporates) to 0.2 EC. Add Cal / Mag to 0.4 Ec Ph with Organic Ph - to 5.8 - 6.5
MadeInGermany

Likes
8
Share


@MaxGrowCanada
Follow
Here we go again.
2 criticals, bubba Cbd, and dinamed(from left to right)
Still alot of work to be done to finalize the grow room. I now have to replicate this setup on the far side of the room only deeper, for flowering.
The setup was built with diversity in mind. I should be able to switch to almost any recirculation style hydro in a matter of hours.

Likes
34
Share


@ScotlandHaze
Follow
Finally seeing some fluffy flowers!! A small bit of trimming this week to get the light hitting more bud spots. should I defoliate further or let nature take its course??

Likes
11
Share


@Krakt85
Follow
Iniziamo l'ultima settimana di vegetativa , dopo aver defogliato un pó le ragazze e piegato i rami più bassi sembra che vada tutto bene .
Felice crescita e alla prossima settimana ;)

Likes
25
Share


@Rob691
Follow
Today, day 23 was the last repotting. Girls went from 11.6L to a 20L pot. Now there in the right place, serious things can begin ! I planned to top the girls on wednesday or thursday. It will depends on hos they will recover.
Actually, it's my first time with smartpots. If smartpots have a lot of advantages, repotting is not one of them ! I made a mistake : the plants were 60% dry, and abviously, it was not a good idea ! It should be clearly moist. Nextime I think I will water the girls 1 hour before repotting.
I hope it will be ok and they will recover from this tough moment.... Will see in a few days 😰😨
Anyway, I have generously watered them right after repotting with no nutrient. Juste clear water with the right Ph. As they are in some brand new light-mix medium, I thought they have enough nutrient for a at least 2 or 3 days.
D-25 : Everything is ok. Girls seems to have recover very well :) Anyway, I'll wait at least one more day before topping.
D-26 : Topping the girls. Hope everything is going to ok... Also feeding the girls right after the top. During the topping process, the plants were reduced from 25cm to 12cm.
Likes
2
Share


@CheeRz
Follow
Flowering Week 1 is going well, and Oreoz is developing nicely. The weather is currently very changeable, with lots of clouds and occasional some rain. However, the weather should improve significantly over the next few days ☀️☀️☀️☀️🏝️🏝️🏝️


Processing
Likes
103
Share


@MG2009
Follow
08/30/2008
Day 1 week 4
Seedling leaves turning pale, started nutrients today Advanced Nutrients Grow,Micro,Bloom at .25% quarter strength 💪 of recommendation. I will ease her into the nutes. First res. Change today also.
Ps.
I noticed under day light she has burgundy coloured stems,like her mom but we will see if adding nutes changes this... I believe it's genetic ! 😎
Also changed lights to 16-8 and red spectrum turned to 50%, prepare her for the flip!.....
09/05/2018
Noticed i noticed in the last pic a little fert burn 🔥 but that's why I increase it slow 🐌 but got decent amount of growth so onto 1/2strength for next reservoir change in week 5 .😎
Likes
89
Share


@Nebula420
Follow
In this week the plant is fine, no have any problems.
Gorilla Girl grows well, have a amazing smell of citrus, watermelon, woody and earthy.
I love this strain, amazing and sweetie), buds like stone, heavy and frosty) satisfied.
Thanks to everyone who follows my grow reports. 😘
Likes
19
Share


@Hashy
Follow
********************************************
Week 13 Late flower (week 9 flower)
********************************************
Light cycle=12/12
Light Power=120w 50%
Extractor controller settings (during lights on).
High temp= 26c
Temp step=0c
High Rh= 46%
Rh step=0%
Speed max=10
Speed min=3
Extractor controller settings (during lights off).
High temp= 20c
Temp step=0c
High Rh= 50%
Rh step=0%
Speed max=10
Speed min=3
Smart controller settings (during lights on).
Lights on=9.00am
Smart controller settings (during lights off).
Lights off=9.00pm
VPD aim=1.0-1.5
DLI aim=40-45
EC aim=1.0-1.8
PH aim=6.0-6.5
💧💧💧💧💧💧💧💧💧💧💧💧💧💧💧💧
NPK= 5-14-20
Method= Automatic
Feed=Late Flower nutes
Neutralise=0.1ml/L
Plagron bloom=2.5ml/L
Plagron Power buds=1ml/L
Green Sensation=1ml/L
Easy Ph down=0ml/L
(1ml=24 drops, 1 drop=0.04ml)
Easy Ph Up=0.0ml/L
(1ml=24 drops, each drop is 0.04ml)
Ec=1.2 PH=6.3/6.0
Runs=10
Run times=3mins (0.75L/0.375L each)
Gap times= 17mins
Total runtime=30mins(6.0L/3.0L each)
Total flowrate= 0.25L/0.125L/min each
Auto start time=10.00am
Auto stop time=1.03pm
💧💧💧💧💧💧💧💧💧💧💧💧💧💧💧💧
********************************************
********************************************
📅3/5/25 Saturday(Day 85)
📋 Removed Radiator summer conditions from now on.
Small defoliation
💧
Automatic Water
Ec=0.2 PH=6.6/6.5
Volume=10L
Volume left=2.5L
Volume used=7.5L
Volume each=3.75L
Total runoff=0.6L
Ec=2.1 PH=6.4/6.4
💧
📅4/5/25 Sunday(Day 86)
📋
📅5/5/25 Monday(Day 87)
📋
📅6/5/25 Tuesday(Day 88)
📋
📅7/5/25 Wednesday(Day 89)
📋
💧
Automatic Late flower nutes
Ec=1.2 PH=6.2/6.0
Volume=5L
Volume left=1L
Volume used=4L
Manually
Volume =1L
Total used=5L
Total runoff=0.8L
Ec=2.5 PH=/6.6
💧
📅8/5/25 Thursday(Day 90)
📋
📅9/5/25 Friday(Day 91)
📋Day 63 of flower
********************************************
Weekly roundup.
📋My lung room is a little less crowded now I can take the radiator out of there. It's now the job of keeping the room cool as the season has changed. She's in late bloom now as pistils are starting to brown. The Fat bastard name really suits this plant, nice big flowers, I do have a bit of fox tailing going on the very top of the main cola but that can be expected for how close she is to the light. Still a way to go yet but she is doing great.
Back soon.
Take it easy.
********************************************

Likes
9
Share


@deFharo
Follow
Nueve semanas de floración para esta cepa Diesel hija inesperada de Diesel, semilla fecundada y nacida en casa, cepa fuerte como la madre-padre, ha sobrevivido al oídio y a la plaga de arañas, el rociado con azufre y otro después con tierra de diatomeas en conjunto con las bajas temperaturas están, por el momento, salvaguardando el cultivo.
La progenitora de esta semilla la coseché después de 10 semanas de floración, casi 11, esta hija va por el mismo camino y quizás se alargue más, las colas están engordando claramente y los tricomas transparentes todavía dominan el escenario.
DECODIFICANDO LA NUTRICIÓN 😎
- Sigo calentando el agua de riego entre 21-23°C
Día 112. Agua de montaña (Ca, Mn, Mg, Si, Fe...) PH: 8, EC: 0.27.
Día 113. Agua de lluvia y montaña al 50% (EC: 0.12), Humato potásico de leonardita (Húmicos, fúlvicos, K...) al 1%, Biol de guanos con Microorganismos Eficientes (P, MMA, BAL...).PH:6.60 EC: 1.30. 500ml ,
Día 113. Componentes sólidos a partes iguales destinados al aporte de nutrientes y materia orgánica, mezcla dirigida principalmente como estimulador del cultivo, 10g por maceta: Bocashi de algas, Guanos de aves y murciélago, Humato PK en polvo, Dolomita, Sal de Epsom, Polvo de semillas de algodón, Alga Kelp.
Día 115. Agua de lluvia y montaña al 50% (EC: 0.12), Humato potásico de leonardita (Húmicos, fúlvicos, K...) al 2%. PH:6.65 EC: 1.33. 500ml ,
😁 ORGANIC TIP >>>
Hidrolizado potásico de leonardita con fósforo (Humato PK).
Este producto lo vengo usando en mis cultivos desde el final del crecimiento vegetativo hasta el final de la floración y ahora es una de mis fórmulas indispensables.
La leonardita es un mineraloide derivado del lignito y compuesto en su mayor parte por materia orgánica que se encuentra en el proceso de convertirse en carbón, no es soluble en agua. La leonardita es la mayor fuente existente de Ácidos Húmicos, Fúlvicos e Himatomelánicos.
Yo lo uso como aporte sólido a los sustratos para mejorar la estructura del suelo haciéndolo más esponjoso, estimula el suministro de oxígeno a los microorganismos, incrementa el crecimiento y la división celular y la retención de agua y nutrientes.
También lo uso solubilizado para riegos, donde la digestión por parte de la planta es inmediato.
Para hacer soluble la leonardita uso un tipo de hidrólisis alcalina con Hidroxido de Potasio al que en esta ocasión he añadido Roca Fosfórica (P) y Azomite (Si, Mg, K, Fe... + trazas de 70 minerales). El proceso es simple:
MATERIAL:
Agua pura 2000ml. (Yo en este preparado he usado mi agua de manantial alcalino (PH: 9.2 EC: 0.85), esta agua está muy mineralizada (Ca. Si, Fe, Mg, Mn...) quiere decir que tiene hidrolizados esos minerales los cuales se añaden naturalmente al producto.)
Leonardita: 150g
Roca fosfórica: 10g,
Azomite: 5g
Hidróxido de potasio: 45g.
PROCEDIMIENTO:
1) Juntar la leonardita con la roca fosfórica y el azomite.
2) Añadir el Hidróxido de potasio disuelto en 500ml de agua.
3) Mantener una hora y agitar de vez en cuando.
4) Añadir el resto del agua.
5) Mantener en el recipiente sin cerrar, para dejar paso al oxígeno, durante al menos tres días.
6) Remover o agitar al menos 2 veces al día durante estos 3 primeros días. (Cuanto más o mejor se agite el resultado de la hidrolisis será mejor.)
7) A partir de los 3 días ya se puede usar... pero yo prefiero esperar una semana al menos.
8) El producto se puede almacenar a la sombra durante años, el paso del tiempo hace más añeja la mezcla.
COSTO APROX. DEL PREPARADO: 3€.
USO FOLIAR AL 1% Y RIEGO DEL 1 AL 3%.
==========================
• CONOCE MIS TÉCNICAS DE CULTIVO Y MIS FERTILIZANTES ORGÁNICOS AVANZADOS.... HACER ES COMPRENDER!! 😉
- ORGANIC GROWING TIPS!! 👇
3M • PURPLE BUD
SEMANA 17: Activación de Microorganismos Sólidos (MMA) y biol de frutas con minerales.
SEMANA 20: Agua de montaña y estructurada.
SEMANA 21: Abono sólido y mulch.
3M • Anubis y Auto Magnum
SEMANA 1: Super sustrato y aireación de macetas
3M • Frodo's & OG Kush
SEMANA 7: Elaboración de auxinas.
SEMANA 10: Humato potásico de leonardita enriquecido con minerales.
3M • Diesel bastard.
SEMANA 11: Sólidos y Mulch
SEMANA 13: Aireación forzada del sustrato.
SEMANA 14: Elaboración de un Lacto fermento de auxinas, nutrientes y minerales.
3M • Sweet Zkittlez
SEMANA 2: Agua estructurada, agua viva.
SEMANA 3: Ormus y agua de coco.
SEMANA 5: Compactación con luces Cool White.
SEMANA 6: Cicatrizante y protector de cortes o podas apicales.
3M • Sweet Clementine
SEMANA 5: Elaboración de Lacto fermento multi frutas y minerales.
3M • Fresh Candy auto
SEMANA 4: Recuperación de esporas de Microorganismos y Micorrizas.
3M • Tropicanna Poison
SEMANA 7: Elaboración de un semillero de Microorganismos de Montaña Sólidos (MMS)
SEMANA 10: Extracción de HBO con el método QWISO
3M • Black Domina
SEMANA 6: Reutilización de residuos: Mulch de palos secos.
3M • Monster Bud Kush
SEMANA 7: Elaboración de un Bocashi de Pasto ensilado enriquecido con nutrientes y minerales.
3M • San Fernando Lemon Kush
SEMANA 5: Reutilización de sustrato orgánico.
SEMANA 16: GD TIP: ¿Lente u objetivo?
3M • Magnum Auto
SEMANA 5: Aprovechamiento de residuos caseros. Cáscaras de frutas. Deshidratación y almacenaje.
3M • Quick Sherbet
SEMANA 12: Crema tópica de karite y HBO.
3M • Purple Shot
SEMANA 18: Tierra a la tierra.😎
3M • Gorilla Glue
SEMANA 4: Fibra de coco con Microorganismos de Montaña Activados (MMA) para mezclas de sustratos.
3M • Diesel S1
SEMANA 17. Humato PK. Hidrolizado potásico de leonardita y fósforo.
Likes
4
Share


@420Paddy
Follow
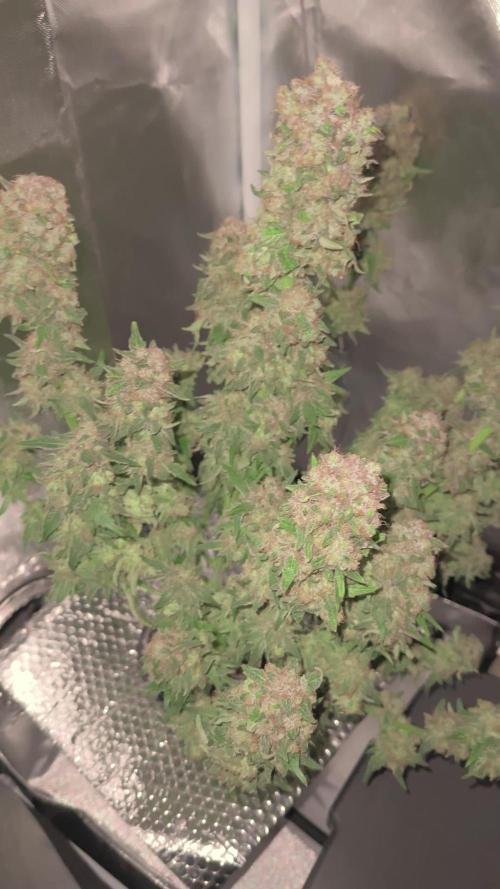
Week 10 starting, was planning to chop after 9 weeks but still not there yet. Flushing starting tomorrow and watching trichomes daily. Well see how week 10 finishes.




Likes
8
Share


@Ieiogrow94
Follow
Eccoci qui...
Tutto va per il meglio, questa settimana non ho applicato stress alla piccola, ma ho guardato l'evoluzione che ha avuto dando i nutrienti.
Ora ha un odore davvero intenso ed uno strato di resina pauroso, vediamo come si riprende dalla defogliazione che ho fatto settimana scorsa.
Seguiranno aggiornamenti, grazie a tutti per il supporto🔥🌲❤️
