
Likes
Comments
Share


@ISCA_Abi_In_Da_HOoD
Follow
hello
after 4 weeks of growth we have just changed the soil and put in new pots in 11 liters.
the red tea I will make them myself in our mixture we have 60l of perlit 70l of coco 50l of soil and to finish 10l of hummus worms.
i changed the lamp too we are now under the zeus at 25% to start I will increase in the days
coming .
to talk about the plants first of all thank you very much to sweet seed for collaborating with me I am very happy with the variety and their way of doing things.
the plants they behave well except the three in the middle which remain very small despite all the attention that I pay them we will see better in the weeks to come what it will give here thank you very much to you good continuation kisses

Likes
12
Share


@cookingwithninja
Follow
day 14 added 1/2tbsp magnesium sulfate in 5gal water along with regular flower water amendments. 1gal of water per day average, bridal and thunder can take more water. Ph 6.8 today
day 15 I will defoliate in a few days :) day 15 video, you see some stem action
day 16 video
day 17 I added (4x20w daisy-chained)80w of poop purple ancient leds Keep adding soluble PK, organic booster etc. I see the stacks relax on defoliation for a few days, maybe tomorrow morning (skip day21) I feel like I will be able to chop week 6-7 as my last grow, push hard fast-continue everything is great, soon bridal and thunder will require 1gal water per day. I would like to see even more mass. I'm extremely happy, starting to see frost
day18. BIG UPDATE many short vids of final defoliation(ahead of "day 21"). Wild amendments appeared! Any recommendations for a lawnmower? Bridalparty stretched over an inch overnight, led touch diode burn on 1 spot. Raised lights slightly, Added new amendments into water. Bridal wants to drink more than 1gal per day, So I will be using almost 5gal-ish water per day not denying the plant needs-watering. I am very happy! defoliation took about 4h today.

Likes
77
Share

@RockoCalenberg
Follow
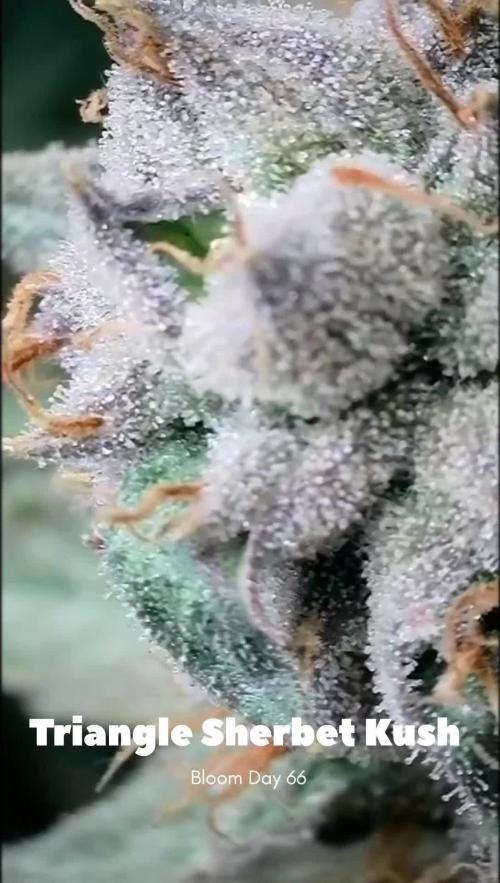
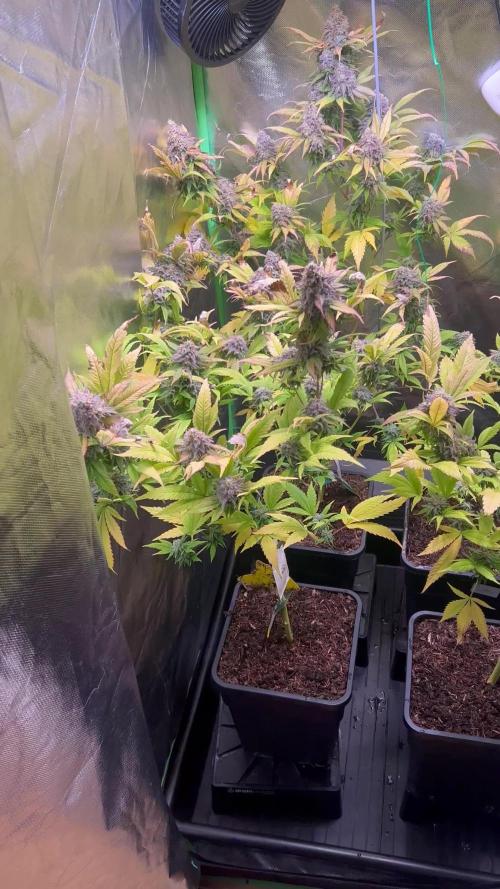
Blütetag 66 / Tag 126 –
Final Ripening – Kush bereit, Gusher kocht noch
Der Dutch Passion Double Run geht jetzt klar in die finale Reifephase.
Beide Pflanzen zeigen sehr deutlich ihre genetischen Unterschiede – vor allem beim Reifetempo. Während die Triangle Sherbet Kush schon stark nach Ernte aussieht, lässt sich die White Gusher 33 noch etwas Zeit.
🌡️ Klima
Klimatisch wurde es diese Woche wieder etwas kühler und feuchter.
Das merkt man im Zelt sofort: Die Luftfeuchtigkeit steigt schneller und der VPD wird etwas schlechter.
Ohne Klimaanlage lässt sich das nicht immer perfekt ausgleichen, aber in dieser späten Phase dürfte das die Pflanzen nicht mehr wesentlich beeinträchtigen.
🌿 Pflanzenstatus
Beide Pflanzen befinden sich sichtbar im Endspurt, allerdings mit unterschiedlichem Tempo.
Die Triangle Sherbet Kush wirkt inzwischen nahezu ausgereift. Die Buds sind massiv angeschwollen, dicht und schwer. Viel Wachstum passiert nicht mehr – sie konzentriert sich jetzt hauptsächlich auf Reife und Harzproduktion.
Auch die Blattstellung zeigt das deutlich: Viele Fächerblätter stehen im typischen Kanu-Modus und wirken fast unbeweglich. Die Pflanze signalisiert ziemlich klar, dass sie langsam fertig ist.
Die White Gusher 33 dagegen braucht noch etwas Zeit. Sie wirkt insgesamt etwas aktiver und schiebt stellenweise sogar noch leicht nach, obwohl einige Buds schon recht weit aussehen.
Struktur / Genetikvergleich
Gerade jetzt zum Ende wird der genetische Unterschied besonders sichtbar.
Die Triangle Sherbet Kush bringt klassische Kush-Struktur:
extrem kompakte, schwere Buds, dicht gestapelt und massiv angeschwollen. Die Blüten wirken fast wie gegossen.
Die White Gusher 33 ist ebenfalls sehr frostig und kompakt, wirkt aber insgesamt etwas struppiger und leicht blättriger aufgebaut. Zwischen den Buds sitzt etwas mehr kleines Blattmaterial, und durch das leichte Foxtailing wirkt die Struktur lebendiger.
Kurz gesagt:
• Triangle Sherbet Kush: kompakte, schwere Kush-Buds
• White Gusher 33: etwas sativa-lastigere Struktur mit Foxtails
🔬 Blütestatus / Trichome
Bei der Triangle Sherbet Kush sind bereits einige bernsteinfarbene Trichome sichtbar. Viele Köpfe sind milchig, aber noch nicht vollständig durchgehend trüb.
Eigentlich wäre sie schon fast im Erntefenster, darf oben aber ruhig noch etwas weiter Richtung Bernstein gehen, damit auch die unteren Buds sauber ausreifen.
Die White Gusher 33 ist hier noch etwas zurück.
Milchige Trichome nehmen zwar zu, aber Bernstein ist noch kaum vorhanden.
Dazu kommt, dass sie stellenweise weiterhin Foxtails bildet – teilweise sogar an kleineren Buds, bei denen man dachte, sie wären schon fertig. Genau das macht das Timing etwas tricky.
Was beide Pflanzen aber deutlich gezeigt haben:
Diese Woche wurde noch einmal kräftig eingezuckert. Die Harzproduktion hat sichtbar zugelegt und der Geruch wird zunehmend stechender und intensiver.
💧 Pflege
Die Nährstoffphase ist abgeschlossen.
Gegossen wird jetzt nur noch mit klarem Wasser, damit die Pflanzen sauber in die Endreife laufen können.
⏳ Ausblick
Jetzt beginnt das klassische Ernte-Timing-Spiel.
Die Triangle Sherbet Kush wäre vom Gefühl her eigentlich schon bereit.
Die White Gusher 33 braucht dagegen noch ein wenig Zeit.
Darum heißt es jetzt: Geduld.
Eine Ernte in etwa einer Woche ist gut möglich –
es kann aber auch sein, dass die White Gusher noch etwas länger stehen bleibt.
Viel fehlt auf jeden Fall nicht mehr.
🏁 Wochenfazit
Kush ist bereit.
Gusher braucht noch.
Grow on 🌱
Rocko
Flower Day 66 / Day 126 –
Final Ripening – Kush ready, Gusher still cooking
The Dutch Passion Double Run is now clearly entering the final ripening phase.
Both plants are showing their genetic differences very clearly – especially when it comes to ripening speed. While the Triangle Sherbet Kush already looks very close to harvest, the White Gusher 33 still wants a little more time.
🌡️ Climate
The climate this week became a bit cooler and more humid again.
You notice that immediately in the tent: humidity rises faster and the VPD drops slightly.
Without an AC it’s not always easy to balance perfectly, but at this late stage it shouldn’t affect the plants too much anymore.
🌿 Plant Status
Both plants are clearly in the final stretch, but moving at different speeds.
The Triangle Sherbet Kush now looks almost fully matured. The buds are massively swollen, dense and heavy. There isn’t much growth happening anymore – it seems to focus mainly on ripening and resin production.
The leaf posture also says a lot: many fan leaves sit in the typical canoe position and hardly move anymore. The plant clearly signals that it’s almost finished.
The White Gusher 33, on the other hand, still needs a bit more time. She looks slightly more active overall and in some places she even keeps pushing a little more, although some buds already look quite advanced.
Structure / Genetic Expression
At this stage the genetic differences become especially visible.
The Triangle Sherbet Kush shows classic Kush structure:
extremely compact, heavy buds stacked tightly and swollen to the maximum.
The White Gusher 33 is also very frosty and compact, but overall appears a bit rougher and slightly leafier. There are more small sugar leaves between the buds, and the light foxtailing gives the flowers a more lively structure.
In short:
• Triangle Sherbet Kush: dense, heavy Kush buds
• White Gusher 33: slightly more sativa-leaning structure with foxtails
🔬 Flower Status / Trichomes
The Triangle Sherbet Kush already shows some amber trichomes. Many heads are milky, though not completely cloudy yet.
She’s basically already inside the harvest window, but it wouldn’t hurt if the top buds develop a little more amber so the lower buds can fully mature as well.
The White Gusher 33 is still slightly behind.
Milky trichomes are increasing, but amber is still rare.
She is also still producing some foxtails, even on smaller buds where you would think development was already finished.
One thing that became very obvious this week though:
Both plants got noticeably more frosty. Resin production clearly increased and the smell is getting sharper and more intense.
💧 Care
The nutrient phase is finished.
From now on the plants are only getting plain water as they move into the final ripening stage.
⏳ Outlook
Now it becomes the classic harvest timing game.
The Triangle Sherbet Kush feels almost ready already.
The White Gusher 33, however, still needs a bit more time.
So for now it’s simply about waiting a little longer.
Harvest in about one week seems possible –
but it could also be that the White Gusher stands a bit longer.
The finish line is very close now.
🏁 Weekly Summary
Kush is ready.
Gusher still needs time.
Grow on 🌱
Rocko

Likes
12
Share


@NorthernChemist
Follow
July 11: Finally this week getting some heat with 25-30 deg C daytime highs. Plants are thriving with a lot of vertical growth and flowers starting to build. Resin is developing nicely. CBD Crack is a smaller plant comparatively, but the resin smells spectacular.


Processing
Likes
2
Share


@Johan2
Follow
Trycs are are showing lots of amber now , will pull her 3 days .
Still flushing very thirsty girl right now .
Amazing smell now and very frosty , stripped 90% shades out for the last 3 days , lots of finger hash from the leaves and they should make great butter for cookies 🍪
Buds are so fat and heavy 1/2 stems have snapped ☹️. Should be fine .


Likes
14
Share


@MG2009
Follow
05/27/2021
Its been a while but all is well, the red light only seems to have encouraged lots of new growth. But I think I'm going to stick with 25-50% blue spectrum and 100% red for the finish.
I'm kind of disappointed that she has no distinguishing smell, but she was bred for resistance to PM specifically. All the good stuff will come once i have stabilized consistent PM resistance.
(Work in progress)
Then the good stuff will be worked in..... If needed.
Ps.
I do believe it will likely be 12+ weeks of flowering to finish
(Hope she has a racy/trippy sativa side) fingers crossed🙏
Likes
30
Share


@Fatnastyz
Follow
Still growing! She started showing some hunger signs....increasing her ppm to about 1100-1200 now.
Her top half seems to be about a week ahead of her bottom.
I think I'm going to have to learn how to harvest in stages this time. Her lower half is just soooo far away from the light.
She slowed down to only growing a half inch a day now....then....She FINALLY stopped growing (i think) Topped out at 44"! At least I hope, I have no more room LOL.
I had the light as high as I could get it...then I took it off the hooks and tied it to the top tent bars. and got it a bit higher LOL She's only 2 to 3 inches away from the light now so fingers crossed she stopped growing.
I got my first smell off of her this week too! Straight ORANGES, loved it!
6/19 - 39.2"tall
6/20 - 41"
6/21 - 42"
6/22 - 42.5"
6/23 - 43"
6/24 - 43.5"
6/25 - 44"
6/26 - 44"
Likes
5
Share


@Ewok923
Follow
They are Blossoming going to remove some more fan leaves from the 4 hydro they are super bushy going to have a great Canopy.


Likes
54
Share


@rhodes68
Follow
What a frosty strain, rivals Stardawg in the stickiness. Good resin potential
Not a big feeder, normal levels do the trick as they will show some burn if they dont like it.
Not a stinker at all
Will try to foxtail @ 85F
The stretch caused by the tent space issues with the Green Crack really shows here, man 2 ft of plant that was not needed.
My fault, start flower under blue or white lights until stretch ends as they will get tall
Serious stretch under HPS
Excellent genetics, taste test in a few days
I _ WANT_ MORE ... please 😉
Letting the FF7 stay in the tent a bit longer, removed all but the small fans to keep the air moving but slow down the rate. Just test weights (love hanging them like this) say @200g a plant.
maybe we will see
Almost forgot, pulling a small branch from Aeryn to test
Easy harvest, nice dense frosty sticky buds, cannot ask for more.

Likes
4
Share


@mlsheahan
Follow
Matilda has stopped making new fan leaves and started stacking on colas now. She has definitely stepped up her loudness as well. I could just sit in the tent and enjoy her complex; fruity, funky cheese, darkness all day long. I still have 4-5 weeks until I even think about harvesting.

Likes
1
Share


@Dabcik
Follow
Aumentato distanza lampada e ph dell’acqua di irrigazione. Le piante stanno bene hanno un bello stretch che sto cercando di tenere sotto la rete. Ora i fiori iniziano a formarsi


Likes
13
Share


@420DeepGrow
Follow
Gracias al equipo de AnesiaSeeds, Marshydro, XpertNutrients y Trolmaster sin ellos esto no sería posible.
💐🍁 Oracle Octane:
Oracle Octane es una cepa altamente potente y con un alto contenido de THC elaborada a partir de una Blackberry Octane seleccionada, excepcionalmente rica en THC y aromática, y de la pesada Blackberry Oracle, inédita, de nuestro propio acervo genético. El desarrollo de esta carismática e impresionante variedad abarcó 8 generaciones y un enorme esfuerzo de cría.
La variedad tiene un sabor intenso e inolvidable que recuerda a bayas dulces y limones frescos.
Las plantas a partir de semillas crecen increíblemente hermosas y sus hojas y cogollos a menudo desarrollan tonos de rojo, morado intenso e incluso casi negro.
Esta cepa vigorosa y ligeramente índica dominante tiene un tiempo de floración de unas 9 semanas, produce hojas grandes y alcanza una altura de unos 120-130 cm en el interior.
🌻🚀 Consigue aqui tus semillas:
https://anesiaseeds.com/product/oracle-octane/
💡TS-3000 + TS-1000: se usaran dos de las lámparas de la serie TS de Marshydro, para cubrir todas las necesidades de las plantas durante el ciclo de cultivo, uso las dos lámparas en floracion para llegar a toda la carpa de 1.50 x 1.50 x 1.80.
https://marshydro.eu/products/mars-hydro-ts-3000-led-grow-light/
🏠 : Marshydro 1.50 x 1.50 x 1.80, carpa 100% estanca con ventanas laterales para llegar a todos los lugares durante el grow
https://marshydro.eu/products/diy-150x150x200cm-grow-tent-kit
🌬️💨 Marshydro 6inch + filtro carbon para evitar olores indeseables.
https://marshydro.eu/products/ifresh-smart-6inch-filter-kits/
💻 Trolmaster Tent-X TCS-1 como controlador de luz, optimiza tu cultivo con la última tecnología del mercado, desde donde puedes controlar todos los parametros.
https://www.trolmaster.com/Products/Details/TCS-1
🍣🍦🌴 Xpert Nutrients es una empresa especializada en la producción y comercialización de fertilizantes líquidos y tierras, que garantizan excelentes cosechas y un crecimiento activo para sus plantas durante todas las fases de cultivo.
Consigue aqui tus Nutrientes:
https://xpertnutrients.com/es/shop/
📆 Semana 4:
Aparecieron un monton de erizos esta semana, el temporal ha hecho algo de mella en la carpa al bajar las temperaturas aunque todo sigue correcto.
Continuamos con las dosis de nutrientes recomendadas por el fabricante.

Likes
18
Share


@Sabac
Follow
Plantas sanitas
Hoy les hice una defoliacion y podas a las partes bajas
A la noche se pasan después de 5 semanas
A flora 12/12.


Likes
8
Share


@Staffedition
Follow
сем привет друзья!
Растние растёт не по дням а по часам.
Набирает жирок на шишках полным ходом.
Очень хорошо кушает
Цветёт и пахнет
Всем мира и добра и хороших урожаев!

Likes
2
Share


@CannaIGrow
Follow
She’s growing well and finally starting to grow
out of her lil leaf mutation at the beginning.
Likes
6
Share


@masterofsmeagol
Follow
5/25 Some pics may be repeated because I forgot to add a new week. Waited until about 11 to bring the girls outside. They were definately dry on top so I used the rest of the gallon to water them. When going outside I noticed a specific kush plant that's lighter than the rest. I really need to up my water volume on these big plants. They are also getting close to not liking it in the 1 gal. and are ready for a transplant. I cleaned the cage so as soon as the weather permits these girls will be outside in the direct sunlight. Basking in the sun in the cage to finish hardening before going into their final homes which will be 20-30 gal smart pots and a 50 gal grow pot. Well SOME of them are ready for transplant. The link kush seems to take its time but it looks extremely indica-E. Weather looks like it will be amazing this week so I'm obviously stoked. Wouldn't suprise me if these girls were outdoors be the end of the week!
EDIT: THE GIRLS STAYED OUT FOR 3.5 HOURS AND LOOKED FANTASTIC. TUEY GOT SOME INTENSE SUN, EXPOSIRE TO THE HIGH RH AND A LITTLE EXPISURE TO THE HIGH WINDS. SPECIAL KUSH SEEMS TO BE THRIVING. I THINK IT WILL DO WELL IN THIS CLIMATE. THAT ONE MK ULTRA IS GROWING AT A RIDICULOUS RATE. I WATERED THE PIBK KUSH THAT WAS LIGHT. I CANT WAIT FOR THE UPCOMING WEATHER. I CAN EXPOSE THE PLANTS TO SOME DIRECT SUNLIGHT AND SEE HOW THEY HANDLE IT. I CAN ALSO GET THE GROW BAGS READY WITH SOIL MOXED AND THEM IN THE RIGHT LOCATION THE DAY BEFORE THE TRWNSPLANT TO FINAL HOME BUT IM GETTING AHEAD OF MYSELF. IM HAPPY THUS FAR. I also added another half hour of darkness so the plants will be closer to actual daylight times. They're down to 16.5. I'd like to have them lower by now but it is what it is. If some reveg I'll deal with it.
5/26 Plants seem to grow an inch I'm a day. MOST are getting to the point where they want to stretch their feet out. Good thing they'll be going in their final homes as soon as they are hardened off completely. I brought them out around 8 this morning. I have to be back at noon but I'm uncertain if leaving them out that long is a good idea. I'll probably have to check them in an hour or so. They're in the lean-to but THAT gets direct sun until the sun rises high enough in the sky to block it. I put them in here rather than the cage so they can build a tolerance to these harsh winds. Topsoil was dry as fuck. I watered everything. I focused on those that SEEMED the lightest and the largest plants. That MK Ultra plant I fimmed is going to be MASSIVE. I'll update what I do as I do it. Oh I also cleaned the bags twice and they are hanging inside the cage with the direct uv rays hitting any part that's discolored. I MIGHT do one more cleaning but I doubt it. Twice is enough. Technically three times but still. I want things to go right. It looks like I've got some pretty good phenos.
EDIT: I PULLED IN (BLOCKING VIEW FROM PART OF THE DRIVEWAY OFF) BECAUSE THAT WAS CLOSER TO MY PLANTS. I GET OUT AND START ADMIRING MY PLANTS AND LOOK ACROSS THE STREET TO SEE TWO STATE TROOPERS AND SOME DETECTIVE ACROSS THE STREET. DAD SAID AN AMBULANCE CAME BUT LEFT WITH NO LIGHTS ON. THEY WERE TALKIMG TO THE COUPLE SEPERATELY. I ATE LUNCH AND THEY WERE STILL THERE. MY HOT WIFE WENT OUT AND THE ALL STARTED FUCKING RUBBER NECKING. MEANWHILE I BROUGHT THE PLANTS INSIDE WITH THE SMALL COVER MY S.U.V PROVIDES LOL. PLANTS WERE LEFT IN DIRECT LIGHT UNTIL IT ROSE HIGH ENOUGH TO CUT IT OFF TO THE LEAN TO. PLANTS SEEM LIGHT. WELL SOME DO. I NEED TO GET A GOOD WATERING SCHEDULE DOWN. JUDGING BY HOW THESE PLANTS TOOK IT TODAY I THINK THEYLL BE OUTSIDE IN FOREVER HOMES WITHIN A WEEK.
5/27 Just poked my head in and checked on them real quick. NO damage whatsoever from all that time in the sun. I left them inside this morning so I can bring them out later in the day to see what happens. I'll add pics later and update what I do.
EDIT: BROUGHT THE PLANTS OUT TO THE CAGE AT A LITTLE BEFORE 10AM AND LET THEM BASK IN THE 85° SUN. THE WIND WAS A LITTLE ROUGH ON THEM. IT WAS ACTUALLY THRASHING THEM BUT MY INTUITION SAID 'LEAVE THEM BE' SO I DID. I DID MORE CLEANING AND FIGURED OUT SPACING IN THE CAGE AND I MIXED A 30GAL GROW BAG AND 2 20GAL GROW BAGS WITH A 50/50 MIX OF FOX FARM OCEAN FOREST AND HAPPY FROG. SOUL WAS MIXED WITH A GRADE STAKE AFTER BEING PUT IN A GALLON AT A TIME (TO ENSURE EQUAL PARTS) AND FINALLY MISED BY HAND. TAKES A LOT OF WORK. IM NOT GOING TO BE AS PICKING WITH THE OTHER ONES. I STILL HAVE MY 50 WITH SOIL IN IT. MAINLY DUE TO LAZINESS AND THE PAIN IN THE ASS IT IS TO MOCE THE FUCKER. PLUS IF IM LOW ON SOIL (WHICH IM NOT) THAT WAS GOOD SOIL AND THE PLANT HAD NO PROBLEMS SO I GUESS IF NEEDED IT FOULD BE REUSED. I NORMALLY JUST EMPTY THAT FIRST AND MIX A SHIT TON OF SOIL IN THERE AND SHOVEL IT IN THE BAGS. THIS WAS MUCH HARDER. PLANTS GOT CLOSER TO 2 HOURS OF DIRECT SUNLIGHT BEFORE I MOVED THEM TO THE LEAN TO. I WILL UPDATE WHEN I HRING THEN IN BUT DESPITE THE HARSH SUN AND WIND THEY SEEM FINE.
EDIT: BROUGHT THE GIRLS IN AT TWO BECAUSE MY WIFE HAD AN APPOINTMENT. NO DAMAGE WHATSOEVER. I THINK IF I USE THIS WEEK TO INCREASE DAYLIGHT HOURS AND UP THE WATERING THESE PLANTS WILL BE READY TO GO IN THEIR HOMES. A FEW ARE BIG AND DEF READY TO STRETCH THEIR FEET.
5/28 With the increased sun some these plants are out growing their containers. PLANTS SPENT APPROX AN HOUR AND A HALF IN DIRECT 85° SUN. EVERYTHING SEEMED FINE AND I WAS GOING TO LEAVE THEM FOR THE DAY IN THE CAGE. THEN I NOTICED THE BIG MK ULTRA'S MAIN STEM (IT GOT FIMMED BUT THE MAIN ONE) WAS STARTING TO DROOP A LITTLE. I PICKED THE PIT UP AND DESPITE A LITTLE BIT OF MOUSTURE ON THE TOP THE PIY WAS LIGHT AS A FEATHER. PLUS SETTING ON THE THEM ON THE TAR WASN'T THE BEST IDEA EITHER. I MISED UP SOME WATER AND WATERED THE PLANTS THAT SEEMED LIGHT. I NEED TO PICK UP LIKE ONE MORE BAG OF OCEAN FOREST FOR MY 50 GAL. I'M GOING TO TRY TO FINISH MY OTHER TWO 20'S AND THE TWO 10'S TONIGHT SO I'LL KNOW WHAT IM LACKING. ITS BASICALLY JUST THE 50. IF MY INTUITION SAYS ITS OK ILL TALE THE "COOLER" DAY TOMORROW AND TRANSPLANT THE THREE PLANTS TGAT ARE GETTING TO BIG FOR THERE POT. ÌF NEEDED I MIGHT GET SOME SCREENS TO USE AS A "BLIND" SO THE PLANTS DONT GO STRAIGHT TO FULL SUN ALL DAY.
EDIT: TJAT HUGE MK ULTRA REVOVETED NOCELY ONCE WATERED AND PUT IN THE SHADE. IT NEEDS TO BE TRANSPLANTED. I MAY DO ITCTOMORROW. PLANTS HAVE GOT TO BE CLOSE TO HARDENED. I MIXED ALL MY SOIL AND FILLED ALL THE GROW BAGS WITH THE MIX. I FINISHED CLEANING THE CAGE AND REMOVED BAMBOO AND TRELLISING. TOMORROW IS GOING TO BE A MILD DAY AND PERFECT FOR TRANSPLANT. SOME OF THESE GIRLS ARE GETTING VERY BIG. I RAN OUT OF SOIL AFTER THE LAST 10GAL GROW BAG. ITS NOT FILLED "ALL" THE WAY AND I GAVENT FILLED MY 50 GAL. I'LL GET THE REST OF THE SOIL I NEED FOR THAT 50 TOMORROW.


