
Likes
Comments
Share


@Borberad
Follow
Woche zwei beginnt mit immer breiter und größer werdenden Blättern. 😊
Scheint ein recht breitblättriges Blümchen werden zu wollen. 🌴
Habe im Laufe der Woche die Düngermenge nach und nach angehoben.


Likes
13
Share


@Popothamio
Follow
Fue como la semana anterior sigo alternando riegos con abono si abono no y esta semana uno de los días se me quedó la luz encendida y tuvieron 36 horas seguidas de luz, espero no les pase nada grave. Por lo demás todo bien


Likes
7
Share


@green_impression
Follow
The Ladys are now in their last week and only going to be flushed without nutrients till harvest
Processing
Likes
15
Share


@HisHope
Follow
8/17 Week 5 Flipping
Lights set to 11-13 for the first few days then 12-12
Nuets will transition accordingly
Took two cuttings for clones
Reducing feeds to once a day during the switch
Intro Cocotek Bloom a/b at 5ml/gal each
Reduce Grow to 10ml/g each
Next feed half and half
8/19
Switching to 12-12 from 11-13 think its done its work changes are afoot
8/20
Colas forming quickly may have to flip the week to Flower, lets hope so 😉
They getting a dose of Kangaroots 5ml/g and Fish Shit 2ml/g at intervals during transition purely as plants seem to need.
Pics tonight
8/21
Not there entirely yet but wont be long at all
Vertical growth has picked up strongly, 2" in 3 days, though I really wont call it stretch yet
Continued light defoliation keeping center clear
Nuets as is for now

Likes
26
Share


@CapeGrows
Follow
The pistils stretched and formed very nicely. Plant stretched fully to 112cm. We are cutting all grow nutrients from here on in with sufficient nitrogen in the micros.

Likes
1
Share

@DogDoctorOfficial
Follow
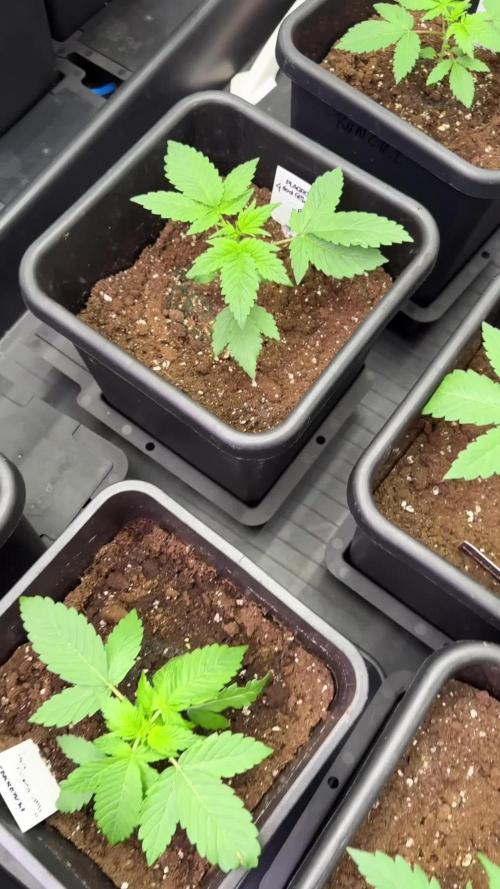
🌱 Black Diamond – Plant A (8A) | Week 3 Vegetation
8×8 Adventure – Folder 08
Welcome back to another chapter of the 8×8 Adventure, my personal pheno hunt where twelve different cultivars are being grown simultaneously using the 12/12 From Seed method. The goal of this project is to explore each cultivar’s natural structure, flowering speed, resin production, aromas, and final quality while allowing every phenotype to express its own unique personality.
This grow is cultivated entirely with the Plagron Terra nutrient line, maintaining a straightforward feeding schedule while documenting every stage of development through macro photography and weekly reports. Every plant receives exactly the same environmental conditions, allowing genetics to tell their own story.
Black Diamond Plant A continues to show exactly why this strain caught my attention. While still young, she already displays excellent vigor, healthy spacing, and the elegant structure that makes a phenotype exciting to follow.
⸻
🌿 Grow Conditions
Week: 3 (Vegetation)
* 🌡️ Day Temperature: 27°C
* 🌙 Night Temperature: 25°C
* 💧 Humidity: 55%
* 🌱 Substrate Temperature: 21°C
* 💦 Solution Temperature: 20°C
* ⚡ EC: 1.3
* pH: 6.0
* 💨 CO₂: 666 ppm
* 💡 Light Schedule: 12/12
* ? Pot Size: 15 L
* 🚿 Water Consumption: Approximately 1 L per plant/day
Feeding Schedule
* Terra Grow — 1.8 ml/L
* Power Roots — 1 ml/L
* Pure Zym — 1 ml/L
* Sugar Royal — 1 ml/L
* pH Plus — adjusted as required
* Lemon Kick — adjusted as required
⸻
🌱 Plant Development
Plant A is developing into a beautifully balanced young lady. She has established a thick central stem with evenly spaced internodes, while the lateral branches are already beginning to push outward, creating the framework for what should become a very productive canopy.
Her leaves display a rich, healthy green with excellent turgor, showing that nutrition and irrigation remain well balanced. New growth is arriving rapidly and with good symmetry, suggesting that she has fully settled into her container and is now directing her energy toward vigorous structural development.
Compared to many plants grown under the 12/12 From Seed method, she is maintaining a compact architecture while still producing enough internodal spacing to ensure future flower sites receive adequate light penetration.
⸻
📷 This Week Behind the Lens
This week’s photographs really highlight the quality of her structure.
The side profiles reveal a strong main stem with excellent node stacking, while the overhead shots showcase an increasingly symmetrical canopy. The macro images capture healthy new growth emerging from every node, giving an excellent preview of the flowering sites that are beginning to form.
One of my favorite photos is the overhead shot where the plant resembles a perfectly balanced green star, each fan leaf extending naturally without competing for space. These are exactly the kinds of structural characteristics I enjoy documenting during early development because they often hint at the final architecture of the mature plant.
⸻
🌿 Looking Ahead
As she enters the coming week, I expect Plant A to begin transitioning fully into her stretch phase. The secondary branches should accelerate noticeably, gradually transforming the compact vegetative structure into a canopy filled with evenly distributed flowering sites.
If she continues at this pace, she has every opportunity to become one of the standout Black Diamond phenotypes within the project.
For now, the objective remains simple: maintain stable environmental conditions, continue the current feeding schedule, and let her natural genetics guide the process.
Growers Love and as always, patience is part of the process… and this lady is definitely making me curious about what’s coming next. 💚


Likes
10
Share


@captaincondor
Follow
Very pleased with this grow so far, I often mess up photo periods one way or another but think im getting somewhere now. I am growing in a mixture of soil and coco with plenty of perlite and it seems to working out better than just in soil , I have also added a few worms not sure if their still allive but will find out later. The pistols are still white so hopefully they will turn amber soon. I have one more seed left of this strain so I am hopeful it will be nice. I am looking forward to seeing it chopped soon to make way for my wedding cake which will probably have to share the tent later with another auto

Likes
5
Share


@TheGreenDisciple
Follow
Day 80 ~ Plants are looking and smelling great. I have been keeping an eye on the trichomes for the first plant and she looks like she will be ready right after the harvest moon! So I am excited to harvest her on Friday. While plant 2 is still another week and a half to 2 weeks away!


Likes
7
Share


@Silvadragon
Follow
Hello all hope you friends and pets are staying cool. Cassie it is around 100 degree lately and plants and herbs are dying and drying out😢. I’m luck my tree are doing very well. I just give them a dose of 1,3,3 of organic tea with good old fashion unsulpher molasses water. The buds are coming out thick and it smell good. Lucky in my state it legalized for cultivation. Hopefully it rain this week as I’ve got a vegetable garden. The lawns are dried up and droughts in many places. Sad time we live me. Everything is so expensive thst why I’ve stated a vegetable 🥦 food is expensive.

Likes
3
Share


@medique
Follow
PK boost was added for this week as lower fans were starting to show serious PK deficiency. Defoliated about 25% of each plant, basically the lower fans/growth that was not getting light. Added some CFLs in a tent dark spot

Processing
Likes
54
Share


@rhodes68
Follow
1/29 Week 5
Nothing but the kind of problems I asked for, some white tips that mean an increase of runoff is needed.
Half expected to see this as I have been varying the amount as a learning experiment. Will up to 20% for a few days
In addition will be reducing nuets slightly keeping cal-mag as is until reason to change presents itself.
Will be kind of boring the next couple of weeks at least till they get into the big tent.
1/30 Aeryn now at 15 inches
Runoff at 40% and nuets reduced to lower pot EC
Ive tossed out my old bottle of Cal-Mag I think its turned on me as these white tips did not appear until it was folded into the feed.
Just no way this dose of nuets is causing the tips to show burning.
2/1 Major defoliation last night at lights out.
Removed perhaps 25-40% or leaf mass on all plants to allow them to stay in the tent another two weeks.
It was time to learn the process anyway, took a compromise path to doing it, some recommended taking more some less, hey sounded good to me.
Plants doing very well after defoliation except for those aggravating white tips, going to be reducing Cal-Mag again to 1ml/gal and keep CT at 5ml/gal taking C-M to zero based on what I see.
2/2 Dropped Cal-Mag from feed, want to see if that has anything to do with those white tips.
Runoff is at 40-50% ppm out under 900 so dam if I know. Will continue to defoliate as we go when something pokes its head where it does not belong.
Otherwise they are beautiful, good job so far Fast Buds. 👍
2/3 man they recover fast, removed a few fan leaves that poked their heads where they shouldnt.
Add Si to feed tomorrow for stem strength
Not comfortable leaving these in veg for two more weeks, just asking for problems. So...
Plan for flowering:
Flipping this weekend so new week will still be veg.
Removing one plant from the Moya tent to the Flowering tent to relieve space pressure as both tents will be set to 12/12 and just flower them all.
Should have space in Moya to cover the few days they are in there with just three plants, have a bout 18" of light hang to work with.
Thinking of moving Aeryn as she is largest and most likely to cause issues.
Just not sure what the stretch is going to be 😳
2/4
The white tips were absolutely caused by the Cal-Mag, considering the doses and PPM that is puzzling to say the least.
Adding Si for a few feeds to get em ready for flowering as I have no idea how these are going to grow so heading off some potentials.
Plants hit 20" over night still flipping in a few days
Likes
25
Share


@PrairieFrostGrow
Follow
******** Week 9 - Feb 3 to 9/20 (Days 57 - 63 from seed popping out)
She has continued to swell this week and stacking her buds. The hairs are turning this week. Kind of a boring week in a way because she has been such an awesome girl to grow!! Have not spent anytime looking at Trich colour this week.....too early anyway. Trying to keep her environment correct so she is happy and those buds swell. Continue to reduce the temperature slightly during the day and night as well as lowering the humidity. She is a very pretty girl and has certainly impressed me now at weeks 7 to 9.......this is a learning grow though because I was not sure what to expect in weeks 3 to 5 but now understand the genetics better. Growing another girl in a 1 gal pot at the same time, just short of 2 weeks behind, and learning from that girl as well so we know the best way to run the last 4 seeds. Hint......I don’t feel 1 gal pot will be the winner and suspect a 3 gal might be the one for me and my style.
What I have reflected on is that this girl has been very impressive to grow even though I have thrown curve balls at her. A little more attention to the LST ensuring a more even canopy and lighten the feedings, this girl can impress!😍 She didn’t like the light intensity in early weeks and preferred a lower pH. Given that she was slow growing at the start I was unsure of how far to push LST and obviously should have tied down her main cola but she was more resilient than I gave her credit for. On bigger branches I would clip off another one of the lower nodes than I did to give a little more energy to fill in the tops. Not sure this girls top cola will fill in as much as one would like but her side branches are making up for it and will definatley add to the weight.........take your time girl😀
Much debate this week over how long she will run in order to determine her last feed.🤪 She had her last feed three times😃 but it was finally Saturday Feb 8, Day 62 as the last day of feed. Plan it to just flush with water and Rezin & Liquid Weight to the end.....or early 70’s anyway if she will hold out that long🤞
She still has several nice white hairs but the red guys, drying, did happen a fair bit this week. She is ripening up. Almost picking up speed but hard to say.....my guessing so far has been off when trying to read this girl so “I am just along for the ride” hope she has a couple more weeks in her yet.😁 The long lanky grows often have you wishing they would have stayed just another 6” shorter.😀 Had to keep the lights higher in the tent to accommodate this girl and now tough to raise as high as I would like for Skywalker. It’s all good though as she is filling in along with the other girls👍She has pretty buds to look at but they are not swelling as much as I would like yet. Hope that comes soon and will continue to lower the temps. Environment is getting colder at night. Crystal production has been strong and very impressive!
Changed the light schedule again this week. Moved her to 19.5 hours of light because she is still not falling to sleep at lights out.
Given she has been very green and tips were burnt a fair bit, will likely use Flawless Finish to flush the medium.
Little more detail:
Feb 3/20 - Day 57
- Water feed today. Runoff in tray was 5.95pH from yesterday.
- 3L plain water with Sensyzime @ 1.5ml/L. 100ppm and 6.4pH going in.
- still trying to raise the medium slightly to over 6.0. Sensyzime to clean up the roots and eat the waste making more food.
- Her red hairs are coming out pretty prominent now on some buds.
Feb 4/20 - Day 58
- Full feed today. Pot still had some weight.
- 3L off full feed with 1125ppm and 6.05pH
- Runoff water in tray before feed: 800ppm and 6.1pH
- Runoff water in tray after feed: 1000ppm 6.0and pH
- Heavy leaf strip today. Almost anything with a stem was removed.
Feb 5/20 - Day 59
- nothing today.
- She is ripening more now. She is happy and her tips are up:)
- Red hairs continue to come out towards the top of the girl.
- Light cycle changed to 19.5hrs on and 4.5hrs off.
Feb 6/20 - Day 60
- Verify medium today....close to flush
- 3L feed of Sensyzime and Rezin @ 2ml/L and Liquid Weight @ 1.5ml/L. = 100ppm and 5.8pH
- Runoff was 1050ppm and 6.05pH.
Feb 7/20 - Day 61
- Nothing today, still heavy.
- She appears to be swelling more on her buds.
Feb 8/20 - Day 62 - ********Last Feed********
- Giving a bit of a flush with Sensyzime, Rezin, and Liquid weight @ 2ml.
- 6L feed with 100ppm and 5.8pH going in.
- Runoff - 600ppm and 6.15pH. Good numbers but wouldn’t mind the ppm around 1,000.
- Evening giver her last full strength feed as listed for the week.
- 2L feed going in was 5.7pH. Want to try and keep it around the 6.0pH mark as she seems happy slightly lower pH.
- Medium got a good soak and good runoff amount
- That will be it. Hope she goes 10 to 14 more days....
Feb 9/20 - Day 63
- Dry out day
- raised the light a bit.....will use lower pH water in flush thinking 5.8.
- She has some nice buds. She has fattened up and her buds are forming “tips” now.
- Again....frosty frosty girl.
Hope we can drag out harvest day until Feb 22 or 23rd.......🤞😁.....Thanks for the read and hope you have a smooth week!


Likes
3
Share

@Ninjabuds
Follow
Week three of flower is off to an amazing start! At day 22, the ladies are looking incredibly healthy. They're praying like crazy, reaching for the light, and stacking nodes like it's their job. The buds are starting to plump up, and the trichome production is getting intense. I'm so excited to see how they develop over the next few weeks!
Likes
37
Share


@XperencdGmanXG
Follow
week 5 of flower and she has started to show some frosty, frosty, diameter of buds is growing nicely. under canopy seems to be developing nicely as well. Light is penetrating into the lower canopy thanks to the intensity and far red capabilities of this awesome light from Meijiu.
Likes
5
Share


@BasiGoToGrow
Follow
🌱🌞🌱Week4🌱🌞🌱
Bruce is much smaller, LST is almost completely tied to the ground, but looks super healthy. All the side shoots have now been directed and I hope that she will now grow nicely upwards 😅
Sherbet is my queen in this grow so far 🌞
It's just fun to watch the beauty grow. To start the fourth week, I removed some leaves today and directed the shoots in the right direction, otherwise Brucie will soon be completely overgrown 😂 but hopefully it will also have the effect that the good energy of growth will now go in the right direction.... I'll be surprised. Now she looks like a beautiful chandelier 😎
Likes
6
Share


@XanHalen
Follow
Nov 29:
They seem to be accelerating in veg growth but I see a small portion of the leaf on the smaller plant either grew in mutated or somthing cut it, I haven’t seen a single bug in the box so I don’t think it’s that but you never know, and the bigger plant has some issues near the base of its stem, I noticed it before I did the LST and now I’m wondering if I should have addressed that issue before starting the LST. Let me know what you guys think!
Dec 2:
Walked into the room and noticed a faint smell, wasn’t any smell last night when I started the LST on the slower girl. Further inspection showed some white pistols on the bigger girl, I believe she is the culprit for the smell as the other seems about a week behind. They are both now LST‘d and leaf tucked. Enjoy the pics and vid’s!
Dec 6:
I have tied down some of the longer chutes on the bigger plant (will see in week 5 update) to create more airflow and light penetration as I didn’t even realize how bushy the stem and node sections had gotten. I have also cut the chutes coming off the first true leaf. I don’t think I will make any cuts to the smaller one as it’s already a slower growing pheno. Going on a trip starting the end of week secede to late week 8, so I have a automatic feeder coming from Amazon, and I will continue using it through flower to reduce open tent time.


