The Grow Awards 2026 🏆 


Likes
Comments
Share
@Fildjoni
Follow
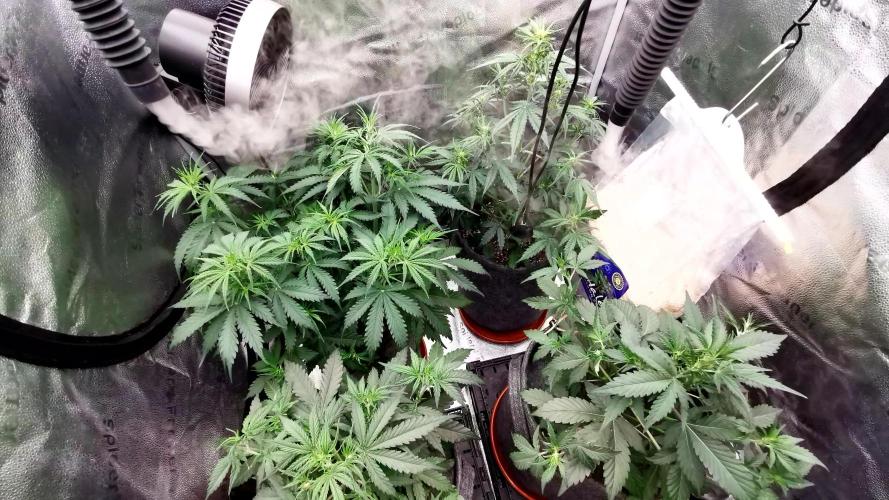
24.10
Aaand here we are in new flower week, plants look good, stucking up buds, middle one realy nice, other two need some time more, but today they are not thursty, no watering, wish them best 🙏🏻🤞🏻
In few days coming 1 more fan and dehumidyfier for tent and room becuse i got lot of trouble with that, hope it will come soon so i dont have problems in this stage when they flower, temperature is good always between 22-27 (night-day)
Thats all from me for today
25.10
They are still not dry, does someone had same Situation in some part of flowering?
They stopped grow before one week for sure, do dont know what to think!?🤔
Stucking upp
26.10
Watering with 0.8 l pro plant with nutrients with cal-mag, stucking good
Dehumidifier arrived today and one more ventilator, hope it will help me to Control situation in tent, wish them luck 🙏🏻🤞🏻😊
27.10
Lokiin good, again 0.7l with nutrients and cal mag, ph 6.25
Humidity is lower for 10% but i also have fight in apartment with moist, so iam wating few days so other dehumidifaier can do the job in room also, temperature is good, new ventilator also work full gas so i hope they Will conitinue progres normaly and good 👍🏻🙏🏻🤞🏻
28.10
They look every day better and better, iam happy, still have some time to bi ticker all over, wish them luck
Big gave 1.3l with cal mag,ph 6.3
Other two, half liter only from same bottel 👋🏻😁😬
Sprayed with neem oil, today they saw first time sun light🙈
29.10
Watering 1.3 l big other two not so thursty aprox. 0.8-1l with nutrients and cal mag, ph 6.4
They geting ticker
30.10
Watering 1l each with nutrients and cal mag, ph 6.3
Aaaand its end of week 3, hope new week will bring bigger buds and nicest colors , wish them luck🙏🏻👌🏻

Likes
38
Share
@PrairieFrostGrow
Follow
******** Week 7 - January 20 to 26, 2020 (Days 43 to 49 from germination)
She continuers to impress with her resilience as I have thrown a couple of curves at her.......but she continues to fatten and grow her buds😎 It was also not without learning though and thats what is so cool about growing this plant.......you always seem to leave a grow feeling like you could do even better next time and therefore challenging yourself to do better......and have dab while doing it😂
Not sure if I have a little different pheno but if I ran her again I would find a way to train her out wider. 5 gal pot diameter idea........maybe don’t fill with as much medium? Again, simply to keep light hitting all the lower sites. Where does the “XL” come into play as well I guess. Removed branches early on that were low. This grow, her narrow leaves have allowed a lot of light down below but it will be felt in a little less yield.....think the pH got a little high....or potassium excess......Terpinator too early? If left to a single cola she would be tall and have a huge cola I suspect......Gorilla Grow with the extension type of potential! She has loved the water feeds. Missed out bit by backing off of the CalMag a bit too much.....stems say deficiency that but leaves show toxicity? (Back to that you always feel you can do better thing😬)
Got a little crazy with the PPM and saw tip burn in week 7. Gave a quick little flush with RO water and Sensyzime to clean up the roots of the salts. Didn’t get crazy though because it was just the top leaves burnt. Been building the medium up to this point so don’t want to wash it all away just yet. She didn’t claw down and over night appeared to still keep moving forward with bud growth.
I did notice a small amount of hairs starting to turn red by weeks end......likely won’t be long before more are red and we go to flush👍 (Make it to end of week 8??) No rush though.......still lots of room to fatten up yet.
In the week a head there will be the last push to get her medium in as good a shape as my skills will warrant. I want to get a good 10 + days of flush but her leaves are going to finish dark from what I can see. Run-off has been reasonable though so will keep fingers crossed 😄🤞
Little more detail....
Jan 20/20 - Day 43
- Drinking lots right now, close to 4L per day, so 2L plain water only in AM. 6.2pH,.
- Feed in PM was light as well. Sensyzime @ 2ml and LW8 & Rezin @ 1.5ml only. 2L given with 75ppm. 5.9pH
- She was given a good feeding yesterday.
- Buds sites are stacking.......she is making me 😃
Jan 21/20 - Day 44
- AM - 3L with Dual Fual A&B @ 1.5ml/L. 725ppm and 5.9pH.
- PM hit her again - full feeding minus Rhino Skin, Sensyzime and Vitrathrive and VeloKelp. 2.5L 1000ppm and 5.9pH.
- Runoff - 1100ppm and 5.9pH.
- top leaves were droopy so the extra feeding in the evening.
Jan 22/20 - Day 45
- Backing off quantity a bit and down to 2L feed in PM. Her pot was still fairly heavy.
- Mass & Terp @ 3ml, Rezin & LW8 & DF @ 1.5ml, CalMag @ 0.5ml = 1300ppm
- Very perky today....standing up all the way down the plant. Liked the feed yesterday.
*******should have reduced this PPM feed......you want to push when you see potential😕
Jan 23/20 - Day 46
- Supplemental feeding only today. Happy so don't rock the boat :)
- Sensyzime @ 2ml, LW8 & Rezin @ 1.5ml = 80ppm 6.1pH
- 2L only today.....still some weight to the pot
Jan 24/20 - Day 47
- Nute burn on Green Poison’s tips seen today.
- Flushed through 7L of plain RO water pH to 5.95. - Runoff: 325ppm and 5.9pH.
- Followed right away with 2L more water with Sensyzime @ 3ml/L
- happy and praying in the evening......little surprising actually👊👌
Jan 25/20 - Day 48
- 2.5L of full strength feeding for this week.
- ppm for that was 1275 so watered down to 1100ppm.....only need 1ml of base nutes at full strength to hit roughly 1,000ppm.
- Runoff: 600ppm & 5.95pH
- Swear her leaves are bigger, more mass today!! Still narrow and dark though.
- she is 30” x 30” now
Jan 26/20 - Day 49
- Feed was full strength one for the week, 1150ppm 6.1pH.
- Removed some more leaves today.
- guessing only another 1.5 weeks of feeding.
Happy growing fellow enthusiasts and thanks for the time to read🙏🙏

Processing
Likes
29
Share
@Lennys_Laboratory
Follow
Feed Started With Tap Water Left Overnight For Chlorine/Chlorides To Evaporate.
Next Day.
Starting EC of our water is 0.10-0.15.
I added 1ML of Regenaroot Per Litre. Then Used Canna Terra Flores Until EC measured 0.7.
I then used the mighty bloom enhancer by the ml until my EC measured 1.3
Always Give A Little Sprinkle Of Great White Into The Mix
Finally i PH'd the mix to 6.2. Made sure the feed was of adequate temp (21c) and continued to feed.
😎

Likes
27
Share
@adam_pawloski87
Follow
Over all was an amazing grow, super sticky dense nugs with smell of berries, highly recommended for everyone!!

Likes
36
Share
@Roberts
Follow
Gorilla glue has been growing really well. She is doing good under the G300W Spider Farmer light. Just did some training today. Waiting for her to spread out good, and reach maturity before I flower. So a few more weeks for sure in vegging. Nothing else to report. Thank you Spider Farmer, and Amsterdam Marijuana Seeds. 💪❄️🌱🤜🤛
Www.amsterdammarijuanaseeds.com
Thank you grow diaries community for the 👇likes👇, follows, comments, and subscriptions on my YouTube channel👇. ❄️🌱🍻
Happy Growing 🌱🌱🌱
https://youtube.com/channel/UCAhN7yRzWLpcaRHhMIQ7X4g
Spider Farmer G300w: https://amzn.to/3S2zvsd
Spider Farmer 10X20 Heat Mat Kit - https://amz.fun/lsa0J
Spider Farmer Amazon Store: https://www.amazon.com/spiderfarmer
Spider Farmer Official Site: https://spider-farmer.com
Discount code: saveurcash


Likes
15
Share
@XperencdGmanXG
Follow
I had such a good response applying raw aloe very gel to the silver haze, just look at this weeks pics compared to last weeks. You can clearly see the difference. Aloe is high in beneficial enzymes and growth factors and more importantly an excellent source of silica. Cannabis flower, specifically the trichomes are made up of between 78% and up to 86% silica depending on the cultivar, so far only a small number of cultivars have been tested. However its clear that cannabis flowers NEED silica. Silica will also help with drought tolerance, it will armour your plant against pests, it will help the plant with transpiration, it will make water transport much easier for the plant, freeing up energy for other things like flower production. Also, If used as a foliar spray once a week in veg, it will help tighten up node spacing. So if you want those frosty buds make sure you have silica readily available for your plants.
Likes
7
Share
@GrowFOUR
Follow
120 grams! 1.2G/W in 2.66sq/ft... Sweet/sour citrus smell. Not exceptionally frosty but decent nugs. Last week just used clearex 44ml for 11 litres.

Likes
201
Share
@Hattiwatti
Follow
Looks like shit 🤣 Timelapse proofs it.
Soil too hot, bionova roots its too much, too old seeds or low humidity? Choose your compination.
Going to restart this again with different soil and without bn roots. Hope we get to the finish some day.
Keep it smoking while waiting


Processing
Likes
7
Share

Likes
12
Share
@BB_UK
Follow
Can’t wait to see how this girl turns out she’s still in pre stretch like her sister #mimosacake and #forbiddenruntz they were the last 3 fastbuds to come into flower! 😊 going to be a great yield can already see it. Fastbuds WW always above and beyond with your genetics


Likes
6
Share
@HowtoBubatz
Follow
The Bruce Banner girls had a strong week! 💪
#1 is still the biggest plant in the tent and looks super happy. She handled the LST perfectly and keeps stretching nicely 🔥.
#2 is catching up and growing more balanced now.
#3 has finally found her rhythm and started growing normally 🙌.
Both #2 and #3 are now showing their first pistils, so they’ve officially entered the flowering stage 🌸.
This week all three received a watering with Green House Bio Enhancer, and aside from that, just RO water + CalMag (Advanced Nutrients) 💧.
No issues or signs of deficiency, leaves are lush green and healthy across the board 🌿.
They’re growing in the 90×90 tent with the AC Infinity AI setup and Spider Farmer SE5000, keeping everything dialed in: 25–26 °C, 60 % RH, and around 500–600 µmol/m²/s PPFD 🌡️.
Overall, #1 remains the queen of the tent 👑, while #2 and #3 are catching up as they ease into early flower. Excited to see them start stacking buds soon! ✨
Likes
14
Share
@Gardens_of_Of
Follow
All the girls in the tent were cooked due to the high light intensity. So I had to dim the light down this week.
Under the hard conditions, they still grow beatiful flowers.


Likes
19
Share
@Gorrilla420
Follow
She’s looking really well, she’s not as tight on main head but side branches are looking good, manybe another week or so and she will be down, pretty happy with the growth of her just pulled side branches down a little to let more light in, happy gorilla growing 🌱
Likes
12
Share

Likes
17
Share
@plant
Follow
Seems like a pretty good strain to grow although the two plants I grew turned out completely different. Overall I’d grow this strain again and I actually will be doing in the near future


